La page est en cours de chargement...

2/4
FKDM 22N1901/S14F
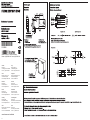
Montage und Justage
Mounting
Montage
Technische Daten
Technical data
Données techniques
Tastweite sensing distance Portée de détection
Grösse Messfleck size of measuring spot Taille du point de mesure
Anzahl Sensorkanäle (einlernbar) number of sensor channels (teachable) Nombre de canaux (programmables)
Toleranzbereiche (einstellbar) tolerance ranges (adjustable) Plages de tolérance (réglables)
Ausgangsstatus / Kanalwahl output status indicator / selection of channel Indicateur de l'état de chaque canal
Signalanzeige / Lernmodus signal display / teach mode indication Affichage du signal (teach)
Betriebsanzeige / Toleranzwahl function display / selection of tolerance Témoin de service
Lichtquelle light source Source de lumière
Betriebsspannungsbereich Vs voltage supply range Vs Plage de tension Vs
max. Stromverbrauch max. supply current Consommation max.
max. Schaltstrom, pro Kanal max. switching current, per output Courant de sortie max., par canal
Spannungsabfall voltage drop Tension résiduelle
Ansprechzeit response time Temps d'activation
Kurzschlussfest short circuit protection Protégé contre courts-circuits
Verpolungsfest reverse polarity protection Protégé contre inversion polarité
Betriebstemperatur temperature range Température de fonctionnement
Gehäusematerial und -Farbe housing material Matériau du boîtier
optische Frontfläche optical surface Surface optique
schwenkbarer Stecker, Drehwinkel connector, turning angle Connecteur, orientable
Schutzklasse protection class Classe de protection
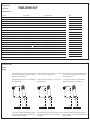
· Bei glänzenden Objekten ist der Sensor zur Objektoberfläche
verwinkelt zu befestigen.
· When cleaning the optics of the sensor use a clean (!), soft and
dry cloth. In case of severe soiling the use of pure alcohol is
recommended.
· Zur Reinigung der optischen Frontfläche genügt ein sauberer (!),
weicher und trockener Stofflappen. Bei starker Verschmutzung
kann reiner Alkohol verwendet werden.
· Le nettoyage de l'optique se fait en général avec un chiffon
propre (!), souple et sec. En cas d'encrassement tenace, on peut
se servir d'alcool pur.
object object
15°
90°
· Lors de l'utilisation du capteur sur des surfaces brillantes,
l'appareil doit être installé avec une inclinaison de 15°.
· Ensure that the sensor is tilted approx. 15° to the side when
detecting shiny objects.
objet objet
15°
90°
· Wenn zur Ansteuerung des Sync.-Eingangs ein optischer Sensor
verwendet wird, sollte dieser im infraroten Bereich arbeiten, um
den Farbtaster nicht zu beeinflussen.
Objekt Objekt
15°
90°
· When an optical sensor commands the sync. in, an infrared light
should be used to avoid interaction with sensor.
· Si un détecteur optique commande l'entrée de synchronisation,
utiliser de préférence une source lumineuse infrarouge pour
éviter de déranger le capteur.
40 mm
3 mm x 5 mm
4
5 steps
LED yellow
LED orange
LED green
LEDs red, green, blue
10 - 30 VDC
80 mA / 24 VDC
100 mA
< 1,8 V
340
m
s
yes
yes
-10...+55 °C
zinc, black
glas
M12 8Pol, 90°
IP 67

3/4
Uebersicht:
1. Die Bedienelemente
2. Run-Modus
3. Manueller Lern-Modus
4. Synchronisations-Eingang
5. Extern-Lern-Modus (Extern Teach Eingang)
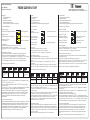
1. Die Bedienelemente
Anzeige-LED gelb
für Status der Ausgänge / Kanalwahl Taste für Kanalwahl
Anzeige-LED grün
für Betriebsanzeige / Toleranzwahl Taste für Toleranzwahl
Anzeige-LED orange
für Lern-Modus Taste für Lern-Modus
2. Run-Modus
Nach dem Einschalten ist der Sensor im Run-Modus.
· alle drei Toleranz-LED ('TOL-LED') leuchten.
· Ausgangs-LED ('CH-LED') zeigen den Zustand der Ausgänge an.
3. Manueller Lern-Modus
Zum Erlernen einer neuen Farbe wählen Sie folgendes Vorgehen:
· Sensor zum Objekt richtig positionieren (Tastabstand, Winkel)
· Drücken der 'SET'-Taste während ca. 1.5 sec. bis die 'SET'-LED leuchtet.
· Evtl. mehrmaliges Drücken der 'CH'-Taste zur Wahl des Kanals.
· Evtl. mehrmaliges Drücken der 'TOL'-Taste zur Wahl der Toleranz.
Darstellung der fünf Toleranzstufen:
· Drücken der 'SET'-Taste. Startet die Messung am zu lernenden Objekt,
'SET-LED' blinkt (3 mal pro Sek.).
Objekt zu hell (glänzend) oder zu dunkel: 'SET-LED' blinkt sehr schnell
(12 mal pro Sek.)
· Drücken der 'SET'-Taste. Lernvorgang wird abgeschlossen, neue Werte
werden gespeichert. Sensor gelangt in den Run-Modus zurück.
Bei sehr schnellem Blinken der 'SET-LED' kann der Lernvorgang nicht
abgeschlossen werden, das Objekt ist zu hell oder zu dunkel. Zurück in
den Run-Modus durch Drücken der 'CH'- oder 'TOL'-Taste (Abbruch-
Funktion). Dabei bleiben die alten Werte erhalten, werden nicht
überschrieben.
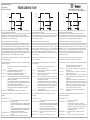
4. Synchronisations-Eingang:
Mit dem Synchronisations-Signal können Sie genau bestimmen, wann die
Farberkennung beginnen und enden soll. Nach dem Wechsel von passiv
auf aktiv beginnt der Erkennungszyklus und nach max. 340ms sind die
Sensorausgänge aktualisiert. Beim Wechsel von aktiv zu passiv werden
alle Ausgänge nach max. 140ms abgeschaltet. Bei unbeschaltetem
Synchronisations-Eingang ist dieser automatisch auf aktiv.
4321
CH
TOL
SET
Toleranzstufe 1
zur Unterscheidung
feiner Farbunter-
schiede
zur Unterscheidung
grober Farbunter-
schiede
Toleranzstufe 2 Toleranzstufe 3 Toleranzstufe 4 Toleranzstufe 5
Tolérance 1
pour la reconnais-
sance de faibles
variations de couleurs
pour la reconnais-
sance de grandes
variations de couleurs
Tolérance 2 Tolérance 3 Tolérance 4 Tolérance 5
Vue d'ensemble:
1. Indications pour l'utilisateur
2. Mode opératoire
3. Mode d'apprentissage manuel
4. Entrée de synchronisation
5. Mode d'apprentissage automatique (Entrée teach-in externe)
1. Indications pour l'utilisateur
Indication-LED jaune
Etat de sortie/ Choix du canal Touche pour le choix du canal
Indication-LED verte
Indication de fonction / Touche pour la sélection
Sélection de la tolérance de la tolérance
Indication-LED orange Touche pour le mode
Mode d'apprentissage apprentissage
2. Mode opératoire
Suite à l'enclenchement du LOGIPAL, celui-ci se trouve en mode opératoire.
· les trois LED de tolérances ('TOL-LED') brillent.
· Les LED de sorties ('CH-LED') indiquent l'état de ceux-ci.
3. Mode d'apprentissage manuel
Pour l'apprentissage d'une nouvelle couleur, nous vous recommandons de
procéder comme suit:
· Positionner correctement le détecteur (portée, angle, ...)
· Pressez la touche 'SET' durant env. 1,5 sec. jusqu'à ce que la LED 'SET' brille.
· Event. plusieurs pressions sur la touche 'CH' pour le choix du canal.
· Event. plusieurs pressions sur la touche 'TOL' pour le choix de la tolérance.
Illustration des cinq niveaux de tolérance à dispositions:
· Pression sur la touche 'SET'. Actionne la mesure sur l'objet à mémoriser
'LED-SET' clignote (3 fois par sec.).
Objet trop clair (brillant) ou trop sombre: 'LED-SET' clignote très rapidement
(12 fois par sec.).
· Confirmation par pression de la touche 'SET'. L'apprentissage est effectué,
les nouvelles valeurs sont mémorisées.
Le détecteur retourne dans le mode opératoire.
Lors d'un clignotement très rapide de la 'LED-SET', l'apprentissage ne peut
être effectué car l'objet est trop clair ou sombre. Retour possible dans le mode
opératoire en pressant la touche 'CH' ou 'TOL' ( annulation). Ainsi, les valeurs
mémorisées préalablement reste programmées et ne sont pas modifiées.
4. Entrée de synchronisation:
Le signal de synchronisation vous permet de définir le moment exact où il
est nécessaire d'effectuer et de terminer la mesure de couleur. Suite au
passage du mode passif à actif, le cycle de reconnaissance débute et les
sorties sont actualisées dans un délai de max. 340ms. Les sorties sont
désactivées dans un délai de max. 140ms lors du passage du mode actif à
passif.
Sans courant, l'entrée synchronisation est automatiquement sur actif.
4321
CH
TOL
SET
Overview:
1. Control elements
2. Run mode
3. Manual learning mode
4. Synchronisation input
5. External learning mode (external teaching input)
1. Control elements
Yellow LED display
for output / Channel selection button
channel selection status
Green LED display Tolerance selection button
for operation indicator /
tolerance selection
Orange LED display Learning mode button
for learning mode
2. Run mode
After switching on, the sensor is in run mode.
· All three tolerance LEDs ('TOL-LED') illuminate.
· The output LEDs ('CH-LED') indicate the output status.
3. Manual learning mode
Follow the procedure below to store a new colour:
· Correctly align the Sensor in relation to the object (distance from button,
angle)
· Press the 'SET' button for approx. 1.5 seconds until the 'SET' LED
illuminates.
· Press the 'CH' button, repeatedly if necessary, to select the channel.
· Press the 'TOL' button, repeatedly if necessary, to select the tolerance.
Representation of the five tolerance levels:
· Press the 'SET' button. The 'SET-LED' flashes when measurement of the
object to be stored begins (3 times per sec.).
If the object is too light (shiny) or too dark: 'SET-LED' flashes very quickly
(12 times per sec.).
· Press the 'SET' button. The learning procedure is now complete and the
new values are stored. The sensor returns to Run mode.
The learning procedure cannot be completed if the 'SET-LED' flashes very
quickly, as the object is too light or too dark. Return to Run mode by
pressing the 'CH' or 'TOL' button (cancel function). All previous values
remain stored and are not overwritten.
4. Synchronisation input:
With the synchronisation signal you can determine exactly when colour
identification should begin and end. The identification cycle begins after
changing from passive to active and the sensor outputs are updated after
max. 340ms. All outputs are switched off after max. 140ms when changed
from active to passive.
Synchronisation input is automatically active if not switched over.
4321
CH
TOL
SET
Tolerance level 1
to distinguish fine
differences in colour
to distinguish gross
differences in colour
Tolerance level 2 Tolerance level 3 Tolerance level 4 Tolerance level 5
Bedienungsanleitung
Manuel d'instruction
User Manual
FKDM 22N1901/S14F
Phone
+41 (0)52 728 1122
· Fax +41 (0)52 728 1144
Baumer Electric AG
· CH-8501 Frauenfeld

4/4
aus
Ausgänge
ein
aktiv
Sync.-Eingang
passiv
max. 340
ms
max. 140ms
Bemerkung: Der sichtbare Messfleck ist immer vorhanden, unabhängig vom
Status des Synchronisations-Signales.
Typische Anwendung ist z. B. ein mehrfarbiges Objekt, bei dem nur an einem
bestimmten Ort die Farbe überprüft werden soll und andere Bereiche
auszublenden sind. Auch Fehldetektionen beim Übergang vom Objekt zum
Hintergrund können so verhindert werden.
5. Extern-Lern-Modus (Extern Teach Eingang)
Mit diesem Signaleingang ist die vollständige Fernsteuerbarkeit des Sensors
möglich. Alle Bedienfunktionen wie Kanalwahl oder Toleranzwahl sind über
eine serielle Schnittstelle ähnlich RS 232 zugänglich. Dabei ist 'Extern Teach'
der Eingang zum Sensor und 'Out 1' dessen Ausgang für Rückmeldungen
vom Sensor. Die beiden Signalleitungen 'Extern Teach' und 'Out 1' müssen
über einen Pegelwandler mit der anwenderseitigen RS-232-Schnittstelle ver-
bunden werden (Bestellnummer anfragen). Die Datenübertragung erfolgt mit
9600 Baud, ohne Parity, mit 8 Datenbits und einem Stoppbit.
Um in den Extern-Lern-Modus zu kommen, muss der Sync. Eingang während
mind. 300ms passiv sein.
Folgende Befehle, welche via Terminal im ASCII-Format eingegeben werden,
stehen zur Verfügung:
@ Startbefehl für den externen Lern-Modus (zusammen mit
Sync. passiv).
cx <CR><LF> Wahl des Kanals (channel). Der Parameter x [1..4]
bezeichnet den entsprechenden Kanal.
tx <CR><LF> Wahl der Toleranz (tolerance). Der Parameter x [1..5]
bezeichnet die entsprechende Toleranzstufe.
e <CR><LF> Ausführungsbefehl (execute). Mit dem Ausführungsbefehl
wird der zuvor eingestellte Kanal mit der gewählten Toleranz
eingelernt, abgespeichert.
Ist vor dem Ausführungsbefehl kein Kanal und/oder keine
Toleranz selektiert worden, wird der Befehl ignoriert und vom
Sensor eine Fehlermeldung ausgegeben.
Ist das zu lernende Objekt zu hell oder zu dunkel, wird der
Befehl ignoriert und eine entsprechende Fehlermeldung
zurückgeschickt.
q <CR><LF> Externen Lern-Modus verlassen, ohne speichern.
Folgende Meldungen werden im externen Lern-Modus vom Sensor zurück-
gemeldet:
<SPC> ok <CR><LF> o.k.
Der zuvor eingegebene Befehl wurde ausgeführt.
<SPC> ?? <CR><LF> Allgemeiner Fehler.
Diese Fehlermeldung erfolgt in den folgenden Fällen:
-Befehl konnte nicht interpretiert werden (ungültige
Eingabe).
-Parameter liegt ausserhalb des Gültigkeitsbereiches.
-Vor dem Ausführungsbefehl (e) ist keine Toleranz
und/oder kein Kanal gewählt worden.
<SPC> hi <CR><LF> Zu hohe Intensität. Das Objekt ist zu hell oder
glänzend.
<SPC> lo <CR><LF> Zu niedrige Intensität. Das Objekt ist zu dunkel.
off
Sorties
on
actif
Entrée synch.
passif
max. 340
ms
max. 140ms
Remarque: le point de mesure lumineux est toujours visible indépendam-
ment des signaux de synchronisation.
Une application typique serait d'identifier une couleur sur un objet à
couleurs multiples, ceci à un endroit définit sur l'objet et d'ignorer toutes
les autres zones colorées. D'autre part, des erreurs de détection provenant
du passage de l'objet à l'arrière-plan peuvent être supprimées.
5. Mode d'apprentissage automatique (entrée teach-in externe)
Cette entrée de signal permet de télécommander les fonctions du détecteur.
Toutes les fonctions telles que choix du canal ou de la tolérance sont acces-
siblent par cette interface sérielle idem à RS 232. Le 'Ext.Teach' est l'entrée
au détecteur et le 'Out 1' le retour des informations. Les deux signaux 'Ex-
tern Teach' et 'Out 1' doivent être reliés avec l'interface RS-232 du côté de
l'utilisateur, à travers un convertisseur (demandez la disponibilité).
La transmission est réalisée à 9600 Baud, sans Parity, avec 8 bits de
données et un bit de stop.
Pour accéder au mode d'apprentissage automatique, l'entrée de
synchronisation doit être sur passif un minimum de 300 ms.
Les ordres suivants, transmis via terminal en format ASCII, sont disponibles:
@ Start du mode d'apprentissage automatique
(simultanément avec synch. sur passif).
cx <CR><LF> Choix des canaux. Le paramètre x [1..4] définit le canal
correspondant.
tx <CR><LF> Choix de la tolérance. Le paramètre x [1..5] désigne le
degré de tolérance choisit.
e <CR><LF> Ordre d'exécution (execute). L'ordre d'exécution permet
de programmer le canal sélectionné préalablement avec
sa tolérance.
Si aucun canal ou tolérance n'a été sélectionné au mo-
ment de l'ordre d'exécution, celui-ci ignorera l'ordre de
programmation et le détecteur renvera un signal d'erreur
correspondant. Si la couleur de l'objet est trop clair ou
sombre, l'ordre d'exécution sera ignoré et un signal
d'erreur correspondant viendra en retour.
q <CR><LF> Quitter le mode d'apprentissage automatique, sans
mémorisation.
Les informations suivantes viennent en retour du détecteur en mode
d'apprentissage automatique:
<SPC> ok <CR><LF> o.k.
L'ordre donné a été effectué.
<SPC> ?? <CR><LF> Erreur commune.
Cette information vient dans les cas suivants:
-l'ordre ne peut être interprèté (fausse introduction).
-les paramètre sont en dehors de la zone autorisée.
-Aucun canal ou tolérance n'a été sélectionné
avant l'ordre d'exécution.
<SPC> hi <CR><LF> -Intensité trop élevée. L'objet est trop clair ou
brillant..
<SPC> lo <CR><LF> -Intensité trop faible. L'objet est trop sombre.
off
output
on
active
Sync.-input
passive
max. 340
ms
max. 140ms
Note: The visible measurement mark is always present irrespective of the
status of the synchronisation signal.
A typical application is e. g. a multi-coloured object where the colour is to
be checked at a particular place only and the other areas have to be faded
out. Incorrect detection during transition from the object to the back-
ground can therefore be avoided.
5. External learning mode (external teaching input)
Complete remote control of the sensor is possible using this signal input.
All control functions such as channel selection or tolerance selection can
be accessed via a serial interface similar to RS 232. In this case, 'external
teaching' is the input for the sensor and 'Out 1' is its output for feedback
from the sensor. Wiring of both 'external teaching' and 'Out 1' leads with
the user's RS-232 interface must be routed via a converter (ask for
availability). Data is transferred at 9600 baud, without parity, with 8 data
bits and one stop bit.
In order to access external learning mode, the sync. input must be
passive for at least 300ms.
The following commands which are entered via the terminal in ASCII
format, are available:
@ Start command for the external learning mode
(together with passive sync.).
cx <CR><LF> Channel selection. The parameter x [1..4] designates
the relevant channel.
tx <CR><LF> Tolerance selection. The parameter x [1..5] designates
the relevant tolerance level.
e <CR><LF> Execute command. The previously selected channel
and previously selected tolerance is learned and stored
using the execute command.
If no channel and/or tolerance was selected before
actuating the execute command, the command is igno-
red and an error message is issued from the sensor.
If the object to be stored is too light or too dark, the
command is ignored and a corresponding error
message is sent back.
q <CR><LF> Quitting the external learning mode, without storing.
The following messages are sent back from the sensor in external
learning mode:
<SPC> ok <CR><LF> o.k.
The command previously entered is executed.
<SPC> ?? <CR><LF> General error.
This error message is issued in the following cases:
-Command could not be interpreted (invalid input).
-Parameter is outside the valid range.
-No tolerance and/or channel was selected
before the execute command (e) was actuated.
<SPC> hi <CR><LF> Intensity is too high. The object is too light or
too shiny.
<SPC> lo <CR><LF> Intensity is too low. The object is too dark.
FKDM 22N1901/S14F
Bedienungsanleitung
Manuel d'instruction
User Manual
Phone
+41 (0)52 728 1122
· Fax +41 (0)52 728 1144
Baumer Electric AG
· CH-8501 Frauenfeld
-
 1
1
-
 2
2
-
 3
3
-
 4
4


dans d''autres langues
Documents connexes
-
Baumer FKDM 22P1901/S14F Fiche technique
-
-
-
-
-
-
-
-