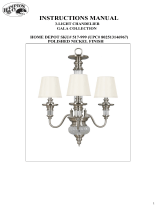
Decor Therapy CH1948 Guide d'installation
- Taper
- Guide d'installation

ASSEMBLY INSTRUCTIONS
5 LIGHT CHANDELIER
Item: CH1948
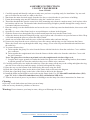
1. Carefully unpack and identify each part to make sure you have everything ready for installation. Lay out each
part on a clean flat area such as a table or the floor.
2. Shut down the main electrical supply from the fuse box or circuit breaker in your house or building.
3. Fasten the mounting strip onto the outlet box using the 2 outlet box screws.
4. Thread the threaded tube into the center hole of the mounting strip (about 4 complete turns), lock in place with a
lock washer and hex nut. The threaded tube should extend long enough to protrude through the canopy when it
is mounted (adjust as necessary).
5. Place the canopy over the threaded tube and screw the screw collar loop onto the threaded tube, then secure with
the ring.
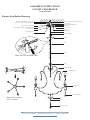
6. Open the five arms of the fixture body to an equal distance as shown in the diagram.
7. Guide the fixture wires through the loop as shown and fasten the loop into the fixture body.
8. Adjust the chain to the desired length by using a pair of pliers and a screwdriver to open and remove links. Wrap
a soft cloth around the pliers to protect the chain's finish.
9. Attach one end of the chain onto the screw collar loop and the other end onto the loop.
10. Unscrew the ring from the screw collar loop, lower the canopy and the ring over the chain onto the fixture.
Weave the fixture wires up through the chain, ring, canopy, screw collar loop and threaded tube and then into
the outlet box.
11. To connect fixture wires:
A. Twist together the glossy/live wire from the fixture with the black wire from the outlet box. Cover with the
wire connector.
B. Twist together the rough/neutral wire from the fixture with the white wire from the outlet box. Cover with
the wire connector.
Note: The glossy/live wire has text printed on it; the rough/neutral wire has ridges on it.
C. Loop the bare copper ground wire under the head of the green screw on the mounting bracket, then connect
it with the ground wire from the outlet box then cover with the wire connector.
12. Carefully position all wires inside the outlet box. Place the canopy all the way to the ceiling and tighten the ring
onto the screw collar loop until the canopy is firmly held against the ceiling.
13. Place the cap over the bottom of the fixture body and secure using the finial.
14. Hook the crystal drop (short) on the holes of the fixture body as shown in the diagram.
15. Hook the crystal drop (long) on the holes of the finial as shown in the diagram.
16. Install the bulbs (not included) to each socket on the fixture body. Use five Max 60W candelabra base (E12)
type "B" bulbs or Max 9W candelabra base (E12) self-ballasted LED bulbs.
17. Turn on the electrical power in your house or building to test the lamp. Save these instructions for future use.
Cleaning
● Use only a soft cloth to dust and clean your new lamp.
● Do not use any chemicals, polishers or abrasives.
Warning:
Do not immerse your lamp in water; doing so will damage the wiring.
Customer Service Hotline: 1-800-643-0092 ext. 100 Mon.– Fri., 8:00 am - 5:00pm CST

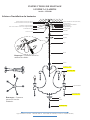
Wire connector
White wire from outlet box (not provided)
Mounting strip
Rough wire from xture body
Black wire from outlet box (not provided)
Ground wire from outlet box (not provided)
Bare copper grounding wire from xture body
Glossy wire from xture body
Green ground screw
Outlet box screw
Lock washer
Hex nut
Threaded tube
Canopy
Ring
Screw collar loop
Chain
Loop
Fixture body
Crystal drop (short)
Crystal drop (short)
Crystal drop (short)
Cap
Finial
Crystal drop (long)
Fixture Installation Drawing
ASSEMBLY INSTRUCTIONS
5 LIGHT CHANDELIER
Item: CH1948
Customer Service Hotline: 1-800-643-0092 ext. 100 Mon.– Fri., 8:00 am - 5:00pm CST
Note: How to open chain links.
Note: How to adjust
arms of fixture.

INSTRUCTIONS DE MONTAGE
LUSTRE À 5 LAMPES
Article : CH1948
1. Déballez soigneusement chaque pièce et identifiez-les pour vous assurer que tout est prêt pour l’installation.
Disposez les pièces sur une surface propre et plane comme une table ou le plancher.
2. Fermez l’alimentation électrique principale de la boîte à fusibles ou le disjoncteur dans votre maison ou
bâtiment.
3. Fixez la bande de fixation sur le boîtier de sortie à l’aide des 2 vis de boîtier de sortie.
4. Enfilez le tube fileté dans le trou central de la bande de fixation (environ 4 tours complets), bloquez en place
avec une rondelle de blocage et un écrou hexagonal. Le tube fileté doit s’étendre suffisamment pour dépasser de
la coupelle lorsqu’elle est montée.
5. Placez la coupelle sur le tube fileté et vissez la vis à anneau sur le tube fileté, puis fixez solidement avec la
bague.
6. Ouvrir les cinq bras du corps du luminaire à une distance égale comme illustré sur le schéma suivant.
7. Acheminez les fils du luminaire à travers l’anneau comme indiqué, puis vissez l’anneau dans le corps du
luminaire.
8. Ajustez la chaîne à la longueur désirée en utilisant une pince et un tournevis pour ouvrir le maillon de la chaine.
Enroulez un chiffon doux autour de la pince afin de protéger la finition de la chaîne.
9. Attachez une extrémité de la chaîne à la vis à anneau et l’autre extrémité à l’anneau.
10. Dévissez la bague de la vis à anneau, abaissez la coupelle et la bague sur la chaîne sur le luminaire. Passez les
fils du luminaire dans la chaîne, la bague, la coupelle, la vis à anneau et le tube fileté, puis dans le boîtier de
sortie.
11. Pour connecter les fils du luminaire :
A. Torsadez le fil luisant/sous tension du luminaire avec le fil noir du boîtier de sortie. Recouvrez avec le
connecteur de fil.
B. Torsadez le fil rêche/neutre du luminaire avec le fil blanc du boîtier de sortie. Recouvrez avec le connecteur
de fil.
Remarque : Du texte est imprimé sur le fil luisant/sous tension ; le fil rêche/neutre a une nervure
C. Faites une boucle avec le fil de cuivre de mise à la terre nu sous la tête de la vis verte située sur le support de
montage, puis connectez-le au fil de terre du boitier et recouvrez avec le connecteur de fil.
12. Positionnez soigneusement tous les câbles à l’intérieur du boîtier de sortie. Placez la coupelle contre le plafond
et serrez la bague sur la vis à anneau jusqu’à ce que la coupelle soit fermement maintenue contre le plafond.
13. Place the cap over the bottom of the fixture body and secure using the finial.
14. Hook the crystal drop (short) on the holes of the fixture body as shown in the diagram.
15. Hook the crystal drop (long) on the holes of the finial as shown in the diagram.
16. Installez l’ampoule (non fournie) sur chaque douille du corps du luminaire. Utilisez cinq ampoule à culot de
candélabre (E12) type « B » de 60 W max. ou ampoule DEL à culot de candélabre (E12) et à ballast intégré
de 9 W max.
17. Mettez l’alimentation électrique sous tension dans votre maison ou bâtiment pour tester votre lampe. Conservez
ces instructions pour une utilisation ultérieure.
Nettoyage
● Utilisez uniquement un chiffon doux pour ôter la poussière et nettoyer votre nouvelle lampe.
● N’utilisez pas de nettoyant contenant des produits chimiques, des produits abrasifs ou des solvants.
Avertissement :
Ne plongez pas la lampe dans l’eau, car agir ainsi endommagerait le câblage.
Ligne d’assistance clientèle : 1-800-643-0092 ext. 100, du lundi au vendredi, de 8 h 00 à 17 h (Heure de l’Est)

Schéma d’installation du luminaire
INSTRUCTIONS DE MONTAGE
LUSTRE À 5 LAMPES
Article : CH1948
Ligne d’assistance clientèle : 1-800-643-0092 ext. 100, du lundi au vendredi, de 8 h 00 à 17 h (Heure de l’Est)
Connecteur de l
Fil blanc du boîtier de sortie (non fourni)
Bande de xation
Fil luisant du corps du luminaire
Fil noir du boîtier de sortie (non fourni)
Fil de terre du boîtier de sortie (non fourni)
Fil de cuivre de mise à la terre nu du corps du luminaire
Fil rêche du corps du luminaire
Vis de terre verte
Vis de boîtier de sortie
Rondelle de blocage
Écrou hexagonal
Tube leté
Coupelle
Bague
Vis à anneau
Chaîne
Anneau
Remarque : Comment ouvrir les
maillons de chaîne.
Corps du luminaire
Crystal drop (short)
Crystal drop (short)
Crystal drop (short)
Cap
Faîteau
Crystal drop (long)
Remarque : Comment
ajuster les bras du
luminaire.
-
 1
1
-
 2
2
-
 3
3
-
 4
4


Decor Therapy CH1948 Guide d'installation
- Taper
- Guide d'installation
dans d''autres langues
Documents connexes
-
Decor Therapy CH1962 Guide d'installation
-
-
-
-
-
-
-
-