
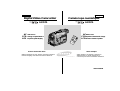
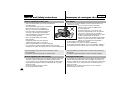
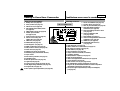
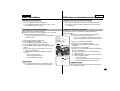
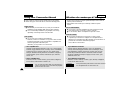
ENGLISH
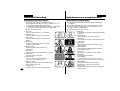
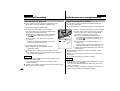
Digital Video Camcorder
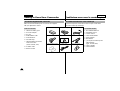
AF
Auto Focus
CCD
Charge Coupled Device
LCD
Liquid Crystal Display
Owner’s Instruction Book
Before operating the unit, please read this instruction
book thoroughly, and retain it for future reference.
ELECTRONICS
SCD71
AF
Auto Focus
CCD
Système à transfert de charge
LCD
Ecran Cristaux Liquides
Mode d’emploi
Avant d’utiliser cet appareil, veuillez lire
attentivement ce mode d’emploi et le
conserver pour toute consultation ultérieure.
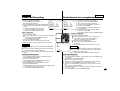
START/
STOP
SELF
TIMER
X2
SLOW
F.ADV
A.DUB
ZERO
MEMORY
WIDE
TELE
STILL
PHOTO DISPLAY
AD68-00395R
FRANÇAIS
Caméscope numérique
SCD71

2
ENGLISH
FRANÇAIS
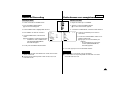
Contents Sommaire
Feature...................................................................................................................9
Accessories Supplied with camcorder................................................................10
Descriptions
FRONT & LEFT VIEW................................................................................. 11
LEFT SIDE VIEW........................................................................................ 12
RIGHT & TOP VIEW .................................................................................. 13
REAR & BOTTOM VIEW ............................................................................ 14
REMOTE CONTROL .................................................................................. 15
OSD (On Screen Display)........................................................................... 16
How to use the Remote Control ....................................................................... 18
Lithium Battery installation................................................................................. 19
Adjusting the Hand Strap and Shoulder Strap .................................................. 20
Connecting a Power Source ............................................................................. 21
Using the Lithium Ion Battery Pack.................................................................... 22
Inserting and Ejecting a Cassette.......................................................................25
Making your First Recording.............................................................................. 26
Hints for Stable Image Recording...................................................................... 28
Adjusting the LCD .............................................................................................. 29
Using the VIEWFINDER..................................................................................... 29
Playing back a tape you have recorded on the LCD......................................... 30
Controlling Sound from the Speaker.................................................................. 31
Using the various Functions
Setting the menu item................................................................................. 32
Availability of functions in each mode......................................................... 33
LCD ADJUST .............................................................................................. 34
CUSTOM SET............................................................................................. 34
DIS................................................................................................................35
PIP............................................................................................................... 36
Zooming In and Out with DIGITAL ZOOM.................................................. 37
PROGRAM AE............................................................................................ 39
Preparing
Advanced Recording
Basic Recording
Notices and Safety Instructions.........................................4
Getting to Know Your Camcorder
Fonctionnalités
......................................................................................................
9
Accessoires fournis avec votre caméscope
......................................................
10
Descriptions
Vue avant et latérale (côté gauche)
............................................................
11
Vue du côté gauche ....................................................................................12
Vue de droite et du dessus
..........................................................................
13
Vue arrière et du dessous
..........................................................................
14
Télécommande
............................................................................................
15
Affichage à l’écran
......................................................................................
16
Utilisation de la télécommande
........................................................................
18
Installation du bloc batterie au lithium-ion
..........................................................
19
Mise en place de la poignée de soutien et de la bandoulière
..........................
20
Connexion d’une alimentation
............................................................................
21
Utilisation du bloc batterie au lithium-ion
............................................................
22
Insertion et éjection d’une cassette
....................................................................
25
Effectuez un enregistrement simple
..................................................................
26
Astuces pour la stabilité de l’image
....................................................................
28
Réglage de l’écran LCD
....................................................................................
29
Utilisation du viseur
............................................................................................
29
Lecture d’une cassette à l’écran
........................................................................
30
Réglage du volume du haut-parleur
..................................................................
31
Utilisation des différentes fonctions
Réglages du menu
......................................................................................
32
Fonctions disponibles pour chaque mode
..................................................
33
Réglage de l’écran LCD
..............................................................................
34
Mode personnalisé (CUSTOM SET)
..........................................................
34
Stabilisateur d’image numérique (DIS)
......................................................
35
Image par Image (PIP)
................................................................................
36
Utilisation du zoom numérique
....................................................................
37
Exposition automatique (PROGRAM AE)
..................................................
39
Préparez votre caméscope
Perfectionnez vos enregistrements
Effectuez un enregistrement simple
Remarques et consignes de sécurité ..................................4
Familiarisez-vous avec le caméscope

3
ENGLISH
FRANÇAIS
DSE (Digital Special Effect)......................................................................... 40
WHITE BALANCE....................................................................................... 42
SHUTTER.................................................................................................... 43
IRIS.............................................................................................................. 44
REC MODE................................................................................................. 45
REC LAMP.................................................................................................. 46
WIND CUT....................................................................................................46
AUDIO MODE...............................................................................................47
DISPLAY...................................................................................................... 48
DATE/TIME.................................................................................................. 49
DEMO.......................................................................................................... 50
CLOCK SET................................................................................................ 51
Easy Shot mode................................................................................................. 52
Custom Shot mode ............................................................................................ 53
MF/AF(Manual Focus/Auto Focus).................................................................... 54
BLC.....................................................................................................................55
Fade In and Out.................................................................................................. 56
Audio dubbing..................................................................................................... 57
PHOTO ............................................................................................................... 58
Using the video light............................................................................................60
Lighting Techniques............................................................................................ 61
Various Recording Techniques........................................................................... 62
To watch with the LCD....................................................................................... 63
To watch with a TV monitor ............................................................................... 63
Playback ............................................................................................................. 64
Various Functions in PLAYER mode ................................................................. 65
After finishing a recording .................................................................................. 70
Cleaning and Maintaining the Camcorder..........................................................71
Playing back a Tape
IEEE 1394 Data Transfer...................................................68
Maintenance
Using Your Camcorder Abroad...........................................72
Troubleshooting...................................................................73
Specifications.......................................................................75
Index....................................................................................77
Warranty (Canada users only).............................................78
Contents Sommaire
Effets spéciaux numériques (DSE)
............................................................
40
Equilibrage du blanc (WHITE BALANCE)
..................................................
42
Vitesse d’obturation (SHUTTER SPEED)
..................................................
43
IRIS
..............................................................................................................
44
Mode d’enregistrement (fonction REC MODE)
..........................................
45
Témoin d’enregistrement (fonction REC LAMP)
........................................
46
Filtre coupe-vent (WIND CUT)
....................................................................
46
Mode AUDIO
................................................................................................
47
Affichage (fonction DISPLAY)
....................................................................
48
Affichage de la date et de l’heure (DATE/TIME)
........................................
49
Mode DEMO
................................................................................................
50
Réglage de l’horloge (CLOCK SET)
..........................................................
51
Enregistrement simplifié (Mode EASY)
............................................................
52
Enregistrement en mode personnalisé (CUSTOM)
..........................................
53
Mise au point automatique/manuelle (MF/AF)
..................................................
54
Contre-jour intelligent (BLC)
..............................................................................
55
Fondu en ouverture et en fermeture (FADE)
....................................................
56
Doublage sonore (AUDIO DUBBING)
................................................................
57
Mode PHOTO
....................................................................................................
58
Utilisation de la torche vidéo ..............................................................................60
Sources de lumière
............................................................................................
61
Différentes techniques d’enregistrement............................................................62
Visionnez sur l’écran LCD..................................................................................63
Visionnez sur l’écran de votre téléviseur
..........................................................
63
Lecture de la cassette
........................................................................................
64
Fonctions du mode magnétoscope....................................................................65
Fin d’un enregistrement
......................................................................................
70
Nettoyage et entretien du caméscope ..............................................................71
Visionnez une cassette
Transfert de données IEEE 1394........................................68
Conseils d’utilisation
Utilisation du caméscope à l’étranger..............................72
Dépannage........................................................................73
Spécifications techniques..................................................75
Index ................................................................................77
Grantie pour le Canada....................................................78

4
ENGLISH
FRANÇAIS
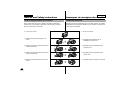
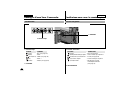
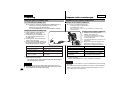
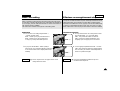
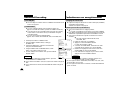
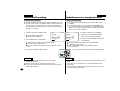
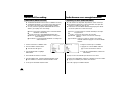
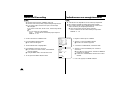
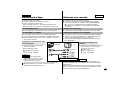
Please rotate the LCD screen carefully as illustrated. Unintended
rotation may cause damage to the inside of the hinge that connects
the LCD screen to the Camcorder.
1. LCD screen closed.
2. Standard recording by using the LCD
screen.
3. Making a recording by looking at the LCD
screen from the top.
4. Making a recording by looking at the LCD
screen from the front.
5. Making a recording with the LCD screen
closed.
Remarques et consignes de sécurité Notices and Safety Instructions
Notices regarding rotation of LCD screen
Manipulez l’écran doucement lorsque vous le faites tourner. Une rotation
intempestive peut endommager l’intérieur de la charnière qui relie l’écran
LCD au corps de l’appareil.
1. Écran LCD fermé.
2. Enregistrement standard lors de
l’utilisation de l’écran LCD.
3. Enregistrement en regardant l’écran
LCD d’en haut.
4. Enregistrement en regardant l’écran
LCD de face.
5. Enregistrement avec l’écran LCD fermé.
Rotation de l’écran LCD
1
2
3
4
5
90°
90°
90°
90°

5
ENGLISH
FRANÇAIS
Notices and Safety Instructions Remarques et consignes de sécurité
Notices regarding moisture condensation
1. A sudden rise in atmospheric temperature may cause condensation
to form inside the camcorder.
for example:
- When you move the camcorder from cold outside to warm inside
during the winter.
- When you move the camcorder from cool inside to hot outside
during the summer.
2. If the “DEW” protection feature is activated, leave the camcorder
for at least two hours in a dry, warm room with the cassette
compartment opened and the battery removed.
Notices regarding COPYRIGHT
Television programs, video tapes, DVD titles, films, and other program
materials may be copyrighted.
Unauthorized copying of copyrighted material may be against the law.
Notices regarding CAMCORDER
1. Do not leave the camcorder exposed to high temperature
(above 60˚C or 140˚F).
For example, in a parked car in the sun or under direct sunlight.
2. Do not let the camcorder get wet.
Keep the camcorder away from rain, sea water, and any other form of
moisture. If the camcorder gets wet, it may be damaged.
Sometimes malfunction cannot be repaired.
Formation de condensation
1. Un accroissement soudain de température peut entraîner la
formation de buée à l’intérieur de l’appareil.
Ce peut être le cas lorsque vous passez :
- d’un extérieur froid à un intérieur chaud (en hiver, par exemple),
- d’un intérieur frais à un extérieur chaud (en été, par exemple).
2. Si la fonction de protection “DEW” se déclenche, laissez l’appareil
pendant deux heures dans un endroit sec et à température
ambiante, le compartiment à cassette ouvert et sans le bloc batterie.
Droits d’auteur
Les programmes de télévision, les cassettes vidéo, les DVD, les films
et tout autre support enregistré de ce type peuvent être protégés par
des droits d’auteurs. Les copier sans autorisation peut aller à l’encontre
des lois en vigueur dans votre pays.
Caméscope
1. N’exposez pas votre caméscope à des températures trop élevées
(plus de 60˚C ou 140˚F), par exemple, en plein soleil ou dans une
voiture garée au soleil.
2. Ne mouillez pas votre caméscope.
Tenez-le à l’abri de toute humidité (pluie, eau de mer, etc.).
Sinon, il risque d’être endommagé, entraînant parfois un
dysfonctionnement irréparable de l’appareil.

6
ENGLISH
FRANÇAIS
- Make sure that the battery pack is fully charged before
recording outdoors.
- To preserve battery power, keep your camcorder
turned off when you are not operating it.
- When your camcorder is in CAMERA mode,
if it is left in STBY mode without operation for
more than 5 minutes with a tape installed,
it will automatically turn off to protect against
unnecessary battery discharge.
- Make sure that the battery pack is fitted
firmly into place.
Dropping the battery pack may damage it.
- A brand new battery pack is not charged.
Before using the battery pack, charge it completely.
- It is a good idea to use the viewfinder instead of the LCD when
shooting for a long time, because the LCD uses up more battery power.
Notices and Safety Instructions Remarques et consignes de sécurité
*When the battery reaches the end of its life, please contact
your local dealer.
The batteries have to be dealt with as chemical waste.
Notices regarding the battery pack
Notices regarding video head cleaning
- To ensure normal recording and a clear picture, clean the video heads
regularly. If square block-shaped noise distorts playback pictures,
or if only a blue screen is displayed during playback, the video heads
may be dirty. If this happens, clean the video heads with a dry type
cleaning cassette.
- Do not use a wet type cleaning cassette.
It may damage the video heads.
- Assurez-vous que le bloc batterie est chargé avant de filmer sans
connexion au secteur.
- Pour conserver la charge de la batterie,
maintenez votre caméscope éteint lorsque
vous ne l’utilisez pas.
- En mode caméscope, si vous laissez votre
appareil en veille pendant plus de cinq minutes
sans vous en servir et avec une cassette à
l’intérieur, il s’éteint automatiquement pour éviter
un déchargement inutile de la batterie.
- Assurez-vous que le bloc batterie est fermement
maintenu en place. Ne faites pas tomber le bloc
batterie ; vous risqueriez de l’endommager.
- Un bloc batterie neuf n’est jamais chargé.
Avant de l’utiliser, vous devez le charger complètement.
- Si vous filmez pendant longtemps, nous vous conseillons d’utiliser le
viseur plutôt que l’écran LCD car celui-ci consomme plus d’énergie.
*Lorsque la batterie ne fonctionne plus, contactez votre revendeur le
plus proche.
Les batteries doivent être traitées en tant que déchets chimiques.
Bloc batterie
Nettoyage des têtes vidéo
- Pour garantir un enregistrement normal et obtenir des images claires,
nettoyez régulièrement les têtes vidéo. L’apparition de parasites sur
l’image ou l’affichage d’un écran vide peut signifier que les têtes vidéo
sont sales. Dans ce cas, nettoyez-les avec la cassette de type sec
prévue à cet effet.
- N’utilisez pas de cassette de type humide, car vous risqueriez
d’endommager les têtes vidéo.

7
ENGLISH
FRANÇAIS
- Do not film with the camera lens pointing directly at the sun.
Direct sunlight can damage the CCD(Charge Coupled Device).
1. Do not position the camcorder such that the viewfinder is pointing
towards the sun.
Direct sunlight can damage the inside of the viewfinder.
Be careful when placing the camcorder under sunlight or by a window.
2. Do not pick up the camcorder by the viewfinder.
3. Over-rotation of the viewfinder may damage it.
1. The LCD monitor is manufactured using high precision technology.
However, there can be tiny dots(red, blue or green in color)
that appear on the LCD display.
These dots are normal and do not affect
the recorded picture in any way.
2. When you use the LCD display in direct
sunlight or outdoors, it may be difficult
to see the picture.
In this case, we recommend that the viewfinder is used.
3. Direct sunlight can damage the LCD monitor.
- To ensure a steady picture during filming, check that
the hand strap is properly adjusted.
- Do not force your hand into the hand strap as you could
damage it.
Notices and Safety Instructions Remarques et consignes de sécurité
Notice regarding the LENS
Notices regarding Record or Playback using LCD
Notices regarding the hand strap
Notices regarding electronic viewfinder
- Si vous filmez en plein soleil, veillez à ne pas diriger l’objectif vers le
soleil. La lumière solaire directe peut endommager le dispositif
électronique à transfert de charge (Charge Coupled Device).
1. N’orientez pas le viseur vers le soleil.
La lumière solaire directe peut endommager l’intérieur du viseur.
Soyez vigilant lorsque vous placez votre caméscope au soleil ou près
d’une fenêtre.
2. Ne saisissez pas votre caméscope par le viseur.
3. Evitez les rotations intempestives du viseur qui risquent de
l’endommager.
1. L’écran a été conçu à l’aide d’une technologie de haute précision.
Cependant, de minuscules points (rouges, bleus ou verts) peuvent
apparaître de façon constante sur l’écran
LCD.
Ces points sont normaux et n’affectent
aucunement l’image enregistrée.
2. Lorsque vous utilisez l’écran LCD
directement sous le soleil, la vision à l’écran
peut s’avérer difficile. Dans ce cas, nous
vous recommandons d’utiliser le viseur.
3. La lumière solaire directe peut endommager l’écran LCD.
- Pour une meilleure qualité de prise de vue, il est
important de bien ajuster la poignée de soutien.
- Ne forcez pas pour insérer votre main dans la poignée,
car vous risqueriez de l’endommager.
Objectif
Enregistrement ou lecture avec l’écran LCD
Poignée de soutien
Viseur électronique

8
ENGLISH
FRANÇAIS
Notices and Safety Instructions Remarques et consignes de sécurité
Precautions regarding the Lithium battery
Warning: Keep the LITHIUM BATTERY out of the reach of children.
Should any battery be swallowed, consult a doctor
immediately.
1. The lithium battery maintains the clock function and user settings;
even if the battery pack or AC adapter is removed.
2. The lithium battery for the camcorder lasts about 6 months under
normal operation from time of installation.
3. When the lithium battery becomes weak or dead, the date/time
indicator will flash for about five seconds when you set the power
switch to CAMERA.
In this case, replace the lithium battery with a new one(type CR2025 ).
Dang
er:
The video light can become extremely hot. Do not touch it during
operation or after turning it off, otherwise serious injury may result.
Take 5 minutes (approx.) for the light to cool down.
Do not place the camcorder into the carrying case immediately after
using the video light.The video light will be hot. Please allow time for it
to cool down.
Do not use near flammable or explosive materials.
It is recommended that you consult your nearest SAMSUNG dealer for
replacement bulbs.
DANGER - NOT TO BE HANDLED BY CHILDREN. EMITS INTENSE
HEAT AND LIGHT. USE WITH CAUTION TO REDUCE
THE RISK OF FIRE OR INJURY TO PERSONS.
DO NOT DIRECT LIGHT AT PERSONS OR MATERIALS
FROM LESS THAN FOUR FEET DURING USE AND
UNTIL COOL. DISCONNECT WHEN NOT IN USE.
DANGER - TO PREVENT POSSIBLE BURN HAZARD,
DISCONNECT SUPPLY CORD AND ALLOW LAMP TO
COOL BEFORE REPLACING.
Notice regarding VIDEO LIGHT
Précautions d’emploi de la pile au Lithium-ion
Attention : Maintenez la PILE AU LITHIUM hors de la portée des
enfants. Si la pile venait à être avalée, consultez
immédiatement un médecin.
1. La pile au lithium-ion sert à sauvegarder la date et l’heure, les titres
et les réglages prédéfinis, en l’absence du bloc batterie ou de
l’adaptateur secteur.
2. La longévité de la pile au lithium est d’environ six mois à partir de sa
mise en fonctionnement et dans des conditions normales d’utilisation.
3. Lorsque la pile au lithium s’affaiblit ou est déchargée, l’affichage de la
date et de l’heure clignote pendant cinq secondes environ lorsque
vous passez en mode Caméscope. Dans ce cas, remplacez-la par un
pile Lithium-Ion de type CR2025.
Attention :
■
La torche vidéo peut devenir extrêmement chaude. Ne la touchez pas
lors de son utilisation ou de sa mise hors tension, vous risqueriez de
vous brûler.
■
Attendez environ 5 minutes que la torche refroidisse avant de ranger le
caméscope dans son étui.
■
N'utilisez pas le caméscope à proximité de produits inflammables ou
chimiques.
■
Contactez votre revendeur Samsung le plus proche pour vous procurer
des ampoules de rechange.
ATTENTION : CONSERVEZ L'APPAREIL HORS DE PORTEE DES ENFANTS.
CET APPAREIL EMET UNE LUMIERE ET UNE CHALEUR
INTENSES.UTILISEZ CET APPAREIL AVEC PRECAUTION POUR
EMPECHER TOUT RISQUE DE BRULURE OU D'INCENDIE.
N'ORIENTEZ PAS LA TORCHE VERS UN SUJET SITUE A UNE
DISTANCE DE MOINS DE 1,20 METRE LORS DE L'UTILISATION
DE L'APPAREIL OU AVANT SON REFROIDISSEMENT COMPLET.
LORSQUE VOUS N'UTILISEZ PAS VOTRE CAMESCOPE,
DEBRANCHEZ-LE DE LA SOURCE D'ALIMENTATION.
ATTENTION : POUR EVITER TOUT RISQUE DE BRULURE, DEBRANCHEZ LE
CORDON D'ALIMENTATION ET ATTENDEZ QUE LA TORCHE
SOIT COMPLETEMENT REFROIDIE AVANT DE LA REMPLACER.
Avertissements relatifs à l'utilisation de la torche vidéo

9
ENGLISH
FRANÇAIS
Getting to Know Your Camcorder
•
Digital data transfer function with IEEE1394
By incorporating IEEE 1394 (i.LINK
TM
: i.LINK is a serial data transfer
protocol and interconnection system, used to transmit DV data) high
speed data transport port, moving and still images can be transferred to
PC, making it possible to produce or edit various images.
•
PHOTO
The PHOTO function lets you capture an object as a still along with
sound, while in CAMERA mode.
•
500x Digital zoom
Allows you to magnify an image to up to 500 times its original size.
•
Color TFT LCD
A high-resolution color TFT LCD (with 112,320 pixels) gives
you clean, sharp images as well as the ability to review your
recordings immediately.
•
Digital Image Stabilizer
The DIS compensates for handshake, reducing unstable images
particularly at high magnification.
•
Various digital effects
The DSE (Digital Special Effects) allows you to give your films a
special look by adding various special effects.
•
Back Light Compensation ( BLC )
When you record a subject with the light source behind it or a subject
with a light background, the BLC function compensates for the bright
background.
•
Program AE
The Program AE enables you to alter the shutter speed and aperture
to suite the type of scene/action to be filmed.
Features
Familiarisez-vous avec le caméscope
•
Transfert de données numériques
avec IEEE1394
Le port haute vitesse IEEE 1394 de type i.LINK
TM
: i.LINK (protocole
de transfert de données série et système d’interconnexion), vous
permet de transférer des images mobiles et immobiles vers un PC,
où vous pourrez les modifier à loisir.
•
PHOTO
La fonction PHOTO vous permet de filmer un sujet en enregistrant un
objet immobile pendant un temps limité, en mode caméscope.
•
Zoom numérique 500x
La fonction Zoom est une technique d’enregistrement qui vous permet
de modifier la taille du sujet filmé, dans l’image.
•
LCD TFT couleur
L’écran LCD TFT couleur à haute résolution (112 320 pixels) offre une
image nette et permet de filmer dans une position stable et
confortable.
•
Stabilisateur d’images numériques
La fonction DIS rétablit la stabilité des images lorsque le tremblement
de la main provoque des vibrations désagréables, surtout en mode
zoom.
•
Effets numériques divers
L’ajout de différents effets spéciaux vous permet de donner un côté
spectaculaire à vos films.
•
Contre-jour/BLC (Backlight compensation)
Lorsque vous filmez un sujet devant une source lumineuse ou devant
un fond clair, utilisez la fonction BLC (contre-jour intelligent).
•
Fonction d’exposition automatique (
Program AE)
La fonction Program AE vous permet d’adapter la vitesse d’obturation
et le diaphragme selon la scène à filmer.
Fonctionnalités

10
ENGLISH
FRANÇAIS
Getting to Know Your Camcorder
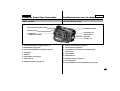
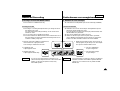
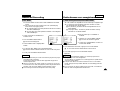
Make sure that the following basic accessories are supplied
with your digital video camera.
Accessories Supplied with camcorder
1. Lithium Ion Battery pack
2. AC Power Adapter
3. AC cord
4. AUDIO/VIDEO cable
5. Instruction Book
6. Shoulder Strap
7. Lithium batteries for Remote
Control and Clock.
(TYPE: CR2025, 2 EA)
8. S-VIDEO cable
9. Remote Control
Basic Accessories
Familiarisez-vous avec le caméscope
Assurez-vous que les accessoires de base ci-après ont été livrés
avec votre caméscope numérique.
Accessoires fournis avec votre caméscope
1. Bloc batterie lithium-ion
2. Adaptateur secteur
3. Cordon secteur
4. Câble AUDIO/VIDEO
5. Mode d’emploi
6. Bandoulière
7. Jeu de piles au Lithium pour la
télécommande
(type : CR2025, 2EA)
8. Câble S-VIDEO
9. Télécommande
Accessoires de base
1. Lithium Ion Battery pack
3. AC cord
4. AUDIO/VIDEO cable
9. Remote Control
8. S-VIDEO cable7. Lithium batteries (2EA)
5. Instruction Book
2. AC Power Adapter
6. Shoulder Strap
START/
STOP
SELF
TIMER
X2
SLOW
F.ADV
A.DUB
ZERO
MEMORY
WIDE
TELE
STILL
PHOTO DISPLAY
START/
STOP
SELF
TIMER
X2
SLOW
F.ADV
A.DUB
ZERO
MEMORY
WIDE
TELE
STILL
PHOTO DISPLAY

11
ENGLISH
FRANÇAIS
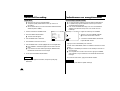
Getting to Know Your Camcorder
Familiarisez-vous avec le caméscope
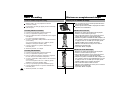
Front & Left View Vue avant et latérale (côté gauche)
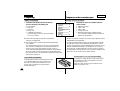
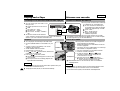
1. Lens
2. REC lamp
3. Remote sensor
4.Video Light (see page 60)
5. Hook for Hand Strap (see page 20)
6. Internal MIC
7. CUSTOM button (see page 53)
8. EASY button (see page 52)
9. TFT LCD monitor
10. Viewfinder (see page 29)
1. Objectif
2. Témoin d’enregistrement
3. Capteur de la télécommande
4. Torche vidéo (voir page 60)
5. Anneau pour la bandoulière (voir page 20)
6. Entrée MIC interne
7. Touche CUSTOM (voir page 53)
8. Touche EASY (voir page 52)
9. Ecran à cristaux liquides
10. Viseur (voir page 29)
1. Lens
2. REC lamp
3. Remote sensor
4.Video Light
5. Hook for Hand Strap
6. Internal MIC
10.Viewfinder
9.TFT LCD monitor
8. EASY button
7. CUSTOM button

12
ENGLISH
FRANÇAIS
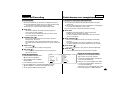
Getting to Know Your Camcorder
Left Side View
1. Function Keys
PLAYER : CAMERA
(STOP) : BLC (see page 55)
(REW) : EDIT –
(PLAY/STILL) : FADE (see page 56)
(FF) : EDIT +
(SLOW) : MF/AF (see page 54)
2. SPEAKER
Familiarisez-vous avec le caméscope
Vue du côté gauche
1. Function Keys
2. SPEAKER
1. Touches de fonction
LECTURE : CAMESCOPE
(STOP) : BLC (voir page 55)
(REW)/ Rembobinage rapide : Avance arrière par séquence
(PLAY/STILL) Lecture/Pause : Fondu (voir page 56)
(FF) Avance rapide : Lecture avant par séquence
(SLOW) Ralenti : MF/AF Mise au point
automatique/manuelle
(voir page 54)
2. HAUT-PARLEUR

13
ENGLISH
FRANÇAIS
Getting to Know Your Camcorder
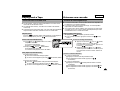
1. Zoom lever and Volume Control (see page 37)
2. PHOTO button (see page 58)
3. Power switch (CAMERA or PLAYER) (see page 21)
4. S-VIDEO out
5. DV IN/OUT
6. External MIC in (see page 57)
7. Audio/Video out
8. OPEN/EJECT button (see page 25)
Familiarisez-vous avec le caméscope
1. Bouton zoom et volume (voir page 37)
2. Touche PHOTO (voir page 58)
3. Commutateur (mode caméscope ou magnétoscope)
(voir page 21)
4. Sortie S-VIDEO
5. Entrée/Sortie DV
6. Entrée MIC externe (voir page 57)
7. Sortie Audio/Video
8. Bouton OPEN/EJECT (Ouverture/Ejection) (voir page 25)
8. OPEN/EJECT button
7. Audio/Video out
6. External MIC in
5. DV IN/OUT
4. S-VIDEO out
1. Zoom lever and Volume Control
2. PHOTO button
3. Power switch
(CAMERA or PLAYER)
Right & Top View Vue de droite et du dessus

14
ENGLISH
FRANÇAIS
Getting to Know Your Camcorder
Rear & Bottom View
1. Charging indicator
(see page 22)
2. MENU ON/OFF button
(see page 32)
3. ENTER/DISPLAY button
4. MENU DIAL (see page 32)
5. LCD open
6. LIGHT switch (see page 60)
7. Hook for shoulder strap
8. DC jack (see page 21)
9. START/STOP button
(see page 26)
10. Battery Release button
(see page 70)
11. Lithium Battery holder
(see page 19)
Familiarisez-vous avec le caméscope
Vue arrière et du dessous
1. Témoin de charge
(voir page 22)
2. Touche MENU ON/OFF
(voir page 32)
3. Touche Entrée/Affichage
4. Molette de MENU
(voir page 32)
5. Ouverture de l’écran à
cristaux liquides
6. Commutateur de la
TORCHE (voir page 60)
7. Anneau pour la bandoulière
8. Prise DC
(voir page 21)
9. Bouton START/STOP
(voir page 26)
10. Ejection de la batterie
(voir page 70)
11. Batterie au Lithium-ion
(voir page 19)
10. Battery Release button
9. START/STOP button
11. Lithium Battery
Holder
1. Charging indicator
2. MENU ON/OFF button
3. ENTER/DISPLAY button
4. MENU DIAL
5. LCD open
6. LIGHT Switch
7. Hook for shoulder strap
8. DC jack

15
ENGLISH
FRANÇAIS
Getting to Know Your Camcorder
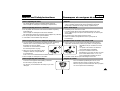
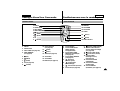
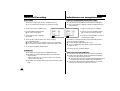
Remote control
1. PHOTO
2. START/STOP
3. SELF TIMER (see page 18)
4. ZERO MEMORY
(see page 67)
5. (FF)
6. (REW)
7. (PLAY)
8. X2 (see page 66)
9. (SLOW)
10. Frame Advance
(see page 66)
11. (STOP)
12. (STILL)
13. A.DUB (see page 57)
14. Zoom TELE
15. Zoom WIDE
16. DISPLAY (see page 17)
Familiarisez-vous avec le caméscope
Télécommande
1. Touche PHOTO
2. Touche START/STOP
(Début/ arrêt de
l’enregistrement)
3. Touche SELF TIMER
(Minuterie automatique)
(voir page 18)
4. Touche ZERO MEMORY
(voir page 67)
5. Touche FF
(Avance rapide)
6. Touche REW
(Rembobinage)
7. Touche PLAY (Lecture)
8. Touche X2 (voir page 66)
9. Touche SLOW (Ralenti)
10. Touche Frame Advance
(Avance image par image)
(voir page 66)
11. Touche STOP (Arrêt)
12. Touche STILL (Pause)
13. Touche A.DUB
(Doublage sonore)
(Voir page 57)
14. Touche Zoom TELE
(Téléobjectif)
15. Touche Zoom WIDE
(Grand angle)
16. Touche DISPLAY
(Activation) (voir page 17)
START/
STOP
SELF
TIMER
X2
SLOW
F.ADV
A.DUB
ZERO
MEMORY
WIDE
TELE
STILL
PHOTO DISPLAY
16. DISPLAY
15. Zoom WIDE
14. Zoom TELE
13. A.DUB
12. (STILL)
11. (STOP)
10. Frame Advance
1. PHOTO
2. START/STOP
3. SELF TIMER
4. ZERO MEMORY
5. (FF)
6. (REW)
7. (PLAY)
8. X2
9. (SLOW)

16
ENGLISH
FRANÇAIS
Getting to Know Your Camcorder
OSD (On Screen Display)
1. Battery level (see page 24)
2. Zoom position (see page 37)
3. Manual focus (see page 54)
4. DSE (Digital Special Effect) mode
(see page 40)
5. White Balance mode (see page 42)
6. Shutter speed and IRIS
(see page 43, 44)
7. Audio Record mode (see page 47)
8. Self record recording and
waiting timer (see page 18)
9. WIND CUT (see page 46)
10. DATE/TIME (see page 49)
11. Self diagnosis (see page 73)
12. DEW condensation (see page 73)
13. PIP (Picture in Picture) (see page 36)
14. Photo shot (see page 58)
15. Digital zoom mode (see page 38)
16. Remaining Tape (measured in minutes)
17. Tape counter
18. Zero memory indicator (see page 67)
19. Operating mode
20. Record speed mode (see page 45)
21. Light ON (see page 60)
22. Custom or Easy mode (see pages 52, 53)
23. DIS (Digital Image Stabilizer) (see page 35)
24. Program AE (see page 39)
25. BLC (Back Light Compensation) (see page 55)
Familiarisez-vous avec le caméscope
Affichage à l’écran
1. Niveau de la batterie (voir page 24)
2. Position Zoom (voir page 37)
3. Mise au point manuelle (voir page 54)
4. Mode DSE (Effet numérique
sélectionné) (voir page 40)
5. Mode d’équilibrage du blanc choisi
(voir page 42)
6. Vitesse d’obturation, IRIS
(voir page 43-44)
7. Mode AUDIO (voir page 47)
8. Vitesse d’enregistrement sélectionnée
et Minuterie (voir page 18)
9. WIND CUT (voir page 46)
10. DATE/TIME (Date et heure)
(voir page 49)
11. Auto-diagnostic (voir page 73)
12. DEW Contrôle de la condensation (voir page 73)
13. PIP (Image sur image) (voir page 36)
14. Mode PHOTO (voir page 58)
15. Zoom numérique (voir page 38)
16. Temps restant sur la bande (en minutes)
17. Compteur de bande
18. MEM (mémoire compteur) (voir page 67)
19. Mode de fonctionnement
20. Vitesse d’enregistrement sélectionné (voir page 45)
21. Torche allumée (voir page 60)
22. Mode Custom ou Easy (voir page 52-53)
23. DIS (stabilisateur d’image numérique) (voir page 35)
24. Program AE (Activation/désactivation du mode d’exposition
automatique sélectionné) (voir page 39)
25. BLC (Back Light Compensation) (Contre-jour intelligent)
(voir page 55)
OSD in CAMERA mode
WAIT-10S W.CUT
CUSTOM
SP STBY
MIRROR PHOTO
OUTDOOR
1/500
16 BIT
TAPE
M.FOCUS 100 MIN
DEW
PIP
11:30 PM
SELF-30S DEC.31,2001
500 0:00:00
18
17
16
15
14
13
12
11
10
1
2
3
4
5
6
7
8
25 24 23 22 21 20 19
9
W
BLC
T M
x
I 29

17
ENGLISH
FRANÇAIS
Getting to Know Your Camcorder
OSD (On Screen Display)
26. Volume control
(see page 31)
27. Audio playback channel
(see page 58)
28. Audio playback mode
29. DV IN (DV data receiving mode)
(see page 68)
30. A.DUB
(see page 57)
✤
When you set the power switch to
CAMERA, and the OSD is
automatically turned on.
✤
When you set the power switch to
PLAYER, and the OSD is
automatically turned off.
✤ Refer to page 48.
•
Turning OSD on/off
Press the ENTER button on the rear side panel.
- Each press of the button toggles the OSD function on and off.
- When you turn the OSD off,
In CAMERA mode:You can see those features being used.
In PLAYER mode: All OSD messages flash for 3 seconds then
disappear.
•
Turning on/off the DATE/TIME
- The DATE/TIME is not affected when the OSD function is switched
ON or OFF.
- To turn the DATE/TIME on or off, access the menu and change
the DATE/TIME mode. (see page 49)
Turning the OSD on/off (On Screen Display)
Familiarisez-vous avec le caméscope
Affichage à l’écran
2
6. Contrôle du volume (voir page 31)
27. Canal de lecture audio (voir page 58)
28. Mode d’enregistrement audio
29. DV IN (mode de réception des
données DV) (voir page 68)
30. DUB (voir page 57)
✤
Lorsque vous placez le commutateur
principal sur la position CAMERA,
l’affichage est activé.
✤
En position PLAYER, cet affichage est désactivé.
✤
Reportez-vous page 48.
•
Modification de l’affichage
Appuyez sur la touche ENTER à l’arrière du panneau de
commandes.
- A chaque fois que vous appuyez sur cette touche, la fonction
change dans l’ordre suivant : (ON OFF)
- Lorsque vous désactivez l’affichage :
En mode caméscope (CAMERA) : seul le mode OSD apparaît.
En mode magnétoscope (PLAYER) : l’affichage clignote pendant
3 secondes dans le viseur ou à l’écran, puis disparaît.
• Affichage
de la date et de l’heure
- L’affichage de la date et de l’heure est indépendant de la touche
OSD ON/OFF (ENTER).
- Pour faire apparaître ou disparaître la date et l’heure, sélectionnez
le menu DATE/TIME du panneau de commandes. (Voir page 49)
Activation/désactivation de l’affichage
SOUND2
SP STILL
A.DUB
TAPE
100 MIN
DEW
DV IN
VOLUME
0 16 20
11:30 PM
16BIT DEC.31,2001
0:00:00:00
17
16
30
29
10
1
12
11
26
27
28
20 19
OSD in PLAYER mode

18
ENGLISH
FRANÇAIS
Getting to Know Your Camcorder
✤ You must insert or replace the lithium battery when :
- You purchase the camcorder.
- The remote control doesn’t work.
✤ Ensure that you insert the lithium cell correctly,
following the + and – markings.
✤ Be careful not to reverse the polarity of the battery.
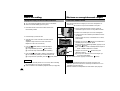
Self Record using the Remote Control
The Self-Timer function on the remote control allows
you to start and stop recording automatically.
Example:
Scene with all members of your family
Two options are available
■
WAIT-10S/SELF-30S: 10 seconds wait, 30 seconds
of recording.
■
WAIT-10S/SELF-END: 10 seconds wait, records
until you press the START/
STOP button again.
1. Set the camcorder to CAMERA mode.
2. Press the SELF TIMER button until the appropriate
indicator is displayed in the viewfinder :
■
WAIT-10S/SELF-30S
■
WAIT-10S/SELF-END
3. Press the START/STOP button to start the timer.
: After a 10 second wait, recording starts.
: If you have selected SELF-30S, recording stops
automatically after 30 seconds.
: If you have selected SELF-END, press START/STOP again
when you wish to stop recording.
How to use the Remote Control
Battery Installation for the Remote Control
Familiarisez-vous avec le caméscope
✤ Vous devez insérer ou remplacer la batterie au lithium :
- lors de l’achat du caméscope
- quand la télécommande ne fonctionne pas.
✤ Insérez la batterie au lithium (CR2025) en respectant la
polarité + et -.
Enregistrement automatique avec la télécommande
La fonction de minuterie automatique sur la télécommande
(touche 1) vous permet de démarrer et d’arrêter un
enregistrement automatiquement.
Ex
emple : Scène regroupant tous les membres de
votre famille
Vous avez deux possibilités :
■
WAIT-10S/SELF-30S : dix secondes d’attente,
suivies de trente secondes d’enregistrement,
■
WAIT-10S/SELF-END : dix secondes d’attente,
suivies de l’enregistrement, jusqu’à ce que vous
appuyiez de nouveau sur la touche START/STOP.
1. Mettez le caméscope en mode CAMERA.
2. Appuyez sur la touche SELF TIMER jusqu’à ce que l’indication
souhaitée s’affiche dans le viseur :
■
WAIT-10S/SELF-30S
■
WAIT-10S/SELF-END
3. Appuyez sur la touche START/STOP pour démarrer la minuterie.
: Après une attente de dix secondes, l’enregistrement démarre.
: Si vous avez sélectionné SELF-30S, l’enregistrement s’arrête après
trente secondes.
: Si, au contraire, vous avez sélectionné SELF-END, appuyez de
nouveau sur START/STOP pour arrêter l’enregistrement.
Utilisation de la télécommande
Installation de la batterie pour la télécommande
START/
STOP
SELF
TIMER
X2
SLOW
F.ADV
A.DUB
ZERO
MEMORY
WIDE
TELE
STILL
PHOTO DISPLAY
SELF
TIMER

19
ENGLISH
FRANÇAIS
✤ The lithium battery maintains the clock
function and preset contents of the
memory; even if the battery pack
or AC power adapter is removed.
✤ The lithium battery for the camcorder
lasts about 6 months under normal
operation from the time of installation.
✤ When the lithium battery becomes weak or dead, the date/time indica-
tor flashes for about 5 seconds when you set the power switch to
CAMERA.
In this case, replace the lithium battery with CR2025 type.
1. Remove the Lithium battery holder from the camera.
2. Position the Lithium cell in the holder, with the positive ( ) terminal
face down.
3. Reinsert the holder into the lithium battery compartment.
Reference The holder must be inserted in the correct direction
or it will not fit properly.
Warning: Keep the LITHIUM BATTERY out of the reach
of the children.
Should any battery be swallowed, consult a doctor
immediately.
Lithium Battery Installation
Preparing
✤ La pile au lithium-ion sert à
mémoriser la date et l’heure, les titres
et les réglages prédéfinis, en
l’absence du bloc batterie ou de
l’adaptateur secteur.
✤ La longévité de la pile au lithium est d’environ six mois à partir de sa
mise en place et dans des conditions normales d’utilisation.
✤ Lorsque la pile au lithium s’affaiblit ou est déchargée, l’affichage de la
date et de l’heure clignote pendant cinq secondes environ lorsque
vous passez en mode caméscope (CAMERA). Dans ce cas,
remplacez-la par une pile de type CR2025.
1 Retirez du compartiment le support de la pile au lithium.
2. Mettez la pile en place de manière que la face soit en contact avec
le support.
3. Replacez le support dans le compartiment.
Important Le support doit être correctement positionné.
Attention : Maintenez la PILE AU LITHIUM hors de la portée des
enfants.
Si la pile venait à être avalée, consultez immédiatement
un médecin.
Installation du bloc batterie au lithium-ion
Préparez votre caméscope

20
ENGLISH
FRANÇAIS
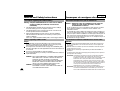
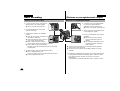
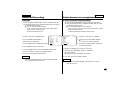
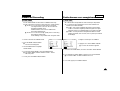
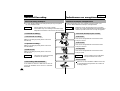
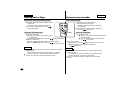
It is very important to ensure that the Hand Strap is correctly adjusted
before you begin your filming.
The hand strap enables you to :
- Hold the camcorder in a stable, comfortable position.
- Press the Zoom and START/STOP button without having to
change the position of your hand.
Hand strap
a. Pull open the Hand-Strap cover and
release the Hand Strap.
b. Adjust its length and stick it back onto
the Hand Strap cover.
c. Close the hand strap cover back up again.
Shoulder Strap
The Shoulder Strap enables you to carry
your camcorder around in complete safety.
1. Insert the end of strap into the Shoulder
Strap hook on the camcorder.
Insert the other end of strap into ring
inside hand strap.
2. Thread each end into the buckle, adjust the length
of the strap and then pull it tight in the buckle.
Adjusting the Hand Strap and Shoulder Strap
Preparing
Il est très important d’ajuster la poignée de soutien afin de filmer dans
les meilleures conditions possibles.
La poignée de soutien vous permet :
- de maintenir le caméscope dans une position stable et confortable,
- d’appuyer sur le bouton du zoom et sur le bouton START/STOP sans
avoir à changer la position de votre main.
Poignée de soutien
a. Ouvrez le rabat de la poignée en le
décollant.
b. Ajustez la longueur de la poignée, puis
recollez-la.
c. Refermez le rabat.
Bandoulière
La bandoulière vous permet de porter le
caméscope en toute sécurité.
1. Insérez une extrémité de la bandoulière
dans l’anneau de fixation sur le
caméscope.
Insérez l’autre extrémité dans l’anneau
situé à l’intérieur de la poignée de soutien.
2. Enfilez ensuite les extrémités dans la
boucle,
ajustez la longueur désirée, puis resserrez
la boucle.
Mise en place de la poignée de soutien et de la bandoulière
Préparez votre caméscope
a
c
b
1
2
La page est en cours de chargement...
La page est en cours de chargement...
La page est en cours de chargement...
La page est en cours de chargement...
La page est en cours de chargement...
La page est en cours de chargement...
La page est en cours de chargement...
La page est en cours de chargement...
La page est en cours de chargement...
La page est en cours de chargement...
La page est en cours de chargement...
La page est en cours de chargement...
La page est en cours de chargement...
La page est en cours de chargement...
La page est en cours de chargement...
La page est en cours de chargement...
La page est en cours de chargement...
La page est en cours de chargement...
La page est en cours de chargement...
La page est en cours de chargement...
La page est en cours de chargement...
La page est en cours de chargement...
La page est en cours de chargement...
La page est en cours de chargement...
La page est en cours de chargement...
La page est en cours de chargement...
La page est en cours de chargement...
La page est en cours de chargement...
La page est en cours de chargement...
La page est en cours de chargement...
La page est en cours de chargement...
La page est en cours de chargement...
La page est en cours de chargement...
La page est en cours de chargement...
La page est en cours de chargement...
La page est en cours de chargement...
La page est en cours de chargement...
La page est en cours de chargement...
La page est en cours de chargement...
La page est en cours de chargement...
La page est en cours de chargement...
La page est en cours de chargement...
La page est en cours de chargement...
La page est en cours de chargement...
La page est en cours de chargement...
La page est en cours de chargement...
La page est en cours de chargement...
La page est en cours de chargement...
La page est en cours de chargement...
La page est en cours de chargement...
La page est en cours de chargement...
La page est en cours de chargement...
La page est en cours de chargement...
La page est en cours de chargement...
La page est en cours de chargement...
La page est en cours de chargement...
La page est en cours de chargement...
La page est en cours de chargement...
La page est en cours de chargement...
-
 1
1
-
 2
2
-
 3
3
-
 4
4
-
 5
5
-
 6
6
-
 7
7
-
 8
8
-
 9
9
-
 10
10
-
 11
11
-
 12
12
-
 13
13
-
 14
14
-
 15
15
-
 16
16
-
 17
17
-
 18
18
-
 19
19
-
 20
20
-
 21
21
-
 22
22
-
 23
23
-
 24
24
-
 25
25
-
 26
26
-
 27
27
-
 28
28
-
 29
29
-
 30
30
-
 31
31
-
 32
32
-
 33
33
-
 34
34
-
 35
35
-
 36
36
-
 37
37
-
 38
38
-
 39
39
-
 40
40
-
 41
41
-
 42
42
-
 43
43
-
 44
44
-
 45
45
-
 46
46
-
 47
47
-
 48
48
-
 49
49
-
 50
50
-
 51
51
-
 52
52
-
 53
53
-
 54
54
-
 55
55
-
 56
56
-
 57
57
-
 58
58
-
 59
59
-
 60
60
-
 61
61
-
 62
62
-
 63
63
-
 64
64
-
 65
65
-
 66
66
-
 67
67
-
 68
68
-
 69
69
-
 70
70
-
 71
71
-
 72
72
-
 73
73
-
 74
74
-
 75
75
-
 76
76
-
 77
77
-
 78
78
-
 79
79


Samsung SC-D70 Manuel utilisateur
- Catégorie
- Caméscopes
- Taper
- Manuel utilisateur
dans d''autres langues
- English: Samsung SC-D70 User manual
Documents connexes
-
Samsung SCD23/D24 Manuel utilisateur
-
Samsung SC-W97 Manuel utilisateur
-
-
-
-
-
-
-
-