
GB
LA PRÉSENCE DE BRUITS, DE VIBRATIONS EXCESSIVES ET DE
FUITES D’EAU PEUT ÊTRE DUE À UNE MAUVAISE INSTALLATION.
NE DÉPLACEZ JAMAIS L’APPAREIL EN LE PRENANT PAR LE
PLAN DE TRAVAIL.
INSTALLATION GUIDE
GUIDE D’INSTALLATION
•
Read this “INSTALLATION GUIDE” before operating.
•
Keep this “INSTALLATION GUIDE” for future reference.
•
Read the general recommendations about disposing of packaging in the Instructions for use.
•
Veuillez lire ce “GUIDE D’INSTALLATION” avant d’utiliser la machine.
•
Conservez ce “GUIDE D’INSTALLATION” en cas de consultation ultérieure.
•
Lisez les recommandations générales sur l’élimination de l’emballage dans la Notice d’emploi.
F
NOISE, EXCESSIVE VIBRATIONS AND WATER LEAKAGES CAN BE
CAUSED BY INCORRECT INSTALLATION.
NEVER MOVE THE APPLIANCE BY CARRYING IT AT THE WORKTOP.
RUS
РУКОВОДСТВО ПО УСТАНОВКЕ
•
Прежде чем пользоваться стиральной машиной, прочитайте данное “РУКОВОДСТВО
ПО УСТАНОВКЕ”.
•
Сохраните это “РУКОВОДСТВО ПО УСТАНОВКЕ” для справок в будущем.
•
Ознакомьтесь в Инструкциях по эксплуатации с общими рекомендациями по удалению
упаковочных материалов.
ШУМ, ИЗБЫТОЧНАЯ ВИБРАЦИЯ И УТЕЧКА ВОДЫ МОГУТ БЫТЬ
ВЫЗВАНЫ НЕПРАВИЛЬНОЙ УСТАНОВКОЙ СТИРАЛЬНОЙ
МАШИНЫ.
НИКОГДА НЕ ПЕРЕМЕЩАЙТЕ ПРИБОР, УДЕРЖИВАЯ ЕГО ЗА
РАБОЧУЮ ПЛОСКОСТЬ.
KO
10600831.fm Page 1 Wednesday, June 21, 2006 6:24 PM
Black process 45.0° 100.0 LPI

2
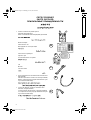
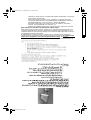
PIÈCES FOURNIES
PARTS SUPPLIED
ПРИЛАГАЕМЫЕ ПРИНАДЛЕЖНОСТИ
•
Sachet contenant les petites pièces
Package with small items
Пакет с мелкими комплектующими деталями
Notice d’emploi
Instruction for use
Инструкции по эксплуатации
4 bouchons en plastique
4 plastic caps
4 пластмассовых заглушки
Clé
Wrench
Гаечный ключ
•
Tuyau d’arrivée d’eau (à l’intérieur de la machine ou
déjà installé)
Inlet hose (inside the machine or already installed)
Шланг подачи воды (внутри машины или уже
в установленном виде)
•
Crosse de vidange coudée (à l’intérieur de la
machine ou déjà installée)
“U”-bend (inside the machine or already installed)
“U”"образное колено (внутри машины или уже
в установленном виде)
A
B
C
D
E
10600831.fm Page 2 Wednesday, June 21, 2006 6:24 PM
Black process 45.0° 100.0 LPI

3
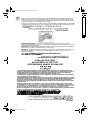
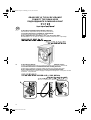
ENLEVEZ LE BRIDAGE DE TRANSPORT !
REMOVE TRANSPORT BOLTS!
СНИМИТЕ ТРАНСПОРТИРОВОЧНЫЕ БОЛТЫ!
Remarque importante : Il faut impérativement enlever le bridage de transport afin de ne pas
endommager l’appareil.
Important: Not removed transport bolts cause damages to the appliance.
Внимание: если транспортировочные болты не будут сняты, то это может привести
к повреждению прибора.
Dévissez les 4 vis (voir les flèches) avec la clé
C
fournie.
Unscrew the four screws (see arrows) with the wrench
C
supplied.
Открутите четыре винта (см. стрелки) с помощью прилагаемого гаечного ключа
C
.
Faites glisser les vis jusqu’au centre des trous.
Move the screws to the centre of the holes.
Сместите винты к центру отверстий.
Retirez les vis avec l’entretoise plastique colorée.
Pull out the screws together with the coloured plastic spacer.
Выньте винты вместе с цветной пластмассовой прокладкой.
1
2
3
10600831.fm Page 3 Wednesday, June 21, 2006 6:24 PM
Black process 45.0° 100.0 LPI

4
Obturez les trous en insérant les bouchons en plastique
B
fournis dans la partie large du trou et
faites-les glisser dans le sens de la flèche jusqu’à ce qu’ils s’encastrent dans leur emplacement.
To seal the holes insert the supplied plastic caps
B
in the wide part of the hole and slide them
in the direction of the arrow until they click into place.
Чтобы плотно закрыть отверстия, вставьте прилагаемые пластмассовые заглушки
B
в широкую часть отверстия и затем сдвиньте их в направлении стрелки до щелчка.
Remarque importante :
Conservez le bridage de transport et la clé pour de futurs
déplacements de l’appareil. Si ce cas se présente, montez le bridage de transport en suivant
le sens inverse du démontage.
Important:
Keep the transport bolts and the wrench for further transporting of the appliance
and in this case refit the transport bolts in reverse order.
Внимание:
сохраните транспортировочные болты и гаечный ключ для перевозки
прибора в будущем. Установка транспортировочных болтов выполняется в
обратном порядке.
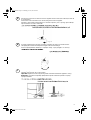
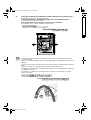
RÉGLAGE DES PIEDS
ADJUSTMENT OF THE FEET
РЕГУЛИРОВКА НОЖЕК ПО ВЫСОТЕ
La machine doit être installée sur une surface stable et plane (si nécessaire utilisez un
niveau). Si la machine est placée sur un plancher en poutres de bois, répartissez le poids en
posant l’appareil sur un panneau de contre-plaqué 60 x 60 cm et de 3 cm d’épaisseur
minimum puis vissez fermement le panneau de contre-plaqué au sol.
Compensez les petites inégalités du sol en réglant les 4 pieds de l’appareil ; n’insérez pas
sous les pieds des cales de bois etc...
The appliance must be installed on a solid and level floor surface (if necessary use a spirit
level). If the appliance is to be installed on a wooden floor, distribute the weight by placing
it on a 60 x 60 cm sheet of plywood at least 3 cm in thickness and secure it to the floor.
If the floor is uneven, adjust the 4 levelling feet as required; do not insert pieces of wood etc.
under the feet.
Прибор должен быть установлен на прочную и ровную поверхность пола (при
необходимости воспользуйтесь спиртовым уровнем). Если прибор должен быть
установлен на деревянном полу, распределите его вес, подложив под него лист
фанеры 60 х 60 см не менее 3 см толщиной. Прикрепите фанеру к полу.
Если пол неровный, отрегулируйте соответствующим образом 4 выравнивающие
ножки; не подкладывайте кусочки дерева и т.п. под ножки.
4
10600831.fm Page 4 Wednesday, June 21, 2006 6:24 PM
Black process 45.0° 100.0 LPI

5
Desserrez le contre-écrou dans le sens des aiguilles d’une montre (voir la flèche) à l’aide de
la clé
C
fournie.
Slacken the locknut clockwise (see arrow) using the wrench
C
supplied.
Ослабьте контргайку вращением по часовой стрелке (см. стрелку) при помощи
прилагаемого гаечного ключа
C
.
Soulevez légèrement la machine et réglez la hauteur du pied en le faisant tourner.
Lift slightly the machine and adjust the height of the foot revolving it.
Слегка приподнимите машину и, вращая ножку, отрегулируйте ее высоту.
Remarque importante :
Serrez le contre-écrou en le tournant dans le sens contraire des
aiguilles d’une montre, face à la machine.
Important:
tighten the locknut by turning it anti-clockwise towards the appliance casing.
Внимание:
затяните контргайку вращением против часовой стрелки в сторону
корпуса машины.
5
6
7
10600831.fm Page 5 Wednesday, June 21, 2006 6:24 PM
Black process 45.0° 100.0 LPI

6
BRANCHEZ LE TUYAU D’ARRIVÉE D’EAU !
CONNECT THE WATER SUPPLY INLET HOSE!
ПРИСОЕДИНИТЕ ПРИЛАГАЕМЫЙ ШЛАНГ ПОДАЧИ ВОДЫ!
Si le tuyau d’arrivée d’eau n’est pas déjà en place, il doit être relié à la machine.
If the water inlet hose is not already installed, it must be screwed to the appliance.
Если шланг подачи воды еще не установлен, он должен быть прикручен к прибору.
Vissez à la main le tuyau d’arrivée d’eau
sur le robinet en serrant l’écrou.
Attention :
• Veillez à ce que le tuyau ne soit pas plié !
• L’appareil
ne doit en aucun cas
être connecté au mitigeur d’un chauffe-eau
non pressurisé.
• Vérifiez l’étanchéité des raccordements en ouvrant le robinet à fond.
• Si le tuyau n’est pas suffisamment long, remplacez-le par un tuyau de longueur
suffisante résistant à la pression (minimum 1000 kPa - en conformité avec EN 50084).
• Vérifiez régulièrement que le tuyau d’arrivée d’eau ne présente ni signes de
fragilisation, ni fissures. Le cas échéant, remplacez-le.
• La machine à laver peut être branchée sans clapet anti-retour.
Pour les machines avec sécurité hydraulique :
Si le tuyau flexible n’est pas suffisamment long, remplacez-le par un tuyau avec sécurité
hydraulique de 3 m de long (disponible auprès du Service Après-Vente ou chez votre
Revendeur). Ce remplacement ne peut être effectué que par un électricien qualifié.
Selon le modèle, le tuyau d’arrivée d’eau et le boîtier en plastique de branchement au
robinet contiennent des composants électriques.
Le tuyau flexible ne doit pas être coupé
et le boîtier ne doit pas être plongé dans l’eau
. Si le tuyau flexible est endommagé,
débranchez immédiatement l’appareil.
Screw by hand the inlet hose
onto the tap tightening the nut.
Attention:
• no kinks in the hose!
• The appliance
must not
be connected to the mixing tap of an un-pressurized
water heater.
• Check water-tightness of connections by turning the tap completely on.
• If the hose is too short, replace it with a suitable length of pressure resistant hose
(1000 kPa min, EN 50084 approved type).
• Check the inlet hose regularly for brittleness and cracks and replace if necessary.
• The washing machine can be connected without a non-return valve.
For models with Water Stop hose:
If the flexible hose is too short, replace it with a 3 m Water Stop hose (available from After-Sales
Service or from your dealer). This replacement is only to be carried out by a trained electrician.
Depending on the model, the inlet hose and the plastic enclosure at the tap connection contain
electrical components.
Do not cut the hose and do not immerse the plastic enclosure in
water
. Isolate the appliance from the mains immediately if the hose is damaged.
Прикрутите рукой шланг подачи воды
к крану, затянув гайку.
Внимание:
• шланг не должен иметь перегибов!
•Прибор
нельзя
подсоединять к смесительному крану нагревателя
воды, не находящейся под давлением.
8
9
10600831.fm Page 6 Wednesday, June 21, 2006 6:24 PM
Black process 45.0° 100.0 LPI
La page est en cours de chargement...

8
BRANCHEZ LE TUYAU DE VIDANGE
CONNECT THE DRAIN HOSE
ПОДСОЕДИНИТЕ СЛИВНОЙ ШЛАНГ
I.
Si le tuyau est installé comme illustré ci-dessous :
Décrochez-le uniquement du clip de droite (voir flèche)
In case the drain hose is installed as shown below:
Unhook it only from the right clip (see arrow).
Если сливной шланг размещен так, как показано ниже:
Высвободите его только из правого зажима (помеченного стрелкой).
II.
Si le tuyau de vidange est installé à l’intérieur de la machine à laver :
Sortez complètement le tuyau du support et obturez le trou avec le bouchon
a
.
In case the drain hose is installed inside the washing machine:
Pull the hose completely out of the holder and close the opening with cap
a
.
Если сливной шланг находится внутри стиральной машины:
Полностью вытяните шланг наружу и закройте отверстие, в которое он был
вставлен, заглушкой
a
.
10
1
2
a
10600831.fm Page 8 Wednesday, June 21, 2006 6:24 PM
Black process 45.0° 100.0 LPI

9
III.
Si le tuyau de vidange est installé dans la partie supérieure de la machine à laver :
Débranchez-le des deux clips (voir les flèches).
In case the drain hose is installed in the upper part of the washing machine:
Unhook it from both clips (see arrows)
Если сливной шланг установлен в верхней части машины:
отсоедините его от обоих зажимов (см. стрелки)
Connectez le tuyau de vidange au siphon ou accrochez-le au rebord d’un évier avec la
crosse de vidange.
Fixez la crosse de vidange
E
, si elle n’est pas déjà installée, à la partie finale du tuyau de
vidange.
Connect the drain hose to the siphon or hook it over the edge of a sink by means of the "U"
bend.
Fit the “U” bend
E
, if not already installed, at the end of the drain hose.
Соедините сливной шланг с сифоном или повесьте его на край мойки, используя
“U”"образное колено.
Установите “U”"образное колено,
E
если оно еще не установлено, на конце
сливного шланга.
11
E
10600831.fm Page 9 Wednesday, June 21, 2006 6:24 PM
Black process 45.0° 100.0 LPI

10
Remarques :
•
Vérifiez que le tuyau n’est pas plié
•
Fixez le tuyau afin qu’il ne tombe pas
•
Les petits lavabos ne conviennent pas
•
Pour effectuer une extension, utilisez un tuyau du même type et fixez les branchements
avec les clips.
•
Charge maximale du tuyau de vidange : 2,50 m.
Notes:
•
Make sure there are no kinks in the drain hose
•
Secure the hose so that it cannot fall down
•
Small hand basins are not suitable
•
To make an extension use a hose of the same type and secure the connections with
clips.
•
Max. Overall drain hose length: 2.50 m.
Примечания:
•
Убедитесь, чтобы сливной шланг не был пережат
•
Закрепите его так, чтобы он не упал во время работы стиральной машины
•
Маленькие умывальники для этого не пригодны
•
В случае необходимости увеличить длину шланга используйте шланг такого же
типа и стяните винтовыми скобами место соединения.
•
Макс. общая длина сливного шланга: 2,50 м.
10600831.fm Page 10 Wednesday, June 21, 2006 6:24 PM
Black process 45.0° 100.0 LPI

11
RACCORDEMENT ÉLECTRIQUE
ELECTRICAL CONNECTION
ПОДКЛЮЧЕНИЕ К ЭЛЕКТРИЧЕСКОЙ СЕТИ
Utilisez impérativement une fiche avec prise de terre.
N’utilisez ni rallonge, ni adaptateur multiple.
Le câble d’alimentation ne doit être remplacé que par un technicien agréé.
Les raccordements électriques doivent être conformes aux normes locales en vigueur.
Use a socket with an earth connection.
Do not use extension leads or multi sockets.
The electrical power cable must be replaced exclusively by a licensed electrician.
Electrical connections must be made in accordance with local regulations.
Подключите машину к розетке с заземлением.
Не пользуйтесь удлинителями или многогнездовыми розетками.
Замена шнура питания должна выполняться только квалифицированным электриком.
Подключение к электрической сети должно выполняться в соответствии с местными нормами.
5019 106 00831
10600831.fm Page 11 Wednesday, June 21, 2006 6:24 PM
Black process 45.0° 100.0 LPI
-
 1
1
-
 2
2
-
 3
3
-
 4
4
-
 5
5
-
 6
6
-
 7
7
-
 8
8
-
 9
9
-
 10
10
-
 11
11


