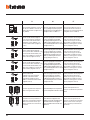
Bticino 361311 Mode d'emploi
- Catégorie
- Haut-parleurs de la barre de son
- Taper
- Mode d'emploi
La page est en cours de chargement...
La page est en cours de chargement...

Audio - Kit
3
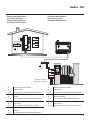
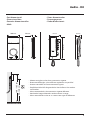
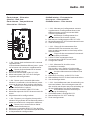
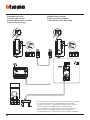
• Vecchio impianto a campanello
Impianto esistente con 3 fili e sola chiamata.
• Old system with bell
Existing system with 3 wires and just call.
• Ancienne installation a sonnette
Installation existante à 3 fils et un seul appel.
• Alte klingelanlage
Vorhandene 3-Leiter Anlage nur mit Ruffunktion.
• Vieja instalación con timbre
Instalación existente con 3 hilos y una llamada.
• Oude deurbelinstallatie
Bestaande 3-aderige installatie met alleen een
oproepfunctie.
• Antiga instalação em campaínha
Instalação existente com 3 fios e somente
chamada.
346040
PRI 110 - 240 V 50 - 60 Hz 370 mA - 225 mA
BUS 26.0 V 600 mA
BUS
PRI
PRI
BUS
230 Vac 12 V
230 Vac
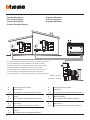
• Nuovo impianto citofonico
Impianto realizzato senza modifiche ai 2 fili
esistenti: chiamata, citofono e serratura.
• New door entry system
System made without modifications to the 2 existing
wires; call, handset and electric door lock.
• Nouvelle installation phonique
Installation réalisée sans modifications sur les 2 fils
existants: appel, phone, et serrure électrique.
• Neue haustelefonanlage
Anlage ohne Änderungen an den vorhandenen
2 Leiter: Ruffunktion, Gegensprechanlage und
elektrisches Schloss.
• Nueva instalación interfónica
Instalación realizada sin las modificaciones a los
2 hilos existentes: llamada, portero y cerradura
eléctrica.
• Nieuwe deurtelefooninstallatie
Installatie aangelegd zonder wijzigingen aan de
2 bestaande aders: oproep, intercom en elektrisch
deurslot.
• Nova instalação do intercomunicador
Instalação realizada sem modificar os 2 fios
existentes: chamada, intercomunicador e
fechadura eléctrica.
346040
PRI 110 - 240 V 50 - 60 Hz 370 mA - 225 mA
BUS 26.0 V 600 mA
BUS
PRI
PRI
BUS
230 Vac 12 V
230 Vac
*
* Acquistabile separatamente
* Can be purchased separately
* Vendu séparément
* Auf Anfrage getrennt erhältlich
* A la venta por separado
* Apart verkrijgbaar
* Adquirível separadamente

4
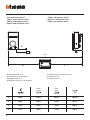
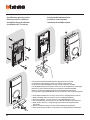
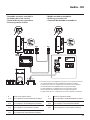
• Cavi e distanze (mm
2
)
• Cables and distances (mm
2
)
• Câbles et distances (mm
2
)
• Kabeln und Abstände (mm
2
)
• Cables y distancias (mm
2
)
• Kabels en afstanden (mm
2
)
• Cabos e distâncias (mm
2
)
B C
A
D
346040
PRI 110 - 240 V 50 - 60 Hz 370 mA - 225 mA
BUS 26.0 V 600 mA
BUS
PRI
PRI
BUS
0,28 mm
2
BTicino
336904
BTicino
L4669
0,35 mm
2
1 mm
2
A 380 m 610 m 400 m 1000 m
B 200 m 290 m 210 m 580 m
C 180 m 320 m 190 m 560 m
D 30 m 50 m 30 m 100 m
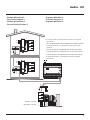
• Installazione no a 3 PI
• Installation of up to 3 handsets
• Montage jusqu’à 3 PI
• Installation von bis zu 3 Türstationen
• Instalación con un máximo de 3 PI
• Installatie tot 3 PI
• Instalação até 3 UI
La page est en cours de chargement...

6
346040
PRI 110 - 240 V 50 - 60 Hz 370 mA - 225 mA
BUS 26.0 V 600 mA
BUS
PRI
PRI
BUS
ON
OFF
BUS
PL S+
S-
N
= –
= –
T = –
S = –
P
= –
–
=
2
1
A
P
= –
= –
= –
= –
MOD
N
= –
= –
P
= –
= –
= –
= –
MOD
N
= –
= *1
B
BUS
5M 1
ON
OFF
B
BUS
5M 1
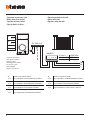
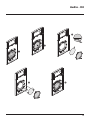
Bifamiliare - Two family
Monofamiliare - One family
*
* • Il secondo posto interno ed il configuratore 3501/1 devono essere acquistati separatemente.
• The second internal unit and the 3501/1 configurator must be purchased separately.
• Le deuxième poste interne et le configurateur 3501/1 doivent être achetés séparément.
• Die zweite Hausstation und der Konfigurator 3501/1 werden getrennt verkauft.
• La segunda unidad interior y el configurador 3501/1 se han de comprar por separado.
• De tweede binnenpost en de configurator 3501/1 moeten apart worden gekocht.
• A segunda unidade interna e o configurador 3501/1 devem ser adquiridos separadamente.
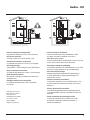
• Schema bifamiliare
• Two-family diagram
• Schéma bi-familiale
• Schema Zweifamilienhaus
• Esquema bifamiliar
• Schema tweegezins
• Esquema bifamiliar
• A Pulsante locale apertura serratura.
B Chiamata al piano.
S+ S- 18 V; 4 A impulsivi. 250 mA mantenimento (30 Ω max).
• A Door lock release local pushbutton.
B Floor call.
S+ S- 18 V; 4 A impulsive. 250 mA holding current (30 Ω max).
• A Bouton local ouverture serrure.
B Appel à l’étage.
S+ S- 18 V; 4 A impulsifs. 250 mA entretien (30 Ω max).
• A Lokale Schlossöffnungstaste.
B Etagenruf.
S+ S- 18 V; 4 A impulsstrom. 250 mA Haltestrom (30 Ω max).
• A Pulsador local apertura cerradura.
B Llamada al piso.
S+ S- 18 V; 4 A por impulsos. 250 mA mantenimiento (30 Ω max).
• A Lokale knop opening slot.
B Oproep aan verdieping.
S+ S- 18 V; 4 A impulsief; 250 mA onderhoud (30 Ω max).
• A Botão local de abertura da fechadura.
B Chamada ao piso.
S+ S- 18 V; 4 A instantâneos. 250 mA continuos (30 Ω max).
La page est en cours de chargement...

8
• Opzione serratura a relè
• Relay door lock option
• Option serrure à relais
• Option Relais-Schloss
• Opción cerradura de relé
• Optie relaisslot
• Opção trinco de relê
BUSPL S+
S-
N
= –
= –
T = –
S = –
P
= –
–
=
8 A cosφ = 1
4 A cosφ = 0,7
3 A cosφ = 0,4
24 Vdc; 24 Vac
24 Vac
24 Vac
NO
NC
C
346250 (*)
S-
S+
C
NC
NO
A
* Acquistabile separatamente
* Can be purchased separately
* Vendu séparément
* Auf Anfrage getrennt erhältlich
* A la venta por separado
* Apart verkrijgbaar
* Adquirível separadamente
• A Pulsante locale apertura serratura.
S+ S- 18 V; 4 A impulsivi. 250 mA mantenimento (30 Ω max).
• A Door lock release local pushbutton.
S+ S- 18 V; 4 A impulsive. 250 mA holding current (30 Ω max).
• A Bouton local ouverture serrure.
S+ S- 18 V; 4 A impulsifs. 250 mA entretien (30 Ω max).
• A Lokale Schlossöffnungstaste.
S+ S- 18 V; 4 A impulsstrom. 250 mA Haltestrom (30 Ω max).
• A Pulsador local apertura cerradura.
S+ S- 18 V; 4 A por impulsos. 250 mA mantenimiento (30 Ω max).
• A Lokale knop opening slot.
S+ S- 18 V; 4 A impulsief; 250 mA onderhoud (30 Ω max).
• A Botão local de abertura da fechadura.
S+ S- 18 V; 4 A instantâneos. 250 mA continuos (30 Ω max).
La page est en cours de chargement...

10
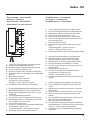
• Posto esterno
• Entrance panel
• Poste extérieur
• Türstation
• Placa exterior
• Externe plaats
• Unidade externa
1
2
3
4
12
11
10
9
8
7
6
5
1 - Morsetti di collegamento
2 - Pulsanti di chiamata
3 - LED connessione attiva
4 - LED indicazione porta aperta
5 - Microfono
6 - Regolazione microfono
7 - Regolazione altoparlante
8 - Switch mono/bifamiliare
9 - Pannello LED per illuminazione
pulsante di chiamata
10 - Sede dei configuratori
11 - Sensore di luminosità per
retroilluminazione notturna
12 - Altoparlante
1 - Bornes de branchement
2 - Boutons d’appel
3 - Voyant connexion active
4 - Voyant indication porte
ouverte
5 - Micro
6 - Réglage micro
7 - Réglage haut-parleur
8 - Commutateur mono/bi-familial
9 - Panneau Voyant d’éclairage
bouton d’appel
10 - Logement des configurateurs
11 - Capteur de luminosité pour
rétro-éclairage nocturne
12 - Haut-parleur
1 - Connection clamp
2 - Call pushbuttons
3 - Active connection LED
4 - Open door notification LED
5 - Microphone
6 - Microphone adjustment
7 - Loudspeaker adjustment
8 - One-family/two-family switch
9 - LED panel for call pushbutton
lighting
10 - Configurator socket
11 - Brightness sensor for night
backlighting
12 - Loudspeaker
1 - Aansluitklemmen
2 - Oproepknoppen
3 - Led verbinding geactiveerd
4 - Led aanduiding deur geopend
5 - Microfoon
6 - Regeling microfoon
7 - Regeling luidspreker
8 - Schakelaar een-/tweegezins
9 - Led paneel voor verlichting
oproepknop
10 - Plaats van de configuratoren
11 - Lichtsensor voor achtergrond-
verlichting ‘s nachts
12 - Luidspreker
1 - Anschlussklemmen
2 - Ruftasten
3 - LED Verbindung aktiv
4 - LED Anzeige Tür offen
5 - Mikrophon
6 - Einstellung des Mikrophons
7 - Einstellung des Lautsprechers
8 - Switch Ein-/Zweifamilienhaus
9 - LED-Tafel zur Beleuchtung
der Ruftaste
10 - Sitz der Konfiguratoren
11 - Helligkeitssensor zur
nächtlichen Rückbeleuchtung
12 - Lautsprecher
1 - Bornes de conexão
2 - Botões de chamada
3 - LED de conexão ativa
4 - LED indicação de porta aberta
5 - Microfone
6 - Regulação do microfone
7 - Regulação do altifalante
8 - Interruptor mono/bifamiliar
9 - Painel LED para iluminação
do botão de chamada
10 - Sede dos configuradores
11 - Sensor de luminosidade para
retroiluminação noturna
12 - Altifalante
1 - Bornes de conexión
2 - Pulsadores de llamada
3 - LED conexión activada
4 - LED indicación puerta abierta
5 - Micrófono
6 - Regulación del micrófono
7 - Regulación del altavoz
8 - Switch mono/bifamiliar
9 - Panel LED para iluminación
pulsador de llamada
10 - Alojamiento de los
configuradores
11 - Sensor de luminosidad para
retroiluminación nocturna
12 - Altavoz
La page est en cours de chargement...
La page est en cours de chargement...
La page est en cours de chargement...

14
• Installazione posto esterno
• Entrance panel installation
•
Installation du poste extérieur
• Installation der Türstation
•
Instalación de la placa exterior
• Installatie externe plaats
•
Instalação da unidade externa
** Prima dell’installazione assicurarsi che la vite sia completamente avvitata.
** Before installing make sure that the screw is completely tightened.
** Avant l’installation, s’assurer que la vis soit complètement vissée.
** Vor der Installation sicherstellen, dass die Schraube richtig festgeschraubt ist.
** Antes de la instalación, compruebe que el tornillo esté completamente
enroscado.
** Vóór de installatie controleren of de schroef volledig vastgedraaid is.
** Antes da instalação vericar se o parafuso está completamente atarraxado.
*
*
1
**
2
3
4
* Per garantire l’impermeabilità montare le guarnizioni a corredo.
* To guarantee water tightness make sure to t the seals supplied.
* Pour garantir l’imperméabilité, monter les joints fournis à cet eet.
* Um die Abdichtung sicherzustellen, montieren Sie die mitgelieferten Dichtungen.
* Montar las juntas de la dotación para garantizar la impermeabilidad.
* Monteer de geleverde pakkingen om de waterdichtheid te waarborgen.
* Para garantir a impermeabilidade, montar as vedações fornecidas juntamente.
5
La page est en cours de chargement...

16
• Se si manifestasse il disturbo del fischio, (effetto Larsen), ridurre prima la potenza del microfono , agendo
con un cacciavite sul potenziometro corrispondente, fino ad un livello accettabile. Qualora il fenomeno persi-
sta, agire sul potenziometro dell’altoparlante in modo da eliminare l’inconveniente. Se il volume è troppo
basso, aumentare prima il volume dell’altoparlante ed eventualmente anche quello del microfono, tenendo
presente che è preferibile una trasmissione chiara e priva di disturbi, che una al limite dell’innesco (Larsen).
• In case of a whistle (Larsen effect), first reduce the microphones
power, adjusting the corresponding potenti-
ometers with a screw driver, until an acceptable level is reached. Should the whistle persist, adjust the loudspeakers
volume in order to eliminate the trouble. If the volume is too low level then, increase first the potentiometer of
the loudspeaker and secondly the one for the microphone, bearing in mind that a clear and noise free reception is
preferable than one just before whistling (Larsen).
• Lors de sifflement (effet de Larsen), reduire d’abord la puissance du micro
sur le potentiomètre corres-
pondant, à l’aide d’un tournevis, jusqu’à l’obtention d’un niveau satisfaisant. Si le sifflement persiste, régler
le potentiomètre du hautparleur
jusqu’à l’élimination de celui-ci. Si le volume est trop bas, augmenter
d’abord la puissance du haut-parleur et éventuellement celle du micro, en considérant qu’une réception
claire et sans parasite est préférable à une communication à la limite de l’accrochage (effet de Larsen).
• Beim etwaigen Auftreten eines Pfeiftones (Larsen-Effekt), zuerst die Lautstärke des Mikrophones
bis auf einen
annehmbaren Wert herabsetzen, indem man das entsprechende Potentiometer mit einem Schraubendreher ein-
stellt. Sollte die Störung weiterhin bestehen, dann das Potentiometer des Lautsprechers
bis zur Beseitigung des
Pfeiftones einstellen. Ist die Lautstärke nun zu niedrig, dann zuerst die des Lautsprechers und erst danach evtl. auch
die des Mikrophones erhohen, wobei ein deutlicher und störungsfreier Empfang einem an der Störungsgrenze lie-
gendem (Larsen-Effekt) vorzuziehen ist.
• Si se manifesta el silbido de acoplamiento, (efecto Larsen), reducir primero la potencia del micrófono
, gi-
rando con un destornillador el potenciómetro correspondiente, hasta obtener un nivel aceptable. Si el
fenómeno persistiera, regular el potenciómetro del altavoz
hasta eliminar la interferencia. Si el volumen
es demasiado bajo, aumentar primero el volumen del altavoz y eventualmente también el del micrófono,
teniendo en cuenta que es preferible una transmissión clara y limpia de interferencias, que una al limite del
acoplo (Larsen).
• Als er een fluittoon hoorbaar is (effect van Larsen): verminder eerst het vermogen van de microfoon
met behulp
van een schroevendraaier zijn stroomregelaar zo te regelen dat de geluidssterkte van het gefluit aanvaardbaar
is. Als het verschijnsel niet verdwijnt, dan moet u ook de stroomregelaar van de luidspreker bijstellen. Als de
geluidssterkte nu te klein is, verhoog dan eerst de geluidssterkte van de luidspreker en daarna eventueel ook die
van de microfoon, en denk er bij het bijstellen aan dat een duidelijk hoorbaar en ongestoord geluid beter is dan een
harder geluid op de grens van het Larsen effect.
• Se se manifestar uma interferência no som (efeito de Larsen), começar por diminuir a potência do microfone
, rodando o potenciómetro correspondente com uma chave de parafusos, até obter um nível aceitável.
Se o fenómeno persistir, regular o potenciómetro do altifalante
de modo a eliminar o problema. Se o
volume estiver demasiado baixo, começar por aumentar o volume do altifalante e depois, se necessário,
o do microfone, tendo presente que é melhor ter uma transmissão clara e sem interferências, que uma no
limiar de início de efeitos Larsen.

Audio - Kit
17
• Configurazione posto esterno
• Entrance panel configuration
• Configuration poste extérieur
• Konfiguration Türstation
• Configuración placa exterior
• Configuratie externe plaats
•
Configuração unidade externa
P T S N
P
- Possono non essere configurati.
- They do not need to be configured.
- Ils peuvent ne pas être configurés
- Brauchen nicht konfiguriert zu werden.
- Pueden no precisar configuración.
- Kunnen niet worden geconfigureerd.
- Podem não serconfigurados.
N
S
T
- Temporizzatore serratura (vedi tabella).
- Door lock timer relay (see table).
- Temporisation serrure (voir tableau).
- Zeitgeber schlossrelaiscerradura (siehe Tabelle).
- Temporizador relé cerradura (véase la tabla).
- Timer deurslotrelais (zie de tabel).
- Temporizador do relé da fechadura (veja a tabela).
– 1 2 3 4 5 6 7
4 s 1 s 2 s 3 s
*
6 s 8 s 10 s
* Funzionamento come pulsante per max. 10 sec. dopodichè entra in stand-by.
Per estendere tale funzionamento oltre i 10 sec. utilizzare l’attuatore 346210 configurato con MOD=5.
* Operation as pushbutton for 10 sec. max after which it goes in stand-by.
In order to extend this type of operation over 10 seconds, use the actuator, item 346210 configured with MOD=5.
* Fonctionnement comme bouton pendant 10 sec. max., ensuite passe en stand-by.
Pour étendre ce fonctionnement au-delà de 10 sec., utiliser l’actionneur 346210 configuré sur MOD=5.
* Die Tastenfunktion dauert max. 10 sec.; danach schaltet sie auf Standby. Um diese Funktion zu verlängern und mehr als 10 sec. dauern zu lassen, den Aktor 346210
verwenden und mit MOD=5 konfigurieren.
* Funcionamiento como pulsador durante al máx.10 s. después se pone en standby.
Para ampliar dicho funcionamiento a más de 10 s., use el actuador art. 346210 configurado con MOD = 5.
* 10 sec. lange werking als knop, vervolgens vindt de overschakeling naar stand-by plaats.
Laat deze functie langer dan 10 sec. duren met behulp van de actuator 346210 die als MOD=5 is geconfigureerd.
* Funcionamento como botão por um máximo de 10 segundos, depois disto dispõe-se em standby. Para prolongar este funcionamento por mais de 10 segundos,
utilizar o atuador 346210 configurado com MOD=5.
• Tutte le volte che si modifica la configurazione è necessario togliere e ridare l’alimentazione all’impianto, attendendo circa 1 minuto.
• Every time the configuration is altered the system must be switched off and back on again, waiting for about 1 minute.
• Chaque fois que l’on modifie la configuration, il faut retirer, puis redonner l’alimentation à l’installation, après avoir attendu environ 1 minute.
• Jedes Mal, wenn die Konfiguration geändert wird, den Strom abschalten, etwa 1 Minute warten und dann wieder einschalten.
• Cada vez que modifica la configuración, es necesario cortar y volver a dar alimentación a la instalación, después de esperar aproximadamente 1 minuto.
• Na iedere wijziging in de configuratie moet de installatie ongeveer 1 minuut van het elektriciteitsnet worden afgesloten.
• Todas as vezes que se modificar a configuração é necessário ligar e desligar a instalação da energia eléctrica, esperando cerca de 1 minuto.
La page est en cours de chargement...
La page est en cours de chargement...
La page est en cours de chargement...

Audio - Kit
21
IT EN FR DE
P
+1
MOD=9
P
+1
P
+2
MOD=9
P
+2
P
P
+1
MOD=5
P
+1
P
+1
2
3
1 32
346210
1
P
+2
MOD=5
P
+2
P
+2
2
3
1 32
346210
1
P
+3
MOD=5
P
+3
P
+3
2
3
1 32
346210
1
P
+4
MOD=5
P
+4
P
+4
2
3
1 32
346210
1
1–+ 23 4
P
+3
MOD=9
P
+3
1–+ 23 4
2
3
1 32
346210
1
Attivazione del PE (configurato
con P+1) in mo do di ret to sen za
la chia mata op pu re at tivazione
at tua to re 346200/346210 (con-
fi gu rato con P+1 e MOD=9)
Activating the EP (configured
with P+1) directly without
the call or ac ti va ting actuator
346200/346210 (con fi gured
with P+1 and MOD=9)
Activation du PE (con fi guré
avec P+1) en mode direct sans
l’appel ou activation actionneur
346200/346210 (configuré avec
P+1 et MOD=9)
Aktivierung der Türstation
(mit P+1 konfiguriert) auf
direkte Weise ohne Ruf oder
Aktivierung über den Aktivator
346200/346210 (mit P+1 und
MOD=9)
P
+1
MOD=9
P
+1
P
+2
MOD=9
P
+2
P
P
+1
MOD=5
P
+1
P
+1
2
3
1 32
346210
1
P
+2
MOD=5
P
+2
P
+2
2
3
1 32
346210
1
P
+3
MOD=5
P
+3
P
+3
2
3
1 32
346210
1
P
+4
MOD=5
P
+4
P
+4
2
3
1 32
346210
1
1–+ 23 4
1–+ 23 4
P
+3
MOD=9
P
+3
1–+ 23 4
Apertura serratura del PE (con fi-
gurato con P+1) in mo do di retto
senza la chia mata op pu re at ti va-
zione attuatore 346200/346210
(con figurato con P+1 e MOD=5)
op pu re at ti va zione attuatore
346230 (con figurato con P+1)
Door lock opening of EP
(con figured with P+2) directly
without the call or activating
the actuator 346200 (con figured
with P+1 and MOD=5) or
activating the actuator 346230
(configured with P+1)
Ouverture serrure du PE (con fi-
gu ré avec P+2) en mode di rect
sans l’appel ou ac ti vation ac-
tion neur 346200 (con fi gu ré avec
P+1 et MOD=5) ou ac ti va tion
ac tion neur 346230 (con fi gu ré
avec P+1)
Türöffnung der Türstation
(mit P+1 konfiguriert) oder
Aktivierung über den Aktivator
346200/346210 (mit P+1 und
MOD=5) oder Aktivierung über
den Aktivator 346230 (mit P+1
konfiguriert)
P
+1
MOD=9
P
+1
P
+2
MOD=9
P
+2
P
P
+1
MOD=5
P
+1
P
+1
2
3
1 32
346210
1
P
+2
MOD=5
P
+2
P
+2
2
3
1 32
346210
1
P
+3
MOD=5
P
+3
P
+3
2
3
1 32
346210
1
P
+4
MOD=5
P
+4
P
+4
2
3
1 32
346210
1
1–+ 23 4
1–+ 23 4
P
+3
MOD=9
P
+3
1–+ 23 4
Apertura serratura del PE (con fi-
gurato con P+2) in mo do di retto
senza la chia mata op pu re at ti va-
zione attuator 346200/346210
(con figurato con P+2 e MOD=5)
op pu re at ti va zione attuatore
346230 (con figurato con P+2)
Door lock opening of EP
(con figured with P+2) directly
without the call or activating
the actuator 346200 (con figured
with P+2 and MOD=5) or
activating the actuator 346230
(configured with P+2)
Ouverture serrure du PE
(con fi gu ré avec P+2) en mode
di rect sans l’appel ou ac ti vation
ac tion neur 346200 (con fi gu ré
avec P+2 et MOD=5) ou
ac ti va tion ac tion neur 346230
(con fi gu ré avec P+2)
Türöffnung der Türstation
(mit P+2 konfiguriert) oder
Aktivierung über den Aktivator
346200/346210 (mit P+2 und
MOD=5) oder Aktivierung über
den Aktivator 346230 (mit P+2
konfiguriert)
P
+1
MOD=9
P
+1
P
+2
MOD=9
P
+2
P
P
+1
MOD=5
P
+1
P
+1
2
3
1 32
346210
1
P
+2
MOD=5
P
+2
P
+2
2
3
1 32
346210
1
P
+3
MOD=5
P
+3
P
+3
2
3
1 32
346210
1
P
+4
MOD=5
P
+4
P
+4
2
3
1 32
346210
1
1–+ 23 4
1–+ 23 4
P
+3
MOD=9
P
+3
1–+ 23 4
Apertura serratura del PE (con fi-
gurato con P+3) in mo do di retto
senza la chia mata op pu re at ti va-
zione attuatore 346200/346210
(con figurato con P+3 e MOD=5)
op pu re at ti va zione attuatore
346230 (con figurato con P+3)
Door lock opening of EP
(con figured with P+3) directly
without the call or activating the
actuator 346200/346210 (con-
figured with P+3 and MOD=5)
or activating the actuator
346230 (configured with P+3)
Ouverture serrure du PE
(con fi gu ré avec P+3) en mode
di rect sans l’appel ou ac ti vation
ac tion neur 346200/346210
(con fi gu ré avec P+3 et MOD=5)
ou ac ti va tion ac tion neur 346230
(con fi gu ré avec P+3)
Türöffnung der Türstation
(mit P+3 konfiguriert) oder
Aktivierung über den Aktivator
346200/346210 (mit P+3 und
MOD=5) oder Aktivierung über
den Aktivator 346230 (mit P+3
konfiguriert)
P
+1
MOD=9
P
+1
P
+2
MOD=9
P
+2
P
P
+1
MOD=5
P
+1
P
+1
2
3
1 32
346210
1
P
+2
MOD=5
P
+2
P
+2
2
3
1 32
346210
1
P
+3
MOD=5
P
+3
P
+3
2
3
1 32
346210
1
P
+4
MOD=5
P
+4
P
+4
2
3
1 32
346210
1
1–+ 23 4
1–+ 23 4
P
+3
MOD=9
P
+3
1–+ 23 4
Apertura serratura del PE (con fi-
gurato con P+4) in mo do di retto
senza la chia mata op pu re at ti va-
zione attuatore 346200/346210
(con figurato con P+4 e MOD=5)
op pu re at ti va zione attuatore
346230 (con figurato con P+4)
Door lock opening of EP
(con figured with P+4) directly
without the call or activating the
actuator 346200/346210 (con-
figured with P+4 and MOD=5)
or activating the actuator
346230 (configured with P+4)
Ouverture serrure du PE
(con fi gu ré avec P+4) en mode
di rect sans l’appel ou ac ti vation
ac tion neur 346200/346210
(con fi gu ré avec P+4 et MOD=5)
ou ac ti va tion ac tion neur
346230 (con fi gu ré avec P+4)
Türöffnung der Türstation
(mit P+4 konfiguriert) oder
Aktivierung über den Aktivator
346200/346210 (mit P+4 und
MOD=5) oder Aktivierung über
den Aktivator 346230 (mit P+4
konfiguriert)
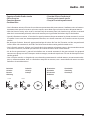
N=1
Intercom tra appartamenti
in impianti con interfaccia da
appartamento 346850
Intercommunicability between
apartments in systems with
apartment interface 346850
Intercommunication entre
appartements sur installations
avec interface d’appartement
346850
Gegenseitige Kommunikation
zwischen Wohnungen
für Anlagen mit
ohnungsschnittstelle 346850
Intercom all’interno dell’ap-
partamento in impianti con
interfaccia di appartamento
346850; oppure intercom tra
appartamenti in impianti senza
interfaccia di appartamento
Intercommunicability inside
an apartment in systems with
apartment interface 346850 or
intercommunicability between
apartments in systems without
apartment interface
Intercommunication à
l’intérieur de l’appartement
sur installations avec interface
d’appartement 346850 ou
intercommunication entre
appartements sur installations
sans interface d’appartement
Gegenseitige Kommunikation
innerhalb der Wohnung für
Anlagen mit Wohnungsschnitt-
stelle 346850 oder gegensei-
tige Kommunikation zwischen
Wohnungen für Anlagen ohne
Wohnungsschnittstelle
La page est en cours de chargement...

Audio - Kit
23
IT EN FR DE ES NL PT
Intercom su se
stesso, invia la
chiamata a tutti
gli apparecchi
con uguale
indirizzo
Intercom on itself,
sends the call to
all the devices
with the same
address
Intercom sur
lui-même, envoie
l’appel à tous les
appareils ayant
une adresse
identique
Intercom mit ein-
seitiger Funktion:
sendet den Ruf
an alle Geräte
mit derselben
Adresse
Intercomunica-
ción hacia los
aparatos iguales,
envía la llamada
a todos los
aparatos con
igual dirección
Intercom op
zichzelf, verstuurt
de oproep naar
alle toestellen met
hetzelfde adres
Intercomunicador
sobre si mesmo,
envia a chamada
a todos os
aparelhos com
endereço igual
Intercom gene-
rale, invia una
chiamata a tutti
gli apparecchi
dell’impianto
General intercom,
sends a call to all
the system devices
Intercom général,
envoie l’appel à
tous les appareils
de l’installation
Intercom mit
allgemeiner
Funktion: sendet
den Ruf an alle
Geräte der Anlage
Intercomuni-
cación general,
envía una
llamada a todos
los aparatos de la
instalación
Algemene Inter-
com, verstuurt
een oproep naar
alle toestellen van
de installatie
Intercomunicador
geral, envia uma
chamada a todos
os aparelhos da
instalação
N=1N=1-99
Intercom a tutti
i posti interni
configurati N=1
Intercom to all
handsets cong-
ured with N=1
Intercom à tous
les postes inter-
nes congurés
N=1.
Gegenspre-
chfunktion an
allen mit N=1
kongurierten
Hausstationen
Intercomuni-
cación a todos
los aparatos
configurados con
N=1
Intercom op alle
binnenposten
geconfigureerd
met N=1
Intercom a todas
as unidades
internas configu-
radas N=1
La page est en cours de chargement...

Audio - Kit
25
• Con la funzione attivata, all’arrivo di una chiamata proveniente dal posto esterno, il citofono suona ed automa-
ticamente viene aperta la serratura ad esso associata, senza dover agire sul tasto serratura del posto interno.
• With the function active, when a call is received from the entrance panel, the handset rings and the associated
door lock is automatically released, without the need for pressing the door lock release key on the handset.
• Quand la fonction est active, à l’arrivée d’un appel provenant du poste externe, le phone sonne et la serrure
à laquelle il est associé est automatiquement ouverte, sans devoir intervenir sur la touche serrure du poste
interne.
• Bei aktivierter Funktion, läutet die gegensprechanlage bei einem Ruf von der Türstation und das entsprechende
Schloss öffnet sich automatisch, ohne dass die Schlosstaste der Hausstation gedrückt werden muss.
• Con la función activada, al llegar una llamada de la placa exterior, el portero suena y abre automáticamente
la cerradura asociada, sin tener que intervenir en la tecla cerradura de la unidad interior.
• Als de functie geactiveerd is, gaat de huistelefoon over en wordt automatisch het geassocieerde slot geopend
wanneer een oproep van een buitenpost wordt ontvangen, zonder dat op de toets slot van de binnenpost moet
worden gedrukt.
• Com a função ativada, na chegada de uma chamada proveniente da unidade externa, o intercomunicador-
toca e, automaticamente, abre-se a fechadura acoplada ao mesmo, sem a necessidade de intervir na tecla
fechadura da unidade interna.
• Funzione Studio Professionale
• Office function
• Fonction Bureau
• Funktion Büro
• Función Oficina Profesional
• Functie professionele studio
• Função Escritório profissional
10 sec.
BIP
10 sec.
BIP
Led OFF Led OFF
Led OFF
• Attivazione
• Activation
• Acivation
• Aktivierung
• Activación
• Activering
• Activação
• Disattivazione
• Deactivation
• Désactivation
• Deaktivieren
• Desactivación
• Deactivering
• Desactivação
10 sec.
BIP
10 sec.
BIP
Led OFF Led OFF
Led OFF
La page est en cours de chargement...
La page est en cours de chargement...

28
• Selezione suoneria
• Bell selection
• Sélection sonnerie
• Läutwerk wählen
• Selección del timbre
• Beltoon kiezen
• Selecção toques
OK
RESET
1
16
2
3
4
1
2
• Selezione suoneria da posto esterno principale (S=0).
• Selection call from main outdoor station (S=0) bell.
• Sélection sonnerie appel d’un poste extérieur principal (S=0).
• Änderung Rufton der Haupttürstation (S=0).
• Selección timbre llamada desde el puesto exterior principal (S=0).
• Kies belgeluid oproep vanuit eerste externe post (S=0).
• Selecção do toque para chamada da unidade externa principal (S=0).
• Selezione suoneria da posto esterno secondario (S=1).
• Bell selection from the secondary entrance panel (S =1)
• Sélection sonnerie depuis poste externe secondaire (S=1)
• Läutwerk Nebentürstation (S=1) wählen
• Selección de un timbre desde una placa exterior secundaria (S=1).
• Keuze beltoon vanaf secundaire buitenpost (S=1).
• Selecionar a campainha a partir de unidade externa secundária (S = 1).
RESET
OK
1
16
2
3
4
1
2
La page est en cours de chargement...

30
· Comando luci scale
· Staircase light control
· Commande lumières escaliers
· Treppenlichtsteuerung
· Mando luces escaleras
· Bediening lichten trapzaal
· Comando das luzes da escada
* • Il secondo posto interno ed il configuratore 3501/1 devono essere acquistati separatemente.
• The second internal unit and the 3501/1 configurator must be purchased separately.
• Le deuxième poste interne et le configurateur 3501/1 doivent être achetés séparément.
• Die zweite Hausstation und der Konfigurator 3501/1 werden getrennt verkauft.
• La segunda unidad interior y el configurador 3501/1 se han de comprar por separado.
• De tweede binnenpost en de configurator 3501/1 moeten apart worden gekocht.
• A segunda unidade interna e o configurador 3501/1 devem ser adquiridos separadamente.
346210
MODP
N
BUS
MODP
N
BUS
1
2
3
1 32
346210
1
C
NO
NC
230V
2A
cos =0,5
6A
M
230 Vac
346040
PRI 110 - 240 V 50 - 60 Hz 370 mA - 225 mA
BUS 26.0 V 600 mA BUS
PRI
PRI
BUS
T SN
P
BUS
PL S+
S-
A
*
*
La page est en cours de chargement...

32
Leggere attentamente prima dell’uso e conservare per un riferimento futuro
Divieto di toccare le unità con le mani bagnate
Divieto di utilizzo di pulitori liquidi o aerosol
Divieto di occludere le aperture di ventilazione
Diveto di modicare i dispositivi
Divieto di rimuovere parti di protezione dai dispositivi
Divieto di installare le unità in prossimità di liquidi e polveri
Divieto di installare le unità in prossimità di fonti di calore
Divieto di installare le unità in prossimità di gas nocivi, polveri metalliche o simili
Divieto di ssaggio delle unità su superci non adatte
Pericolo di shock elettrico
Rischio caduta dei dispositivi a causa di cedimento della supercie su cui
sono installati o installazione inappropriata
Togliere l’alimentazione prima di ogni intervento sull’impianto
Attenzione: le operazioni di installazione, congurazione, messa in servizio e
manutenzione devono essere eettuate esclusivamente da personale quali-
cato. Assicurarsi che l’installazione a parete sia eettuata correttamente
Eettuare la posa dei cavi rispettando le normative vigenti
Collegare i cavi di alimentazione secondo le indicazioni
Per eventuali espansioni di impianto utilizzare solo gli articoli indicati
nelle speciche tecniche
Read carefully before use and keep for future reference
Touching the units with wet hands is forbidden
Using liquid cleaners or aerosols is forbidden
Blocking the ventilation openings is forbidden
Modifying the devices is forbidden
Removing protective parts from the devices is forbidden
Installing the units near liquids and powders is forbidden
Installing the units near heat sources is forbidden
Installing the units near harmful gases, metal dusts or similar is forbidden
Fastening the units on unsuitable surfaces is forbidden
Danger of electrical shock
Risk of devices falling because the surface on which they are installed
collapses or inappropriate installation
Switch the power supply OFF before any work on the system
Caution: Installation, conguration, starting-up and maintenance must
be performed exclusively by qualied personnel.
Check that the wall installation has been carried out correctly
Lay out the wires respecting the standards in force
Connect the power supply wires as indicated
Use only the items indicated in the technical specications for any
system expansions
Lire attentivement avant toute utilisation et installation de nos produits
et conserver pour toute consultation en cas de besoin.
Interdiction de toucher les unités avec les mains mouillées.
Interdiction d’utiliser des produits de nettoyage liquides ou des aérosols.
Interdiction de boucher les ouvertures de ventilation.
Interdiction de modier les dispositifs.
Interdiction des retirer les parties de protection des dispositifs.
Interdiction d’installer les unités à proximité de liquides et poudres/
poussières.
Interdiction d’installer les unités à proximité de sources de chaleur.
Interdiction d’installer les unités à proximité de gaz nocifs, de poudres
métalliques ou autres matières semblables.
Interdiction de xer les unités sur des surfaces non appropriées.
Risque d’électrocution
Risque de chute des dispositifs en cas de rupture de la surface sur
laquelle ils sont installés ou mauvaise installation.
Couper l’alimentation avant toute intervention sur l’installation.
Attention: les opérations d’installation, de conguration, de mise en
service et d’entretien doivent être conées à un personnel qualié.
S’assurer que l’installation murale est correctement eectuée.
Eectuer la pose des câbles dans le respect des normes en vigueur.
Brancher les câbles d’alimentation dans le respect des indications fournies.
Pour les éventuelles extensions de l’installation, utiliser uniquement les
articles indiqués dans les caractéristiques techniques.
Vor Gebrauch, die Hinweise aufmerksam durchlesen und sorgfältig auf-
bewahren, um sie auch in Zukunft nachschlagen zu können.
Verbot, die Einheiten mit nassen Händen zu berühren
Verbot, Flüssigreiniger oder Aerosol zu benutzen
Verbot, die Belüftungsschlitze abzudecken
Verbot, die Vorrichtungen zu ändern
Verbot, die Schutzbleche von den Vorrichtungen abzunehmen
Verbot, die Einheit in der Nähe von Flüssigkeiten und Staub zu in-
stallieren
Verbot, die Einheit in der Nähe von Wärmequellen zu installieren
Verbot, die Einheit in der Nähe von giftigem Gas, Metallstaub o. ä. zu in-
stallieren
Verbot, die Einheit an ungeeignete Flächen zu befestigen
Stromschlaggefahr
Risiko des Herabfallens der Vorrichtungen durch Nachlassen der Aua-
geäche oder wegen falscher Installation
Die Stromversorgung abtrennen, bevor an der Anlage gearbeitet wird.
Achtung: die Installation, Konguration, Inbetriebnahme und Wartung
dürfen nur von qualizierten Fachleuten vorgenommen werden.
Sicherstellen, dass die Wandmontage richtig vorgenommen wird
Die Kabeln gemäß geltenden Normen verlegen
Die Stromkabeln gemäß Anweisungen anschließen
Bei eventuellen Anlagenerweiterungen ausschließlich die Artikel
verwenden, die in den technischen Spezikationen angegeben sind
• Avvertenze e diritti del consumatore
• Warnings and consumer rights
• Avertissements et droits du consommateur
• Hinweise und Rechte der Verbraucher
• Advertencias y derechos del consumidor
• Waarschuwingen en rechten van de consument
• Advertências e direitos do consumidor
La page est en cours de chargement...
La page est en cours de chargement...
La page est en cours de chargement...
La page est en cours de chargement...
-
 1
1
-
 2
2
-
 3
3
-
 4
4
-
 5
5
-
 6
6
-
 7
7
-
 8
8
-
 9
9
-
 10
10
-
 11
11
-
 12
12
-
 13
13
-
 14
14
-
 15
15
-
 16
16
-
 17
17
-
 18
18
-
 19
19
-
 20
20
-
 21
21
-
 22
22
-
 23
23
-
 24
24
-
 25
25
-
 26
26
-
 27
27
-
 28
28
-
 29
29
-
 30
30
-
 31
31
-
 32
32
-
 33
33
-
 34
34
-
 35
35
-
 36
36


Bticino 361311 Mode d'emploi
- Catégorie
- Haut-parleurs de la barre de son
- Taper
- Mode d'emploi
dans d''autres langues
- italiano: Bticino 361311 Istruzioni per l'uso
- English: Bticino 361311 Operating instructions
- español: Bticino 361311 Instrucciones de operación
- Deutsch: Bticino 361311 Bedienungsanleitung
- Nederlands: Bticino 361311 Handleiding
- português: Bticino 361311 Instruções de operação