Thermador Professional Series Mode d'emploi
- Catégorie
- Hottes
- Taper
- Mode d'emploi

THERMADOR.COM
Use and care
GUIDE
Professional Series Hoods

THERMADOR.COM
Use and care
GUIDE
Table of contents (English) ......................................................... 2
Table de matières (Français) ..................................................... 16
Models |
Modèles :
PH30HWS
PH36HWS
PH48HWS
PH36GWS
PH42GWS
PH48GWS
PH54GWS
PH60GWS
VCIN36WS
VCIN42WS
VCIN48WS
VCIN54WS
VCIN60WS
HPCN36WS
HPCN48WS
HPIN42WS
HPIN54WS
Professional Series Hoods

2
This Thermador® appliance is made by
BSH Home Appliances Corporation
1901 Main Street, Suite 600
Irvine, CA 92614
Questions?
1-800-735-4328
www.thermador.com or www.thermador.ca
We look forward to hearing from you!
Table of contents
Safety ........................................................................... 3
Important safety instructions ...................................... 3
Introduction ................................................................... 5
Before you begin ........................................................ 5
Operating the appliance .............................................. 5
Overview ...................................................................... 5
Touch control panel ................................................... 7
Operating the hood ................................................... 8
Home ConnectTM .......................................................... 8
Setup ............................................................................ 8
Care and cleaning ....................................................... 10
Filter and grease tray cleaning ................................ 10
Hood surface cleaning ................................................ 11
Heat lamps (PHxxGWS only) ..................................... 11
Service ........................................................................... 12
Troubleshooting .......................................................... 12
How to obtain service or parts ................................. 13
Product data rating plate .......................................... 13
Service information ..................................................... 13
Product registration .................................................... 13
Statement of limited product warranty ...................... 14
Support, accessories, and parts ...................... back page

3
⚠ IMPORTANT SAFETY INSTRUCTIONS
READ AND SAVE THESE INSTRUCTIONS
This Use and Care Guide explains the basics of operating
your appliance and those safety measures that must be
followed. For complete and safe installation information,
refer to the Installation Instructions included with the
appliance.
All product manuals may be downloaded online at
www.thermador.com/us/support/owner-manuals or
www.thermador.ca/en/support/owner-manuals.
INSTALLER: Please leave these instructions with this unit
for the owner.
OWNER: Please retain these instructions for future
reference. Read all safety instructions before operating
the appliance. Have the installer show you where the
electric circuit breaker and the gas supply shut-off valve
are located so you know how and where to turn off the
gas and electricity to the appliance.
Safety definitions
⚠ WARNING: This indicates that death or serious injuries
may occur as a result of non-observance of this warning.
⚠ CAUTION: This indicates that minor or moderate
injuries may occur as a result of non-observance of this
warning.
NOTICE: This indicates that damage to the appliance or
property may occur as a result of non-compliance with this
advisory.
Note: This alerts you to important information and/or tips.
WARNING
To reduce the risk of fire, electric shock, or injury to
persons, observe the following:
• Use this unit only in the manner intended by the
manufacturer. If you have questions, contact the
manufacturer (800-735-4328).
• Before servicing or cleaning the unit, switch power off
at service panel and lock service panel. This will
prevent power from being switched on accidentally.
When the service panel cannot be locked, securely
fasten a prominent warning device, such as a tag to
the service panel.
WARNING
For general ventilating use only. To avoid a fire or
explosion hazard, DO NOT use to exhaust hazardous or
explosive materials or vapor.
WARNING
TO REDUCE THE RISK OF A GREASE FIRE
a) Never leave surface units unattended at high settings.
Boilovers cause smoking and greasy spillovers that
may ignite. Heat oils slowly on low or medium
settings.
b) Always turn hood ON when cooking at high heat or
when flambéing food (i.e. Crepes Suzette, cherries
jubilee, peppercorn beef flambé).
c) Clean the appliance frequently. Grease should not be
allowed to accumulate on the appliance.
d) Use proper pan size. Always use cookware
appropriate for the size of the surface element or gas
burner.
WARNING: If the information in this
manual is not followed exactly, a fire
or explosion may result causing
property damage, personal injury or
death.
— DO NOT store or use gasoline or other
flammable vapors and liquids in the
vicinity of this or any other appliance.
— WHAT TO DO IF YOU SMELL GAS
• DO NOT try to light any appliance.
• DO NOT touch any electrical switch.
• DO NOT use any phone in your
building.
• Immediately call your gas supplier
from a neighbor’s phone. Follow the
gas supplier’s instructions.
• If you cannot reach your gas supplier,
call the fire department.
— Installation and service must be
performed by a qualified installer,
service agency or the gas supplier.

4
⚠ IMPORTANT SAFETY INSTRUCTIONS
READ AND SAVE THESE INSTRUCTIONS
WARNING
Repairs should only be done by a trained servicer.
Improper repair of your appliance may result in risk of
severe physical injury or death.
CAUTION
Items of interest to children should not be stored in an
appliance or in cabinets above an appliance. Children
climbing on an appliance to reach items could be seriously
injured.
CAUTION
Grease left on filters can re-melt and move into the vent.
Clean ventilating fans frequently. Grease should not be
allowed to accumulate on fan, filters, or exhaust ducts.
• This appliance must be properly installed and
grounded by a qualified technician. Connect only to
properly grounded supply. Refer to installation
instructions for details.
• Have the installer show you the location of the circuit
breaker or fuse. Mark it for easy reference.
• This appliance is intended for normal family household
use only. It is not approved for outdoor use. Use of
this product in a commercial setting or if installed
outdoors is not covered by the warranty. If you have
any questions, contact the manufacturer.
•DO NOT store or use corrosive chemicals, vapors,
flammables, or nonfood products in or near this
appliance. It is specifically designed for use when
heating or cooking food. The use of corrosive
chemicals in heating or cleaning will damage the
appliance and could result in injury.
•DO NOT operate this appliance if it is not working
properly or if it has been damaged. Contact an
authorized servicer.
•DO NOT repair or replace any part of the appliance
unless specifically recommended in this manual.
• For safety reasons and to avoid potential equipment
damage, do not hang cookware, fabrics, or other
articles from any part of the appliance.
• Have an appropriate fire extinguisher available,
nearby, highly visible and easily accessible near the
cooking appliance.
• Always have a working smoke detector near the
kitchen.
• Smother flames from food fires, other than grease
fires, with baking soda. Never use water on cooking
fires.
• Whenever possible, do not operate the ventilation
system during a cooktop fire. However, do not reach
through fire to turn it off.
• If your garments or hair catch fire, fall to the ground
immediately and roll to extinguish the flames.
• Examine the appliance after unpacking it. In the event
of transport damage, do not plug it in.
• When children become old enough to use the
appliance, it is the responsibility of the parents or
guardian to ensure that they are instructed in safe
practices by qualified persons.
•DO NOT allow anyone to climb, stand, lean, sit, or
hang on any part of an appliance. This can damage
the appliance and the unit may tip over, potentially
causing severe injury.
•DO NOT allow children to use this appliance unless
closely supervised by an adult. Children and pets
should not be left alone or unattended in the area
where the appliance is in use. They should never be
allowed to play in its vicinity, whether or not the
appliance is in use.
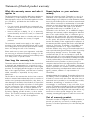
PROPOSITION 65 WARNING
This product may contain a chemical known to the State of
California, which can cause cancer or reproductive harm.
Therefore, the packaging of your product may bear the
following label as required by California:
State of California Proposition 65 Warning:
⚠ WARNING
Cancer and Reproductive Harm -
www.P65Warnings.ca.gov

5
Introduction
Before you begin
⚠ WARNING
To avoid risk of burn, turn the hood ON when cooking at
high heat or when flambéing food.
DO NOT use all heating elements or gas burners
simultaneously at high settings for a prolonged period
(max.15 minutes).
If the hood is located over a gas cooktop, operate the
hood at maximum setting whenever three or more gas
burners are being used.
DO NOT operate the ventilation system during a cooktop
fire.
Before using your appliance, be sure to read this manual.
Pay special attention to the Important Safety Instructions
located at the beginning of the manual.
All hoods require the choice of a remote, in-line, or
integral blower. Use only Thermador® blowers with
Thermador ventilation hoods. All blower models are sold
separately. See the Ventilation Planning Guide for
recommended blowers. Contact Customer Service for
additional options.
All hood models are rated for 120 VAC, using a 15 or 20
amp circuit breaker; see the Installation Instructions for
more details.
When connected to a GFCI-protected supply, the Pro
Hoods are suitable for use in damp locations that are
protected from outside weather conditions and not
subject to saturation with water and other liquids, but can
be subject to moderate degrees of moisture. Refer to
local codes, NEC/CEC, and or the Authority Having
Jurisdiction (AHJ) for additional information.
Operating the appliance
Overview
NOTE: The Use and Care Guide applies to several
versions of this appliance. Accordingly, you may find
descriptions of individual features that do not apply to
your specific appliance.
IMPORTANT: DO NOT use cooktop, rangetop, or range
while hood is disassembled.
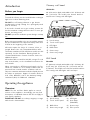
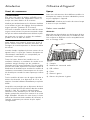
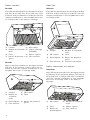
Chimney wall hood
HPCNxxWx
24'' (610 mm) in depth, with widths of 36'' (914 mm) and
48'' (1,219 mm). This model series features brushed
stainless-steel canopy with LED lights.
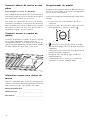
Wall hood
PHxxGWx
27'' (686 mm) in depth, with widths of 36'' (914 mm), 42''
(1,067 mm), 48'' (1,219 mm), 54'' (1,372 mm) and 60"
(1,524 mm). This model series features brushed stainless-
steel canopy with LED lights and heat lamps.
(1) Hood canopy
(2) Touch control panel
(3) LED lights
(4) Baffle filters
(5) Grease trays
(6) Grease tray trough
(1)Hood canopy (2)LED lights
(3) Touch control panel (4) Heat lamps
(PHxxGWS)
(5) Baffle filters (6) Grease trays
(7) Grease tray trough (8) Filter spacers
2
3
4
5
6
1
2
3
4
5
7
8
6
1

6
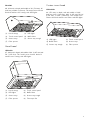
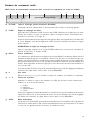
PHxxHWx
24'' (610 mm) in depth, with widths of 30'' (762 mm), 36''
(914 mm), and 48'' (1,219 mm). This model series features
brushed stainless-steel canopy with LED lights.
Island hood
HPINxxWx
27'' (686 mm) in depth, with widths of 42'' (1,067 mm) and
54'' (1,372 mm). This model series features brushed
stainless-steel canopy with LED lights.
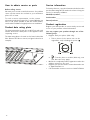
Custom insert hood
VCINxxGWx
22'' (559 mm) in depth, and with widths of 32¼''
(820 mm), 39¾'' (1,010 mm), 44¼'' (1,125 mm), 50-3/8 ''
(1,281 mm), or 56¼'' (1,429 mm). This model series
features brushed stainless-steel filters and LED lights.
(1)Hood canopy (2)LED lights
(3) Touch control panel (4) Baffle filters
(5) Grease trays (6) Grease tray trough
(7) Filter spacers
(1) Hood canopy (2) Touch control panel
(3) LED lights (4) Baffle filters
(5) Grease trays (6) Grease tray trough
(7) Filter spacers (8) Telescopic flue
2
3
4
5
7
6
1
2
3
4
5
6
7
8
1
(1) LED lights (2) Touch control panel
(3) Baffle filters (4) Grease trays
(5) Grease tray trough (6) Filter spacers
2
3
4
5
6
1

7
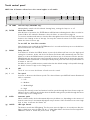
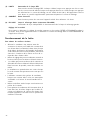
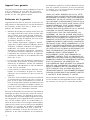
Touch control panel
NOTE: Not all features referred to in this manual applies to all models.
(a) LH LAMP Left heat lamp (PHxxGWS only)
Independently controls the left infrared heating lamp, turning the lamp on or off.
(b) FILTER Clean filter reminder
After 40 hours of operation, the FILTER button will illuminate indicating that the filters need to be
cleaned. When this indicator illuminates clean the filters as instructed on page 10 .
To receive a reminder notification to clean the filters through the Home Connect™ app, activate the
feature in the Settings section of the app. You may also review the status of the filter saturation
within the Home Connect app.
To turn OFF the clean filter reminder:
After cleaning, press and hold the FILTER button for 3 seconds until it beeps to reset the 40-hour
period and to turn the reminder off.
(c) DELAY Delay shut off
If the blower is off when the DELAY button is pressed, the blower will turn on to the high speed
setting for 10 minutes. At the end of the 10 minutes the blower will automatically turn off. If the
blower is on when the DELAY button is pressed, the blower runs for 10 minutes from the time the
DELAY button was pressed at the current speed then turns off. During the 10 minute timed period,
the DELAY button is illuminated. To interrupt a timed period, press one of the fan speed buttons or
0 button to turn off.
An ability to choose a different time period other than the default setting is also possible through
the Home Connect™ app in the settings menu.
(d) 0 OFF
Touch ‘0’ once to turn the blower off and reset the control.
(e) 1 – 4 Fan speed
Increases or decreases the blower speeds. The chosen blower speed LED will remain illuminated
while in operation.
1 – Low
2 – Medium
3 – Medium/High
4 – High
You may also remotely control and monitor hood fan speeds through the Home Connect app. An
ability to choose a different speed other than the default setting is also possible through the Home
Connect app in the settings menu.
(f) AUTO Automatic mode
When in AUTO mode, the hood automatically turns the blower on, depending on the amount of
heat the control senses. It automatically adjusts every 5 minutes. If the control does not sense a high
level of heat, it will turn the blower off.
(g) LIGHTS LED Light Control
This button controls the LED lighting. The first press turns the lights on. A second press dims the
lights. A third press turns the lights off. An 0 –100% light slider in the Home Connect app allows
additional control to obtain the perfect level of light.
L H LAMP FILTER DELAY
01234
AUTO LIGHTS CONNECT R H LAMP
abcdefghi

8
Operating the hood
For better results
• The blower should be turned on for about 5 minutes
before cooking in order to establish air currents
upward through the hood. Thus when heat, smoke,
moisture, grease and cooking odors are produced,
they will be carried outside instead of drifting into
other rooms.
• Use the lower speeds for normal use and the higher
speeds for strong odors or fumes.
• Drafts across the range or cooktop will reduce the
effectiveness of the hood. Such drafts should be
prevented when possible.
• The best job of ventilation in the kitchen is done
where the only air currents are those created by the
blower itself.
• Regular use of the fan system while cooking helps
keep the kitchen comfortable and less humid.
• Use a rear burner when browning or pan frying meat.
• For optimal performance, the width of the hood
should equal that of the cooktop or rangetop or
exceed it by 3 inches on either side. Install these
hoods only with Thermador blowers.
Home Connect™
With Home Connect™, the appliance is Wi-Fi capable and
can be remotely controlled using a mobile device (e.g.
tablet or smartphone). The Home Connect app offers
additional functions which are a perfect complement to
the networked appliance.
Home Connect does not work over Wi-Fi networks that
require browser registration, i.e. a user name and
password entered via a web browser.
You should have a stable wireless network with good
reception and access to the internet.
If the appliance is not connected to the WLAN network
(home network), it functions in the same way as a typical
appliance with no network connection and can be
operated as usual.
NOTE: Please ensure that you follow the safety
instructions given at the beginning of this instruction
manual and that these are also observed when operating
the appliance via the Home Connect app and when away
from home. Please also follow the instructions in the
Home Connect app.
NOTE: Operation on the appliance itself always takes
priority, and during this time it is not possible to operate
the appliance using the Home Connect app.
Setup
To implement settings via Home Connect™, you must
have installed the Home Connect app on a mobile device
(e.g. tablet or smartphone). Please observe the supplied
Home Connect documents that came with your appliance
with regard to this feature.
Follow the steps specified by the app to implement the
settings.
What do you need to connect your appliance to Home
Connect™?
1. Your appliance must be installed properly.
2. A smartphone or tablet equipped with the latest
version of iOS or Android operating system.
3. Your home appliance within the Wi-Fi signal of your
home network.
4. The name of your Wi-Fi network (SSID) and its
password (key).
IMPORTANT INFORMATION ABOUT DATA SECURITY:
The transfer of data is always encrypted. Home Connect
meets the highest security standards, which are
continuously reviewed. For further information visit
www.home-connect.com.
Information:
We are constantly working to improve the Home
Connect app, which may lead to differences in the
setup steps. Please rely on the instructions in the
latest version of the Home Connect app to guide you
through the setup process.
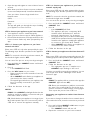
STEP 1: Download the Home Connect app and create a
user account
1. Open the App Store (Apple® devices) or Google
Play™ store (Android™ devices) on your smartphone
or tablet.
2. Search for the HOME CONNECT app in the store's
search and install it.
(h) CONNECT Home Connect™
This function allows the user to connect the hood with a mobile device.
(i) RH LAMP Right heat lamp (PHxxGWS only)
Independently controls the right infrared heating lamp, turning the light on or off.
Control tone
To turn the control tone off or on, hold the FILTER and LIGHTS button for 3 seconds. The control tone may also be
turned off or on through the settings section of the Home Connect app.

9
3. Open the app and register to create a Home Connect
account.
4. Write down your Home Connect account credentials
(user account and password). You will need them later.
Save your Home Connect login details here:
Network name
(SSID):............................................................................
Password
(Key):..............................................................................
The app will guide you through the steps of adding
your appliance to Home Connect.
STEP 2: Connect your appliance to your home network
1. Your appliance must be installed properly.
2. Open your Home Connect app to add an appliance.
3. Please follow the directions in the app and refer to the
Home Connect Guide only when prompted by the
app.
STEP 2.1: Connect your appliance to your home
network with WPS
Please enter STEP 2.1 only when prompted by the app.
The following steps describe operations at the appliance
itself.
NOTE: To connect the hood to your home network, the
hood and the lights must be OFF.
You can cancel the process at any time by pressing 0.
1. Press and hold the CONNECT button until 0 and
CONNECT flash.
2. Press 1.
-- 1 and CONNECT will flash.
3. Press the WPS button on your router.
-- Please consult your router's manual to locate the
WPS button.
-- When CONNECT and 3 flashes your appliance is
connected to the home network.
-- The app will get notified once your appliance has
been successfully connected to your Wi-Fi
network.
4. Follow the directions in the app.
NOTICE:
ERROR: If the CONNECT and 2 light flashes then the
appliance could not establish a connection with your
home Wi-Fi within 2 minutes.
FIX: Check whether your appliance is in range of your
Wi-Fi and repeat the process. If unsuccessful, refer to
STEP 2.2 to connect the appliance manually.
STEP 2.2: Connect your appliance to your home
network step-by-step
Please enter STEP 2.2 only when prompted by the app.
The following steps describe operations at the appliance
itself.
NOTE: To connect the hood to your home network, the
hood and the light must be OFF.
You can cancel the process at any time by pressing 0.
1. Press and hold the CONNECT button until 0 and
CONNECT flash.
2. Press 2.
-- 2 and CONNECT will flash.
-- The appliance will open a temporary Wi-Fi
network called “HomeConnect” with the
password “HomeConnect” for 2 minutes.
-- The app provides your home Wi-Fi network name
(SSID) and its password via this temporary Wi-Fi
network to the appliance enabling the appliance
to connect to your home Wi-Fi network.
-- When CONNECT and 3 flashes your appliance is
connected to the home network.
3. Follow the directions in the app.
STEP 3: Connect your appliance to the Home Connect™
app
Please enter STEP 3 only when prompted by the app. The
following steps describe operations at the appliance itself.
1. Press and hold the CONNECT button until 0 and
CONNECT flash.
2. Follow the directions in the app.
-- The registration process is complete once
CONNECT stops flashing on the hood.
You have successfully connected your appliance. You can
now benefit from all the advantages of the Home
Connect™ app!
NOTICE:
ERROR: The appliance fails to connect to the app (the
CONNECT light will turn OFF).
FIX: Ensure your smartphone or tablet is connected to
the same home network (Wi-Fi). Check that your
wireless connection is stable and has a strong signal.
Then repeat the process from STEP 2.2.
Connecting your appliance to another Home Connect
account
If you want to change the wireless home network that is
connected to the hood, reset the connection to your hood
by:
1. Press and hold the CONNECT and 0 buttons on your
hood for at least 3 seconds.
-- The CONNECT button will turn off.
2. Repeat the connection to your home network.

10
Software update
Using the software update function, your appliance's
software can be updated (e.g. for the purpose of
optimization, troubleshooting or security updates). To do
this, you need to be a registered Home Connect™ user,
have installed the app on your mobile device and be
connected to the Home Connect™ server.
As soon as a software update is available, you will be
informed through the Home Connect™ app and will be
able to start the software update via the app.
Once the update has been successfully downloaded, you
can start installing it via the Home Connect™ app if you
are on your local area network.
The Home Connect™ app will inform you once installation
is complete.
Notes:
• You can continue to use your appliance as normal
while updates are downloading.
• Depending on your personal settings in the app,
software updates can also be set to download
automatically.
• We recommend that you install security updates as
soon as possible.
About data protection
When your appliance is connected for the first time to a
WLAN network, which is connected to the Internet, your
appliance transmits the following categories of data to the
Home Connect server (initial registration):
• Unique appliance identification (consisting of
appliance codes as well as the MAC address of the
installed Wi-Fi communication module).
• Security certificate of the Wi-Fi communication
module (to ensure a secure IT connection).
• The current software and hardware version of your
domestic appliance.
• Status of any previous resetting to factory settings.
This initial registration prepares the Home Connect
functions for use and is only required when you want to
use these Home Connect functions for the first time.
NOTE: Ensure that the Home Connect functions can be
used only in conjunction with the Home Connect app.
Information on data protection can be accessed in the
Home Connect app.
Declaration of conformity
BSH Home Appliances hereby declares that the appliance
which features Home Connect is in accordance with the
basic requirements and the other relevant provisions of
the directive 1999/5/EC.
Care and cleaning
Filter and grease tray cleaning
⚠ WARNING
Be sure the entire appliance (including the filters and
lights) has cooled and grease has solidified before
attempting to clean any part of the appliance. Watch for
sharp edges.
⚠ CAUTION
DO NOT use the cooktop, rangetop, or range while hood
is disassembled.
NOTICE: Filters are not dishwasher safe. DO NOT place
filter in a dishwasher to avoid discoloration. Hand Wash
Only.
Your hood has removable filters and grease trays. They
must be cleaned when the FILTER light illuminates on the
control panel or whenever they collect grease. When used
over a grill, wok or other high grease applications, more
frequent cleaning may be required.
The filters and grease trays can be washed by hand. Soak
the ventilation filters in hot water using a mild detergent.
Rinse well and shake to dry.
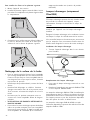
NOTE: Reverse the directions below to remove the filters
and grease trays. Ensure filters are cool and grease has
congealed before removal.
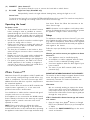
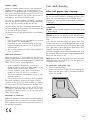
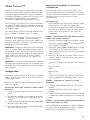
To install filters and grease trays
1. Turn the appliance OFF.
2. Grease trays must be in place before installing the
filters. Push the grease tray in and down inside the
grease tray trough.

11
3. Start with an outside filter. Slide the filter up, toward
the front of the hood, then push down on top of the
grease tray.
Hood surface cleaning
• For general care, wipe the outside of the stainless
steel with mild, lukewarm, soapy water. Always wipe
and dry in the direction of the stainless steel grain.
Avoid using too much pressure, which may mar the
surface.
•DO NOT use abrasive products such as steel wool.
•DO NOT use cellulose sponges. Some sponges are
processed with salt and can cause corrosion by leaving
salt deposits on the metal.
•DO NOT allow any cleaning compounds to remain in
contact with stainless steel for extended periods.
• DO NOT USE CHLORINE-BASED CLEANERS.
• To remove fingerprints and produce added shine, use
a stainless steel cleaner or conditioner. The
Thermador Stainless Steel Conditioner can be
purchased online (US only) at:
www.store.thermador.com (order part number
00576697).
Heat lamps (PHxxGWS only)
⚠ WARNING
Heat lamps might be hot. Disconnect from power and
allow to cool before servicing.
DO NOT operate the appliance without the heat lamps
installed.
Turn off the heat lamps and blower. Allow the heat lamps
to cool before handling.
If new heat lamps do not operate, be sure lamps are
inserted correctly before calling for service.
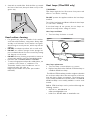
Heat lamp installation
1. Turn heat lamp clockwise to install.
Heat lamp replacement
1. Turn heat lamp counterclockwise to remove.
2. Replace lamp with either a PAR-38 175W heat lamp or
a PAR-40 250W heat lamp.
The PAR-38 175W heat lamp provides a tighter seal within
the enclosure and produces the same amount of effective
heat with lower energy consumption. These lamps may
not be readily available at local retail outlets. The PAR-40
250W heat lamp is more widely available. It can be used
instead.
PAR-38 175W heat lamps can be purchased through the
following retailers:
• OpTech Inc: 800-848-6624 or
www.optechlightbulbs.com
• bulbs.com: 888-455-2800 or www.bulbs.com
2
3
1

12
Service
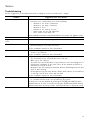
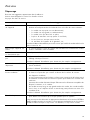
Troubleshooting
Use the suggestions in the table below before calling for service to avoid service charges.
Problem Suggested cause and solution
Noise during operation Some noise is normal due to vibration and air movement.
• Excessive noise could indicate one of the following:
-- ductwork is too small / undersized
-- ductwork is too large / oversized
-- ductwork is loose
-- transition is too small or is loose
-- wood screws are not fully tightened
-- loose screws in trim parts, etc.
Check installation manual to verify that ductwork is the proper size. Tighten screws.
Noise when unit is off • Backflow flap on outside of duct wall cap moves with the wind. This is normal.
Lights and fan blower do not
work
• Hood circuit breaker may be tripped. Reset breaker.
Fan blower does not work • Power supply is insufficient .
• Electrical wiring is incorrectly connected .
See the installation manual for more information.
Hood trips breaker • Electrical wiring is incorrectly connected.
• Circuit is not sufficient.
See the installation manual for more information.
The hood is not venting properly • The hood may be too high from the cook top.
• The hood may not be centered above the cook top.
• Make up air not sufficient.
• The wind from opened windows or opened doors in the surrounding area is
affecting the ventilation of the hood. Close all the windows and doors to
eliminate the outside air flow.
• Blockage in the duct opening or ductwork. Remove all blockage from the duct-
work or duct opening.
• Duct length too long, too many elbows, “back to back” elbows, or too small roof
or wall cap, will all cause issues with air draw.
See the installation manual for more information.
Fault tone • Two short beeps will sound whenever the pressing of a button by the user results
in a possible function that is not possible by the system.
The beep tone can be disabled by pressing the FILTER and LIGHTS buttons
simultaneously for at least 3 seconds. Pressing the FILTER and LIGHTS buttons
simultaneously when the beep sound is turned off will turn on the beep sound.

13
How to obtain service or parts
Before calling service
We want you to remain a satisfied customer. If a problem
comes up that cannot be resolved to your satisfaction
please let us know.
To reach a service representative, see the contact
information at the back page of the manual. Whether you
write or call, please provide us with the model number,
serial number and date of original purchase or installation.
Product data rating plate
The data rating plate shows the model (E-nr) and serial
number. Refer to the data plate on the appliance when
requesting service.
The data rating plate is located on the frame behind the
filter. Remove the filter to view it (see figure below for an
example).
Service information
For handy reference, copy the information below from the
product data rating label located on the frame. Keep your
invoice for warranty validation.
Model (E-nr) number:________________________________
Serial number:______________________________________
Date of purchase:___________________________________
Product registration
Register your BSH product to ensure timely service and
access to your product related information.
You may register your product through one of the
following ways:
• Register with your phone (USA only).
1. Take a photo of the camera icon on the
registration card, including the points ( ).
2. Tex Text the photo to 21432. (USA only, text
and data rates may apply.)
• Mail in the completed product registration card to the
address printed on the card.
• Register your product online at www.thermador.com
or www.thermador.ca.
• Call Thermador customer service at 1-800-735-4328.
PHOTOREGISTER
SM
THERMADOR

14
Statement of limited product warranty
What this warranty covers and who it
applies to
The limited warranty provided by BSH Home Appliances
(“Thermador“) in this Statement of Limited Product
Warranty applies only to the Thermador appliance sold to
you (“Product“), provided that the Product was
purchased:
• For your normal, household (non-commercial) use,
and has in fact at all times only been used for normal
household purposes.
• New at retail (not a display, “as is”, or previously
returned model), and not for resale, or commercial
use.
• Within the United States or Canada, and has at all
times remained within the country of original
purchase.
The warranties stated herein apply to the original
purchaser of the product warranted herein and to each
succeeding owner of the product purchased for ordinary
home use during the term of the warranty.
Please make sure to return your registration card; while
not necessary to effectuate warranty coverage, it is the
best way for Thermador to notify you in the unlikely event
of a safety notice or product recall.
How long the warranty lasts
Thermador warrants that the Product is free from defects
in materials and workmanship for a period of seven
hundred and thirty (730) days from the date of the original
purchase. The foregoing timeline begins to run upon the
date of the original purchase, and shall not be stalled,
tolled, extended, or suspended, for any reason
whatsoever.
This Product is also warranted to be free from cosmetic
defects in material and workmanship (such as scratches of
stainless steel, paint/porcelain blemishes, chip, dents, or
other damage to the finish) of the Product, for a period of
sixty (60) days from the date of purchase or closing date
for new construction. This cosmetic warranty excludes
slight color variations due to inherent differences in
painted and porcelain parts, as well as differences caused
by kitchen lighting, product location, or other similar
factors. This cosmetic warranty specifically excludes any
display, floor, “As Is”, or “B” stock appliances.
Repair/replace as your exclusive
remedy
During this warranty period, Thermador or one of its
authorized service providers will repair your Product
without charge to you (subject to certain limitations stated
herein) if your Product proves to have been manufactured
with a defect in materials or workmanship. If reasonable
attempts to repair the Product have been made without
success, then Thermador will replace your Product
(upgraded models may be available to you, in
Thermador’s sole discretion, for an additional charge).
Nothing in this warranty requires damaged or defective
parts to be replaced with parts of a different type or
design than the original part. All removed parts and
components shall become the property of Thermador at
its sole option. All replaced and/or repaired parts shall
assume the identity of the original part for purposes of
this warranty and this warranty shall not be extended with
respect to such parts. Thermador's sole liability and
responsibility hereunder is to repair manufacturer-
defective Product only, using a Thermador-authorized
service provider during normal business hours. For safety
and property damage concerns, Thermador highly
recommends that you do not attempt to repair the
Product yourself, or use a non-authorized service provider;
Thermador will have no responsibility or liability for repairs
or work performed by a non-authorized service provider.
Authorized service providers are those persons or
companies that have been specially trained on Thermador
products, and who possess, in Thermador's opinion, a
superior reputation for customer service and technical
ability (note that they are independent entities and are not
agents, partners, affiliates or representatives of
Thermador).
Notwithstanding the foregoing, Thermador will not incur
any liability, or have responsibility, for the Product if it is
located in a remote area (more than 100 miles from an
authorized service provider) or is reasonably inaccessible,
hazardous, threatening, or treacherous locale,
surroundings, or environment; in any such event, if you
request, Thermador would still pay for labor and parts and
ship the parts to the nearest authorized service provider,
but you would still be fully liable and responsible for any
travel time or other special charges by the service
company, assuming they agree to make the service call.
Out of warranty product
Thermador is under no obligation, at law or otherwise, to
provide you with any concessions, including repairs,
prorates, or Product replacement, once this warranty has
expired.

15
Warranty exclusions
The warranty coverage described herein excludes all
defects or damage that are not the direct fault of
Thermador, including without limitation, one or more of
the following:
• Use of the Product in anything other than its normal,
customary and intended manner (including without
limitation, any form of commercial use, use or storage
of an indoor product outdoors, use of the Product in
conjunction with air or water-going vessels).
• Any party's willful misconduct, negligence, misuse,
abuse, accidents, neglect, improper operation, failure
to maintain, improper or negligent installation,
tampering, failure to follow operating instructions,
mishandling, unauthorized service (including self
performed “fixing” or exploration of the appliance's
internal workings).
• Adjustment, alteration or modification of any kind.
• A failure to comply with any applicable state, local,
city, or county electrical, plumbing and/or building
codes, regulations, or laws, including failure to install
the product in strict conformity with local fire and
building codes and regulations.
• Ordinary wear and tear, spills of food, liquid, grease
accumulations, or other substances that accumulate
on, in, or around the Product.
• Any external, elemental and/or environmental forces
and factors, including without limitation, rain, wind,
sand, floods, fires, mud slides, freezing temperatures,
excessive moisture or extended exposure to humidity,
lightning, power surges, structural failures surrounding
the appliance, and acts of God.
In no event shall Thermador have any liability or
responsibility whatsoever for damage to surrounding
property, including cabinetry, floors, ceilings, and other
structures or objects around the Product. Also excluded
from this warranty are Products, on which the serial
numbers have been altered, defaced, or removed; service
visits to teach you how to use the Product, or visits where
there is nothing wrong with the Product; correction of
installation problems (you are solely responsible for any
structure and setting for the Product, including all
electrical, plumbing or other connecting facilities, for
proper foundation/flooring, and for any alterations
including without limitation cabinetry, walls, floors,
shelving, etc.); and resetting of breakers or fuses.
TO THE EXTENT ALLOWED BY LAW, THIS WARRANTY
SETS OUT YOUR EXCLUSIVE REMEDIES WITH RESPECT
TO PRODUCT, WHETHER THE CLAIM ARISES IN
CONTRACTOR OR TORT (INCLUDING STRICT LIABILITY,
OR NEGLIGENCE) OR OTHERWISE. THIS WARRANTY IS
IN LIEU OF ALL OTHER WARRANTIES, WHETHER
EXPRESS OR IMPLIED. ANY WARRANTY IMPLIED BY
LAW, WHETHER FOR MERCHANTABILITY OR FITNESS
FOR A PARTICULAR PURPOSE, OR OTHERWISE, SHALL
BE EFFECTIVE ONLY FOR THE PERIOD THAT THIS
EXPRESS LIMITED WARRANTY IS EFFECTIVE. IN NO
EVENT WILL THE MANUFACTURER BE LIABLE FOR
CONSEQUENTIAL, SPECIAL, INCIDENTAL, INDIRECT,
“BUSINESS LOSS”, AND/OR PUNITIVE DAMAGES,
LOSSES, OR EXPENSES, INCLUDING WITHOUT
LIMITATION TIME AWAY FROM WORK, HOTELS AND/
OR RESTAURANT MEALS, REMODELLING EXPENSES IN
EXCESS OF DIRECT DAMAGES WHICH ARE
DEFINITIVELY CAUSED EXCLUSIVELY BY THERMADOR,
OR OTHERWISE. SOME STATES DO NOT ALLOW THE
EXCLUSION OR LIMITATION OF INCIDENTAL OR
CONSEQUENTIAL DAMAGES, AND SOME STATES DO
NOT ALLOW LIMITATIONS ON HOW LONG AN IMPLIED
WARRANTY LASTS, SO THE ABOVE EXCLUSIONS OR
LIMITATIONS MAY NOT APPLY TO YOU. THIS
WARRANTY GIVES YOU SPECIFIC LEGAL RIGHTS, AND
YOU MAY ALSO HAVE OTHER RIGHTS WHICH VARY
FROM STATE TO STATE.
No attempt to alter, modify or amend this warranty shall
be effective unless authorized in writing by an officer of
BSH.
Obtaining warranty service
To obtain warranty service for your Product, you should
contact Thermador Customer Service at 1-800-735-4328
to schedule a repair.

16
Cet appareil électroménager de THERMADORTM
est fait par BSH Home Appliances LtD
6696 Financial Drive , Unit 3
Mississauga, ON L5N 7J6
Des questions?
1-800-735-4328
www.thermador.ca
Nous attendons de vos nouvelles!
Table des matières
Sécurité ...................................................................... 17
Consignes de sécurité importantes ......................... 17
Introduction ................................................................. 20
Avant de commencer ............................................... 20
Utilisation de l'appareil .............................................. 20
Aperçu ....................................................................... 20
Bandeau de commande tactile ................................ 22
Fonctionnement de la hotte .................................... 23
Home Connect ............................................................ 24
Configuration ............................................................. 24
Nettoyage et entretien .............................................. 26
Nettoyage des filtres et des plateaux à graisse ... 26
Nettoyage de la surface de la hotte ..................... 27
Lampes infrarouges (certains modèles) ................... 27
Entretien ...................................................................... 28
Dépannage ................................................................ 28
Comment obtenir du service ou des pièces ......... 29
Comment trouver le numéro de modèle ............. 29
Information requise pour obtenir du service ......... 29
Enregistrement de produit ....................................... 29
Énoncé de garantie limitée du produit .................... 30
Soutien, accessoires, et pièces ................... page verso

17
⚠ CONSIGNES DE SÉCURITÉ IMPORTANTES
LIRE ET CONSERVER CES DIRECTIVES
Ce guide d'utilisation et d'entretien explique les principes
de base du fonctionnement de votre appareil et les
mesures de sécurité à suivre. Pour des informations
d'installation complètes et sûres, reportez-vous aux
instructions d'installation fournies avec l'appareil.
Tous les manuels des produits peuvent être téléchargés en
ligne à l'adresse www.thermador.com/us/support/
owner-manuals ou www.thermador.ca/en/support/
owner-manuals.
INSTALLATEUR : Prière de laisser ces instructions
d’installation avec cet appareil à l’intention du
propriétaire.
PROPRIÉTAIRE : Prière de conserver ces consignes pour
pouvoir s’y référer ultérieurement. Lisez toutes les
consignes de sécurité avant d'utiliser l'appareil.
Demandez à l'installateur de vous montrer où se trouvent
le disjoncteur électrique et le robinet d'arrêt de
l'alimentation en gaz afin que vous sachiez comment et où
couper le gaz et l'électricité de l'appareil.
Définitions des termes de sécurité
⚠ AVERTISSEMENT : ceci indique des risques de
blessures graves ou mortelles en cas de non-respect de
cette mise en garde.
⚠ MISE EN GARDE : ceci indique des risques de
blessures mineures ou de gravité moyenne en cas de non-
respect de cette mise en garde.
AVIS : Signale un risque de dommage matériel ou de
dommage à l’appareil électroménager
si l’avis n’est pas respecté.
Remarque : Cette section vous donne des informations
et/ou des conseils importants.
AVERTISSEMENT
Pour ventilation générale seulement. Pour éviter tout
risque d’incendie ou d’explosion, n’utilisez pas cet
appareil pour évacuer des vapeurs et des matériaux
explosifs ou dangereux.
AVERTISSEMENT
Si vous ne suivez pas rigoureusement
les renseignements fournis dans le
présent guide, des risques d'incendie
ou d'explosion sont susceptibles de
causer des dommages matériels, des
blessures ou la mort.
• N'entreposez pas et n'utilisez pas
d'essence ou d'autres produits
inflammables sous forme de liquide ou de
vapeur à proximité de la table de cuisson
ou de tout autre appareil.
• SI VOUS DÉTECTEZ UNE ODEUR DE GAZ
-- N’allumez aucun appareil.
-- Ne touchez pas aux interrupteurs
électriques.
-- N’utilisez pas les téléphones du
bâtiment où vous trouvez.
-- Appelez immédiatement votre société
gazière chez un voisin et suivez les
instructions qu’elle vous donne.
-- Si vous n’arrivez pas à contacter votre
société gazière, appelez le service
d’incendie.
• L’installation et les travaux d’entretien
doivent être réalisés par un installateur
qualifié, un centre de réparation agréé ou
une société gazière.

18
⚠ CONSIGNES DE SÉCURITÉ IMPORTANTES
LISEZ ET CONSERVEZ CES INSTRUCTIONS
AVERTISSEMENT
POUR RÉDUIRE LES RISQUES DE BLESSURE LORS
D’UN INCENDIE SUR LA SURFACE DE CUISSON,
OBSERVEZ LES CONSIGNES SUIVANTES :
a) ÉTOUFFEZ LES FLAMMES avec un couvercle, une
plaque à biscuits ou un plateau de métal et éteignez
ensuite le brûleur. FAITES ATTENTION POUR NE
PAS VOUS BRÛLER. Si les flammes ne disparaissent
pas immédiatement, ÉVACUEZ LES LIEUX ET
APPELEZ LE SERVICE D’INCENDIE.
b) NE PRENEZ JAMAIS UN POÊLON EN FEU – vous
pourriez vous brûler.
c) N’UTILISEZ PAS D’EAU ou un linge à vaisselle mouillé
pour éteindre des flammes – une violente explosion
de vapeur s’ensuivra.
d) Utilisez un extincteur SEULEMENT si :
1) Vous savez que vous possédez un extincteur de
classe ABC et vous savez vous en servir.
2) Le feu est faible et ne s’est pas répandu depuis
son point d’origine.
3) Vous avez appelé le service d’incendie.
4) Vous pouvez sortir facilement de l’endroit où vous
combattez le feu.
AVERTISSEMENT
Pour réduire les risques d'incendie, de décharge
électrique ou de blessure, respectez ces consignes :
• N’utilisez cet appareil que de la manière prévue par le
fabricant. Si vous avez des questions, communiquez
avec le fabricant (800-735-4328).
• Avant de procéder au nettoyage ou à l’entretien de
l’appareil, éteignez l’alimentation du panneau
électrique et bloquez le dispositif de déconnexion
pour éviter que l’alimentation électrique ne soit
accidentellement rallumée. Si le dispositif de
sectionnement d’électricité ne peut être bloqué,
attachez un avertissement (comme une étiquette) bien
en vue sur le tableau électrique.
AVERTISSEMENT
POUR RÉDUIRE LES RISQUES DE FEU DE FRITURE
a) Ne laissez jamais l’appareil sans surveillance lors de
son utilisation à haute température. Les
débordements par bouillonnement causent de la
fumée et des déversements de graisse qui peuvent
prendre feu. Faites chauffer l’huile à des températures
basses ou moyennes.
b) Allumez toujours la hotte lorsque vous cuisinez à
haute température ou que vous faites flamber des
alim s'aents (c.-à-d. crêpes Suzette, cerises jubilé,
bœuf flambé au poivre).
c) Nettoyer fréquemment l'appareil. Ne pas laisser la
graisse accumuler sur l'appareil.
d) Utilisez des poêlons aux dimensions adéquates.
Utilisez toujours une batterie de cuisine
correspondant aux dimensions de l’élément ou du
brûleur.
AVERTISSEMENT
Les réparations doivent être effectuées uniquement par
un personnel d’entretien formé. Toute réparation
inadéquate de votre appareil peut entraîner un risque de
blessure grave ou de mort.
ATTENTION
Ne rangez pas d’objets attirant l’attention d’enfants dans
un appareil, dans une armoire au-dessus d’un appareil ou
sur l’étagère garde-chaud. Ils risqueraient d’y monter pour
s’en emparer et pourraient se blesser gravement.
ATTENTION
La graisse qui s’accumule sur les filtres peut fondre et se
déplacer dans les conduits d’aération. Nettoyez
fréquemment les ventilateurs. Ne laissez pas la graisse
s’accumuler sur le ventilateur, les filtres et les conduits
d’aération.
• L'appareil doit être adéquatement installé et mis à la
terre par un technicien qualifié. Ne le branchez qu'à
une alimentation électrique avec une mise à la terre
adéquate. Consultez le manuel d'installation pour plus
de détails.
• Demandez à l'installateur de vous montrer
l'emplacement du disjoncteur. Marquez-le pour qu'il
soit facile à identifier.

19
⚠ CONSIGNES DE SÉCURITÉ IMPORTANTES
LIRE ET CONSERVER CES DIRECTIVES
• Cet appareil est conçu pour une utilisation ménagère
normale seulement. Il n'est pas approuvé pour une
utilisation à l'extérieur. La garantie s'annulera si ce
produit est utilisé dans un environnement commercial
ou s'il est installé à l'extérieur. Si vous avez des
questions, appelez le fabricant.
• N'entreposez pas et n'utilisez pas des gaz et des
produits chimiques, des produits inflammables ou non
alimentaires dans cet appareil ou près de cet appareil.
Il est spécifiquement conçu pour être utilisé lorsque
vous faites chauffer ou cuire des aliments. L'utilisation
de produits corrosifs lorsque l'appareil chauffe ou
lorsque vous le nettoyez endommagera l'appareil et
pourrait causer une blessure corporelle.
• N'utilisez pas cet appareil s'il ne fonctionne pas
correctement ou s'il a été endommagé.
Communiquez avec une agence autorisée.
• Ne réparez et ne remplacez aucune pièce de l'appareil
à moins que le manuel ne recommande expressément
de le faire.
• Pour des raisons de sécurité et pour éviter tout
dommage potentiel, ne suspendez pas d'ustensiles de
cuisine, de tissus ou d'autres articles à aucune pièce
de l'appareil.
• Assurez-vous qu’il y a un détecteur de fumée
fonctionnel près de la cuisine.
• Ayez un extincteur approprié à portée de la main,
visible et facile d’accès, tout près de l’appareil de
cuisson.
• N’utilisez jamais de l’eau pour éteindre des aliments
en feu. Étouffez les flammes avec des extincteurs à
poudre sèche ou à mousse.
• Dans la mesure du possible, ne faites pas fonctionner
le système de ventilation lorsqu’il y a un feu sur la
surface de cuisson. Cependant, ne tentez pas de
l’éteindre en passant votre main dans le feu.
• Si vos vêtements ou vos cheveux prennent feu, jetez-
vous immédiatement par terre et roulez pour éteindre
les flammes.
• Examinez l’électroménager après l’avoir déballé. Dans
l’éventualité de dommages en cours de transport, ne
branchez pas l’électroménager.
• Lorsque les enfants sont assez âgés pour utiliser
l'appareil, il est de la responsabilité des parents ou
des tuteurs de veiller à ce que des personnes
qualifiées leur enseignent des pratiques sécuritaires.
• Ne laissez personne monter, s'asseoir ou s'appuyer sur
une partie quelconque de l'appareil, car cela pourrait
endommager l'appareil, qui pourrait basculer et
provoquer de graves blessures.
• Ne laissez pas d'enfants utiliser cet appareil à moins
qu'un adulte exerce une surveillance étroite. Ne
laissez pas d'enfants ou d'animaux seuls ou sans
surveillance dans une pièce où des appareils
fonctionnent. Ils ne devraient pas être autorisés à
jouer près de l'appareil, qu'il soit en cours d'utilisation
ou non.
Avertissement issu de la proposition 65 :
Ce produit pourrait contenir un produit chimique reconnu
par l'État de la Californie comme cancérigène ou ayant
des effets nocifs sur la reproduction. Par conséquent,
l’emballage de votre produit pourrait porter l’étiquette
suivante, comme requis par la Californie :
AVERTISSEMENT ISSU DE LA PROPOSITION 65 DE
L’ÉTAT DE LA CALIFORNIE :
⚠ AVERTISSEMENT
Cancér et dommages à la reproduction –
www.P65Warnings.ca.gov.
La page est en cours de chargement...
La page est en cours de chargement...
La page est en cours de chargement...
La page est en cours de chargement...
La page est en cours de chargement...
La page est en cours de chargement...
La page est en cours de chargement...
La page est en cours de chargement...
La page est en cours de chargement...
La page est en cours de chargement...
La page est en cours de chargement...
La page est en cours de chargement...
La page est en cours de chargement...
La page est en cours de chargement...
La page est en cours de chargement...
La page est en cours de chargement...
-
 1
1
-
 2
2
-
 3
3
-
 4
4
-
 5
5
-
 6
6
-
 7
7
-
 8
8
-
 9
9
-
 10
10
-
 11
11
-
 12
12
-
 13
13
-
 14
14
-
 15
15
-
 16
16
-
 17
17
-
 18
18
-
 19
19
-
 20
20
-
 21
21
-
 22
22
-
 23
23
-
 24
24
-
 25
25
-
 26
26
-
 27
27
-
 28
28
-
 29
29
-
 30
30
-
 31
31
-
 32
32
-
 33
33
-
 34
34
-
 35
35
-
 36
36


Thermador Professional Series Mode d'emploi
- Catégorie
- Hottes
- Taper
- Mode d'emploi