Waring Commercial BB300 Series Manuel utilisateur
- Catégorie
- Mélangeurs
- Taper
- Manuel utilisateur

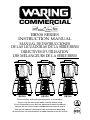
BB300 SERIES
INSTRUCTION MANUAL
MANUAL DE INSTRUCCIONES
DE LAS LICUADORAS DE LA SERIE BB300
DIRECTIVES D’UTILISATION
DES MÉLANGEURS DE LA SÉRIE BB300
BB300 BB320 BB340
For your safety and continued enjoyment of this product,
always read the instruction book carefully before using.
Para su seguridad y para disfrutar plenamente de este producto,
siempre lea las instrucciones cuidadosamente antes de usarlo.
An que cet appareil vous procure en toute sécurité beaucoup
de satisfaction, lire attentivement le mode d’emploi avant de l’utiliser.

2
IMPORTANT SAFEGUARDS
When using electrical appliances, basic safety precautions
should always be taken, including the following:
1. READ ALL INSTRUCTIONS.
2. Unplug from outlet when not in use, before putting
on or taking off parts, and before cleaning.
3. T o protect against electrical hazards, do not immerse
the blender base in water or other liquids.
4. T his appliance is not intended for use by persons
(including children) with reduced physical, sensory
or mental capabilities, or lack of experience and
knowledge, unless they have been given supervision
or instruction concerning use of the appliance by a
person responsible for their safety.
5. Children should be supervised to ensure that they
do not play with the appliance.
6. Avoid contact with moving parts.
7. Do not operate any appliance with a damaged cord or
plug or after the appliance malfunctions or is dropped
or damaged in any manner. Return appliance to the
nearest authorized service facility for examination,
repair or electrical or mechanical adjustment.
8. T he use of attachments not recommended by the
appliance manufacturer may cause hazards.
9. Do not use outdoors.
10. Do not let cord hang over edge of table or counter,
where it can inadvertently be pulled on or tripped over,
or touch hot surfaces, which could damage the cord.
11. Keep hands and utensils out of container while
blending to prevent the possibility of severe personal
injury and/or damage to the blender. A rubber scraper
may be used, but must be used only when the blender
is not running.
12. Blades are SHARP. Handle carefully.

3
13. Never place cutting assembly or cutting blades on base
without container properly attached.
14. Always operate blender with cover in place.
15. Always operate blender with jar pad in place.
16. CAUTION: This blender is not intended for use with hot
liquids or ingredients.
17. D o not ll above MAX FILL line for blending.
18. Not for waterjet cleaning.
19. Ensure the jar coupler and motor coupler are aligned
and engaged before operating. If unable to engage,
remove jar and shake contents, then try again.
20. T he jar coupler and motor coupler may be hot after
running; do not touch.
21. Replace jar pad if worn.
22. Always use HIGH speed for crushing ice.
23. If the jar overows during blending, there is too much
liquid/ingredients in the jar. Stop blending, remove
enough liquid/ingredients to below MAX FILL line, and
continue blending. Do not operate if overowing.
24. DO NOT use carbonated liquids in the blender jar or
any blending container. Using carbonated liquids in
the blender jar or any blending container may result in
injury.
25. DO NOT blend oil or oil-based products, such as
peanut butter, for more than 5 minutes.
26. Never remove blender jar from base unit until the blade
and coupling have completely stopped.
SAVE THESE INSTRUCTIONS

4
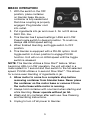
GROUNDING INSTRUCTIONS
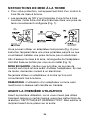
• F or your protection, Waring® Commercial Blenders are
equipped with a 3-conductor cord set.
• 1 20 volt units are supplied with a molded 3-prong,
grounding-type plug and should be used in combination
with a properly connected, grounding-type outlet, as
shown in Figure 1.
If a grounding-type outlet is not available, an adapter, shown
in Figure 2, may be obtained to enable a 2-slot wall outlet to
be used with a 3-prong plug.
Referring to Figure 3, the adapter must be grounded by
attaching its grounding lug under the screw of the outlet
cover plate.
CAUTION: Before using an adapter, it must be determined
that the outlet cover plate screw is properly grounded. If in
doubt, consult a licensed electrician.
Never use an adapter unless you are sure it is properly
grounded.
NOTE: Use of an adapter is not permitted in Canada.
BEFORE FIRST USE
Follow the cleaning and sanitizing instructions on page 8
before rst use and if you have not used your blender for a
period of time. Thoroughly dry the container before placing it
on the base.

5
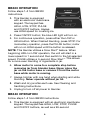
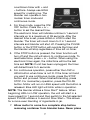
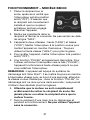
BB300 OPERATION
1. With the switch in the OFF
position, place container
on blender base. Be sure
container is fully seated and
that drive coupling is properly
engaged. Plug blender cord
into outlet.
2. P ut ingredients into jar and cover it. Do not ll above
MAX FILL line.
3. T his blender has 2 speed settings: HIGH and LOW.
Press toggle switch to desired position. To crush ice,
always use HIGH speed setting.
4. Wh en nished blending, set toggle switch to OFF
position.
5. This blender is equipped with a PULSE option. Hold
toggle switch in down position to engage PULSE
function. Unit will run on HIGH speed until the toggle
switch is released.
NOTE: This blender utilizes a Slow Start™ feature. When
beginning HIGH or LOW operation, the unit will start in a
lower speed for 1 second and then switch to the full selected
speed. PULSE utilizes a .5-second Slow Start™. This allows
for a more even blending of ingredients in jar.
6. Allow motor to come to a complete stop before
removing container from blender base. Never place
the container on the motor base or remove it from
the motor base while motor is running.
7. Always hold container with one hand when starting and
while blending. Never operate without jar lid.
8. W ash and dry container after each use. See Cleaning
and Sanitizing Instructions.
9. Unplug to turn off all power to blender.

6
BB320 OPERATION
Follow steps 1–2 from BB300
instructions.
3. T his blender is equipped
with an electronic membrane
keypad. The keypad has
HIGH, LOW, STOP, PULSE
and ON/OFF buttons. Always
use HIGH speed for crushing ice.
4. Press ON/OFF button; the blue LED light will turn on.
5. For continuous operation, press either the LOW or
HIGH button. When nished blending, press STOP. For
momentary operation, press the PULSE button; motor
will run on HIGH speed until the button is released.
NOTE: This blender utilizes a Slow Start™ feature. When
beginning HIGH or LOW operation, the unit will start in a
lower speed for 1 second and then switch to the full selected
speed. PULSE utilizes a .5-second Slow Start™. This allows
for a more even blending of ingredients in jar.
6. Allow motor to come to a complete stop before
removing jar from blender base. Never place the
jar on the motor base or remove it from the motor
base while motor is running.
7. Always hold jar with one hand when starting and while
blending. Never operate without jar lid.
8. W ash and dry jar after each use. See Cleaning and
Sanitizing Instructions.
9. Unplug to turn off all power to blender.
BB340 OPERATION
Follow steps 1–2 from BB300 instructions.
3. T his blender is equipped with an electronic membrane
keypad. The keypad has HIGH, LOW, STOP, PULSE
and ON/OFF buttons, as well as a 99-second

7
countdown timer with + and
– buttons. Always use HIGH
speed for crushing ice. The
blender can operate in two
modes: timer mode and
continuous mode.
4. F or timer mode, press the ON/
OFF button. Press the + or –
button to set the desired time.
The electronic timer will indicate runtime in 1-second
intervals up to a maximum of 99 seconds. After the
desired time is set, press HIGH or LOW to start the
blender. The timer will count down to 0 in 1-second
intervals and blender will shut off. Pressing the PULSE
button or the STOP button will override the timer and
the blender will stop regardless of time left on timer.
5. If the STOP button is pressed, the timer function will
turn off and the unit will return to continuous mode. To
reactivate timer, press + or – button. When using the
electronic timer again, the initial time will be the last
time set. NOTE: If unit has been unplugged, the timer
will default back to 5 seconds.
6. For continuous operation, press either the LOW or
HIGH button when timer is not lit. If the timer is lit and
you want to use continuous mode, press the STOP
button and proceed. When nished blending, press
STOP. For momentary operation, press the PULSE
button. Motor will run on HIGH speed until the button is
released. Blue LED light will blink while in operation.
NOTE: This blender utilizes a Slow Start™ feature. When
beginning HIGH or LOW operation, the unit will start in a
lower speed for 1 second and then switch to the full selected
speed. PULSE utilizes a .5-second Slow Start™. This allows
for a more even blending of ingredients in jar.
7. Allow motor to come to a complete stop before
removing container from blender base. Never place

8
the container on the motor base or remove it from
the motor base while motor is running.
8. A lways hold jar with one hand when starting and while
blending. Never operate without jar lid.
9. W ash and dry jar after each use. See Cleaning and
Sanitizing Instructions.
10. Unplug to turn off all power to blender.
RESETTING THERMAL PROTECTION
• Y our blender is equipped with a manual reset switch to
protect the motor from overheating.
• I f your blender stops running under heavy use, press the
ON/OFF button and unplug the power cord. Empty the
blender jar of all its contents and allow approximately
5 to 10 minutes for the motor to cool down.
• P lug the power cord back into the outlet and continue
blending.
• I f your blender does not function properly following this
procedure, discontinue use and contact a certied Waring
Customer Service Center.
CLEANING AND SANITIZING INSTRUCTIONS
THE JAR MUST BE CLEANED AND DRIED AFTER EACH
USE OF THE BLENDER ACCORDING TO THE FOLLOWING
INSTRUCTIONS.
FAILURE TO DO SO MAY ALLOW RESIDUE OF
PROCESSED MATERIAL TO COLLECT ON THE INTERNAL
SEALS OF THE BLADE ASSEMBLY, RENDERING THEM
INEFFECTIVE.
• W ash, rinse, sanitize and dry jar prior to initial use and
whenever it will not be used again within a period of
1 hour.
• Wash and rinse container after each use.
• C lean and sanitize motor base prior to initial use and after
each use.

9
• W ashing solutions based on non-sudsing detergents and
chlorine-based sanitizing solutions having a minimum
chlorine concentration of 100 PPM are recommended.
The following washing, rinsing, and sanitizing solutions, or
their equivalents, may be used.
TO WASH AND RINSE JAR
1. REMOVE JAR FROM MOTOR BASE. Remove lid.
Rinse jar interior and lid under running water. Add
washing solution to jar. Scrub and ush out the jar
interior to dislodge and remove as much food residue
as possible. Empty jar.
2. W ipe down exterior of jar with a soft cloth or sponge
dampened with washing solution. Wash lid and lid
insert in fresh washing solution. Fill jar one-quarter full
with fresh washing solution, cover (with lid only), place
on motor base and run on HIGH speed for two (2)
minutes. Empty jar.
3. R epeat step (2) using clean rinse water in place of
washing solution.
SOLUTION PRODUCT DILUTION IN TEMPERATURE
WATER
Washing Diversey Wyandotte 4 Tablespoons/Gallon Hot 115˚F ( 46˚C )
Diversol® BX/A or CX/A
Rinsing Plain Water Warm 95˚F (35˚C)
Sanitizing Clorox® Institutional 1 Tablespoon/Gallon Cold 50˚F–70˚F
Bleach (10˚C–21˚C)
• I n repetitive batch-processing applications, frequent
cleaning of the jar will prolong the life of the blade
assembly. In no case should actual running time between
cleanings exceed one-half hour.
• D o not use jar to store processed foods or beverages.

10
IMPORTANT
NOTE: IN ORDER TO MINIMIZE POSSIBILITY OF
SCALDING, TEMPERATURE OF WASHING SOLUTION
AND RINSE WATER MUST NOT EXCEED 115˚F (46˚C),
AND QUANTITY USED MUST NOT EXCEED ONE-
QUARTER JAR FULL.
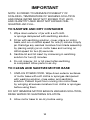
TO SANITIZE AND DRY CONTAINER
1. Wipe down exterior of jar with a soft cloth
or sponge dampened with sanitizing solution.
2. F ill jar with sanitizing solution, cover, place on motor
base, and run on HIGH speed for one (1) minute. Empty
jar. Dislodge any residual moisture from blade assembly
by placing empty jar on motor base and running on
HIGH speed for two (2) seconds.
3. S anitize lid and lid insert by immersing in sanitizing
solution for two (2) minutes.
4. D o not rinse jar, lid, or lid insert after sanitizing
is completed. Allow parts to air-dry.
TO CLEAN AND SANITIZE MOTOR BASE
1. UNPLUG POWER CORD. Wipe down exterior surfaces
of motor base with soft cloths or sponges dampened
with washing solution, rinse water, and sanitizing
solution. Prevent liquid from running into motor base
by wringing all excess moisture from cloths or sponges
before using them.
DO NOT IMMERSE MOTOR BASE IN WASHING SOLUTION,
RINSE WATER OR SANITIZING SOLUTION.
2. A llow motor base to air-dry before using.

11
SERVICE
Authorized Service Centers
For a zip code search of authorized service centers near
you, visit waringcommercialproducts.com/support.
Or write to:
Waring Factory Service Center
314 Ella T. Grasso Ave.
Torrington, CT 06790
(800) 269-6640
Ship blenders for repair to the above address or to an
authorized service center. Do not ship to a Waring sales
ofce.
NOTE: If your application involves the processing of
biologically active material, we request that any items
returned for service be sterilized before being shipped.
Such items must be clearly identied as having been
sterilized, both by a tag on the item itself and by a statement
in the accompanying correspondence. Waring will not
accept delivery of any return unless it is so identied.
Replacement parts for your out-of-warranty repairs are
obtainable at the address below.
LIMITED TWO-YEAR WARRANTY
(U.S. and Canada Only)
Waring warrants every new Waring® Commercial Blade
Blender to be free from defects in material and workmanship
for a period of two years from the date of purchase when
used with foodstuffs, nonabrasive liquids (other than
detergents) and nonabrasive semi-liquids, providing it has
not been subject to loads in excess of the indicated rating.
In addition, the motor in this appliance has a full
two-year warranty.
Under this warranty, Waring will repair or replace any part
that, upon our examination, is defective in materials or
workmanship, provided the product is delivered prepaid to the

12
Waring Service Center at: 314 Ella T. Grasso Ave., Torrington,
CT 06790, or any Factory Approved Service Center.
This warranty does not: a) apply to any product that has
become worn, defective, damaged or broken due to misuse
or due to repairs or servicing by other than the Waring
Service Center or a Factory Approved Service Center; or
due to abuse, misuse, overloading or tampering; or b) cover
incidental or consequential damages of any kind.
The two-year warranty is applicable only to appliances
used in the United States or Canada; this supersedes all
other express product warranties or warranty statements.
For Waring products sold outside of the U.S. and Canada,
the warranty is the responsibility of the local importer
or distributor. This warranty may vary according to local
regulations.
Warning: This warranty is void if appliance is used on
Direct Current (DC).
Waring Commercial
314 Ella T. Grasso Avenue
Torrington, CT 06790
1-800-4-WARING
www.waringcommercialproducts.com

13
MEDIDAS DE SEGURIDAD
IMPORTANTES
Al usar aparatos eléctricos, siempre se deben tomar
precauciones básicas de seguridad, entre ellas las
siguientes:
1. LEA TODAS LAS INSTRUCCIONES.
2. Desenchufe el aparato cuando no esté en uso,
antes de instalar/sacar piezas y antes de limpiarlo.
3. P ara evitar los riesgos eléctricos, no sumerja el aparato
en agua ni en ningún otro líquido.
4. L os niños o las personas que carezcan de la
experiencia o de los conocimientos necesarios para
manipular el aparato, o aquellas cuyas capacidades
físicas, sensoriales o mentales estén limitadas, no
deben usar el aparato sin la supervisión o la dirección
de una persona responsable por su seguridad.
5. No permita que los niños jueguen con este aparato.
6. Evite el contacto con las piezas móviles.
7. No use este aparato si el cable o el enchufe están
dañados, después de un mal funcionamiento, después
de que se haya caído, o si está dañado; devuélvalo
a un centro de servicio autorizado para su revisión,
reparación o ajuste.
8. E l uso de accesorios no recomendados por el
fabricante presenta un peligro.
9. No lo use en exteriores.
10. No permita que el cable cuelgue del borde de la
encimera o de la mesa, donde niños lo puedan jalar
o tropezar, ni que tenga contacto con superficies
calientes.
11. Para reducir el riesgo de lesiones personales graves
o de daño al aparato, mantenga las manos y los
utensilios fuera de la jarra durante el funcionamiento.
Se puede usar una espátula de goma, siempre que
el aparato esté apagado.

14
12. Las cuchillas son MUY AFILADAS; manipule el juego
de cuchillas con cuidado.
13. Nunca coloque el juego de cuchillas por sí solo en la
base. El juego de cuchillas siempre debe encontrarse
en la jarra, la cual debe ser debidamente instalada en
la base del aparato.
14. No encienda el aparato a menos que la tapa esté
puesta.
15. N o use el aparato a menos que la base de jarra esté
puesta.
16. PRECAUCIÓN: Esta licuadora no ha sido diseñada
para procesar ingredientes/líquidos calientes.
17. N o llene la jarra más allá de la línea de llenado máximo
(“MAX”).
18. No lave la jarra a chorro/presión.
19. Compruebe que los acopladores de la jarra y del motor
están correctamente alineados y engranados antes de
encender el aparato. Si no logra engranarlos, retire la
jarra, agite el contenido e intente otra vez.
20. L os acopladores de la jarra y del motor pueden estar
calientes después del uso; no los toque.
21. Cambie la base de jarra si está desgastada.
22. Nota: Siempre use la velocidad alta (“HIGH”) para picar
hielo.
23. En caso de derrame, apague el aparato y vacíe
parcialmente la jarra, de manera que el líquido o los
ingredientes no pasen la línea “MAX”. Interrumpa el uso
en caso de derrame.
24. NO procese líquidos gaseosos con este aparato ni con
ninguna otra licuadora; esto puede causar lesiones.
25. NO licue aceite o mezclas a base de aceite (p. ej.,
mantequilla de maní) por más de 5 minutos.
26. Espere hasta que el motor se haya detenido por
completo y que las cuchillas estén inmóviles antes
de retirar la jarra de la base.
GUARDE ESTAS INSTRUCCIONES

15
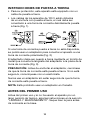
INSTRUCCIONES DE PUESTA A TIERRA
• P ara su protección, este aparato está equipado con un
cable de puesta a tierra.
• L os cables de los aparatos de 120 V están dotados
de un enchufe con puesta a tierra, el cual debe ser
conectado a una toma de corriente debidamente puesta
a tierra (Fig. 1).
Si una toma de corriente puesta a tierra no está disponible,
se podrá usar un adaptador para conectar el aparato a una
toma de corriente polarizada (Fig. 2).
El adaptador debe ser puesto a tierra mediante un tornillo de
metal que conecte la lengüeta del adaptador a la placa de la
toma de corriente (Fig. 3).
PRECAUCIÓN: Antes de enchufar el adaptador, cerciórese
de que la toma de corriente está puesta a tierra. Si no está
seguro/a, comuníquese con un electricista.
Nunca use un adaptador sin estar seguro/a de que la toma
de corriente esté puesta a tierra.
NOTA: Está prohibido usar un adaptador en Canadá.
ANTES DEL PRIMER USO
Antes del primer uso y si no ha usado el aparato por un
largo período de tiempo, siga las instrucciones en la sección
“LIMPIEZA Y MANTENIMIENTO”. Seque bien la jarra antes
de colocarla en la base.

16
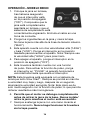
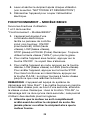
OPERACIÓN – MODELO BB300
1. Coloque la jarra en la base,
tras haberse asegurado
de que el interruptor está
en la posición de apagado
(“OFF”). Compruebe que la
jarra está completamente
asentada en la base y que el
sistema de acoplamiento está
correctamente engranado. Enchufe el cable en una
toma de corriente.
2. P onga los ingredientes en la jarra y cierra la tapa.
No llene la jarra más allá de la línea de llenado máximo
(“MAX”).
3. E ste aparato cuenta con dos velocidades: alta (“HIGH”)
y baja (“LOW”). Ponga el interruptor en la posición
deseada para encender el aparato. Nota: Siempre use
la velocidad alta (“HIGH”) para picar hielo.
4. P ara apagar el aparato, ponga el interruptor en la
posición de apagado (“OFF”).
5. Esta licuadora también cuenta con una función
de pulso. Para activar la función de pulso, ponga
el interruptor en “PULSE”; el aparato funcionará a
velocidad alta hasta que suelte el interruptor.
NOTA: Esta licuadora está equipada con el sistema de
arranque lento Slow Start™. Siempre se pondrá en marcha
a velocidad muy baja y luego, después de un segundo,
alcanzará la velocidad escogida. Nota: Este plazo es de
solo medio segundo con la función de pulso, lo que permite
obtener resultados más homogéneos.
6. Permita que el motor se detenga completamente
antes de retirar la jarra de la base. Nunca instale/
retire la jarra mientras el motor está encendido.
7. Siempre sostenga la jarra con una mano durante el
funcionamiento. Nunca haga funcionar la licuadora
sin la tapa puesta.

17
8. L ave y seque la jarra después de cada uso (véase la
sección “LIMPIEZA Y DESINFECCIÓN”).
9. Desenchufe la unidad para cortar la corriente.
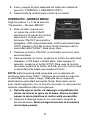
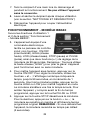
OPERACIÓN – MODELO BB320
Siga los pasos 1 y 2 de la sección
“Operación – Modelo BB300”.
3. E ste modelo cuenta con
un panel de control táctil
electrónico El panel de control
electrónico incluye cinco
botones: ON/OFF (encendido/
apagado), HIGH (velocidad alta), LOW (velocidad baja),
STOP (pausa) y PULSE (pulso). Nota: Siempre use la
velocidad alta (“HIGH”) para picar hielo.
4. P resione el botón ON/OFF; el indicador luminoso azul
se encenderá.
5. Para encender el motor, presione el botón de velocidad
deseado, LOW (bajo) o HIGH (alto). Para apagar el
aparato, presione el botón STOP. Para usar la función
de pulso, presione el botón PULSE; el motor funcionará
a velocidad alta hasta que suelte el botón.
NOTA: Esta licuadora está equipada con el sistema de
arranque lento Slow Start™. Siempre se pondrá en marcha
a velocidad muy baja y luego, después de un segundo,
alcanzará la velocidad escogida. Nota: Este plazo es de
solo medio segundo con la función de pulso, lo que permite
obtener resultados más homogéneos.
6. Permita que el motor se detenga completamente
antes de retirar la jarra de la base. Nunca instale/
saque la jarra mientras el motor está encendido.
7. Siempre sostenga la jarra con una mano durante el
funcionamiento. Nunca haga funcionar la licuadora
sin la tapa puesta.

18
8. L ave y seque la jarra después de cada uso (véase la
sección “LIMPIEZA Y DESINFECCIÓN”).
9. Desenchufe la unidad para cortar la corriente.
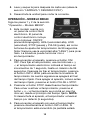
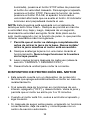
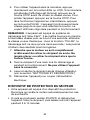
OPERACIÓN – MODELO BB340
Siga los pasos 1 y 2 de la sección
“Operación – Modelo BB300”.
3. E ste modelo cuenta con
un panel de control táctil
electrónico. El panel de
control electrónico incluye
cinco botones: ON/OFF
(encendido/apagado), HIGH (velocidad alta), LOW
(velocidad), STOP (pausa) y PULSE (pulso), así como
botones de ajuste del temporizador de 99 segundos.
Nota: Siempre use la velocidad alta (“HIGH”) para picar
hielo. La licuadora puede funcionar con o
sin temporizador.
4. P ara encender el aparato, presione el botón ON/
OFF. Para fijar el temporizador, use los botones + y
–; el temporizador electrónico indicará el tiempo en
incrementos de 1 segundo, hasta un máximo de 99
segundos. Después de fijar el temporizador, presione
el botón LOW o HIGH para encender la licuadora. El
temporizador de cuenta regresiva se apagará al final
del tiempo fijado. Para apagar el aparato, incluso antes
del tiempo fijado, presione el botón PULSE o STOP.
5. Presionar el botón STOP desactivará el temporizador.
Para volver a activar el temporizador, presione el
botón + o –; el temporizador se pondrá en marcha
otra vez, desde el principio del tiempo fijado. NOTA:
Si desenchufa el aparato, el temporizador volverá al
tiempo por defecto (5 segundos).
6. Para encender el aparato sin usar el temporizador,
presione directamente el botón LOW o HIGH. Si
el temporizador está encendido (la pantalla estará

19
iluminada), presione el botón STOP antes de presionar
el botón de velocidad deseado. Para apagar el aparato,
presione el botón STOP. Para usar la función de pulso,
presione el botón PULSE; el aparato funcionará a
velocidad alta hasta que se suelte el botón. El indicador
luminoso azul parpadeará durante el uso.
NOTA: Esta licuadora está equipada con el sistema de
arranque lento Slow Start™. Siempre se pondrá en marcha
a velocidad muy baja y luego, después de un segundo,
alcanzará la velocidad escogida. Nota: Este plazo es de
solo medio segundo con la función de pulso, lo que permite
obtener resultados más homogéneos.
7. Permita que el motor se detenga completamente
antes de retirar la jarra de la base. Nunca instale/
retire la jarra mientras el motor está encendido.
8. S iempre sostenga la jarra con una mano durante el
funcionamiento. Nunca haga funcionar la licuadora
sin la tapa puesta.
9. L ave y seque la jarra después de cada uso (véase la
sección “LIMPIEZA Y DESINFECCIÓN”).
10. Desenchufe la unidad para cortar la corriente.
DISPOSITIVO DE PROTECCIÓN DEL MOTOR
• E ste aparato cuenta con un dispositivo de protección
térmica que apaga automáticamente el motor en caso de
recalentamiento.
• S i el aparato deja de funcionar en condiciones de uso
intenso, apáguelo (“OFF”) y desenchúfelo. Vacíe la jarra y
permita que el motor se enfríe por 5 a 10 minutos.
• C uando el motor esté frío, vuelva a enchufar el aparato y
siga licuando.
• S i, después de seguir estos pasos, el aparato no funciona
correctamente, deje de usarlo y comuníquese con un
centro de servicio autorizado.

20
LIMPIEZA Y DESINFECCIÓN
LIMPIE Y SEQUE LA JARRA DESPUÉS DE CADA USO,
SEGÚN SE INDICA A CONTINUACIÓN.
EL INCUMPLIMIENTO DE ESTAS INSTRUCCIONES PUEDE
CAUSAR UNA ACUMULACIÓN DE RESIDUOS EN LOS
SELLOS INTERNOS DE LA CUCHILLA, PERJUDICANDO
SU BUEN FUNCIONAMIENTO.
• L ave, enjuague, desinfecte y seque la jarra antes del
primer uso y después de cada uso, a menos que vuelva
a usarlo dentro de la hora siguiente.
• Lave y seque la jarra después de cada uso.
• L impie y desinfecte el bloque-motor antes del primer uso
y después de cada uso.
• Se recomienda usar soluciones limpiadoras a base de
detergente sin espuma y soluciones desinfectantes con
una concentración mínima de cloro de 100 ppm.
Se podrán usar las soluciones siguientes o sus equivalentes:
• L impiar la jarra frecuentemente incrementará la vida de
las cuchillas. Nunca debe transcurrir más de media hora
entre dos limpiezas.
• N o guarde alimentos o líquidos procesados en la jarra.
LIMPIEZA DE LA JARRA
1. RETIRE LA JARRA DE LA BASE. Quite la tapa.
Enjuague el interior de la jarra y la tapa. Llene la jarra
con solución limpiadora. Restriegue el interior de
la jarra con un cepillo para quitar los residuos de
alimentos. Vacíe la jarra.
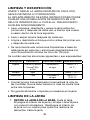
SOLUCIÓN PRODUCTO PROPORCIONES TEMPERATURA
Limpieza Diversey Wyandotte 4 cucharadas/4 L Caliente 115°F
Diversol® BX/A de agua ( 45°C )
o CX/A
Enjuague Agua Tibia 95°F (35°C)
Desinfección Cloro 1 cucharada/4 L Fría 50–70°F
de agua (10–20°C)
La page est en cours de chargement...
La page est en cours de chargement...
La page est en cours de chargement...
La page est en cours de chargement...
La page est en cours de chargement...
La page est en cours de chargement...
La page est en cours de chargement...
La page est en cours de chargement...
La page est en cours de chargement...
La page est en cours de chargement...
La page est en cours de chargement...
La page est en cours de chargement...
La page est en cours de chargement...
La page est en cours de chargement...
La page est en cours de chargement...
La page est en cours de chargement...
-
 1
1
-
 2
2
-
 3
3
-
 4
4
-
 5
5
-
 6
6
-
 7
7
-
 8
8
-
 9
9
-
 10
10
-
 11
11
-
 12
12
-
 13
13
-
 14
14
-
 15
15
-
 16
16
-
 17
17
-
 18
18
-
 19
19
-
 20
20
-
 21
21
-
 22
22
-
 23
23
-
 24
24
-
 25
25
-
 26
26
-
 27
27
-
 28
28
-
 29
29
-
 30
30
-
 31
31
-
 32
32
-
 33
33
-
 34
34
-
 35
35
-
 36
36


Waring Commercial BB300 Series Manuel utilisateur
- Catégorie
- Mélangeurs
- Taper
- Manuel utilisateur