Yoo Digital Home I.WIP 2000 Manuel utilisateur
- Taper
- Manuel utilisateur


ENGLISH

__________________________________________________________ USER’S MANUAL I.WIP 2000 5

__________________________________________________________ USER’S MANUAL I.WIP 2000 5
EN
INDEX _____________________________________
06
10
12
13
14
17
20
23
24
32
34
36
38
40
44
46
47
48
49
Cautions for safety
Product features
Parts
Before using the product
Name of parts
Installing the product
Descriptions for remote controller buttons
Basic cleaning (Automatic cleaning)
Using advanced cleaning functions
Setup of time and reservation
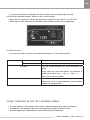
Setup and execution of macros
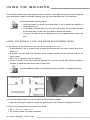
Using the indicator
Using through setup of cleaning areas
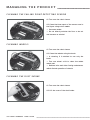
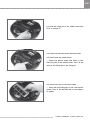
Managing the product
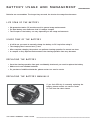
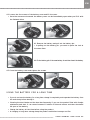
Battery usage and management
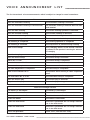
Voice announcement list
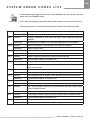
System error codes list
Checkpoints before request for after-sales service
Product specifications

6 U S E R ’ S MANUAL I . W I P 2 0 0 0 __________________________________________________________
__________________________________________________________ U S E R ’ S M A N UA L I . W I P 2 0 0 0 7
CAUTI ONS FOR SAF ETY _______________________
The instructions with the following caution marks must be carefully read and followed in order to
use the product properly and to prevent accident or damage which may occur during the operation
of the product.
SIGNIFICATION DES SYMBOLES
It refers to important information, definitions, general knowledge and references.
If you do not follow the instruction with this warning icon, a serious injury or pro-
perty loss may occur.
If you do not follow the instruction with this danger icon, a serious injury, death, or
property loss may occur.
WARNING : BEFORE USING THE PRODUCT
Remove light clothes or fragile materials from the floor. These matters may obstruct movement •
of the product or cause a breakdown of the product.
Remove any obstacle from the floor in the space where the product travels about. The product •
can’t travel the area which is blocked with an obstacle of certain height.
Do not install the product in the place under direct sunlight. Direct sunlight may cause discolora-•
tion of the product. Adapters may cause electric shock or fire due to overheat during charging.
Do not install the charger on an inclined floor, and do not give an impact to the charger. The •
charger may be damaged or broken.
Install the charger in a place that can be easily detected by the robot. If the site is in a corner •
or has many obstacles around it, automatic charging is not possible.
Do not use the product in the room with a child or an elderly person who is left alone. A child •
or an elderly person can be frightened or injured.
Make sure that the power of the charger is always supplied. Otherwise, you cannot use the •
function of making the robot go back to the charger for automatic charging after it finishes
cleaning.
Danger
Warning
Important

6 U S E R ’ S MANUAL I . W I P 2 0 0 0 __________________________________________________________
__________________________________________________________ U S E R ’ S M A N UA L I . W I P 2 0 0 0 7
EN
______________________________________________
IN USING THE PRODUCT
Do not stand or sit on the product. Movement of the product may cause an injury or the product •
can be damaged.
Do not use the product in a narrow and elevated place such as a desk. The product may fell •
down, causing an injury to people or damage to the product.
Make sure that no liquid enters the product. The product may malfunction or can be damaged.•
If the product happens to inhale plastic bags or others, they should be immediately removed. •
If the dust intake gets clogged and the product is used for a long time with the internal motor
overheated, the product will be damaged.
Do not use the enclosed battery charger for charging of any other product. The charger or other •
products can be damaged.
Make sure that clothes, hair, fingers or other body parts are not caught by the wheels. An injury •
may occur.
Do not press the bumper of the product severely or give excessive shock. The bumper sensor •
can be damaged and then work abnormally.
Do not keep or use the product at too low or high temperature. Do not use the product at the •
temperature of - 5°C or lower or 35°C or higher.
Do not make the robot perform cleaning with the dust box filled with dust. It can cause reduc-•
tion in sucking power.
Check if the filer is inserted into the dust box. If the robot gets activated with no filter, it can •
cause product failure.
Prevent the main brush and the side brush from being clogged with hairs or other foreign subs-•
tances. It can cause noise and reduction in sucking power or damage to the product.
Before using the product, clear away stuffs from the floor and make arrangement nearby. Small •
dish towels, bath towels, pads, telephone lines, power cables, strings or belts can be entangled
with the operating wheels or the brushes. Make sure to remove stuffs that can be broken (cera-
mic wares, glass cups, etc.).
Do not use the product in a site whose walls or floor is made of mirror or glass. The obstacle •
sensor of the robot cleaner uses an infrared sensor and so it may not see glass or mirrors as
obstacle.
Do not use the product in a utility room, on a wet floor, in stairs, on a table or shelf, in an under-•
ground room, a warehouse, a commercial building or the outdoors.
If you have dropped the product or caused an impact to the product, contact the designated •
service center immediately.

8 U S E R ’ S MANUAL I . W I P 2000 __________________________________________________________
__________________________________________________________ USER’S M A N UA L I . W I P 2 0 0 0 9
ELECTRICAL CAUTIONS
Make sure to use the specified voltage and current. Power supply outside the specifications •
ranges may cause a serious damage to the product.
The battery can be discharged if the product is not used for a long time. If the battery is fully •
discharged, charge it manually.
Do not use a damaged power cord or plug. You can get shocked or seriously injured.•
If the power cord of the charger is damaged, contact the service center immediately.•
Make sure that the power cord is not pulled or pressed down by the door. The power cord can •
be pulled out or damaged.
When connecting / disconnecting the plug into / from the receptacle, make sure to hold the plug •
part tight, rather than to pull the cord.
Do not touch the power cord with wet hands. You can get shocked.•
If the product is wet, pull out the power cord, and dry up the product before use. An electric •
shock or a fire may occur. If water enters the product, contact the service center.
Use the enclosed charger only. The product may be damaged due to overvoltage, or a fire or •
electric shock may occur.
Do not bend the power cord with excessive force or place a heavy stuff on it. A damaged cord •
may cause an electric shock or a fire.
Do not install the charger in a place which is damp or dusty, where water splashes or where •
steam belches out. The product may malfunction, or a shock or damage of the product may
occur.
Do not contact any metal objects such as clip and pin to the charger terminal. It can cause •
electric shock and fire.
For indicator power, use rated batteries and adapters. If not, the product can be damaged and •
then set afire or it may not work.
In case of insufficient indicator battery, replace with a new one. Or, indicator functions may not •
work normally.
CAUT I ONS FOR SAFET Y ____________________

8 U S E R ’ S MANUAL I . W I P 2000 __________________________________________________________
__________________________________________________________ USER’S M A N UA L I . W I P 2 0 0 0 9
EN
IN PRODUCT MANAGEMENT
Use the standard filter only. No warranty service will apply to any error or failure of the product •
caused due to a substandard filter.
In cleaning the product, turn the power off in advance. If you happen to care for the product •
while it is working or the power is being connected, you can get hurt.
Periodically clear brushes, dust box, dust box filter and dust intake. If the product is used for a •
long time with no clearing done, it can work abnormally and cause product failure.
OTHERS
Do not operate the product in a site with inflammable substances. Places with alcohol, gasoline, •
distilled water, thinners, ashtrays with flames, candle lights and stoves in them.
Disassembling or repairing the product must be performed by the designated service center or •
the authorized engineers. The product can be damaged or users can get shocked.
Do not discard the battery carelessly. If you put it near fire or expose it to the sun’s rays for a •
long time, it can cause fire and explosion. Discard used-up batteries safely according to local
discarding regulations.
DANGER
Do not place hot or flammable objects such as cigarette, candle, heater, match or gasoline. The •
product can be badly damaged or a fire may break out.
Do not use the product near an explosive object or in an explosive place.•
______________________________________________

10 USER’S MANUA L I.WIP 2000 __________________________________________________________
__________________________________________________________ U S E R ’ S MANUAL I . W I P 2 0 0 0 1 1
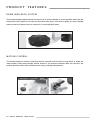
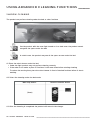
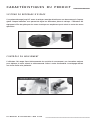
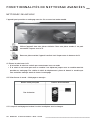
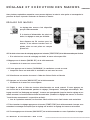
PRO DUC T FEATUR ES _________________________
ROOM INDICATOR SYSTEM
This system divides cleaning areas into up to five to select cleaning of some specified areas and the
entire place. Each indicator can help you set each room and it can work as guide for room cleaning
areas so that the cleaner will not move out of some specified areas.
MOTION CONTROL
The cleaner adopts a motion-controlling remote controller, the first time in the world, to make the
robot cleaner freely move through minute moves of the remote controller. With this function, the
product provides users with convenient and funny cleaning environments.

10 USER’S MANUA L I.WIP 2000 __________________________________________________________
__________________________________________________________ U S E R ’ S MANUAL I . W I P 2 0 0 0 1 1
EN
PRO DUC T FEATUR ES _________________________ ______________________________________________
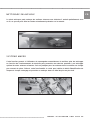
SHADOW ACTIVE
The cleaner can clean dark floors with no lights in them. It can clean every part under the bed, which
cannot be cleaned with existing cleaners.
MACRO SYSTEM
This function enables the user to manually save the most optimized cleaning pattern suitable for
home environments to make the cleaner work more efficiently than before. This is useful in homes
whose furniture does not frequently change its position. With this function, the cleaner can reduce
the time to identify the internal structure every time it starts working and finish cleaning in the
shortest time.

12 US E R ’ S MANUAL I. W I P 2000 __________________________________________________________
__________________________________________________________ USER’S MA N UA L I . W I P 2 0 0 0 1 3
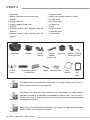
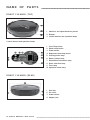
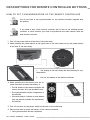
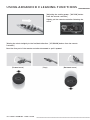
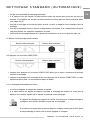
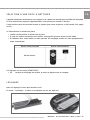
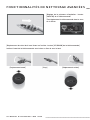
PA RTS __________________________________________
The appearance and specifications are subject to change without prior notice for
better product functions or performance.
The battery, the filter, tools and dustcloths are consumables. You need separate
purchase for used-up or damaged consumables to replace them. The life span of
the dust box filter is around six months and it can increase/decrease depending
on usage environments.
Make sure to use expendables in standard. For inquires for appropriate standards,
please contact our customer care center.
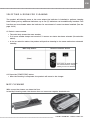
Main body•
Battery (Inserted into the main body)•
Charger•
Charger adapter•
Charger adapter power cord•
Indicator•
Indicator adapter (Not supplied with the •
product)
Indicator battery (Not supplied with the •
product)
Remote control•
Battery for remote control (2 X AAA)•
2x Side brush•
Dustcloth guard•
2x Dustcloth•
Brush•
Dust box filter•
Superfine fibers•
User manual•
Important
Important
Important
Main body Charger Charger
sdapter
Charger
sdapter
power cord
Indicator Remote control &
Battery(2x AAA)
2x Side
brush
Dustcloth guard &
2x Dustcloth
Brush Dust box filter User
manual
Quick
User
Guide

12 US E R ’ S MANUAL I. W I P 2000 __________________________________________________________
__________________________________________________________ USER’S MA N UA L I . W I P 2 0 0 0 1 3
EN
BEFO R E US I NG TH E PRODU CT _______________ PA RTS __________________________________________
* The appearance, specifications and other parts of the product are subject to change without prior
notice for better features.
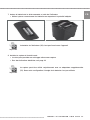
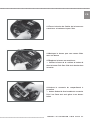
Install the left/right side brushes in the robot cleaner.1.
Turn over the robot cleaner and press the left/right side brushes to insert them.
Make sure to check the groove(D) of the side brushes before inserting them.
Make sure to prevent the product and the components from being shocked in opening the 2.
package.
For product installation, see the page 17
When you open the product package, charge it manually before others.3.
In initial opening, the battery may have been discharged and not work. For manual charging
method, see the page 18.
Clear away stuffs from the floor to be cleaned.4.
Clear away objects, which might be broken or fall, from the floor. For carpets and other decorative
stuffs with long tassels, they can hinder the product from moving normally. Fold the tassels or
clear away the carpets.
If the dust box of the robot cleaner gets filled, the cleaning performance will be worsened.5.
After cleaning operation, check if the dust box is filled up.
For clearing methods, see the page 40.
If there are foreign substances in the location-detecting sensor and the wheels, remove them.6.
Or, the robot cleaner may not move in an accurate way.
For each location, see the page 42.
Children or the old and the weak may get frightened at the robot.7.
To prevent children or the old and the weak nearby from being taken aback, let them fully un-
derstand the product is being working.
Be careful that the robot cleaner can fall from some sites.8.
At an entrance and a place whose height is different from that of the living room, if shoes are
placed at entrance, the robot might see the shoes as floor, falling from the living room. Use the
product carefully in a narrow site (e.g. desks, tables, etc.) where the robot may fall.
The cleaner may not cross over a threshold in 1cm or longer height.9.
The robot cleaner may not move properly on a carper with long wool.10.

14 US E R ’ S MANUA L I.WIP 20 0 0 __________________________________________________________
__________________________________________________________ US E R ’ S MANUAL I.WIP 2000 15
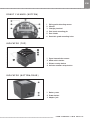
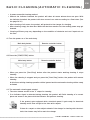
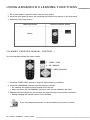
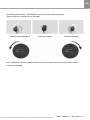
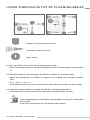
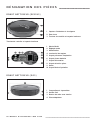
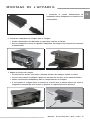
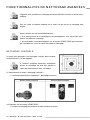
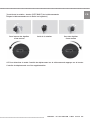
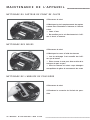
NAME OF PARTS ______________________________
ROBOT CLEANER (TOP)
Obstacle- and signal-detecting sensor1.
Bumper2.
Control buttons and operation lamps3.
Control buttons and operation lamps
Start/Stop button1.
Mode setup button2.
Power button3.
Brightness-detecting sensor4.
Sucking power lamp5.
Battery status lamp6.
Reservation information lamp7.
Room selection lamp8.
Time lamp9.
Operation mode lamp10.
ROBOT CLEANER (REAR)
Dust box1.
Air outlet2.
Power switch3.
Adapter jack4.

14 US E R ’ S MANUA L I.WIP 20 0 0 __________________________________________________________
__________________________________________________________ US E R ’ S MANUAL I.WIP 2000 15
EN
________________________________________________ NA M E OF PA RTS ______________________________
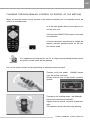
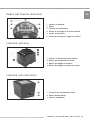
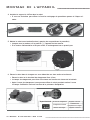
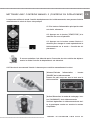
ROBOT CLEANER (BOTTOM)
Falling point-detecting sensor1.
Wheels2.
Charging terminal3.
Side brush mounting pin4.
Dust intake5.
Dustcloth guard mounting holes6.
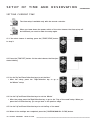
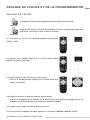
INDICATOR (TOP)
Signal transmission sensor1.
Mode switch button2.
Distance setup button3.
Indicator number setup button4.
INDICATOR (BOTTOM/REAR)
Battery cover1.
Power button2.
Adaptor jack3.

16 US E R ’ S MANUAL I. W I P 2000 __________________________________________________________
__________________________________________________________ USER’S MA N UA L I . W I P 2 0 0 0 1 7
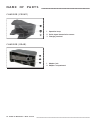
NAME OF PARTS ______________________________
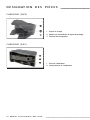
CHARGER (FRONT)
Operation lamp1.
Guide signal transmission sensor2.
Charging terminal3.
CHARGER (REAR)
Adapter jack1.
Adapter compartment2.

16 US E R ’ S MANUAL I. W I P 2000 __________________________________________________________
__________________________________________________________ USER’S MA N UA L I . W I P 2 0 0 0 1 7
EN
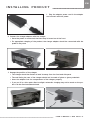
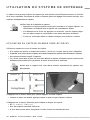
INSTAL LING PRO DUC T _______________________ NA ME OF PART S ______________________________
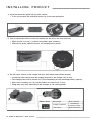
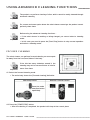
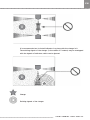
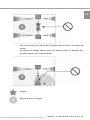
Plug the adapter power cord in the adapter 1.
and connect with the power.
Connect the charger adapter with the charger.2.
Once the power is connected, the blue lamp is turned on at the front.•
For appropriate charging of the product, the charger adapter should be connected with the •
power in any case.
Arrange the position of the charger.3.
The charger should be distant at least 1m away from the front and side parts.•
The wall facing the rear of the charger should not be made of glass or glossy materials.•
Insert the adapter into the compartment of the charger, properly.•
If you put it in a site under direct sunlight, automatic charging may not be made or the pro-•
duct can be discolored/decolorized.

18 US E R ’ S MANUAL I. W I P 2000 __________________________________________________________
__________________________________________________________ US E R ’ S M A N UA L I . W I P 2000 19
INSTAL LING PRO DUC T _______________________
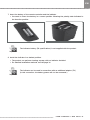
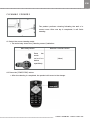
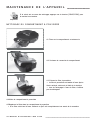
Install the dustcloth guard into the robot cleaner.4.
If you do not want the dustcloth function, go to the next procedure.•
Turn on the power switch of the robot cleaner (at the left of the rear dust box).5.
Whenyouliftittothe[•]position,theproductgetsturnedon.•
Without the power switch turned on, no charging will be made.•
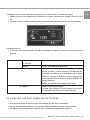
Put the robot cleaner in the charger with your both hands and activate manual6.
Locate the robot cleaner and the charging terminal of the charger, face to face.•
The charging time can be around one (1) hour depending on the remaining battery capacity.•
After 1-hour charging, you can use the product for around one (1) hour.•
Usage time may vary depending on the strength of the sucking power.•
Battery lamp
Being charged Blinks 1 time/sec
Charging completed
The battery is
completely charged.
Low battery Blinks 4 times/sec

18 US E R ’ S MANUAL I. W I P 2000 __________________________________________________________
__________________________________________________________ US E R ’ S M A N UA L I . W I P 2000 19
EN
________________________________________________ IN S TA LLI N G PROD U CT _______________________
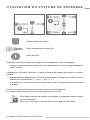
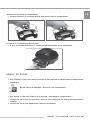
Insert the battery of the remote controller and the indicator.7.
You need to insert the battery in a correct position following the polarity data indicated in •
the insertion position.
The indicator battery (D2 specifications) is not supplied with the product.
Install the indicator in a desired position.8.
The product can perform cleaning, anyway, with no indicator installed.•
For detailed installation methods, see the page 36.•
The indicator can be used in connection with an additional adaptor (5V).
(In this connection, the battery power will not be consumed.)
Important
Important

20 U S E R ’ S MANUA L I.WIP 2000 __________________________________________________________
__________________________________________________________ US E R ’ S M A N UA L I.WIP 2000 21
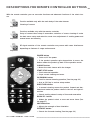
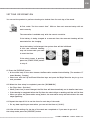
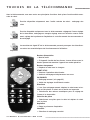
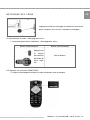
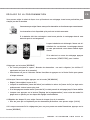
DESCRIPTIONS FOR REMOTE CONTROLLER BUTTONS _
With the remote controller, you can use main functions and advanced functions of the robot clea-
ner.
Function available only with the main body of the robot cleaner.
Cleaning of corners
Functions available only with the remote controller.
Setup of current time, setup of reservation, selection of rooms, cleaning of under
the bed, macro setup and selection, mute tone, adjustment of sucking power and
manual move and cleaning
RF signal modules of the remote controller may cause radio wave interference
depending on features of usage environments.
POWER button
•Turnson/offthepower
•Iftheproductoperationgetsstoppedduetoerrors,the
button makes the product go back to the operation mode.
CHARGE button
•Movestherobotcleanerwiththecharger
START/STOP button
•Startsselectedoperation
•Stopscurrentcleaningandmove
OK/MANUAL button
•Usedformanualcleaningoperation(Seethepage28.)
•Actsas[Ok]keyinvarioussetupmodes.
DIRECTION buttons
•Inmanualcleaning,movestheproductforwardandbac-
kward and make the product rotate in the left and right di-
rections.
•Selectssettingvaluesinsetupoftimeandreservation
ROOM SEL. button
• Makes the product selectaroom andmovethere (See
the page 27.)
VACUUM button
•Adjuststhestrengthofdustinhalation
INTENSIVE button
•Selectsthefocusedcleaning(Seethepage24.).
Important
Important
Important
La page est en cours de chargement...
La page est en cours de chargement...
La page est en cours de chargement...
La page est en cours de chargement...
La page est en cours de chargement...
La page est en cours de chargement...
La page est en cours de chargement...
La page est en cours de chargement...
La page est en cours de chargement...
La page est en cours de chargement...
La page est en cours de chargement...
La page est en cours de chargement...
La page est en cours de chargement...
La page est en cours de chargement...
La page est en cours de chargement...
La page est en cours de chargement...
La page est en cours de chargement...
La page est en cours de chargement...
La page est en cours de chargement...
La page est en cours de chargement...
La page est en cours de chargement...
La page est en cours de chargement...
La page est en cours de chargement...
La page est en cours de chargement...
La page est en cours de chargement...
La page est en cours de chargement...
La page est en cours de chargement...
La page est en cours de chargement...
La page est en cours de chargement...
La page est en cours de chargement...
La page est en cours de chargement...
La page est en cours de chargement...
La page est en cours de chargement...
La page est en cours de chargement...
La page est en cours de chargement...
La page est en cours de chargement...
La page est en cours de chargement...
La page est en cours de chargement...
La page est en cours de chargement...
La page est en cours de chargement...
La page est en cours de chargement...
La page est en cours de chargement...
La page est en cours de chargement...
La page est en cours de chargement...
La page est en cours de chargement...
La page est en cours de chargement...
La page est en cours de chargement...
La page est en cours de chargement...
La page est en cours de chargement...
La page est en cours de chargement...
La page est en cours de chargement...
La page est en cours de chargement...
La page est en cours de chargement...
La page est en cours de chargement...
La page est en cours de chargement...
La page est en cours de chargement...
La page est en cours de chargement...
La page est en cours de chargement...
La page est en cours de chargement...
La page est en cours de chargement...
La page est en cours de chargement...
La page est en cours de chargement...
La page est en cours de chargement...
La page est en cours de chargement...
La page est en cours de chargement...
La page est en cours de chargement...
La page est en cours de chargement...
La page est en cours de chargement...
La page est en cours de chargement...
La page est en cours de chargement...
La page est en cours de chargement...
La page est en cours de chargement...
La page est en cours de chargement...
La page est en cours de chargement...
La page est en cours de chargement...
La page est en cours de chargement...
La page est en cours de chargement...
La page est en cours de chargement...
La page est en cours de chargement...
La page est en cours de chargement...
La page est en cours de chargement...
La page est en cours de chargement...
La page est en cours de chargement...
La page est en cours de chargement...
La page est en cours de chargement...
La page est en cours de chargement...
La page est en cours de chargement...
La page est en cours de chargement...
La page est en cours de chargement...
La page est en cours de chargement...
La page est en cours de chargement...
La page est en cours de chargement...
-
 1
1
-
 2
2
-
 3
3
-
 4
4
-
 5
5
-
 6
6
-
 7
7
-
 8
8
-
 9
9
-
 10
10
-
 11
11
-
 12
12
-
 13
13
-
 14
14
-
 15
15
-
 16
16
-
 17
17
-
 18
18
-
 19
19
-
 20
20
-
 21
21
-
 22
22
-
 23
23
-
 24
24
-
 25
25
-
 26
26
-
 27
27
-
 28
28
-
 29
29
-
 30
30
-
 31
31
-
 32
32
-
 33
33
-
 34
34
-
 35
35
-
 36
36
-
 37
37
-
 38
38
-
 39
39
-
 40
40
-
 41
41
-
 42
42
-
 43
43
-
 44
44
-
 45
45
-
 46
46
-
 47
47
-
 48
48
-
 49
49
-
 50
50
-
 51
51
-
 52
52
-
 53
53
-
 54
54
-
 55
55
-
 56
56
-
 57
57
-
 58
58
-
 59
59
-
 60
60
-
 61
61
-
 62
62
-
 63
63
-
 64
64
-
 65
65
-
 66
66
-
 67
67
-
 68
68
-
 69
69
-
 70
70
-
 71
71
-
 72
72
-
 73
73
-
 74
74
-
 75
75
-
 76
76
-
 77
77
-
 78
78
-
 79
79
-
 80
80
-
 81
81
-
 82
82
-
 83
83
-
 84
84
-
 85
85
-
 86
86
-
 87
87
-
 88
88
-
 89
89
-
 90
90
-
 91
91
-
 92
92
-
 93
93
-
 94
94
-
 95
95
-
 96
96
-
 97
97
-
 98
98
-
 99
99
-
 100
100
-
 101
101
-
 102
102
-
 103
103
-
 104
104
-
 105
105
-
 106
106
-
 107
107
-
 108
108
-
 109
109
-
 110
110
-
 111
111
-
 112
112


Yoo Digital Home I.WIP 2000 Manuel utilisateur
- Taper
- Manuel utilisateur
dans d''autres langues
Autres documents
-
Beko VRR Manuel utilisateur
-
LG VPARQUET Manuel utilisateur
-
-
Fagor FG879 Le manuel du propriétaire
-
 E.zicom e.ziclean Manuel utilisateur
-
E.zicom E.ziclean Furtiv Manuel utilisateur
-
Samsung SR8898 Manuel utilisateur
-
Samsung SR10F71UB Manuel utilisateur
-
Samsung VCR8830T1R Manuel utilisateur
-
Laresar L6 Pro Robotic Vacuum Cleaner Manuel utilisateur
