Sunbrella Veranda Classic 6PC Woven Seating Set FG-MELSCT6PC Manuel utilisateur
- Taper
- Manuel utilisateur

1
IMPORTANT, RETAIN FOR FUTURE REFERENCE:
READ CAREFULLY
For Outdoor Use Only
6PC Woven Seating Set
ITM. / ART. 1902233
model# FG-MELSCT6PC
Customer Service
E-Mail : customerservice@foremostgroups.com
8:30a.m.– 5:00p.m. EST, M-F
Toll Free 1-855-390-5474
(Int.) 001-855-286-4931
Fax: (973) 428-8026
Website: www.foremostgroups.com
906 Murray Road East Hanover, New Jersey 07936 US

2
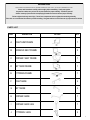
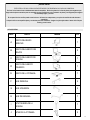
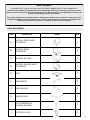
PART DESCRIPTION PICTURE QTY
A RIGHT ARM FRAME
1
B ARMLESS SEAT FRAME
2
C CORNER SEAT FRAME
1
D LEFT ARM FRAME
1
E OTTOMAN FRAME
1
F RIGHT BASE
4
G LEFT BASE
4
H CORNER BASE
1
I CORNER BACK LEG
1
J OTTOMAN LEGS
4
WARNING!
THIS ITEM IS INTENDED FOR OUTDOOR DOMESTIC USE ONLY, NOT FOR COMMERCIAL USE.
Please read instructions carefully and thoroughly before assembling. Check parts against
the parts list to make sure you have all the parts needed for proper assembly. Familiarize yourself
with the inventory of parts and the accompanying illustrations to ensure safe and proper assembly.
Failure to tighten bolts may cause injury. Do not force components and over tighten the nuts during assembly.
Place chair on a non-abrasive flat surface to prevent scratching. Hang wet cushion over chair frame to dry to prevent mold / mildew.
PARTS LIST

3
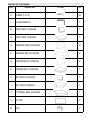
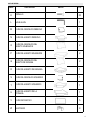
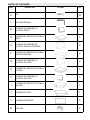
PART DESCRIPTION PICTURE QTY
K SCREW (1/4*15)
53
L ALLEN WRENCH
1
M RIGHT BACK CUSHION
1
N RIGHT SEAT CUSHION
1
O ARMLESS BACK CUSHION
2
P ARMLESS SEAT CUSHION
2
Q CORNER BACK CUSHION
2
R CORNER SEAT CUSHION
1
S LEFT BACK CUSHION
1
T LEFT SEAT CUSHION
1
U OTTOMAN SEAT CUSHION
1
V PILLOW
5
W CLIP
8
PARTS LIST CONTINUED

4
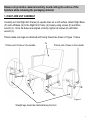
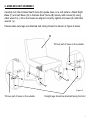
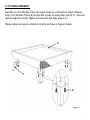
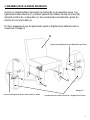
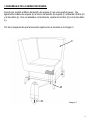
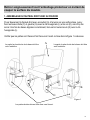
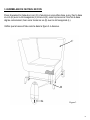
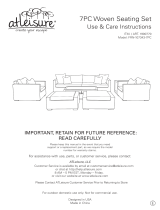
Figure 1
1. RIGHT ARM UNIT ASSEMBLY
Carefully turn the Right Arm Frame (A) upside down on a soft surface. Attach Right Base
(F) and Left Base (G) to the Right Arm Frame (A) loosely using screws (K) and Allen
wrench (L). Once the bases are aligned correctly, tighten all screws (K) with Allen
wrench (L).
Please make sure legs are attached and facing forward as shown in Figure 1 below.
A
F
K
G
Straight legs should be attached facing the front.
K
Thinner part of base on the outside.
Thinner part of base on the outside.
Remove all protective material carefully. Avoid cutting the surface of the
furniture while removing the packaging material.

5
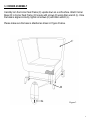
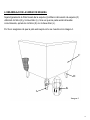
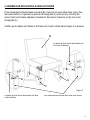
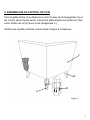
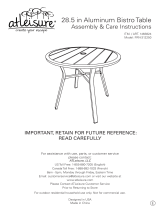
Figure 2
2. ARMLESS UNIT ASSEMBLY
Carefully turn the Armless Seat Frame (B) upside down on a soft surface. Attach Right
Base (F) and Left Base (G) to Armless Seat Frame (B) loosely with screws (K) using
Allen wrench (L). Once the bases are aligned correctly, tighten all screws (K) with Allen
wrench (L).
Please make sure legs are attached and facing forward as shown in Figure 2 below.
B
F
K
G
Straight legs should be attached facing the front.
K
Thinner part of base on the outside.
Thinner part of base on the outside.

6
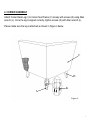
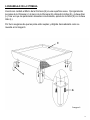
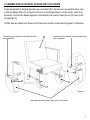
Figure 3
3. CORNER ASSEMBLY
Carefully turn the Corner Seat Frame (C) upside down on a soft surface. Attach Corner
Base (H) to Corner Seat Frame (C) loosely with screws (K) using Allen wrench (L). Once
the base is aligned correctly, tighten all screws (K) with Allen wrench (L).
Please make sure the base is attached as shown in Figure 3 below.
C
H
K

7
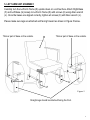
Figure 4
4. CORNER ASSEMBLY
Attach Corner Back Leg (I) to Corner Seat Frame (C) loosely with screws (K) using Allen
wrench (L). Once the leg is aligned correctly, tighten screws (K) with Allen wrench (L).
Please make sure the leg is attached as shown in Figure 4 below.
C
H
K
I

8
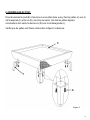
Figure 5
5. LEFT ARM UNIT ASSEMBLY
Carefully turn the Left Arm Frame (D) upside down on a soft surface. Attach Right Base
(F) and Left Base (G) loosely to Left Arm Frame (D) with screws (K) using Allen wrench
(L). Once the bases are aligned correctly, tighten all screws (K) with Allen wrench (L).
Please make sure legs are attached and facing forward as shown in Figure 5 below.
D
F
K
G
K
Straight legs should be attached facing the front.
Thinner part of base on the outside. Thinner part of base on the outside.

9
Figure 6
6. OTTOMAN ASSEMBLY
Carefully turn the Ottoman Frame (E) upside down on a soft surface. Attach Ottoman
Legs (J) to Ottoman Frame (E) loosely with screws (K) using Allen wrench (L). Once the
legs are aligned correctly, tighten all screws (K) with Allen wrench (L).
Please make sure legs are attached correctly as shown in Figure 6 below.
E
J
K

10
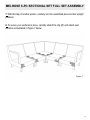
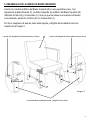
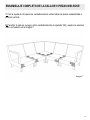
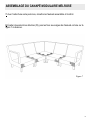
8. To secure your sectional in place, carefully stretch the clip (W) and attach seat
sections as illustrated in Figure 7 below.
MELROSE 6-PC SECTIONAL SET FULL SET ASSEMBLY
Figure 7
7. With the help of another person, carefully turn the assembled pieces to their upright
positions.

11
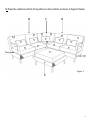
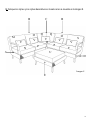
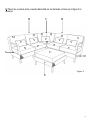
9. Place the cushions and the throw pillows on the sections as shown in Figure 8 below.
A
B
C
B
D
E
U
N
M
V
V
V
V
V
P
O
Q
Q
R
O
P
T
S
Figure 8

12
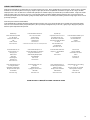
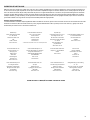
CARE & MAINTENANCE
Clean furniture frame with wet towel using mild soap and water solution. Dry completely with soft towel. Clean cushions and sling seat material with a mild solution of
soap and water and hang cushions to drip dry completely. Store them in a clean dry area of your home. Do not machine wash or dry. Do not use bleach or strong
solvents to clean any of your patio furniture. It will harm both fabrics and metal finishes. Caution should be used when using oils, lotions and other chemicals such as
chlorine or repeated exposure to extreme weather conditions (including heat), which may cause permanent discoloration to the fabric. To maintain and protect the
furniture, always cover it with an outdoor furniture cover or store in a safe area when not in use for long periods of time.
Sunbrella® Fabric Cleaning Instructions:
Sunbrella® fabric should be cleaned regularly. Brush off any loose dirt and wash with a mild soap and lukewarm water solution. For stubborn stains and mildew, wash with
a solution of 236 ml (1 cup) of bleach and 59 ml (1/4 cup) of mild soap per 3.8 l (gallon) of water. Rinse thoroughly to remove soap. Allow fabric to air dry.
MADE IN CHINA / FABRIQUÉ EN CHINE / HECHO EN CHINA
Distributed by: Costco Wholesale Canada Ltd.* Importado por:
Costco Wholesale Corporation 415 W. Hunt Club Road Importadora Primex S.A. de C.V. Costco Wholesale Australia Pty Ltd
P.O. Box 34535 Ottawa, Ontario Blvd. Magnocentro No. 4 17-21 Parramatta Road
Seattle, WA 98124-1535 K2E 1C5, Canada San Fernando La Herradura Lidcombe NSW 2141
USA 1-800-463-3783 Huixquilucan, Estado de México Australia
1-800-774-2678 www.costco.ca C.P. 52765 www.costco.com.au
www.costco.com
* faisant affaire au Québec sous le nom Les Entrepôts Costco
RFC: IPR-930907-S70
(55)-5246-5500
www.costco.com.mx
Costco Wholesale UK Ltd / Costco Wholesale Spain S.L.U. Costco Wholesale Iceland ehf. Costco France
Costco Online UK Ltd Polígono Empresarial Los Gavilanes Kauptún 3-7, 210 Gardabaer 1 avenue de Bréhat
Hartspring Lane C/ Agustín de Betancourt, 17 Iceland 91140 Villebon-sur-Yvette
Watford, Herts 28906 Getafe (Madrid) España www.costco.is France
WD25 8JS NIF: B86509460 01 80 45 01 10
United Kingdom 900 111 155 www.costco.fr
01923 213113 www.costco.es
www.costco.co.uk
Costco Wholesale Japan Ltd. Costco Wholesale Korea, Ltd. Costco President Taiwan, Inc. Shanghai Minhang Costco Trading
3-1-4 Ikegami-Shincho 40, Iljik-ro No. 656 Chung-Hwa 5th Road Co., Ltd
Kawasaki-ku, Kawasaki-shi, Gwangmyeong-si Kaohsiung, Taiwan Unit 109, No 388, Lian You Road
Kanagawa 210-0832 Japan Gyeonggi-do, 14347, Korea Company Tax ID: 96972798 Minhang District, Shanghai
0570-032600 1899-9900 0800-885-889 China 201107
www.costco.co.jp
www.costco.co.kr
www.costco.com.tw +86-21-6257-7065

13
IMPORTANTE, CONSERVAR ESTAS INSTRUCCIONES PARA
REFERENCIAS FUTURAS: LEER DETENIDAMENTE
Para su uso en exteriores solamente
6 PIEZAS JUEGO DE SALA TEJIDA
ITM. / ART. 1902233
m# FG-MELSCT6PC
Atención al cliente
Correo electrónico:customerservice@foremostgroups.com
8:30 a.m.– 5:00p.m. EST, M-F
Toll Free 1-855-390-5474
(Int.) 001-855-286-4931
Fax: (973) 428-8026
Página web: www.foremostgroups.com
906 Murray Road East Hanover, New Jersey 07936 US

14
PIEZA DIBUJO IMAGEN CTD.
A
MARCO DEL BRAZO
DERECHO
1
B
MARCO DEL ASIENTO SIN
BRAZOS
2
C
MARCO DEL ASIENTO DE
ESQUINA
1
D
MARCO DEL ASIENTO
IZQUIERDO
1
E
MARCO DE LA OTOMANA
1
F
BASE DERECHA
4
G
BASE IZQUIERDA
4
H
BASE DE ESQUINA
1
I
PATA TRASERA DE LA
ESQUINA
1
J
PATAS DE LA OTOMANA
4
¡ADVERTENCIA!
ESTE ARTÍCULO ES SOLO PARA USO EN EXTERIORES Y EN RESIDENCIAS, NO PARA USO COMERCIAL
Por favor lea las instrucciones cuidadosamente antes de ensamblar. Revise las piezas con la lista de piezas para asegurarse que
tenga todas las piezas necesarias para un ensamble correcto. Familiarícese con el inventario de piezas y las imágenes para asegurar
un ensamblaje seguro y correcto.
El no apretar bien los tornillos puede causar lesiones. No fuerce los componentes y no apriete los tornillos de más durante el
ensamblaje.
Coloque la silla en una superficie plana y no abrasiva para evitar ralladuras. Cuelgue el cojín mojado sobre el maco de la silla para
secarlo y prevenir moho.
LISTA DE PIEZAS

15
PIEZA DESCRIPCIÓN DIBUJO CTD.
K
TORNILLO
53
L
LLAVE ALLEN
1
M
COJÍN DEL RESPALDO DERECHO
1
N
COJÍN DEL ASIENTO DERECHO
1
O
COJÍN DEL RESPALDO DEL
ASIENTO SIN BRAZOS
2
P
COJÍN DEL ASIENTO SIN BRAZOS
2
Q
COJÍN DEL RESPALDO DEL
ASIENTO DE ESQUINA
2
R
COJÍN DEL ASIENTO DE ESQUINA
1
S
COJÍN DEL RESPALDO IZQUIERDO
1
T
COJÍN DEL ASIENTO IZQUIERDO
1
U
COJÍN DEL ASIENTO DE LA
OTOMANA
1
V
COJÍN DECORATIVO
5
W
SUJETADOR
8
LISTA DE PIEZAS

16
Imagen 1
1. ENSAMBLAJE DE LA UNIDAD DE BRAZO DERECHO
Invierta con cuidado el Marco del Brazo Derecho (A) en una superficie suave. Fije
ligeramente la Base Derecha (F) y la Base Izquierda (G) al Marco del Brazo Derecho (A)
utilizando tornillos (K) y la llave Allen (L). Una vez alineados correctamente, apriete los
tornillos (K) con la llave Allen (L).
Por favor asegúrese de que las patas estén sujetas y dirigidas hacia adelante como se
muestra en la Imagen 1.
A
F
K
G
Las patas deberán sujetarse derechas y dirigidas hacia el frente.
K
La parte más delgada de la base deberá estar por afuera
La parte más delgada de la base deberá estar por afuera
Retire cuidadosamente todo el material protector. Evite cortar la superficie
del mueble mientras retira el embalaje.

17
Imagen 2
2. ENSAMBLAJE DE LA UNIDAD SIN BRAZOS
Invierta con cuidado el Marco del asiento sin brazos (B) en una superficie suave. Fije
ligeramente la Base Derecha (F) y la Base Izquierda (G) al Marco de silla sin brazos (B)
utilizando tornillos (K) y la llave Allen (L). Una vez alineados correctamente, apriete los
tornillos (K) con la llave Allen (L).
Por favor asegúrese de que las patas estén sujetas y dirigidas hacia adelante como se
muestra en la Imagen 2.
B
F
K
G
Las patas deberán sujetarse derechas y dirigidas hacia el frente.
K
La parte más delgada de la base deberá estar por afuera
La parte más delgada de la base deberá estar por afuera

18
Imagen 3
3. ENSAMBLAJE DE LA UNIDAD DE ESQUINA
Invierta con cuidado el Marco del asiento de esquina (C) en una superficie suave. Fije
ligeramente la Base de esquina (H) al marco del asiento de esquina (C) utilizando tornillos (K)
y la llave Allen (L). Una vez alineados correctamente, apriete los tornillos (K) con la llave Allen
(L).
Por favor asegúrese de que la base esté sujeta como se muestra en la Imagen 3.
C
H
K

19
Imagen 4
4. ENSAMBLAJE DE LA UNIDAD DE ESQUINA
Sujete ligeramente la Pata trasera de la esquina (I) al Marco del asiento de esquina (C)
utilizando tornillos (K) y la llave Allen (L). Una vez que las patas estén alineadas
correctamente, apriete los tornillos (K) con la llave Allen (L).
Por favor asegúrese de que la pata esté sujeta como se muestra en la Imagen 4.
C
H
K
I

20
Imagen 5
5. ENSAMBLAJE DE LA UNIDAD DE BRAZO IZQUIERDO
Invierta con cuidado el Marco del Brazo Izquierdo (D) en una superficie suave. Fije
ligeramente la Base Derecha (F) y la Base Izquierda (G) al Marco del Brazo Izquierdo (D)
utilizando tornillos (K) y la llave Allen (L). Una vez que las bases se encuentren alineados
correctamente, apriete los tornillos (K) con la llave Allen (L).
Por favor asegúrese de que las patas estén sujetas y dirigidas hacia adelante como se
muestra en la Imagen 5.
D
F
K
G
K
Las patas deberán sujetarse derechas y dirigidas hacia el frente.
La parte más delgada de la base deberá estar por afuera La parte más delgada de la base deberá estar por afuera
La page charge ...
La page charge ...
La page charge ...
La page charge ...
La page charge ...
La page charge ...
La page charge ...
La page charge ...
La page charge ...
La page charge ...
La page charge ...
La page charge ...
La page charge ...
La page charge ...
La page charge ...
La page charge ...
-
 1
1
-
 2
2
-
 3
3
-
 4
4
-
 5
5
-
 6
6
-
 7
7
-
 8
8
-
 9
9
-
 10
10
-
 11
11
-
 12
12
-
 13
13
-
 14
14
-
 15
15
-
 16
16
-
 17
17
-
 18
18
-
 19
19
-
 20
20
-
 21
21
-
 22
22
-
 23
23
-
 24
24
-
 25
25
-
 26
26
-
 27
27
-
 28
28
-
 29
29
-
 30
30
-
 31
31
-
 32
32
-
 33
33
-
 34
34
-
 35
35
-
 36
36


Sunbrella Veranda Classic 6PC Woven Seating Set FG-MELSCT6PC Manuel utilisateur
- Taper
- Manuel utilisateur
dans d''autres langues
Autres documents
-
 OVE Mesa II 6-piece Guide d'installation
-
 OVE Decors EGO3PC Mode d'emploi
-
Martha Stewart 15PDBR-SUNN26-BR1 Manuel utilisateur
-
 HomeSullivan 403292-01(MTL) Guide d'installation
-
 Foremost 1656678 Assembly Instructions
-
 Foremost 1656678 Assembly Instructions
-
 Atleisure FRN-107343-7PC Manuel utilisateur
-
 Atleisure FRN-312250 Manuel utilisateur
-
Classic Accessories 62-009-HFERN-EC Mode d'emploi
-
Classic Accessoires 60-374-011101-RT Mode d'emploi


