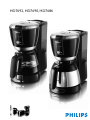
Philips HD7686/30 Manuel utilisateur
- Catégorie
- Accessoires de préparation de café
- Taper
- Manuel utilisateur

HD7692, HD7690, HD7686

2
1

HD7692,HD7690,HD7686
ENGLISH 4
FRANÇAIS 9
INDONESIA
15
한국어 20
BAHASA MELAYU
25
ภาษาไทย 30
35
繁體中文 40
简体中文 49
54
59

4
Important
Read this user manual carefully before you use the appliance and save it for future reference.
Check if the voltage indicated on the appliance corresponds to the local mains voltage before
you connect the appliance.
Do not use the appliance if the mains cord, the plug or the appliance itself is damaged.
If the mains cord is damaged, you must have it replaced by Philips, a service centre authorised by
Philips or similarly qualied persons in order to avoid a hazard.
This appliance is not intended for use by persons (including children) with reduced physical,
sensory or mental capabilities, or lack of experience and knowledge, unless they have been given
supervision or instruction concerning use of the appliance by a person responsible for their
safety.
Children should be supervised to ensure that they do not play with the appliance.
Keep the cord out of the reach of children. Do not let the mains cord hang over the edge of
the table or worktop on which the appliance stands.
Do not place the appliance on a hot surface and do not let the mains cord come into contact
with hot surfaces.
Never immerse the appliance in water or any other liquid.
Unplug the appliance if problems occur during brewing and before you clean it.
Thermos jug (HD7692 only)
Do not disassemble the thermos jug.
To prevent water from entering the thermos jug, never immerse the jug in water or any other
liquid.
The thermos jug is not dishwasher-proof.
When the jug is lled with coffee, keep it in upright position to prevent leakage.
During brewing, the lower part of the appliance and the bottom of the thermos jug become
hot.
Electromagnetic elds (EMF)
This Philips appliance complies with all standards regarding electromagnetic elds (EMF). If handled
properly and according to the instructions in this user manual, the appliance is safe to use based on
scientic evidence available today.
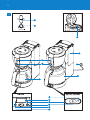
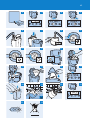
General description (Fig. 1)
A Filter holder
B Detachable water tank
C Mains plug
D Thermos jug (HD7692 only)
E Glass jug
F Aroma Control knob
G Aroma Control indicator
H Descaling light (HD7692/HD7686 only)
I Display (HD7690 only)
J Power-on light
K On/off button
L Timer light (HD7690 only)
M Timer button (HD7690 only)
Preparing for use
1
Puttheapplianceonaatandstablesurface.
2 Putthepluginanearthedwallsocket.
-
-
-
-
-
-
-
-
-
-
-
-
-
-
ENGLISH

3 Youcanstoreexcesscordbypushingitintotheopeninginthebackofthecoffee
maker(Fig.2).
Setting the clock (HD7690 only)
1 Afteryouhaveputthepluginthewallsocket,theword‘SET’appearsonthedisplay(Fig.3).
2 Pressthe‘H’buttononeormoretimestosetthehour(Fig.4).
Thedisplayshowsthesethour(e.g.7:00).
3 Pressthe‘M’buttononeormoretimestosettheminutes(Fig.5).
Thedisplayshowsthesetminutes(e.g.7:20).
Flushing the appliance
1 Removethewatertankandllitwithfresh,coldtapwater(Fig.6).
HD7692only:Whenyouoperatetheappliancewithoutgroundcoffee,donotllthewatertank
beyondthe8-cupmark,otherwisethethermosjugwilloverow.
2 Putthewatertankbackontotheappliance(Fig.7).
Do not put a lter and ground coffee in the lter holder.
3 Presstheon/offbuttontoswitchontheappliance.
Thepower-onlightgoeson.
4 Lettheapplianceoperateuntilthewatertankisempty.
HD7692:Theapplianceswitchesoffautomaticallyafterbrewing.
5 HD7690/HD7686:Presstheon/offbuttontoswitchofftheappliance.
The appliance switches off automatically after 2 hours.
6 Cleanthejugandthelterholder(seechapter‘Cleaning’).
7 Lettheappliancecooldownforatleast3minutesbeforeyoustartbrewingcoffee.
Thermos jug (HD7692 only)
Note: Always preheat the thermos jug with hot tap water before you start brewing coffee.
1 Rinsethethermosjugwithhottapwatertopreheatit(Fig.8).
To obtain the tastiest and hottest coffee, brew at least half a jug of coffee.
2 Topouroutcoffee,turnthelidtotherightbyitsnuntilthearrowonthejugpoints
towardsthe‘pour’symbolonthelid.Alwaysclosethelidafterpouringcoffeetokeepthe
coffeehot(Fig.9).
3 Toclosethelid,turnittotheleftbyitsnuntilthearrowonthejugpointstowardsthe
‘closed/brewing’symbolonthelid(Fig.10).
4 Toremovethelidfromthethermosjug,turnittotheleftbyitsnuntilthearrowonthejug
pointstowardsthe‘removelid’symbolonthelid(Fig.11).
Using the appliance
Brewing coffee
This coffee maker is equipped with Aroma Control, which allows you to adjust the strength of the
coffee to your own taste. Aroma Control also helps you determine the right balance between pre-
ground coffee and water.
Note: When you use Aroma Control, always ll the water tank with water before you put ground coffee in
the lter.
,
,
,
,
ENGLISH 5

1 Makesuretheplugisinthewallsocket.
2 Makesuretheglassjugorthermosjug(withthelidinthe‘closed/brewing’positionr)is
underthelterholder.
3 SetthecoffeestrengthyoupreferwiththeAromaControlknob.(Fig.12)
To increase the coffee strength, turn the knob to the right. To decrease the coffee strength, turn the
knob to the left.
Note: When you set the coffee strength, make sure that the lter holder is in the appliance.
4 Removethewatertankandllitwithfresh,coldtapwater(Fig.6).
The level indications correspond to cups of 120ml.
5 Putthewatertankbackontotheapplianceproperly(Fig.7).
TheAromaControlindicatormovesupwards.
6 Takeapaperlter(type1x4orno.4)andfoldthesealededgestopreventtearingand
folding.
Note: If you want to use Aroma Control to determine the right balance between ground coffee and water,
do not use a permanent lter. Due to its weight, a permanent lter disrupts the coffee-water balance of
Aroma Control.
7 Openthelterholderlidandputapaperlterinthelterholder(Fig.13).
8 Putpre-groundcoffee(lter-negrind)inthelteruntiltheAromaControlindicatorisin
theOKpositionandclosethelterholderlid(Fig.14).
9 Presstheon/offbuttontoswitchontheappliance.
Theredpower-onlightgoeson.
10 Whenallthewaterhaspassedthroughthelter,youcanremovethejugfromtheappliance.
Ifyouremovethejugformorethan30secondsbeforeallthewaterhaspassedthroughthe
lter,theltermayoverow.
HD7692:theapplianceswitchesoffautomaticallyafterbrewing.Thethermosjugkeepsthe
coffeehot.
HD7690/HD7686:thecoffeeiskepthotonthehotplateaslongasyouleavetheappliance
switchedon.
11 HD7690/7HD7686:presstheon/offbuttontoswitchofftheapplianceafteruse.
The appliance switches off automatically after 2 hours.
12 Removethelterholder(Fig.15).
13 Throwawaythepaperlter.(Fig.16)
14 Lettheappliancecooldownforatleast3minutesbeforeyoustartbrewingcoffeeagain.
Timer (HD7690 only)
You can use the timer to preset the time at which you want the coffeemaker to brew coffee.
Note: If you want to use the timer function (HD7690 only), make sure the clock is set to the correct
time. You can only set the current time when the appliance is switched off (see section ‘Setting the clock’
in chapter ‘Preparing for use’).
Note: After a power failure, you have to set the clock and the timer again.
1 Pressthetimerbutton(Fig.17).
Thedisplayshowsthesetauto-ontimeandtheyellowtimerlightgoeson.
,
,
,
,
,
ENGLISH6

Afteryoupressthetimerbutton,thenormaltimereappearsifyoustoppressingthehour
buttonorminutesbuttonformorethan5seconds.Inthatcase,thetimerisset.
2 Pressthe‘H’buttononeormoretimestosetthehour(Fig.4).
3 Pressthe‘M’buttononeormoretimestosettheminutes(Fig.5).
5secondsafteryoustoppressingthehourbuttonorminutesbutton,thenormal
timereappears.Theyellowtimerlightgoesontoindicatethatthetimerisset.
4 Followsteps1to8ofsection‘Brewingcoffee’topreparetheapplianceforbrewingcoffee.
5 Theappliancestartsbrewingcoffeeatthepresettime.
Theyellowtimerlightgoesoffandtheredpower-onlightgoeson.
If you want to check whether you have set the timer correctly, press the timer button.
If you want to switch off the timer, press the on/off button.
Cleaning
Neverimmersetheapplianceinwater.
1 Unplugtheappliance.
2 Cleantheoutsideoftheappliancewithamoistcloth.
3 Removethelterholder.
4 Cleantheglassjugandthelterholderinhotwaterwithsomewashing-upliquidorinthe
dishwasher.
To clean the thermos jug, see section ‘Thermos jug (HD7692 only)’ in this chapter.
5 Aftercleaning,rinsetheglassjugwithfreshhotwater.
Water tank
1 Removethewatertankfromtheappliance.
2 Removethecoverfromthewatertank(Fig.18).
3 Cleanthewatertankinhotwater,ifnecessarywithsomewashing-upliquid.
Note:If you use a washing-up brush, be careful not to damage the valve in the bottom of the water tank.
Donotuseanobjectwithsharpedgestocleanthewaterinletontheappliance.
4 Rinsethewatertankwithfreshwateraftercleaningandputitbackontotheappliance.
Thermos jug (HD7692 only)
Donotimmersethethermosjuginwateroranyotherliquidanddonotcleanitinthe
dishwasher(Fig.19).
1 Removethelidofthethermosjug(Fig.11).
Turn the lid to the left by its n until the arrow on the jug points towards the ‘remove lid’ symbol.
2 Cleantheinsideofthethermosjugwithasoftbrush,hotwaterandsomewashing-up
liquid(Fig.20).
Tip: To remove stubborn brown deposits, ll the jug with hot water and add a spoonful of sodium
carbonate. Let the sodium carbonate do its work for some time.
3 Aftercleaning,rinsethethermosjugwithfresh,hotwater(Fig.8).
4 Putthelidbackontothethermosjug.
,
,
,
ENGLISH 7

Descaling
Regular descaling prolongs the life of the appliance and guarantees optimal brewing results for a
long time. the appliance measures the amount of scale and noties you when the appliance needs
to be descaled.
HD7690: The word CALC appears on the display when you need to descale the
appliance (Fig. 21).
HD7692/HD7686: The yellow descaling light goes on when you need to descale the
appliance (Fig. 22).
To descale the appliance, perform the following steps:
1 Fillthewatertankwithwhitevinegar(4%aceticacid).Donotputalterandgroundcoffee
inthelterholder.
2 Lettheappliancecompletetwobrewingcycles.
See chapter ‘Using the appliance’. Let the appliance cool down for 3 minutes before you start the
second brewing cycle.
3 Lettheappliancecompletetwomorebrewingcycleswithfresh,coldwatertoremoveall
vinegarresidues.
Youcanalsouseanappropriateliquiddescaler.Inthiscase,followtheinstructionsonthe
packageofthedescaler.
Donotuseadescalingpowder.
4 Cleantheseparateparts(seechapter‘Cleaning’).
Replacement
You can order a new glass jug from your Philips dealer or a Philips service centre under type
number HD7985/30 (dark grey) or HD7986/90 (black).
You can order a new thermos jug from your Philips dealer or a Philips service centre under type
number HD7988/90.
Environment
Donotthrowawaytheappliancewiththenormalhouseholdwasteattheendofitslife,but
handitinatanofcialcollectionpointforrecycling.Bydoingthis,youhelptopreservethe
environment(Fig.23).
Guarantee & service
If you need information or if you have a problem, please visit the Philips website at www.philips.com
or contact the Philips Customer Care Centre in your country (you nd its phone number in the
worldwide guarantee leaet). If there is no Customer Care Centre in your country, go to your local
Philips dealer or contact the Service Department of Philips Domestic Appliances and Personal
Care BV.
-
-
,
-
-
,
ENGLISH8

9
Important
Lisez attentivement ce mode d’emploi avant d’utiliser l’appareil et conservez-le pour un usage
ultérieur.
Avant de brancher l’appareil, vériez que la tension indiquée sur l’appareil correspond à la
tension secteur locale.
N’utilisez pas l’appareil si le cordon d’alimentation, la che ou l’appareil lui-même est
endommagé.
Si le cordon d’alimentation est endommagé, il doit être remplacé par Philips, un
Centre Service Agréé ou un technicien qualié an d’éviter tout accident.
Cet appareil n’est pas destiné à être utilisé par des personnes (notamment des enfants) dont les
capacités physiques, sensorielles ou intellectuelles sont réduites, ou par des personnes manquant
d’expérience ou de connaissances, à moins que celles-ci ne soient sous surveillance ou qu’elles
aient reçu des instructions quant à l’utilisation de l’appareil par une personne responsable de
leur sécurité.
Veillez à ce que les enfants ne puissent pas jouer avec l’appareil.
Maintenez le cordon d’alimentation hors de portée des enfants. Ne le laissez pas pendre de la
table ou du plan de travail sur lequel l’appareil est posé.
Ne posez jamais l’appareil sur une surface chaude et veillez à ce que le cordon d’alimentation
ne soit pas en contact avec des surfaces chaudes.
Ne plongez jamais l’appareil dans l’eau ou dans tout autre liquide.
Débranchez toujours l’appareil en cas de problème lors de la préparation du café et avant de le
nettoyer.
Verseuse thermos (HD7692 uniquement)
Ne démontez pas la verseuse thermos.
Pour éviter toute inltration d’eau dans la verseuse thermos, ne la plongez jamais dans l’eau ou
dans tout autre liquide.
La verseuse thermos ne peut pas être nettoyée au lave-vaisselle.
Lorsque la verseuse est remplie de café, maintenez-la en position verticale pour éviter toute
fuite.
La partie inférieure de l’appareil et le fond de la verseuse thermos sont très chauds pendant la
préparation du café.
Champs électromagnétiques (CEM)
Cet appareil Philips est conforme à toutes les normes relatives aux champs électromagnétiques
(CEM). Il répond aux règles de sécurité établies sur la base des connaissances scientiques actuelles
s’il est manipulé correctement et conformément aux instructions de ce mode d’emploi.
Description générale (g. 1)
A Porte-ltre
B Réservoir d’eau amovible
C Cordon d’alimentation
D Verseuse thermos (HD7692 uniquement)
E Verseuse en verre
F Bouton Aroma Control
G Indicateur Aroma Control
H Voyant de détartrage (HD7692/HD7686 uniquement)
I Afcheur (HD7690 uniquement)
J Voyant d’alimentation
K Bouton marche/arrêt
L Voyant du minuteur (HD7690 uniquement)
M Bouton du minuteur (HD7690 uniquement)
-
-
-
-
-
-
-
-
-
-
-
-
-
-
FRANÇAIS

Avant utilisation
1
Placezl’appareilsurunesurfacestableetplane.
2 Branchezlachesuruneprisemuralemiseàlaterre.
3 Vouspouvezajusterlalongueurducordonenlepoussantdansl’oricesituéàl’arrièredela
cafetière(g.2).
Réglage de l’heure (HD7690 uniquement)
1 Lorsquevousbranchezlecordond’alimentationsurlaprisemurale,lemotSETapparaîtsur
l’afcheur(g.3).
2 AppuyezuneouplusieursfoissurleboutonHpourréglerl’heure(g.4).
L’heureapparaîtsurl’afcheur(parexemple7:00).
3 AppuyezuneouplusieursfoissurleboutonMpourréglerlesminutes(g.5).
Lesminutesapparaissentsurl’afcheur(parexemple7:20).
Rinçage de l’appareil
1 Retirezleréservoiretremplissez-led’eauclaireetfroidedurobinet(g.6).
HD7692uniquement:lorsquevousfaitesfonctionnerl’appareilsanscafémoulu,neremplissez
pasleréservoird’eauau-delàdelagraduationde8tasses:laverseusethermosdéborderait.
2 Replacezleréservoird’eausurl’appareil(g.7).
Ne placez pas de ltre ni de café dans le porte-ltre.
3 Mettezl’appareilenmarcheenappuyantsurleboutonmarche/arrêt.
Levoyantd’alimentationrouges’allume.
4 Laissezl’appareilfonctionnerjusqu’àcequeleréservoirsoitvide.
HD7692:l’appareils’éteintautomatiquementlorsquelecaféestprêt.
5 HD7690/HD7686:appuyezsurleboutonmarche/arrêtpouréteindrel’appareil.
L’appareil s’éteint automatiquement au bout de 2 heures.
6 Nettoyezlaverseuseetleporte-ltre(voirlechapitre«Nettoyage»).
7 Laissezl’appareilrefroidirpendantaumoins3minutesavantdefaireducafé.
Verseuse thermos (HD7692 uniquement)
Remarque: Préchauffez toujours la verseuse thermos à l’eau chaude du robinet avant de faire du café.
1 Rincezlaverseusethermosàl’eauchaudedurobinetandelapréchauffer(g.8).
Pour obtenir un café bien chaud et riche en goût, préparez au moins une demi-verseuse de café.
2 Pourverserlecafé,tournezlecouvercleversladroitejusqu’àcequelaèchedelaverseuse
pointeverslesymbole«Verser»ducouvercle.Andemaintenirlecaféauchaud,fermez
toujourslecouvercleaprèsutilisation(g.9).
3 Pourfermerlecouvercle,tournez-leverslagauchejusqu’àcequelaèchedelaverseuse
pointeverslesymbole«Fermé/Préparation»ducouvercle(g.10).
4 Pourôterlecouvercledelaverseusethermos,tournez-leverslagauchejusqu’àcequela
èchedelaverseusepointeverslesymbole«Ôterlecouvercle»decedernier(g.11).
,
,
,
,
FRANÇAIS10

Utilisation de l’appareil
Préparation du café
Cette cafetière est équipée du dispositif Aroma Control qui permet de préparer un café plus ou
moins fort, selon vos goûts, et vous aide à trouver le juste dosage entre le café moulu et l’eau.
Remarque: lorsque vous utilisez le dispositif Aroma Control, remplissez toujours le réservoir d’eau avant
de verser le café moulu dans le ltre.
1 Assurez-vousquelecordond’alimentationestbranchésurlaprisemurale.
2 Vériezquelaverseuseenverreoulaverseusethermossetrouvesousleporte-ltre(avec
soncouvercleenposition«Fermé/Préparation»
r).
3 Choisissezl’intensitéducaféquevouspréférezàl’aideduboutonAromaControl.(g.12)
Pour un café fort, tournez le bouton vers la droite ; pour un café léger, tournez-le vers la gauche.
Remarque :le porte-ltre doit se trouver sur l’appareil lorsque vous sélectionnez l’intensité du café.
4 Retirezleréservoiretremplissez-led’eauclaireetfroidedurobinet(g.6).
Les indications de niveau correspondent à des tasses de 120 ml.
5 Replacezconvenablementleréservoirsurl’appareil(g.7).
Leniveaudel’indicateurAromaControlmonte.
6 Prenezunltreenpapier(type1x4oun°4)etrabattezlesbordsdultrepouréviterdele
déchireroudeleplier.
Remarque: si vous souhaitez utiliser le dispositif Aroma Control pour déterminer le juste équilibre entre le
café moulu et l’eau, évitez d’utiliser un ltre permanent. En effet, le poids d’un ltre permanent fausse
l’équilibre café-eau déni par Aroma Control.
7 Ouvrezlecouvercleduporte-ltreetplacezunltreenpapierdansleporte-ltre(g.13).
8 Versezducafémoulu(pourltre)dansleltrejusqu’àcequel’indicateurAromaControl
atteigneleniveauOK,puisrefermezlecouvercleduporte-ltre(g.14).
9 Mettezl’appareilenmarcheenappuyantsurleboutonmarche/arrêt.
Levoyantd’alimentationrouges’allume.
10 Lorsquetoutel’eaus’estécouléeparleltre,vouspouvezretirerlaverseuse.
Sivousretirezlaverseuseplusde30secondesavantquetoutel’eausesoitécouléeparleltre,
celui-cirisquededéborder.
HD7692:l’appareils’éteintautomatiquementlorsquelecaféestprêt.Laverseusethermos
conservelecaféchaud.
HD7690/HD7686:laplaquechauffantemaintientlecaféchaudtantquevouslaissezl’appareil
allumé.
11 HD7690/7HD7686:appuyezsurleboutonmarche/arrêtpouréteindrel’appareilaprèsusage.
L’appareil s’éteint automatiquement au bout de 2 heures.
12 Retirezlesupportdultre(g.15).
13 Jetezleltreenpapier.(g.16)
14 Laissezl’appareilrefroidirpendantaumoins3minutesavantderefaireducafé.
Minuteur (HD7690 uniquement)
Le minuteur de la cafetière permet de programmer le moment auquel vous souhaitez que le café
soit préparé.
,
,
,
,
FRANÇAIS 11

Remarque: si vous souhaitez utiliser la fonction minuteur (HD7690 uniquement), assurez-vous que
l’horloge indique la bonne heure. Vous ne pouvez régler l’heure que lorsque l’appareil est éteint (voir la
section « Réglage de l’heure » du chapitre « Avant utilisation »).
Remarque :en cas de panne de courant, vous devrez de nouveau régler l’heure et le minuteur.
1 Appuyezsurleboutonduminuteur(g.17).
L’heuredemiseenrouteautomatiqueprogramméeapparaîtsurl’afcheuretlevoyantjaune
duminuteurs’allume.
Aprèsl’appuisurleboutonduminuteur,l’heurenormaleréapparaîtsivousarrêtezd’appuyersur
leboutondesheuresoudesminutespendantplusde5secondes.Àcemoment,leminuteurest
programmé.
2 AppuyezuneouplusieursfoissurleboutonHpourréglerl’heure(g.4).
3 AppuyezuneouplusieursfoissurleboutonMpourréglerlesminutes(g.5).
L’heurenormaleréapparaîtsivousn’appuyezpassurleboutondesheuresoudesminutes
pendant5secondes.Levoyantjauneduminuteurs’allume,cequiindiquequeleminuteurest
programmé.
4 Préparezl’appareilpourlecaféensuivantlesétapes1à8delasection«Préparationdu
café».
5 L’appareilcommenceàpréparerlecaféàl’heureprogrammée.
Levoyantjauneduminuteurs’éteinttandisquelevoyantd’alimentationrouges’allume.
Si vous souhaitez vérier l’heure de programmation, appuyez sur le bouton du minuteur.
Pour désactiver le minuteur, appuyez sur le bouton marche/arrêt.
Nettoyage
Neplongezjamaisl’appareildansl’eau.
1 Débranchezl’appareil.
2 Nettoyezl’extérieurdel’appareilàl’aided’unchiffonhumide.
3 Retirezlesupportdultre.
4 Nettoyezlaverseuseenverreetleporte-ltreàl’eauchaudesavonneuseouaulave-
vaisselle.
Pour nettoyer la verseuse thermos, consultez la section « Verseuse thermos (HD7692
uniquement) » de ce même chapitre.
5 Aprèsavoirlavélaverseusethermos,rincez-laàl’eauchaude.
Réservoir d’eau
1 Retirezleréservoird’eaudel’appareil.
2 Retirezlecouvercleduréservoir(g.18).
3 Nettoyezleréservoird’eauàl’eauchaude,enajoutantunpeudeproduitvaissellesi
nécessaire.
Remarque: si vous utilisez une brosse à vaisselle, veillez à ne pas endommager la soupape au fond du
réservoir d’eau.
N’utilisezpasd’objetpointupournettoyerl’oricederemplissagedel’appareil.
4 Aprèsavoirlavéleréservoird’eau,rincez-leàl’eauclaireetreplacez-lesurl’appareil.
,
,
,
FRANÇAIS12

Verseuse thermos (HD7692 uniquement)
Neplongezjamaislaverseusethermosdansl’eauoudanstoutautreliquideetnelalavezpas
aulave-vaisselle(g.19).
1 Enlevezlecouvercledelaverseusethermos(g.11).
Tournez le couvercle vers la gauche jusqu’à ce que la èche de la verseuse pointe vers le symbole
Ôter le couvercle.
2 Nettoyezl’intérieurdelaverseusethermosàl’eauchaudelégèrementsavonneuse,àl’aide
d’unebrossedouce(g.20).
Conseil: pour enlever les dépôts de café tenaces, remplissez la verseuse d’eau chaude et ajoutez une
cuillère de carbonate de sodium. Laissez le carbonate de sodium agir quelques instants.
3 Unefoislenettoyageterminé,rincezlaverseusethermosàl’eauchaude(g.8).
4 Replacezlecouverclesurlaverseusethermos.
Détartrage
Un détartrage régulier prolonge la durée de vie de votre appareil et garantit des résultats optimaux
à long terme. L’appareil mesure la quantité de calcaire et vous informe lorsqu’il a besoin d’être
détartré.
HD7690: le mot CALC apparaît sur l’afcheur lorsque l’appareil a besoin d’être
détartré (g. 21).
HD7692/HD7686 : le voyant de détartrage jaune s’allume lorsque l’appareil a besoin d’être
détartré (g. 22).
Pour détartrer l’appareil, procédez comme suit :
1 Remplissezleréservoird’eauavecduvinaigreblanc(4%d’acideacétique).Neplacezpasde
ltreenpapiernidecafédansleporte-ltre.
2 Faitespasserlevinaigre,puisrépétezl’opération.
Reportez-vous au chapitre « Utilisation de l’appareil ». Laissez l’appareil refroidir 3 minutes avant de
procéder au deuxième cycle.
3 Ensuite,faitesfonctionnerlacafetièredeuxfoisavecdel’eaufroideand’éliminertousles
résidusdevinaigre.
Vouspouvezégalementutiliserundétartrantspécial.Danscecas,suivezlesinstructions
indiquéessurl’emballage.
N’utilisezpasdedétartrantenpoudre.
4 Nettoyezlesdifférentséléments(voirlechapitre«Nettoyage»).
Remplacement
Vous pouvez vous procurer une nouvelle verseuse en verre auprès de votre revendeur Philips
ou d’un Centre Service Agréé Philips. Celle-ci est disponible sous la référence HD7985/30
(gris foncé) ou HD7986/90 (noir).
Vous pouvez vous procurer une nouvelle verseuse thermos auprès de votre revendeur Philips
ou d’un Centre Service Agréé Philips. Celle-ci est disponible sous la référence HD7988/90.
Environnement
Lorsqu’ilnefonctionneraplus,nejetezpasl’appareilaveclesorduresménagères,mais
déposez-leàunendroitassignéàceteffet,oùilpourraêtrerecyclé.Vouscontribuerezainsià
laprotectiondel’environnement(g.23).
,
-
-
,
-
-
,
FRANÇAIS 13

Garantie et service
Si vous souhaitez obtenir des informations supplémentaires ou si vous rencontrez un problème,
visitez le site Web de Philips à l’adresse www.philips.com ou contactez le
Service Consommateurs Philips de votre pays (vous trouverez le numéro de téléphone
correspondant sur le dépliant de garantie internationale). S’il n’existe pas de
Service Consommateurs Philips dans votre pays, renseignez-vous auprès de votre revendeur local
ou contactez le « Service Department of Philips Domestic Appliances and Personal Care BV ».
FRANÇAIS14

15
Penting
Bacalah buku petunjuk ini secara saksama sebelum Anda menggunakan alat dan simpan untuk
referensi di kemudian hari.
Periksalah apakah voltase pada alat sesuai dengan voltase listrik di rumah Anda, sebelum
menghubungkan alat.
Jangan menggunakan alat jika kabel listrik, steker, atau alat ini sendiri dalam keadaan rusak.
Jika kabel listrik rusak, maka harus diganti oleh Philips, pusat servis resmi Philips atau orang yang
mempunyai keahlian sejenis agar terhindar dari bahaya.
Alat ini tidak dimaksudkan untuk digunakan oleh orang (termasuk anak-anak) dengan cacat sik,
indera atau kecakapan mental yang kurang, atau kurang pengalaman dan pengetahuan, kecuali
jika mereka diberikan pengawasan atau pengarahan mengenai penggunaan alat oleh orang yang
bertanggungjawab bagi keselamatan mereka.
Anak kecil harus diawasi untuk memastikan mereka tidak bermain-main dengan alat ini.
Jauhkan alat dan kabelnya dari jangkauan anak-anak. Jangan biarkan kabel listrik tergantung di tepi
meja atau tempat alat berada.
Jangan letakkan alat di atas permukaan yang panas dan jangan sampai kabel listrik terkena
permukaan yang panas.
Jangan celupkan alat ke dalam air atau cairan lainnya.
Cabut alat jika terjadi masalah selama menyeduh dan sebelum Anda membersihkannya.
Tabung termos (HD7692 saja)
Jangan lepas tabung termos.
Untuk mencegah air masuk ke tabung termos, jangan sekali-kali merendam tabung dalam air atau
cairan lain.
Tabung termos tidak tahan terhadap mesin cuci piring.
Bila tabung diisi dengan kopi, jaga posisi selalu tegak untuk menghindari kebocoran.
Selama menyeduh, bagian bawah alat dan bawah tabung termos menjadi panas.
Medan elektromagnet (EMF)
Alat Philips ini mematuhi semua standar yang berkenaan dengan medan elektromagnet (EMF).
Jika ditangani sebagaimana layaknya dan sesuai dengan petunjuk dalam buku panduan ini, alat
tersebut aman digunakan menurut bukti ilmiah yang kini tersedia.
Gambaran umum (Gbr. 1)
A Penahan saringan
B Tangki air dapat dilepas
C Steker listrik
D Tabung termos (HD7692 saja)
E Tabung gelas
F Kenop Aroma Control
G Indikator Aroma Control
H Lampu pembersihan kerak (HD7692/HD7686 saja)
I Layar (HD7690 saja)
J Lampu daya sedang hidup
K Tombol on/off
L Lampu timer (HD7690 saja)
M Tombol timer (HD7690 saja)
Persiapan penggunaan
1
Letakkanalatdiataspermukaanyangratadanstabil.
2 Masukkanstekerkestopkontakyangmemilikiarde
-
-
-
-
-
-
-
-
-
-
-
-
-
-
INDONESIA

3 Andadapatmenyimpansisakabeldenganmendorongnyakedalamcelahdibagianbelakang
alatpembuatkopi(Gbr.2).
Menyetel jam (HD7690 saja)
1 SetelahAndamemasangstekerkestopkontakdinding,kata‘SET’munculdilayar(Gbr.3).
2 Tekantombol‘H’satuataubeberapakaliuntukmenyeteljamnya(Gbr.4).
Layarmenampilkanjamyangdisetel(misalnya,7:00).
3 Tekantombol‘M’satuataubeberapakaliuntukmenyetelmenit(Gbr.5).
Layarmenampilkanmenityangdisetel(misalnya,7:20).
Menguras alat
1 Keluarkantangkiairdanisidenganairdinginyangbersihdarikeran(Gbr.6).
HD7692saja:BilaAndamengoperasikanalattanpakopibubuk,janganisitangkiairmelebihitanda
8-cangkir,jikatidaktabungtermosakanmeluap.
2 Pasangkembalitangkiairkealat(Gbr.7).
Jangan letakkan saringan dan kopi bubuk pada penahan saringan.
3 Tekantombolon/offuntukmenghidupkanalat.
Lampudayamenyalaterus.
4 Biarkanalatbekerjasampaitangkiairnyahabis.
HD7692:Alatotomatismatisetelahpenyeduhan.
5 HD7690/HD7686:Tekantombolon/offuntukmematikanalat.
Alat otomatis mati setelah 2 jam.
6 Bersihkantekodanpenahansaringan(lihatbab‘Membersihkan’).
7 Biarkanalatmendinginsetidaknyaselama3menitsebelumAndamulaimenyeduhkopi.
Tabung termos (HD7692 saja)
Catatan: Panasi tabung termos dengan air keran yang panas sebelum mulai menyeduh kopi.
1 Bilastabungtermosdenganairkeranyangpanassetelahmemanasinya(Gbr.8).
Untuk memperoleh kopi yang paling panas dan nikmat, seduh sedikitnya setengah tabung kopi.
2 Untukmenuangkopi,putartutupnyakekirimenggunakansiripnyahinggapanahpadatabung
menunjukkesimbol‘tuang’padatutupnya.Tutuplahselalusetelahmenuangkopiagartetap
panas(Gbr.9).
3 Untukmerapatkantutupnya,putarkekirimenggunakansiripnyahinggapanahpadatabung
menunjukkesimbol‘tutup/seduh’padatutupnya(Gbr.10).
4 Untukmelepastutupdaritabungtermos,putarkekirimenggunakansiripnyahinggapanah
padatabungmenunjukkesimbol‘lepastutup’padatutupnya(Gbr.11).
Menggunakan alat
Menyeduh kopi
Pembuat kopi ini dilengkapi dengan Aroma Control, yang memungkinkan Anda menyesuaikan kadar
kopi menurut selera Anda. Aroma Control juga membantu menentukan takaran yang tepat untuk
kopi bubuk dan air.
Catatan: Bila Anda menggunakan Aroma Control, isilah selalu tangki airnya sebelum memasukkan kopi
bubuk dalam saringannya.
,
,
,
,
INDONESIA16

1 Pastikanstekertelahdihubungkankestopkontak.
2 Pastikantabunggelasatautermos(dengantutupdalamposisi‘tutup/seduh)’r)beradadi
bawahpenahanlter.
3 SetelkadarkopiyangAndasukaidengankenopAromaControl.(Gbr.12)
Untuk menambah kadar kopi, putar kenop ke kanan. Untuk mengurangi kada kopi, putar kenop ke
kiri.
Catatan: Ketika menyetel kadar kopi, pastikan penahan lter berada dalam alat.
4 Keluarkantangkiairdanisidenganairdinginyangbersihdarikeran(Gbr.6).
Indikator ukuran setara dengan cangkir 120ml.
5 Pasangkembalitangkiairkealatdenganbenar(Gbr.7).
IndikatorAromaControlnaik.
6 Ambilsecariksaringankertas(jenis1x4atauno.4)lalulipattepiyangbersegeluntuk
mencegahrobekdantertekuk.
Catatan: Jika Anda ingin menggunakan Aroma Control untuk menentukan takaran yang pas antara kopi
dan air, jangan gunakan lter permanen. Dikarenakan beratnya, lter permanen mengganggu takaran
kopi-air pada Aroma Control.
7 Bukatutuppenahanlterdanpasanglterkertasdalampenahanlter(Gbr.13).
8 Masukkankopibubuk(gilinganyangsudahdisaring)dalamlterhinggaindikatorAroma
ControldalamposisiOKdantutupkembalipenahanlter(Gbr.14).
9 Tekantombolon/offuntukmenghidupkanalat.
Lampu-dayamerahmenyalaterus.
10 Setelahsemuaairmengalirmelaluisaringan,Andadapatmengeluarkantekodarialat.
JikaAndamelepastabungselamalebihdari30detiksebelumsemuaairselesaikeluardarilter,
ltermungkinmeluap.
HD7692:alatakanmatiotomatissetelahmenyeduh.Tabungtermosmenjagakopitetappanas.
HD7690/HD7686:kopitetappanasdiataspemanasnyaasalkanAndameninggalkanalatdalam
keadaanhidup.
11 HD7690/7HD7686:tekantombolon/offuntukmematikanalatsetelahdipakai.
Alat otomatis mati setelah 2 jam.
12 Keluarkanpegangansaringan(Gbr.15).
13 Buanglterkertas.(Gbr.16)
14 Biarkanalatmendinginselamasetidaknya3menitsebelumandamulaimembuatkopilagi.
Timer (HD7690 saja)
Anda bisa menggunakan timer untuk mengatur waktu kapan pembuat kopi mulai menyeduh.
Catatan: Jika Anda ingin menggunakan fungsi timer (HD7690 saja), pastikan jamnya disetel ke waktu
yang benar. Anda hanya bisa menyetel waktu yang sekarang bila alat telah mati (lihat bagian ‘Menyetel
jam’ dalam bab ‘Menyiapkan penggunaan’).
Catatan: Setelah listrik putus, Anda harus menyetel lagi jam dan timer.
1 Tekantomboltimer(Gbr.17).
Layarmenampilkanwaktusetelauto-ondanlamputimerkuningmenyalaterus.
,
,
,
,
,
INDONESIA 17

SetelahAndamenekantomboltimer,waktunormalmunculkembalijikaAndaberhentimenekan
tomboljamataumenitselamalebihdari5detik.Dalamhalini,timertelahdisetel.
2 Tekantombol‘H’satuataubeberapakaliuntukmenyeteljamnya(Gbr.4).
3 Tekantombol‘M’satuataubeberapakaliuntukmenyetelmenit(Gbr.5).
5detiksetelahAndaberhentimenekantomboljamatautombolmenit,waktunormalmuncul
kembali.Lamputimerkuningmenyalaterusuntukmenunjukkantimertelahdisetel.
4 Ikutilangkah1sampai8padabagian‘Menyeduhkopi’untukmenyiapkanalatuntukmenyeduh
kopi.
5 Alatmulaimenyeduhpadawaktuyangtelahdiatur.
Lampukuningtimerakanmatidanlampu-dayamerahmenyalaterus.
Jika Anda ingin memeriksa apakah sudah menyetel timer dengan benar, tekan tombol timer.
Jika Anda ingin mematikan timer, tekan tombol on/off.
Membersihkan
Janganmerendamalatdidalamair.
1 Cabutstekeralatdarilistrik.
2 Bersihkanbagianluaralatdengankainlembab.
3 Keluarkanpegangansaringan.
4 Bersihkantabunggelasdanpenahansaringandalamairpanasdengansedikitcairanpembersih
ataudalammesincucipiring.
Untuk membersihkan tabung termos, lihat bagian ‘Tabung termos (HD7692 saja)’ dalam bab ini.
5 Setelahdibersihkan,bilastabunggelasdenganairpanas.
Tangki air
1 Keluarkantangkiairdarialat.
2 Lepastutupnyadaritangkiair(Gbr.18).
3 Bersihkantangkiairdalamairdenganairpanas,jikaperludengansedikitcairanpembersih.
Catatan: Jika Anda menggunakan sikat pencuci, hati-hatilah agar tidak merusak katup di dasar tangki air.
Jangangunakanbendayangbersisitajamuntukmembersihkanpengisiairpadaalat.
4 Bilastangkiairdenganairbersihsetelahmembersihkandanpasangkembalikealat.
Tabung termos (HD7692 saja)
Janganrendamtabungtermosdalamairataucairanlaindanjanganbersihkandalammesin
cucipiring(Gbr.19).
1 Lepastutuptabungtermos(Gbr.11).
Putar tutupnya ke kiri menggunakan siripnya hingga panah di atas tabung menunjuk ke simbol ‘lepas
tutup’.
2 Bersihkanbagiandalamtabungtermosdengansikatlembut,airpanasdansedikitcairan
pembersih(Gbr.20).
Tip: Untuk melepas kerak coklat yang membandel, isi tabung dengan air panas dan tambahkan satu
sendok makan sodium karbonat (soda kue). Biarkan sodium karbonat bereaksi beberapa saat.
3 Setelahdibersihkan,bilastabungtermosdenganairpanasyangbersih(Gbr.8).
4 Pasangkembalitutupketabungtermos.
,
,
,
INDONESIA18

Menghilangkan kerak
Pembersihan kerak secara teratur akan memperpanjang masa pakai alat dan akan menjamin hasil
seduhan yang optimal dalam waktu lama. Alat akan mengukur jumlah kerak dan memberitahu Anda
kapan alat perlu dibersihkan keraknya.
HD7690: Kata CALC muncul pada layar bila saatnya Anda perlu membersihkan kerak pada
alat (Gbr. 21).
HD7692/HD7686: Lampu kuning pembersihan kerak terus menyala bila saatnya Anda perlu
membersihkan kerak pada alat (Gbr. 22).
Untuk membersihkan kerak pada alat, lakukan langkah berikut:
1 Isilahtangkiairdengancukaputih(4%asamasetat).Janganmenaruhlterataukopibubuk
dalampenahanlter.
2 Biarkanalatbekerjaselamaduasikluspenuh.
Lihat bab ‘Menggunakan alat’. Biarkan alat mendingin selama 3 menit sebelum Anda memulai siklus
penyeduhan kedua.
3 Biarkanalatmenyelesaikanduasilkluslagidenganairdinginuntukmembuangsemuasisacuka.
Andajugadapatmenggunakancairanpenghilangkerakyangsesuai.Dalamhalini,ikuti
petunjukpadapenghilangkerak.
Jangangunakanbubukpenghilangkerak.
4 Cucisemuabagianyangbisadilepas(lihatbab‘Membersihkan’).
Penggantian
Anda bisa memesan tabung gelas baru dari dealer Philips atau pusat servis Philips dengan nomor
jenis HD7985/30 (abu-abu tua) atau HD7986/90 (hitam).
Anda bisa memesan tabung termos baru dari dealer Philips atau pusat servis Philips dengan
nomor jenis HD7988/90.
Lingkungan
Janganmembuangalatbersamalimbahrumahtanggabiasajikaalatsudahtidakbisadipakai
lagi,tetapiserahkanketempatpengumpulanbarangbekasresmiuntukdidaurulang.Dengan
melakukannya,berartiAndaikutmembantumelestarikanlingkungan.(Gbr.23)
Garansi & servis
Jika Anda memerlukan informasi atau mengalami masalah, silakan kunjungi situs web Philips di
www.philips.com atau hubungi Pusat Layanan Pelanggan Philips di negara Anda (Anda dapat
memperoleh nomor teleponnya dalam leaet garansi yang berlaku di seluruh dunia). Jika tidak ada
Pusat Layanan Pelanggan di negara Anda, silakan datang ke dealer Philips setempat atau hubungi
Bagian Servis dari Philips Domestic Appliances and Personal Care BV.
-
-
,
-
-
,
INDONESIA 19

20
중요사항
본 제품을 사용하기 전에 이 사용 설명서를 주의 깊게 읽고 나중에 참조할 수 있도록 잘
보관하십시오.
제품에 전원을 연결하기 전에, 제품에 표시된 전압과 사용 지역의 전압이 일치하는지
확인하십시오.
전원 코드, 플러그 또는 제품 자체가 손상된 경우에는 본 제품을 사용하지 마십시오.
전원 코드가 손상된 경우, 안전을 위해 필립스 서비스 센터 또는 필립스 서비스 지정
점에 의뢰하여 교체하십시오.
신체적인 감각 및 정신적인 능력이 떨어지거나 경험과 지식이 풍부하지 않은 성인 및
어린이는 혼자 제품을 사용하지 말고 제품 사용과 관련하여 안전에 책임 질 수 있도
록 지시사항을 충분히 숙지한 사람의 도움을 받으십시오.
어린이가 제품을 가지고 놀지 못하도록 지도해 주십시오.
전원 코드는 어린이의 손이 닿지 않는 곳에 보관하십시오. 제품이 올려져 있는 식탁
이나 조리대의 가장자리로 전원 코드가 흘러내리지 않도록 하십시오.
제품을 뜨거운 곳에 놓지 마시고 전원 코드가 뜨거운 표면과 접촉하지 않도록 주의하
십시오.
제품을 절대로 물 또는 기타 액체에 담그지 마십시오.
커피를 끓이는 도중에 문제가 발생한 경우 또는 제품 청소 시, 제품의 전원 코드를 뽑
으십시오.
보온 용기(HD7692만 해당)
보온 용기는 분해하지 마십시오.
보온 용기에 물이 들어가지 않게 하려면 용기를 물이나 기타 액체에 절대 담그지 마
십시오.
식기세척기를 사용하여 보온 용기를 세척하지 마십시오.
커피가 가득 찬 보온 용기는 항상 세운 상태를 유지하여 커피가 새지 않도록 하십시
오.
커피를 끓이는 동안 제품의 하단부와 보온 용기 바닥면이 뜨거워질 수 있습니다.
EMF(전자기장)
이 필립스 제품은 EMF(전자기장)와 관련된 모든 기준을 준수합니다. 이 사용 설명서의
지침에 따라 적절하게 취급할 경우 이 제품은 안전하게 사용할 수 있으며 이는 현재까지
의 과학적 증거에 근거하고 있습니다.
각 부의 명칭 (그림 1)
A 필터 홀더
B 착탈식 물탱크
C 전원 플러그
D 보온 용기 (HD7692만 해당)
E 유리 용기
F 아로마 컨트롤 조절기
G 아로마 컨트롤 표시기
H 스케일 제거 표시등 (HD7692/HD7686만 해당)
I 디스플레이 (HD7690만 해당)
J 전원 표시등
K 전원 버튼
L 타이머 표시등 (HD7690만 해당)
M 타이머 버튼 (HD7690만 해당)
사용 전 준비
1
제품은 평평하고 안정적인 곳에 놓으십시오.
2 전원 플러그를 벽면 콘센트에 꽂으십시오.
-
-
-
-
-
-
-
-
-
-
-
-
-
-
한국어
La page est en cours de chargement...
La page est en cours de chargement...
La page est en cours de chargement...
La page est en cours de chargement...
La page est en cours de chargement...
La page est en cours de chargement...
La page est en cours de chargement...
La page est en cours de chargement...
La page est en cours de chargement...
La page est en cours de chargement...
La page est en cours de chargement...
La page est en cours de chargement...
La page est en cours de chargement...
La page est en cours de chargement...
La page est en cours de chargement...
La page est en cours de chargement...
La page est en cours de chargement...
La page est en cours de chargement...
La page est en cours de chargement...
La page est en cours de chargement...
La page est en cours de chargement...
La page est en cours de chargement...
La page est en cours de chargement...
La page est en cours de chargement...
La page est en cours de chargement...
La page est en cours de chargement...
La page est en cours de chargement...
La page est en cours de chargement...
La page est en cours de chargement...
La page est en cours de chargement...
La page est en cours de chargement...
La page est en cours de chargement...
La page est en cours de chargement...
La page est en cours de chargement...
La page est en cours de chargement...
La page est en cours de chargement...
La page est en cours de chargement...
La page est en cours de chargement...
La page est en cours de chargement...
La page est en cours de chargement...
La page est en cours de chargement...
La page est en cours de chargement...
La page est en cours de chargement...
La page est en cours de chargement...
-
 1
1
-
 2
2
-
 3
3
-
 4
4
-
 5
5
-
 6
6
-
 7
7
-
 8
8
-
 9
9
-
 10
10
-
 11
11
-
 12
12
-
 13
13
-
 14
14
-
 15
15
-
 16
16
-
 17
17
-
 18
18
-
 19
19
-
 20
20
-
 21
21
-
 22
22
-
 23
23
-
 24
24
-
 25
25
-
 26
26
-
 27
27
-
 28
28
-
 29
29
-
 30
30
-
 31
31
-
 32
32
-
 33
33
-
 34
34
-
 35
35
-
 36
36
-
 37
37
-
 38
38
-
 39
39
-
 40
40
-
 41
41
-
 42
42
-
 43
43
-
 44
44
-
 45
45
-
 46
46
-
 47
47
-
 48
48
-
 49
49
-
 50
50
-
 51
51
-
 52
52
-
 53
53
-
 54
54
-
 55
55
-
 56
56
-
 57
57
-
 58
58
-
 59
59
-
 60
60
-
 61
61
-
 62
62
-
 63
63
-
 64
64


Philips HD7686/30 Manuel utilisateur
- Catégorie
- Accessoires de préparation de café
- Taper
- Manuel utilisateur
dans d''autres langues
- English: Philips HD7686/30 User manual
Documents connexes
-
Philips HD7692 Manuel utilisateur
-
Philips CRP714/01 Product Datasheet
-
Philips CRP410/01 Product Datasheet
-
Philips CP1124/01 Product Datasheet
-
Philips HD7688/50 Le manuel du propriétaire
-
Philips HD7546/20 Manuel utilisateur
-
-
-
Philips HD7450/00 Manuel utilisateur
-