Whirlpool WRS555SIHW Manuel utilisateur
- Catégorie
- Frigos
- Taper
- Manuel utilisateur
Ce manuel convient également à

1
W11101942A
1
User Guide
Side by Side Refrigerator
You can be killed or seriously injured if you don’t immediately follow instructions.
You can be killed or seriously injured if you don’t follow instructions.
All safety messages will tell you what the potential hazard is, tell you how to reduce the chance of injury, and tell you what can happen if the
instructions are not followed.
Your safety and the safety of others are very important.
We have provided many important safety messages in this manual and on your appliance. Always read and obey all safety messages.
This is the safety alert symbol.
This symbol alerts you to potential hazards that can kill or hurt you and others.
All safety messages will follow the safety alert symbol and either the word “DANGER” or “WARNING.”
These words mean:
DANGER
WARNING
IMPORTANT SAFETY INSTRUCTIONS
WARNING:
To reduce the risk of fire, electric shock, or injury when using your refrigerator, follow these basic precautions:
SAVE THESE INSTRUCTIONS
Plug into a grounded 3 prong outlet.
Do not remove ground prong.
Do not use an adapter.
Do not use an extension cord.
Disconnect power before servicing.
Replace all parts and panels before operating.
Remove doors from your old refrigerator.
Use nonflammable cleaner.
Keep fla
mmable materials and vapors, such as gasoline, away from
refrigerator.
Use two or more people to move and install refrigerator.
Disconnect power before installing ice maker (on ice maker kit ready
models only).
Use a sturdy glass when dispensing ice (on some models).
Do not hit the refrigerator glass doors (on some models).
State of California Proposition 65 Warnings:
WARNING: This product contains one or more chemicals known to the State of California to cause cancer.
WARNING: This product contains one or more chemicals known to the State of California to cause birth defects or other reproductive harm.
PROPER DISPOSAL OF
YOUR OLD REFRIGERATOR
Suffocation Hazard
Remove doors from your old refrigerator.
Failure to do so can result in death or brain damage.
WARNING
LEARN MORE
In an effort to conserve natural resources, this refrigerator includes a condensed User Guide. A complete User Instructions manual for your
model can be downloaded at www.wh
irlpool.com/manuals. The model number is located on the inside wall of the refrigerator compartment.
For assistance or service, call 1-800-253-1301 in the U.S.A. or 1-800-807-6777 in Canada.
Register your refrigerator at www.whirlpool.com. In Canada, register at www.whirlpool.ca.
Para una version de estas instrucciones en español, visite www.whirlpool.com.
User Guide
Side by Side Refrigerator
You can be killed or seriously injured if you don’t immediately follow instructions. �
�
You can be killed or seriously injured if you don’t follow instructions.
�
All safety messages will tell you what the potential hazard is, tell you how to reduce the chance of injury, and tell you what can happen if the
instructions are not followed.
Your safety and the safety of others are very important.
We have provided many important safety messages in this manual and on your appliance. Always read and obey all safety messages.
This is the safety alert symbol.
This symbol alerts you to potential hazards that can kill or hurt you and others.
All safety messages will follow the safety alert symbol and either the word “DANGER” or “WARNING.”
These words mean:
DANGER
WARNING
LEARN MORE
In an effort to conserve natural resources, this refrigerator includes a condensed User Guide. A complete User Instructions manual for
your model can be downloaded at www.whirlpool.com/manuals. The model number is located on the inside wall of the refrigerator
compartment. To request a printed copy of the User Instructions manual (shipping and handling fees may apply), call 1-800-253-1301 in
the U.S.A. or 1-800-807-6777 in Canada.
Register your refrigerator at www.whirlpool.com. In Canada, register at www.whirlpool.ca.
Para una version de estas instrucciones en español, visite www.whirlpool.com.
IMPORTANT SAFETY INSTRUCTIONS
WARNING: To reduce the risk of fire, electric shock, or injury when using your refrigerator, follow these basic precautions:
SAVE THESE INSTRUCTIONS
■ Plug into a grounded 3 prong outlet.
■ Do not remove ground prong.
■ Do not use an adapter.
■ Do not use an extension cord.
■ Disconnect power before servicing.
■ Replace all parts and panels before operating.
■ Remove doors from your old refrigerator.
■ Use nonflammable cleaner.
■
Keep flammable materials and vapors, such as gasoline, away from
refrigerator.
■ Use two or more people to move and install refrigerator.
■ Disconnect power before installing ice maker (on ice maker kit ready
models only).
■ Use a sturdy glass when dispensing ice (on some models).
■ Do not hit the refrigerator glass doors (on some models).
State of California Proposition 65 Warnings:
WARNING: This product contains one or more chemicals known to the State of California to cause cancer.
WARNING: This product contains one or more chemicals known to the State of California to cause birth defects or other reproductive harm.

2
Important information to know about disposal of
refrigerants:
Dispose of refrigerator in accordance with Federal and Local
regulations. Refrigerants must be evacuated by a licensed,
EPA certified refrigerant technician in accordance with
established procedures.
PROPER DISPOSAL OF YOUR OLD REFRIGERATOR
Suffocation Hazard
Remove doors from your old refrigerator.
Failure to do so can result in death or brain damage.
WARNING
IMPORTANT: Child entrapment and suffocation are not problems of
the past. Junked or abandoned refrigerators are still dangerous, even
if they will sit for “just a few days”. If you are getting rid of your old
refrigerator, please follow these instructions to help prevent accidents.
Before You Throw Away Your Old Refrigerator or Freezer:
J Take off the doors.
J Leave the shelves in place so that children may not easily climb
inside.
Using the Controls
The refrigerator and freezer controls are located on the
dispenser panel.
IMPORTANT: The display screen on the dispenser control panel
will turn off automatically and enter “sleep” mode when the control
buttons and dispenser lever have not been used for 2 minutes or
more. While in “sleep” mode, the first press of a control button will
only reactivate the display screen, without changing any settings.
J Touch any control button on the dispenser panel to activate the
display screen. The home screen will appear as shown.
Adjusting Controls
For your convenience, your refrigerator and freezer controls are
preset at the factory. When you first install your refrigerator, make
sure that both the refrigerator and freezer controls are still set to
the recommended “mid-setting”. This will be indicated with three
illuminated bars.
IMPORTANT:
J Wait 24 hours before you put food into the refrigerator. If you add
food before the refrigerator has cooled completely, your food may
spoil.
NOTE: Adjusting the set points to a colder than recommended setting
will not cool the compartments any faster.
J If the temperature is too warm or too cold in the refrigerator or
freezer, first check the air vents to be sure they are not blocked
before adjusting the controls.
J The preset settings should be correct for normal household
usage. The controls are set correctly when milk or juice is as cold
as you like and when ice cream is firm.
J Wait at least 24 hours between adjustments. Recheck the
temperatures before other adjustments are made.
When adjusting set points, use the following chart as a guide:
Condition: Adjustment:
REFRIGERATOR too cold REFRIGERATOR Setting one
setting lower
REFRIGERATOR too
warm
REFRIGERATOR Setting one
setting higher
FREEZER too cold FREEZER Setting one setting lower
FREEZER too warm/ too
little ice
FREEZER Setting one setting
higher
The set point range is “1 bar” (least cold) to “5 bars” (coldest).
Refrigerator Control:
J Press REFRIGERATOR TEMP to view the current set point for the
refrigerator.
J Press REFRIGERATOR TEMP again to adjust the set point. The
settings will increase by 1 bar with each press of the button,
returning to 1 bar after reaching 5.
After 2 minutes of inactivity, any changes will be saved and the
display will return to the home screen.
Freezer Control:
J Press FREEZER TEMP to view the current set point for the freezer.
2
IMPORTANT: Child entrapment and suffocation are not problems of the
past. Junked or abandoned refrigerators are still dangerous, even if
they will sit for “just a few days.” If you are getting rid of your old
refrigerator, please follow these instructions to help prevent accidents.
Before You Throw Away Your Old Refrigerator or Freezer:
Take off the doors.
Leave the shelves in place so that children may not easily climb
inside.
Using the Controls
The refrigerator and freezer controls are located on the dispenser
panel.
IMPORTANT: The display screen on the dispenser control panel will
turn off automatically and enter “sleep” mode when the control buttons
and dispenser lever have not been used for 2 minutes or more. While in
“sleep” mode, the first press of a control button will only reactivate the
display screen, without changing any settings.
Touch any control button on the dispenser panel to activate the
display screen. The home screen will appear as shown.
Adjusting the Controls
For your convenience, your refrigerator and freezer controls are preset
at the factory. When you first install your refrigerator, make sure that
both the refrigerator and freezer controls are still set to the recommended
“mid-setting.” This will be displayed in the sequence of bars with three
illuminated bars.
IMPORTANT:
Wait 24 hours before you put food into the refrigerator. If you add
food before the refrigerator has cooled completely, your food may
spoil.
NOTE: Adjusting the set points to a colder than recommended
setting will not cool the compartments any faster.
If the temperature is too warm or too cold in the refrigerator or
freezer, first check the air vents to be sure they are not blocked
before adjusting the controls.
The preset settings should be correct for normal household usage.
The controls are set correctly when milk or juice is as cold as you
like and when ice cream is firm.
Wait at least 24 hours between adjustments. Recheck the
temperatures before other adjustments are made.
When adjusting set points, use the following chart as a guide.
The set point range is “1 bar” (coldest) to “5 bars” (least cold).
Refrigerator Control:
Press REFRIGERATOR TEMP to view the current set point for the
refrigerator.
Important information to know about disposal of
refrigerants:
Dispose of refrigerator in accordance with Federal and Local
regulations. Refrigerants must be evacuated by a licensed,
EPA certified refrigerant technician in accordance with
established procedures.
OPERATING YOUR REFRIGERATOR
CONDITION: ADJUSTMENT:
REFRIGERATOR too cold REFRIGERATO R S etting
one setting higher
REFRIGERATOR too warm REFRIGERATO R S etting
one setting lower
FREEZER too cold FREEZER Setting
one setting higher
FREEZER too warm /
Too little ice
FREEZERSetting
one setting lower
Press REFRIGERATOR TEMP again to adjust the set point.
The setting will increase by one bar with each press of the button,
returning to one bar after reaching five. After 2 minutes of
inactivity, any changes will be saved and the display will return to
the home screen.
Freezer Control:
Press FREEZER TEMP to view the current set point for the freezer.

3
J Press FREEZER TEMP again to adjust the set point. The settling
will increase by one bar with each press of the button, returning to
one bar after reaching five.
After 2 minutes of inactivity, any changes will be saved and the
display will return to the home screen.
Crisper Humidity Control
You can control the amount of humidity in the moisture-sealed crisper.
Adjust the control to any setting between LOW and HIGH.
LOW (open) for best storage of fruits and vegetables with skins.
HIGH (closed) for best storage of fresh, leafy vegetables.
Water and Ice Dispensers
NOTES:
J The dispensing system will not operate when the freezer door is
open.
J Allow 24 hours for the refrigerator to cool down and chill water.
J Allow 24 hours to produce the first batch of ice. Discard the first
three batches of ice produced. Wait 72 hours for full ice production.
J The display screen on the dispenser control panel will turn off
automatically and enter “sleep” mode when the control buttons and
dispenser lever have not been used for 2 minutes or more. While in
“sleep” mode, the first press of a control button will only reactivate
the display screen, without changing any settings.
Flush the Water System
Air in the water dispensing system can cause the water dispenser to
drip. After connecting the refrigerator to a water source or replacing
the water filter, flush the water system. Flushing the water dispensing
system forces air from the water line and filter, and prepares the water
filter for use.
NOTE: As air is cleared from the system, water may spurt out of the
dispenser.
1. Using a sturdy container, depress and hold the water dispenser
lever for 5 seconds, then release it for 5 seconds.
2. Repeat Step 1 until water begins to flow.
3. Once water begins to flow, continue depressing and releasing the
dispenser lever (5 seconds on, 5 seconds off) until a total of 3 gal.
(12 L) has been dispensed.
Additional flushing may be required in some households.
The Water Dispenser
IMPORTANT:
J Dispense at least 1 qt (1 L) of water every week to maintain a fresh
supply.
J If the flow of water from the dispenser decreases, it could be
caused by low water pressure.
J With the water filter removed, dispense 1 cup (237 mL) of water.
If 1 cup of water is dispensed in 8 seconds or less, the water
pressure to the refrigerator meets the minimum requirement.
J If it takes longer than 8 seconds to dispense 1 cup of water, the
water pressure to the refrigerator is lower than recommended.
See “Water Supply Requirements” (in the User Instructions
or the Installation Instructions and Owner’s Manual) or
“Troubleshooting” for suggestions.
To Dispense Water:
1. Press a sturdy glass against the water dispenser lever. Hold the
glass close to the water dispenser spout to ensure that the water
dispenses into the glass.
2. Remove the glass to stop dispensing.
IMPORTANT: The small tray at the bottom of the dispenser is designed
to catch small spills and allow for easy cleaning. There is no drain in
the tray.
The Ice Dispenser
Ice dispenses from the ice maker storage bin in the freezer when the
dispenser lever is pressed. To turn off the ice maker, see
“Ice Maker and Storage Bin.”
Your ice maker can produce both crushed and cubed ice. Before
dispensing ice, select which type of ice you prefer by pressing the
“Ice Type” button.
The display screen indicates which type of ice is selected.
CRUSHED CUBED
For crushed ice, cubes are crushed before being dispensed. This
may cause a slight delay when dispensing crushed ice. Noise from
the ice crusher is normal, and pieces of ice may vary in size. When
changing from crushed to cubed, a few ounces of crushed ice will be
dispensed along with the first cubes.
The Dispenser Light
When you use the dispenser, the light will automatically turn on.
If you want the light to be on continuously, press LIGHT.
Press LIGHT again to turn the dispenser light off.
The dispenser lights are LEDs that cannot be changed. If it appears
that your dispenser lights are not working, see “Troubleshooting” for
more information.
The Dispenser Lock
The dispenser can be turned off for easy cleaning or to avoid
unintentional dispensing by small children and pets.
NOTE: The lock feature does not shut off power
to the refrigerator, to
the ice maker, or to the dispenser light. It simply deactivates the
controls and dispenser lever. To turn off the ice maker, see “Ice Maker
and Storage Bin.”
Press and hold LOCK for 3 seconds to lock the dispenser.
Press and hold LOCK a second time to unlock the dispenser.
The display screen indicates when the dispenser is locked.
Ice Maker and Storage Bin
Allow 24 hours to produce the first batch of ice. Discard the first
three batches of ice produced.
The quality of your ice will be only as good as the quality of the
water supplied to your ice maker. Avoid connecting the ice maker to
a softened water supply. Water softener chemicals (such as salt)
can damage parts of the ice maker and lead to poor quality ice. If a
softened water supply cannot be avoided, make sure the water
softener is operating properly and is well mai
ntained.
Do not use anything sharp to break up the ice in the storage bin.
This can cause damage to the ice container and the dispenser
mechanism.
Do not store anything on top of or in the ice maker or storage bin.
Turning the Ice Maker On/Off
The On/Off switch, located on the left wall of the freezer door, can only
be accessed when the ice storage bin has been removed. See the
following section for bin removal instructions.
To turn on the ice maker, flip the switch to the ON (up) position.
To manually turn off the ice maker, flip the switch to the OFF
(down) position.
NOTE: Your ice maker has an automatic shutoff to keep the storage
bin from overfilling druing normal operation. As ice is made, the ice
cubes will fill the ice storage bin, and the ice cubes will raise the shutoff
arm to the OFF (arm up) position. When the storage bin is at full
capacity, the ice maker will automatically stop ice production, but the
ice maker On/Off switch will remai
n in the ON (up) position.
oving and Replacing the Ice Storage Bin
. Press down the release lever and tilt the bucket outward. Use both
hands to hold the base of the storage bin, then lift it up and out.
NOTE: It is not necessary to turn the ice maker control to the
OFF (right) position when removing the storage bin. The sensor
cover (“flipper door”) on the left wall of the freezer stops the ice
maker from producing ice if the door is open or the storage bin is
removed.
ON
OFF
The Dispenser Light
When you use the dispenser, the light will automatically turn on.
If you want the light to be on continuously, press LIGHT.
Press LIGHT again to turn the dispenser light off.
The dispenser lights are LEDs that cannot be changed. If it appears
that your dispenser lights are not working, see “Problem Solver” for
more information.
The Dispenser Lock
The dispenser can be turned off for easy cleaning or to avoid
unintentional dispensing by small children and pets.
NOTE: The lock feature does not shut off power to the refrigerator, to
the ice maker, or to the dispenser light
. It simply deactivates the
controls and dispenser lever. To turn off the ice maker, see “Ice Maker
and Storage Bin.”
Press and hold LOCK for 3 seconds to lock the dispenser.
Press and hold LOCK a second time to unlock the dispenser.
The display screen indicates when the dispenser is locked.
Ice Maker and Storage Bin
Allow 24 hours to produce the first batch of ice. Discard the first
three batches of ice produced.
The quality of your ice will be only as good as the quality of the
water supplied to your ice m
aker. Avoid connecting the ice maker to
a softened water supply. Water softener chemicals (such as salt)
can damage parts of the ice maker and lead to poor quality ice. If a
softened water supply cannot be avoided, make sure the water
softener is operating properly and is well maintained.
Do not use anything sharp to break up the ice in the storage bin.
This can cause damage to the ice container and the dispenser
mechanism.
Do not store anything on top of or in the ice maker or stora
ge bin.
Turning the Ice Maker On/Off
The On/Off switch, located on the left wall of the freezer door, can only
be accessed when the ice storage bin has been removed. See the
following section for bin removal instructions.
To turn on the ice maker, flip the switch to the ON (up) position.
To manually turn off the ice maker, flip the switch to the OFF
(down) position.
NOTE: Your ice maker has an automatic shutoff to keep the storage
bin from overfilling druing normal operation. As ice is made, the ice
cubes will fill the ice storage bin, and the ice cubes will raise the shutoff
arm to the OFF (arm up) position. When the storage bin is at full
capacity, the ice maker will automatically stop ice production, but the
ice maker On/Off switch will remai
n in the ON (up) position.
Removing and Replacing the Ice Storage Bin
1. Press down the release lever and tilt the bucket outward. Use both
hands to hold the base of the storage bin, then lift it up and out.
NOTE: It is not necessary to turn the ice maker control to the
OFF (right) position when removing the storage bin. The sensor
cover (“flipper door”) on the left wall of the freezer stops the ice
maker from producing ice if the door is open or the storage bin is
removed.
The Dispenser Light
When you use the dispenser, the light will automatically turn on.
If you want the light to be on continuously, press LIGHT.
Press LIGHT again to turn the dispenser light off.
The dispenser lights are LEDs that cannot be changed. If it appears
that your dispenser lights are not working, see “Problem Solver” for
more information.
The Dispenser Lock
The dispenser can be turned off for easy cleaning or to avoid
unintentional dispensing by small children and pets.
NOTE: The lock feature does not shut off power to the refrigerator, to
the ice maker, or to the dispenser light
. It simply deactivates the
controls and dispenser lever. To turn off the ice maker, see “Ice Maker
and Storage Bin.”
Press and hold LOCK for 3 seconds to lock the dispenser.
Press and hold LOCK a second time to unlock the dispenser.
The display screen indicates when the dispenser is locked.
Ice Maker and Storage Bin
Allow 24 hours to produce the first batch of ice. Discard the first
three batches of ice produced.
The quality of your ice will be only as good as the quality of the
water supplied to your ice m
aker. Avoid connecting the ice maker to
a softened water supply. Water softener chemicals (such as salt)
can damage parts of the ice maker and lead to poor quality ice. If a
softened water supply cannot be avoided, make sure the water
softener is operating properly and is well maintained.
Do not use anything sharp to break up the ice in the storage bin.
This can cause damage to the ice container and the dispenser
mechanism.
Do not store anything on top of or in the ice maker or stora
ge bin.
Turning the Ice Maker On/Off
The On/Off switch, located on the left wall of the freezer door, can only
be accessed when the ice storage bin has been removed. See the
following section for bin removal instructions.
To turn on the ice maker, flip the switch to the ON (up) position.
To manually turn off the ice maker, flip the switch to the OFF
(down) position.
NOTE: Your ice maker has an automatic shut off to keep the storage
bin from overfilling druing normal operation. As ice is made, the ice
cubes will fill the ice storage bin, and the ice cubes will raise the shut
off arm to the OFF (arm up) position. When the storage bin is at full
capacity, the ice maker will automatically stop ice production,
but the
ice maker On/Off switch will remain in the ON (up) position.
Removing and Replacing the Ice Storage Bin
1. Press down the release lever and tilt the bucket outward. Use both
hands to hold the base of the storage bin, then lift it up and out.
NOTE: It is not necessary to turn the ice maker control to the
OFF (right) position when removing the storage bin. The sensor
cover (“flipper door”) on the left wall of the freezer stops the ice
maker from producing ice if the door is open or the storage bin is
removed.
A
C
B
D
A
4
The Dispenser Light
When you use the dispenser, the light will automatically turn on.
If you want the light to be on continuously, press LIGHT.
Press LIGHT again to turn the dispenser light off.
The dispenser lights are LEDs that cannot be changed. If it appears
that your dispenser lights are not working, see “Problem Solver” for
more information.
The Dispenser Lock
The dispenser can be turned off for easy cleaning or to avoid
unintentional dispensing by small children and pets.
NOTE: The lock feature does not shut off power to the refrigerator, to
the ice maker, or to the dispenser light
. It simply deactivates the
controls and dispenser lever. To turn off the ice maker, see “Ice Maker
and Storage Bin.”
Press and hold LOCK for 3 seconds to lock the dispenser.
Press and hold LOCK a second time to unlock the dispenser.
The display screen indicates when the dispenser is locked.
Ice Maker and Storage Bin
Allow 24 hours to produce the first batch of ice. Discard the first
three batches of ice produced.
The quality of your ice will be only as good as the quality of the
water supplied to your ice mak
er. Avoid connecting the ice maker to
a softened water supply. Water softener chemicals (such as salt)
can damage parts of the ice maker and lead to poor quality ice. If a
softened water supply cannot be avoided, make sure the water
softener is operating properly and is well maintained.
Do not use anything sharp to break up the ice in the storage bin.
This can cause damage to the ice container and the dispenser
mechanism.
Do not store anything on top of or in the ice maker or storage
bin.
Turning the Ice Maker On/Off
The On/Off switch, located on the left wall of the freezer door, can only
be accessed when the ice storage bin has been removed. See the
following section for bin removal instructions.
To turn on the ice maker, flip the switch to the ON (up) position.
To manually turn off the ice maker, flip the switch to the OFF
(down) position.
NOTE: Your ice maker has an automatic shutoff to keep the storage
bin from overfilling druing normal operation. As ice is made, the ice
cubes will fill the ice storage bin, and the ice cubes will raise the shutoff
arm to the OFF (arm up) position. When the storage bin is at full
capacity, the ice maker will automatically stop ice production, but the
ice maker On/Off switch
will remain in the ON (up) position.
Removing and Replacing the Ice Storage Bin
1. Press down the release lever and tilt the bucket outward. Use both
hands to hold the base of the storage bin, then lift it up and out.
NOTE: It is not necessary to turn the ice maker control to the
OFF (right) position when removing the storage bin. The sensor
cover (“flipper door”) on the left wall of the freezer stops the ice
maker from producing ice if the door is open or the storage bin is
removed.
A. Water dispenser lever
Ice production off
(shut off arm UP)
Ice production on
(shut off arm DOWN)
A. Release lever
A
C
B
D
To Dispense Ice:
1. Make sure the desired type of ice is selected.
Cut Hazard
Use a sturdy glass when dispensing ice.
Failure to do so can result in cuts.
WARNING
2. Press a sturdy glass against the dispenser lever. Hold the glass
close to the ice guide to ensure that the ice dispenses into the
glass.
IMPORTANT: You do not need to apply a lot of pressure to the
lever in order to activate the ice dispenser. Pressing hard will not
make the ice dispense faster or in greater quantities.
2
IMPORTANT: Child entrapment and suffocation are not problems of the
past. Junked or abandoned refrigerators are still dangerous, even if
they will sit for “just a few days.” If you are getting rid of your old
refrigerator, please follow these instructions to help prevent accidents.
Before You Throw Away Your Old Refrigerator or Freezer:
Take off the doors.
Leave the shelves in place so that children may not easily climb
inside.
Using the Controls
The refrigerator and freezer controls are located on the dispenser
panel.
IMPORTANT: The display screen on the dispenser control panel will
turn off automatically and enter “sleep” mode when the control buttons
and dispenser lever have not been used for 2 minutes or more. While in
“sleep” mode, the first press of a control button will only reactivate the
display screen, without changing any settings.
Touch any control button on the dispenser panel to activate the
display screen. The home screen will appear as shown.
Adjusting the Controls
For your convenience, your refrigerator and freezer controls are preset
at the factory. When you first install your refrigerator, make sure that
both the refrigerator and freezer controls are still set to the recommended
“mid-setting.” This will be displayed in the sequence of bars with three
illuminated bars.
IMPORTANT:
Wait 24 hours before you put food into the refrigerator. If you add
food before the refrigerator has cooled completely, your food may
spoil.
NOTE: Adjusting the set points to a colder than recommended
setting will not cool the compartments any faster.
If the temperature is too warm or too cold in the refrigerator or
freezer, first check the air vents to be sure they are not blocked
before adjusting the controls.
The preset settings should be correct for normal household usage.
The controls are set correctly when milk or juice is as cold as you
like and when ice cream is firm.
Wait at least 24 hours between adjustments. Recheck the
temperatures before other adjustments are made.
When adjusting set points, use the following chart as a guide.
The set point range is “1 bar” (coldest) to “5 bars” (least cold).
Refrigerator Control:
Press REFRIGERATOR TEMP to view the current set point for the
refrigerator.
Important information to know about disposal of
refrigerants:
Dispose of refrigerator in accordance with Federal and Local
regulations. Refrigerants must be evacuated by a licensed,
EPA certified refrigerant technician in accordance with
established procedures.
OPERATING YOUR REFRIGERATOR
CONDITION: ADJUSTMENT:
REFRIGERATOR too cold REFRIGERATO R S etting
one setting higher
REFRIGERATOR too warm REFRIGERATO R S etting
one setting lower
FREEZER too cold FREEZER Setting
one setting higher
FREEZER too warm /
Too little ice
FREEZERSetting
one setting lower
Press REFRIGERATOR TEMP again to adjust the set point.
The setting will increase by one bar with each press of the button,
returning to one bar after reaching five. After 2 minutes of
inactivity, any changes will be saved and the display will return to
the home screen.
Freezer Control:
Press FREEZER TEMP to view the current set point for the freezer.
3
Freezer Control:
Press FREEZER TEMP again to adjust the set point. The setting
will increase by one bar with each press of the button, returning to
one bar after reaching five. After 2 minutes of inactivity, any
changes will be saved and the display will return to the home
screen.
Crisper Humidity Control
You can control the amount of humidity in the moisture-sealed crisper.
Adjust the control to any setting between LOW and HIGH.
LOW (open) for best storage of fruits and vegetables with skins.
HIGH (closed) for best storage of fresh, leafy vegetables.
Water and Ice Dispensers
NOTES:
The dispensing system will not operate when the freezer door
is open.
Allow 24 hours for the refrigerator to cool down and chill water.
Allow 24 hours to produce the first batch of ice. Discard the first
three batches of ice produced. Wait 72 hours for full ice production.
The display screen on the dispenser control panel will turn off
automatically and enter “sleep” mode when the control buttons and
dispenser lever have not been used for 2 minutes or more. While in
“sleep” mode, the first press of a control button will only reactivate
the display screen, without changing any settings.
Flush the Water System
Air in the water dispensing system can cause the water dispenser to
drip. After connecting the refrigerator to a water source or replacing the
water filter, flush the water system. Flushing the water dispensing
system forces air from the water line and filter, and prepares the water
filter for use.
NOTE: As air is cleared from the system, water may spurt out of the
dispenser.
1. Using a sturdy container, depress and hold the water dispenser
lever for 5 seconds, then release it for 5 seconds.
2. Repeat St
ep 1 until water begins to flow.
3. Once water begins to flow, continue depressing and releasing the
dispenser lever (5 seconds on, 5 seconds off) until a total of 3gal.
(12 L) has been dispensed.
Additional flushing may be required in some households.
The Water Dispenser
IMPORTANT:
Dispense at least 1 qt (1 L) of water every week to maintain a fresh
supply.
If the flow of water from the dispenser decreases, it could be
caused by low water pressure.
With the water filter removed, dispense 1 cup (237 mL) of
water. If 1 cup of water is dispensed in 8 seconds or less, the
water pressure to the refrigerator meets the minimum
requirement.
If it takes longer than 8 seconds to dispense 1 cup of water,
the water pressure to the refrigerator is lower than
recommended. See “Water Supply Requirements” (in the User
Instructions or the Installation Instructions and Owner’s
Manual) or “Problem Solver” for suggestions.
ICE AND WATER
To Dispense Water:
1. Press a sturdy glass against the water dispenser level. Hold the
glass close to the water dispenser spout to ensure that the water
dispenses into the glass.
2. Remove the glass to stop dispensing.
IMPORTANT: The small tray at the bottom of the dispenser is designed
to catch small spills and allow for easy cleaning. There is no drain in the
tray.
The Ice Dispenser
Ice dispenses from the ice maker storage bin in the freezer when the
dispenser lever is pressed. To turn off the ice maker, see “Ice Maker
and Storage Bin.”
Yo ur ice maker can produce both crushed and cubed ice. Before
dispensing ice, select which type of ice you prefer by pressing
ICE TYPE.
The display screen indicates which type of ice is selected.
For crushed ice, cubes are crushed before being dispensed. This may
cause a slight delay when dispensing crushed ice. Noise from the ice
crusher is normal, and pieces of ice may vary in size. When changing
from crushed to cubed, a few ounces of crushed ice will be dispensed
along with the first cubes.
To Dispense Ice:
1. Make sure the desired type of ice is selected.
2. Press a sturdy glass against the dispenser lever. Hold the glass
close to the ice guide to ensure that the ice dispenses into the
glass.
Cut Hazard
Use a sturdy glass when dispensing ice.
Failure to do so can result in cuts.
WARNING
IMPORTANT: You do not need to apply a lot of pressure to the lever
in order to activate the ice dispenser. Pressing hard will not make
the ice dispense faster or in greater quantities.
3. Remove the glass to stop dispensing.
NOTE: Ice may continue to dispense for several seconds after
removing the glass from the lever. The dispenser may continue to
make noise for a few seconds after dispensing.
CRUSHED CUBED

4
3. Remove the glass to stop dispensing.
NOTE: Ice may continue to dispense for several seconds after
removing the glass from the lever. The dispenser may continue to
make noise for a few seconds after dispensing.
The Dispenser Light
When you use the dispenser, the light will automatically turn on.
J If you want the light to be on continuously, press LIGHT.
J Press LIGHT again to turn the dispenser light off.
The dispenser lights are LEDs that cannot be changed. If it appears
that your dispenser lights are not working, see “Troubleshooting” for
more information.
The Dispenser Lock
The dispenser can be turned off for easy cleaning or to avoid
unintentional dispensing by small children and pets.
NOTE: The lock feature does not shut off power to the refrigerator,
to the ice maker, or to the dispenser light. It simply deactivates the
dispenser lever. To turn off the ice maker, see “Ice Maker and
Storage Bin.”
J Press and hold LOCK for 3 seconds to lock the dispenser.
J Press and hold LOCK a second time to unlock the dispenser.
The display screen indicates when the dispenser is locked.
Ice Maker and Storage Bin
J Allow 24 hours to produce the first batch of ice. Discard the first
three batches of ice produced.
J The quality of your ice will be only as good as the quality of the
water supplied to your ice maker. Avoid connecting the ice maker
to a softened water supply. Water softener chemicals (such as
salt) can damage parts of the ice maker and lead to poor quality
ice. If a softened water supply cannot be avoided, make sure the
water softener is operating properly and is well maintained.
J Do not use anything sharp to break up the ice in the storage bin.
This can cause damage to the ice container and the dispenser
mechanism.
J Do not store anything on top of or in the ice maker or storage bin.
Turning the Ice Maker On/Off
J The On/Off switch, located on the left wall of the freezer door, can
only be accessed when the ice storage bin has been removed.
See the following section for bin removal instructions.
ON
OFF
J To turn on the ice maker, flip the switch to the ON (up) position.
J To manually turn off the ice maker, flip the switch to the OFF
(down) position.
NOTE: Your ice maker has an automatic shut off to keep the storage
bin from overfilling during normal operation. As ice is made, the ice
cubes will fill the ice storage bin, and the ice cubes will raise the shut
off arm to the OFF (arm up) position. When the storage bin is at full
capacity, the ice maker will automatically stop ice production, but the
ice maker On/Off switch will remain in the ON (up) position.
The Dispenser Light
When you use the dispenser, the light will automatically turn on.
If you want the light to be on continuously, press LIGHT.
Press LIGHT again to turn the dispenser light off.
The dispenser lights are LEDs that cannot be changed. If it appears
that your dispenser lights are not working, see “Troubleshooting” for
more information.
The Dispenser Lock
The dispenser can be turned off for easy cleaning or to avoid
unintentional dispensing by small children and pets.
NOTE: The lock feature does not shut off power
to the refrigerator, to
the ice maker, or to the dispenser light. It simply deactivates the
controls and dispenser lever. To turn off the ice maker, see “Ice Maker
and Storage Bin.”
Press and hold LOCK for 3 seconds to lock the dispenser.
Press and hold LOCK a second time to unlock the dispenser.
The display screen indicates when the dispenser is locked.
Ice Maker and Storage Bin
Allow 24 hours to produce the first batch of ice. Discard the first
three batches of ice produced.
The quality of your ice will be only as good as the quality of the
water supplied to your ice maker. Avoid connecting the ice maker to
a softened water supply. Water softener chemicals (such as salt)
can damage parts of the ice maker and lead to poor quality ice. If a
softened water supply cannot be avoided, make sure the water
softener is operating properly and is well mai
ntained.
Do not use anything sharp to break up the ice in the storage bin.
This can cause damage to the ice container and the dispenser
mechanism.
Do not store anything on top of or in the ice maker or storage bin.
Turning the Ice Maker On/Off
The On/Off switch, located on the left wall of the freezer door, can only
be accessed when the ice storage bin has been removed. See the
following section for bin removal instructions.
To turn on the ice maker, flip the switch to the ON (up) position.
To manually turn off the ice maker, flip the switch to the OFF
(down) position.
NOTE: Your ice maker has an automatic shutoff to keep the storage
bin from overfilling druing normal operation. As ice is made, the ice
cubes will fill the ice storage bin, and the ice cubes will raise the shutoff
arm to the OFF (arm up) position. When the storage bin is at full
capacity, the ice maker will automatically stop ice production, but the
ice maker On/Off switch will remai
n in the ON (up) position.
oving and Replacing the Ice Storage Bin
. Press down the release lever and tilt the bucket outward. Use both
hands to hold the base of the storage bin, then lift it up and out.
NOTE: It is not necessary to turn the ice maker control to the
OFF (right) position when removing the storage bin. The sensor
cover (“flipper door”) on the left wall of the freezer stops the ice
maker from producing ice if the door is open or the storage bin is
removed.
ON
OFF
The Dispenser Light
When you use the dispenser, the light will automatically turn on.
If you want the light to be on continuously, press LIGHT.
Press LIGHT again to turn the dispenser light off.
The dispenser lights are LEDs that cannot be changed. If it appears
that your dispenser lights are not working, see “Problem Solver” for
more information.
The Dispenser Lock
The dispenser can be turned off for easy cleaning or to avoid
unintentional dispensing by small children and pets.
NOTE: The lock feature does not shut off power to the refrigerator, to
the ice maker, or to the dispenser light
. It simply deactivates the
controls and dispenser lever. To turn off the ice maker, see “Ice Maker
and Storage Bin.”
Press and hold LOCK for 3 seconds to lock the dispenser.
Press and hold LOCK a second time to unlock the dispenser.
The display screen indicates when the dispenser is locked.
Ice Maker and Storage Bin
Allow 24 hours to produce the first batch of ice. Discard the first
three batches of ice produced.
The quality of your ice will be only as good as the quality of the
water supplied to your ice m
aker. Avoid connecting the ice maker to
a softened water supply. Water softener chemicals (such as salt)
can damage parts of the ice maker and lead to poor quality ice. If a
softened water supply cannot be avoided, make sure the water
softener is operating properly and is well maintained.
Do not use anything sharp to break up the ice in the storage bin.
This can cause damage to the ice container and the dispenser
mechanism.
Do not store anything on top of or in the ice maker or stora
ge bin.
Turning the Ice Maker On/Off
The On/Off switch, located on the left wall of the freezer door, can only
be accessed when the ice storage bin has been removed. See the
following section for bin removal instructions.
To turn on the ice maker, flip the switch to the ON (up) position.
To manually turn off the ice maker, flip the switch to the OFF
(down) position.
NOTE: Your ice maker has an automatic shutoff to keep the storage
bin from overfilling druing normal operation. As ice is made, the ice
cubes will fill the ice storage bin, and the ice cubes will raise the shutoff
arm to the OFF (arm up) position. When the storage bin is at full
capacity, the ice maker will automatically stop ice production, but the
ice maker On/Off switch will remai
n in the ON (up) position.
Removing and Replacing the Ice Storage Bin
1. Press down the release lever and tilt the bucket outward. Use both
hands to hold the base of the storage bin, then lift it up and out.
NOTE: It is not necessary to turn the ice maker control to the
OFF (right) position when removing the storage bin. The sensor
cover (“flipper door”) on the left wall of the freezer stops the ice
maker from producing ice if the door is open or the storage bin is
removed.
The Dispenser Light
When you use the dispenser, the light will automatically turn on.
If you want the light to be on continuously, press LIGHT.
Press LIGHT again to turn the dispenser light off.
The dispenser lights are LEDs that cannot be changed. If it appears
that your dispenser lights are not working, see “Problem Solver” for
more information.
The Dispenser Lock
The dispenser can be turned off for easy cleaning or to avoid
unintentional dispensing by small children and pets.
NOTE: The lock feature does not shut off power to the refrigerator, to
the ice maker, or to the dispenser light
. It simply deactivates the
controls and dispenser lever. To turn off the ice maker, see “Ice Maker
and Storage Bin.”
Press and hold LOCK for 3 seconds to lock the dispenser.
Press and hold LOCK a second time to unlock the dispenser.
The display screen indicates when the dispenser is locked.
Ice Maker and Storage Bin
Allow 24 hours to produce the first batch of ice. Discard the first
three batches of ice produced.
The quality of your ice will be only as good as the quality of the
water supplied to your ice m
aker. Avoid connecting the ice maker to
a softened water supply. Water softener chemicals (such as salt)
can damage parts of the ice maker and lead to poor quality ice. If a
softened water supply cannot be avoided, make sure the water
softener is operating properly and is well maintained.
Do not use anything sharp to break up the ice in the storage bin.
This can cause damage to the ice container and the dispenser
mechanism.
Do not store anything on top of or in the ice maker or stora
ge bin.
Turning the Ice Maker On/Off
The On/Off switch, located on the left wall of the freezer door, can only
be accessed when the ice storage bin has been removed. See the
following section for bin removal instructions.
To turn on the ice maker, flip the switch to the ON (up) position.
To manually turn off the ice maker, flip the switch to the OFF
(down) position.
NOTE: Your ice maker has an automatic shut off to keep the storage
bin from overfilling druing normal operation. As ice is made, the ice
cubes will fill the ice storage bin, and the ice cubes will raise the shut
off arm to the OFF (arm up) position. When the storage bin is at full
capacity, the ice maker will automatically stop ice production,
but the
ice maker On/Off switch will remain in the ON (up) position.
Removing and Replacing the Ice Storage Bin
1. Press down the release lever and tilt the bucket outward. Use both
hands to hold the base of the storage bin, then lift it up and out.
NOTE: It is not necessary to turn the ice maker control to the
OFF (right) position when removing the storage bin. The sensor
cover (“flipper door”) on the left wall of the freezer stops the ice
maker from producing ice if the door is open or the storage bin is
removed.
A
C
B
D
A
4
The Dispenser Light
When you use the dispenser, the light will automatically turn on.
If you want the light to be on continuously, press LIGHT.
Press LIGHT again to turn the dispenser light off.
The dispenser lights are LEDs that cannot be changed. If it appears
that your dispenser lights are not working, see “Problem Solver” for
more information.
The Dispenser Lock
The dispenser can be turned off for easy cleaning or to avoid
unintentional dispensing by small children and pets.
NOTE: The lock feature does not shut off power to the refrigerator, to
the ice maker, or to the dispenser light
. It simply deactivates the
controls and dispenser lever. To turn off the ice maker, see “Ice Maker
and Storage Bin.”
Press and hold LOCK for 3 seconds to lock the dispenser.
Press and hold LOCK a second time to unlock the dispenser.
The display screen indicates when the dispenser is locked.
Ice Maker and Storage Bin
Allow 24 hours to produce the first batch of ice. Discard the first
three batches of ice produced.
The quality of your ice will be only as good as the quality of the
water supplied to your ice mak
er. Avoid connecting the ice maker to
a softened water supply. Water softener chemicals (such as salt)
can damage parts of the ice maker and lead to poor quality ice. If a
softened water supply cannot be avoided, make sure the water
softener is operating properly and is well maintained.
Do not use anything sharp to break up the ice in the storage bin.
This can cause damage to the ice container and the dispenser
mechanism.
Do not store anything on top of or in the ice maker or storage
bin.
Turning the Ice Maker On/Off
The On/Off switch, located on the left wall of the freezer door, can only
be accessed when the ice storage bin has been removed. See the
following section for bin removal instructions.
To turn on the ice maker, flip the switch to the ON (up) position.
To manually turn off the ice maker, flip the switch to the OFF
(down) position.
NOTE: Your ice maker has an automatic shutoff to keep the storage
bin from overfilling druing normal operation. As ice is made, the ice
cubes will fill the ice storage bin, and the ice cubes will raise the shutoff
arm to the OFF (arm up) position. When the storage bin is at full
capacity, the ice maker will automatically stop ice production, but the
ice maker On/Off switch
will remain in the ON (up) position.
Removing and Replacing the Ice Storage Bin
1. Press down the release lever and tilt the bucket outward. Use both
hands to hold the base of the storage bin, then lift it up and out.
NOTE: It is not necessary to turn the ice maker control to the
OFF (right) position when removing the storage bin. The sensor
cover (“flipper door”) on the left wall of the freezer stops the ice
maker from producing ice if the door is open or the storage bin is
removed.
A. Water dispenser lever
Ice production off
(shut off arm UP)
Ice production on
(shut off arm DOWN)
A. Release lever
Removing and Replacing the Ice Storage Bin
1. Press down the release lever and tilt the bucket outward. Use
both hands to hold the base of the storage bin, then lift it up and
out.
A
A. Release lever
NOTE: It is not necessary to turn the ice maker control to the OFF
(right) position when removing the storage bin. The sensor cover
(“flipper door”) on the left wall of the freezer stops the ice maker from
producing ice if the door is open or the storage bin is removed.
A
B
A. On/off switch
B. Storage bin sensor
2. Replace the bin by sliding it onto the door, then tilting it back into
an upright position. The release lever will click when the bin is
securely in place.

5
Water Filtration System
Do not use with water that is microbiologically unsafe or
of unknown quality without adequate disinfection before
or after the system. Systems certified for cyst reduction
may be used on disinfected waters that may contain
filterable cysts.
Water Filter Status Light
The filter status light will help you know when to change your
water filter.
J It is recommended that you replace the filter when the status
light changes to red OR water flow to your water dispenser or ice
maker decreases noticeably.
NOTE: The filter should be replaced at least every six months
depending on your water quality and usage.
Resetting the Filter Status
J After changing the filter, reset the filter status light by pressing and
holding LIGHT and ICE TYPE for 3 seconds.
The status light will turn off when the system is reset.
Changing the Water Filter
Style 1
A
A. Water lter cover door
1. Locate the water filter cover door in the base grille, and pull open
the filter door. The filter will be released and then be ejected as the
door is opened.
2. When the door is completely open, pull the filter straight out.
NOTE: There may be some water in the filter. Some spilling may
occur. Use a towel to wipe up any spills.
3. Take the new filter out of its packaging and remove the covers
from the O-rings. Be sure the O-rings are still in place after the
covers are removed.
4. With the arrow pointing to the left (toward the filter cover door’s
hinge), align the new filter with the filter housing and slide it into
place. The filter cover door will automatically begin to close as the
new filter is inserted.
5. Close the filter cover door completely in order to snap the filter
into place. You may need to press hard.
6. Flush the water system. See the “Water and Ice Dispensers”
section.
Changing the Water Filter
Style 2
1. Locate the water filter cover door in the base grille, and pull open
the filter door.
A
A
A. Water lter cover door
2. Twist the water filter and turn 90 counterclockwise to unlock.
3. Pull the filter out of the housing.
4. Remove the water filter cap from the water filter.
5. Install the water filter cap onto the new filter. Be sure to align the
arrows so the grooves in the filter align with the ribs in filter cap.

6
6. Insert the filter into the housing.
7. Twist the water filter and turn 90 clockwise until it locks into place
and the arrows are aligned.
8. Push the water filter door closed.
The following accessories are available for your refrigerator. To order
an accessory, call 1-800-688-9901 and ask for the appropriate part
number listed below or contact your authorized Whirlpool dealer. In
Canada, call 1-800-807-6777.
affresh
®
Stainless Steel Cleaner:
Order Part #W10355016
In Canada, order Part #W10355016B
affresh
®
Stainless Steel Wipes:
Order Part #W10355049
In Canada, order Part #W10355049B
affresh
®
Kitchen & Appliance Cleaner:
Order Part #W10355010
In Canada, order Part #W10355010B
Water Filter:
Water filtration system style 1 - Order Part # EDR1RXD1
Water filtration system style 2 - Order Part # EDR2RXD1
For recommendations that may help you avoid a service call, visit www.whirlpool.com/product_help.
For a complete Troubleshooting listing with more information about additional topics, see the Installation Instructions and Owner’s Manual
provided with your refrigerator, or visit our website and download the User Instructions for your model.
6
For recommendations that may help you avoid a service call, scan the code at left with your mobile device, or visit
www.whirlpool.com/product_help.
For a complete Problem Solver listing with more information about additional topics, see the Installation Instructions
and Owner’s Manual provided with your refrigerator, or visit our website and download the User Instructions for
your model.
TROUBLESHOOTING
Electrical Shock Hazard
Plug into a grounded 3 prong outlet.
Do not remove ground prong.
Do not use an adapter.
Do not use an extension cord.
Failure to follow these instructions can result in death,
fire, or electrical shock.
WARNING
5.
6.
6. ˚
7.
1-800-442-9991
1-800-807-6777
affresh
®
Stainless Steel Cleaner:
affresh
®
Stainless Steel Wipes:
affresh
®
Kitchen & Appliance Cleaner:
Water Filter:
ACCESSORIES
Electrical Shock Hazard
Plug into a grounded 3 prong outlet.
Do not remove ground prong.
Do not use an adapter.
Do not use an extension cord.
Failure to follow these instructions can result in death,
fire, or electrical shock.
WARNING

7
PROBLEM Possible Causes and/or Recommended Solutions
Refrigerator
will not operate
J Not connected to an electrical supply - Plug the power cord into a grounded 3 prong outlet. Do not use an
extension cord.
J No power to the electrical outlet - Plug in a lamp to see if the outlet is working.
J Household fuse has blown or circuit breaker has tripped - Replace the fuse or reset the circuit breaker. If the
problem continues, call a licensed electrician.
J New Installation - Following instillation, allow 24 hours for the refrigerator and freezer to cool completely.
NOTE: Adjusting the temperature control(s) to the coldest setting will not cool down either compartment (refrigerator
or freezer) more quickly.
Refrigerator
seems noisy
The compressor in your new refrigerator regulates temperature more efficiently and uses less energy than older models.
During various stages of operation, you may hear normal operating sounds that are unfamiliar.
The following noises are normal:
J Buzzing/Clicking - Heard when the water valve opens and closes to dispense water or fill the ice maker. If the
refrigerator is connected to a water line, this is normal. If the refrigerator is not connected to a water line, turn off
the ice maker.
J Cracking/Crashing - Heard when the ice is ejected from the ice maker mold.
J Popping - Heard when the inside walls contract/expand, especially during initial cool down.
J Pulsating/Whirring - Heard when the fans/compressor adjust to optimize performance during normal operation.
J Rattling - Heard when water passes through the water line, or due to the flow of refrigerant. Rattling may also come
from items placed on top of the refrigerator.
J Water running or gurgling - Heard when ice melts during the defrost cycle and water runs into the drain pan.
J Sizzling - Heard when water drips onto the heater during the defrost cycle.
Motor seems
to run to much
J Your new refrigerator has an energy-efficient motor - The refrigerator may run longer than you’re used to, because
the compressor and fans operate at lower speeds that are more energy-efficient. This is normal.
NOTE: Your refrigerator may run even longer if the room is warm, a large load of food is added, the doors are opened
often, or if a door has been left open.
Temperature is
too warm
J New installation - Following installation, allow 24 hours for the refrigerator and freezer to cool down completely.
J NOTE: Adjusting the temperature control(s) to the coldest setting will not cool either compartment
(refrigerator or freezer) more quickly.
J Doors are opened often or not closed completely - This allows warm air to enter the refrigerator. Minimize door
openings, keep the doors fully closed, and make sure both doors are properly sealed.
J Air vents are blocked - Remove items that are immediately in front of the vents.
J Large amount of warm food recently added - Allow several hours for the refrigerator to return to its normal
temperature.
J Controls are not set correctly for the surrounding conditions - Adjust the controls to a colder setting. Check the
temperature again in 24 hours.
Temperature is
too cold
J Controls are not set correctly for the surrounding conditions - Adjust the controls to a warmer setting. Check the
temperature again in 24 hours.
J Top refrigerator shelf is colder than lower shelves - On some models, air from the freezer enters the refrigerator
compartment through vents near the top refrigerator shelf. As a result, the top shelf can be slightly colder than
lower shelves.
J Air vents are blocked - Remove items that are immediately in front of the vents.
Interior
moisture
buildup
NOTE: Some moisture buildup is normal. Clean with a soft dry cloth.
J Room is humid - A humid environment contributes to moisture buildup. Only use the refrigerator in an indoor location,
with as little humidity as possible.
J Doors are opened often or not closed completely - This allows humid air to enter the refrigerator. Minimize door
openings, keep the doors fully closed, and make sure both doors are properly sealed.
User interface
not responding
J User interface is not responding - Wait 10 seconds, then press any key to change the set point.
J Doors are opened often or not closed completely - To exit Lock mode, press and hold the lock key for 3 seconds.

8
03/17
IF YOU NEED SERVICE:
1. Before contacting us to arrange service, please determine whether your product requires repair. Some questions can be addressed without
service. Please take a few minutes to review the Troubleshooting section of the Use and Care Guide or visit producthelp.whirlpool.com.
2. All warranty service is provided exclusively by our authorized Whirlpool Service Providers. In the U.S. and Canada, direct all requests for
warranty service to:
Whirlpool Customer eXperience Center
In the U.S.A., call 1-800-253-1301. In Canada, call 1-800-807-6777.
If outside the 50 United States or Canada, contact your authorized Whirlpool dealer to determine whether another warranty applies.
WHIRLPOOL
®
MAJOR APPLIANCE
LIMITED WARRANTY
ATTACH YOUR RECEIPT HERE. PROOF OF PURCHASE IS REQUIRED
TO OBTAIN WARRANTY SERVICE.
Please have the following information available when you call the
Customer eXperience Center:
■ Name, address, and telephone number
■ Model number and serial number
■ A clear, detailed description of the problem
■ Proof of purchase, including dealer or retailer name and address
ONE YEAR LIMITED WARRANTY
WHAT IS COVERED
WHAT IS NOT COVERED
For one year from the date of purchase,
when this major appliance is installed,
operated, and maintained according
to instructions attached to or furnished
with the product, Whirlpool Corporation
or Whirlpool Canada LP (hereafter
“Whirlpool”) will pay for factory
specified replacement parts and repair
labor to correct defects in materials or
workmanship that existed when this
major appliance was purchased or, at
its sole discretion, replace the product.
In the event of product replacement,
your appliance will be warranted for
the remaining term of the original unit’s
warranty period.
YOUR SOLE AND EXCLUSIVE
REMEDY UNDER THIS LIMITED
WARRANTY SHALL BE PRODUCT
REPAIR AS PROVIDED HEREIN.
Service must be provided by a
Whirlpool designated service company.
This limited warranty is valid only in
the United States or Canada and
applies only when the major appliance
is used in the country in which it was
purchased. This limited warranty is
effective from the date of original
consumer purchase. Proof of original
purchase date is required to obtain
service under this limited warranty.
1. Commercial, non-residential, multiple-family use, or use inconsistent with published user, operator,
or installation instructions.
2. In-home instruction on how to use your product.
3. Service to correct improper product maintenance or installation, installation not in accordance with
electrical or plumbing codes, or correction of household electrical or plumbing (e.g., house wiring,
fuses, or water inlet hoses).
4. Consumable parts (e.g., light bulbs, batteries, air or water filters, preservation solutions).
5. Defects or damage caused by the use of non-genuine Whirlpool parts or accessories.
6. Conversion of products from natural gas or propane gas.
7. Damage from accident, misuse, abuse, fire, floods, acts of God, or use with products not approved
by Whirlpool.
8. Repairs to parts or systems to correct product damage or defects caused by unauthorized service,
alteration, or modification of the appliance.
9. Cosmetic damage including scratches, dents, chips, and other damage to the appliance finishes,
unless such damage results from defects in materials and workmanship and is reported to Whirlpool
within 30 days.
10. Discoloration, rust, or oxidation of surfaces resulting from caustic or corrosive environments including,
but not limited to, high salt concentrations, high moisture or humidity, or exposure to chemicals.
11. Food or medicine loss due to product failure.
12. Pickup or delivery. This product is intended for in-home repair.
13. Travel or transportation expenses for service in remote locations where an authorized Whirlpool
servicer is not available.
14. Removal or reinstallation of inaccessible appliances or built-in fixtures (e.g., trim, decorative panels,
flooring, cabinetry, islands, countertops, drywall) that interfere with servicing, removal, or replacement
of the product.
15. Service or parts for appliances with original model/serial numbers removed, altered, or not easily
determined.
The cost of repair or replacement under these excluded circumstances shall be borne by
the customer.
DISCLAIMER OF IMPLIED WARRANTIES
IMPLIED WARRANTIES, INCLUDING ANY IMPLIED WARRANTY OF MERCHANTABILITY OR IMPLIED WARRANTY OF FITNESS FOR A
PARTICULAR PURPOSE, ARE LIMITED TO ONE YEAR OR THE SHORTEST PERIOD ALLOWED BY LAW. Some states and provinces do not allow
limitations on the duration of implied warranties of merchantability or fitness, so this limitation may not apply to you. This warranty gives you specific
legal rights, and you also may have other rights that vary from state to state or province to province.
DISCLAIMER OF REPRESENTATIONS OUTSIDE OF WARRANTY
Whirlpool makes no representations about the quality, durability, or need for service or repair of this major appliance other than the representations
contained in this warranty. If you want a longer or more comprehensive warranty than the limited warranty that comes with this major appliance,
you should ask Whirlpool or your retailer about buying an extended warranty.
LIMITATION OF REMEDIES: EXCLUSION OF INCIDENTAL AND CONSEQUENTIAL DAMAGES
YOUR SOLE AND EXCLUSIVE REMEDY UNDER THIS LIMITED WARRANTY SHALL BE PRODUCT REPAIR AS PROVIDED HEREIN. WHIRLPOOL
SHALL NOT BE LIABLE FOR INCIDENTAL OR CONSEQUENTIAL DAMAGES. Some states and provinces do not allow the exclusion or limitation of
incidental or consequential damages, so these limitations and exclusions may not apply to you. This warranty gives you specific legal rights, and you
also may have other rights that vary from state to state or province to province.

9
Guide de l’utilisateur
Réfrigérateur Côte à Côte
Risque possible de décès ou de blessure grave si vous ne suivez pas
immédiatement les instructions.
Risque possible de décès ou de blessure grave si vous ne suivez pas les
instructions.
Tous les messages de sécurité vous diront quel est le danger potentiel et vous disent comment réduire le risque de blessure et ce qui peut
se produire en cas de non-respect des instructions.
Votre sécurité et celle des autres est très importante.
Nous donnons de nombreux messages de sécurité importants dans ce manuel et sur votre appareil ménager. Assurez-vous de
toujours lire tous les messages de sécurité et de vous y conformer.
AVERTISSEMENT
DANGER
Voici le symbole d’alerte de sécurité.
Ce symbole d’alerte de sécurité vous signale les dangers potentiels de décès et de blessures graves à vous et à d’autres.
Tous les messages de sécurité suivront le symbole d’alerte de sécurité et le mot “DANGER” ou “AVERTISSEMENT”. Ces
mots signifient :
AVERTISSEMENT :
réfrigérateur, prendre quelques précautions fondamentales, y compris les suivantes :
Pour réduire les risques d'incendie, de choc électrique ou des blessures lors de l'utilisation du
IMPORTANTES INSTRUCTIONS DE SÉCURITÉ
CONSERVEZ CES INSTRUCTIONS
■ Brancher l'appareil sur une prise à 3 alvéoles reliée à la terre.
■
Ne pas enlever la broche de liaison à la terre.
■
Ne pas utiliser un adaptateur.
■
Ne pas utiliser un câble de rallonge.
■ Débrancher la source de courant électrique avant l'entretien.
■ Replacer pièces et panneaux avant de faire la remise en marche.
■ Enlever les portes de votre vieux réfrigérateur.
■ Utiliser un produit de nettoyage ininflammable.
■ Garder les matériaux et les vapeurs inflammables, telle que
l'essence, loin du réfrigérateur.
■ Utiliser deux ou plus de personnes pour déplacer et installer le
réfrigérateur.
■
Débrancher le réfrigérateur avant l'installation de la machine à
glaçons (seulement pour modèles prêts à recevoir une machine à
glaçons).
■
Utiliser un verre robuste pour prendre des glaçons (sur certains
modèles).
■ Ne pas heurter les portes en verre du réfrigérateur (sur certains
modèles).
EN SAVOIR PLUS
Afin de conserver les ressources naturelles, ce réfrigérateur comprend un guide d’utilisation rapide. L’utilisateur trouvera un guide d’utilisation
téléchargeable complet (correspondant au modèle utilisé) à l’adresse www.whirlpool.com/product_help. Le numéro de modèle se
trouve sur la paroi interne du compartiment de réfrigération. Pour obtenir un exemplaire papier du manuel d’instructions d’utilisation (frais
d’expédition et de manutention possibles), composer le 1-800-253-1301 aux É.-U. ou composer le 1-800-807-6777 au Canada.
Enregistrer le réfrigérateur sur www.whirlpool.com. Au Canada, enregistrer sur www.whirlpool.ca.
Para instrucciones en español, visite www.whirlpool.com.

10
Renseignements importants à propos de la mise au
rebut des fluides réfrigérants :
Mettre le réfrigérateur au rebut conformément à la
réglementation fédérale et locale. Les fluides réfrigérants
doivent être évacués par un technicien certifié et agréé par
l’EPA conformément aux procédures établies.
MISE AU REBUT APPROPRIÉE DE VOTRE VIEUX RÉFRIGÉRATEUR
Risque de suffoquer
Enlever les portes de votre vieux réfrigérateur.
Le non-respect de cette instruction peut causer
un décès ou des lésions cérébrales.
AVERTISSEMENT
IMPORTANT : L’emprisonnement et l’étouffement des enfants ne sont pas
un problème du passé. Les réfrigérateurs jetés ou abandonnés sont encore
dangereux, même s’ils sont laissés abandonnés pendant “quelques jours
seulement”. Si vous vous débarrassez de votre vieux réfrigérateur, veuillez
suivre les instructions suivantes pour aider à éviter les accidents.
Avant de jeter votre vieux réfrigérateur ou congélateur :
J Enlever les portes.
J Laisser les tablettes en place de
sorte que les enfants ne puissent
pas y pénétrer facilement.
Utilisation des commandes
Les commandes du réfrigérateur et du congélateur se trouvent sur le
tableau de distribution.
IMPORTANT :
L’écran d’affichage sur le tableau de commande du
distributeur s’éteint automatiquement et entre au mode “veille” lorsque
les boutons de commande et le levier de distribution n’ont pas été
utilisés pendant au moins 2 minutes. Le fait d’appuyer une fois sur un
bouton de commande au mode “veille” réactive uniquement l’écran
d’affichage, sans modifier les réglages.
J Appuyer sur n’importe quel bouton de commande sur le tableau
dedistribution pour activer l’écran d’affichage. L’écran d’accueil
apparaît tel qu’indiqué.
Ajustement des commandes
J Pour votre commodité, les commandes du réfrigérateur et du
congélateur sont préréglées à l’usine. Lors de l’installation initiale du
réfrigérateur, s’assurer que les commandes sont encore préréglées
aux réglages moyens. Ceci sera indiqué avec trois barres lumineuses.
IMPORTANT :
J Attendre 24 heures avant d’ajouter des aliments dans le
réfrigérateur. Si on ajoute des aliments alors que le réfrigérateur n’a
pascomplètement refroidi, les aliments risquent de s’abîmer.
REMARQUE : Ajuster la commande sur un réglage plus froid que
celuiqui est recommandé ne refroidira pas les compartiments plus
rapidement.
J Si la température est trop tiède ou trop froide dans le réfrigérateur
ou le congélateur, vérifier d’abord les évents pour s’assurer qu’ils ne
sont pas bloqués, avant de régler les commandes.
J Les réglages préréglés devraient être corrects pour l’utilisation
domestique normale. Les réglages sont faits correctement lorsque
le lait ou le jus sont aussi froids que vous l’aimez et lorsque la crème
glacée est ferme.
J Attendre au moins 24 heures entre les ajustements. Vérifier
denouveau les températures avant de procéder à d’autres
ajustements.
Pour ajuster les points de réglage, utiliser le tableau suivant comme
guide.
Condition : Ajustement :
RÉFRIGÉRATEUR trop
froid
Réglage du RÉFRIGÉRATEUR à
un degré plus bas
RÉFRIGÉRATEUR trop
tiède
Réglage du RÉFRIGÉRATEUR à
un degré plus haut
CONGÉLATEUR trop froid Réglage du CONGÉLATEUR
à un degré plus bas
CONGÉLATEUR trop tiède/
Trop peu de glaçons
Réglage du CONGÉLATEUR
à un degré plus haut
La plage de consigne est “1 bar” (moins froid) à “5 bars” (plus froid).
Commande du réfrigérateur :
J Appuyez sur “Refrigerator Temp” pour afficher le point de
consigne actuel du réfrigérateur.
J Appuyez à nouveau sur “Refrigerator Temp” pour régler la
consigne. Le réglage augmente de 1 bar à chaque pression du
bouton, revenant à 1 bar après avoir atteint 5.
Après 2 minutes d’inactivité, toutes les modifications sont
enregistrées et l’écran revient à l’écran d’accueil.
Commande du congélateur :
J Appuyez sur “Freezer Temp” pour afficher le point de consigne
actuel du congélateur.
2
IMPORTANT:
“ ”
Before You Throw Away Your Old Refrigerator or Freezer:
Using the Controls
IMPORTANT:
“”
“”
Adjusting the Controls
“”
IMPORTANT:
NOTE:
“ ” “ ”
Refrigerator Control:
Important information to know about disposal of
refrigerants:
UTILISATION DU RÉFRIGÉRATEUR
CONDITION: ADJUSTMENT:
Freezer Control:

11
J Appuyez à nouveau sur “Refigerator Temp” pour régler la consigne.
Le réglage sugmente de 1 bar à chaque pression du bouton,
revenant à 1 bar après avoir atteint 5.
Après 2 minutes d’inactivié, toutes les modifications sont
enregistrées et l’écran revient à l’écran d’accueil.
Réglage de l’humidité dans le bac à légumes
On peut contrôler le degré d’humidité dans le bac à légumes étanche. La
commande peut être ajustée à n’importe quel réglage entre LOW et HIGH.
LOW (bas) [ouvert] pour une meilleure conservation des fruits et légumes
à pelures.
HIGH (haut) [fermé] pour une meilleure conservation des légumes à
feuilles frais.
Distributeurs d’eau et de glaçons
REMARQUES :
J Le système de distribution ne fonctionne pas lorsque la porte du
congélateur est ouverte.
J Accorder 24 heures pour que le réfrigérateur se refroidisse et
refroidisse l’eau.
J Accorder 24 heures pour produire la première quantité de glaçons.
Jeter les trois premières quantités de glaçons produites. Attendre
72 heures pour une production complète de glaçons.
J L’écran d’affichage sur le tableau de commande du distributeur
s’éteint automatiquement et entre au mode “veille” lorsque les
boutons decommande et le levier de distribution n’ont pas été
utilisés pendant aumoins 2 minutes. Le fait d’appuyer une fois sur
un bouton decommande au mode “veille” réactive uniquement
l’écran d’affichage, sans modifier les réglages.
Rinçage du circuit d’eau
De l’air piégé dans le système de distribution d’eau peut faire goutter
le distributeur d’eau. Après avoir raccordé le réfrigérateur à une source
d’alimentation en eau ou remplacé le filtre à eau, vidanger le circuit
d’eau. Le fait de rincer le système de distribution d’eau évacue l’air de la
canalisation et du filtre, et conditionne le filtre à eau.
REMARQUE : Pendant l’évacuation de l’air, de l’eau peut gicler du
distributeur.
1. Utiliser un récipient robuste pour appuyer sur le levier du
distributeur d’eau pendant 5 secondes, puis relâcher le levier
pendant 5 secondes.
2. Répéter l’étape 1 jusqu’à ce que l’eau commence à couler.
3. Une fois que l’eau commence à couler, continuer d’appuyer puis
derelâcher le levier du distributeur (appui pendant 5 secondes,
relâchement pendant 5 secondes) jusqu’à ce qu’un total de 3 gal.
(12L) soit distribué.
Une vidange supplémentaire peut être nécessaire dans certains
domiciles.
Le distributeur d’eau
IMPORTANT :
J Distribuer au moins 1 pte (1 L) d’eau chaque semaine pour
maintenirun approvisionnement en eau fraîche.
J Si le débit en provenance du distributeur diminue, cela peut être dû
àune faible pression en eau.
J Avec le filtre à eau retiré, verser l’équivalent d’une (1)tasse
(237mL) d’eau. Si l’équivalent d’une (1) tasse d’eau est distribué
en 8 secondes ou moins, cela signifie que la pression en eau
alimentant le réfrigérateur répond au critère minimal.
J S’il faut plus de 8 secondes à la machine pour distribuer
l’équivalent d’une (1) tasse d’eau, cela signifie que la pression
en eau alimentant le réfrigérateur est inférieure au niveau
recommandé. Voir “Spécifications de l’alimentation en
eau” (dans les instructions d’utilisation ou les instructions
d’installation et le manuel d’utilisation) ou “Résolution
deproblèmes” pour des suggestions sur la marche à suivre.
Distribution d’eau :
1. Appuyer un verre contre le levier du distributeur d’eau. Tenir le verre
près de la canula du distributeur d’eau pour que l’eau coule dans
le verre.
2. Retirer le verre pour arrêter la distribution.
IMPORTANT: Le petit récipient situé a la base du distributeur est conçu
pour recueillir les petits renversements et pour faciliter le nettoyage. Le
récipient ne comporte pas de conduit d’écoulement.
Le distributeur de glaçons
La glace tombe du bac d’entreposage de la machine à glaçons dans le
congélateur lorsqu’on appuie sur le levier du distributeur. Pour éteindre
la machine a glaçons, voir “Machine a glaçons et bac d’entreposage”.
Votre machine à glaçons peut produire à la fois la glace écrasée et la
glace en cubes. Avant de distribuer de la glace, sélectionnez le type de
glace que vous preferez en appuyant sur le bouton “Ice Type”.
L’écran d’affichange indique le type de glace sélectionné.
CRUSHED CUBED
Pour de la glace concassée, les glaçons sont concassés avant d’être
distribués. Cette action peut causer un court délai lors de la distribution
de glace concassée. Le bruit du broyeur de glaçons est normal et la
dimension des morceaux de glace peut varier. Lorsqu’on passe du
mode glace concassee au mode glaçons, quelques onces de glace
concassée sont distribuées avec les premiers glaçons.
A
C
B
D
Distribution de glaçons:
1. S’assurer que le type de glaçons désiré est bien sélectionné.
Risque de coupure
Utiliser un verre robuste pour prendre des glaçons.
Le non-respect de cette instruction peut causer
des coupures.
AVERTISSEMENT
Appuyer un verre robuste contre le levier de distribution. Tenir le
verre près de la goulotte à glaçons pour que les glaçons tombent
dans le verre.
GLAÇONS ET EAU
A. Levier du distributeur d’eau
B. Le bec verseur
C.
Levier du distributeur de
glaçons
D. Guide de glaçons

12
IMPORTANT: II n’est pas nécessaire d’exercer une pression
importante sur le levier pour activer le distributeur de glaçons. Une
pression forte ne donne pas une distribution plus rapide de glaçons
ou des quantiles plus grandes.
2. Retirer le verre pour arrêter la distribution.
REMARQUE : La distribution de glaçons peut se poursuivre jusqu’à
quelques secondes après que le verre a été éloigné du levier.
Le distributeur peut continuer à faire du bruit pendant quelques
secondes après la distribution.
La lampe du distributeur
Lorsqu’on utilise le distributeur, la lampe s’allume automatiquement.
J Pour que la lampe reste allumee en permanence, appuyez sur
“Light” bouton.
J Appuyer de nouveau sur “Light” (eclairage) pour eteindre la lampe
du distributeur.
Les lampes du distributeur sont des DEL qui ne peuvent pas être
remplacees. Si les lampes du distributeur ne fonctionnent pas, voir la
section “Dépannage” pour plus d’informations.
Le verrouillage du distributeur
Le distributeur peut être verrouillé pour un nettoyage facile ou
pour éviler la distribution involontaire par de jeunes enfants ou
des animaux de compagnie.
REMARQUE : La caractéristique de verrouillage ne coupe pas le
courant électrique au réfrigeratéur, à la machine à glaçons ou a la
lumière du distributeur. Cela désactive tout simplement les commandes
et le levier du distributeur. Pour éteindre la machine à glaçons, voir
“Machine à glaçons et bac d’entreposage”.
J Appuyer sur LOCK pendant 3 secondes pour verrouiller le
distributeur.
J Appuyer à nouveau sur LOCK pour déverrouiller le distributeur.
L’écran d’affichage indique si le distributeur est verrouillé.
Machine a glaçons et bac d’entreposage
J Accorder 24 heures pour produire la première quantilé de glaçons.
Jeter les trois premières quantiles de glaçons produites.
J La qualité de vos glaçons dépend de la qualite de l’eau fournie à
votre machine à glaçons. Eviler de brancher la machine à glaçons
à un approvisionnement d’eau adoucie. Les produits chimiques
adoucisseurs d’eau (tels que le sel) peuvent endommager des
pièces de la machine à glaçons et causer une piètre qualité des
glaçons. Si une alimentation d’eau adoucie ne peut pas être evitée,
s’assurer que l’adoucisseur d’eau fonctionne bien et qu’il est bien
entretenu.
J Ne pas utiliser un objet pointu pour briser les glaçons dans le
bac d’entreposage. Celle action peut endommager le bac et le
mécanisme du distributeur.
J Ne pas garder quoi que ce soit sur le dessus ou dans la machine à
glaçons ou dans le bac à glaçons.
Mise en marche/arret de la machine a glaçons :
J On ne peut accéder au commutateur On/Off (marche/arrêt), sur
la paroi de gauche de la porte du congélateur, qu’une fois le bac
d’entreposage à glaçons retiré. Voir la section suivante pour des
instructions sur le retrait du bac.
ON
OFF
J Pour mettre en marche la machine à glaçons, tourner le
commutateur à la position ON (marche) (vers le haut).
J Pour un arrêt manuel de la machine à glaçons, tourner le
commutateur à la position OFF (arrêt) (vers le bas).
REMARQUE: La machine a glaçons comporte un systeme d’arrêt
automatique pour éviler le sur-remplissage du bac d’entreposage
pendant un fonctionnement normal. Au fur et à mesure de la production
de glace, les glaçons remplissent le bac d’entreposage à glaçons.
Les glaçons soulèvent le bras de commande métallique jusqu’à ce
qu’il atteigne la position ARRÊT (bras vers le haul). Lorsque le bac
d’entreposage est plein, la machine à glaçons arrête automatiquement
la production de glaçons, mais le commutateur On/Off (marche/arrêt)
reste à la position ON (marche) (en haut).
Pour retirer et réinstaller le bac à glaçons :
1. Appuyer sur le levier de dégagement et incliner le seau vers
l’extérieur. Saisir la base du bac d’entreposage à mains et le
soulever pour le dégager.
A
A. Levier de dégagement
REMARQUE : Il n’est pas nécessaire de tourner le commutateur
On/Off (marche/arrêt) de la machine à glaçons à la position
OFF (arrêt) (vers le bas) lors du retrait du gauche de la porte du
congélateur interrimpot la production de glaçons lorsque la porte
est ouverte ou que le bac d’entreposage a été enlevé.
A
B
A. Commutateur On/Off (marche/arrêt)
B. Détecteur du bac d’entreposage
2. Réinstaller le bac en le faisant glisser sur la porte puis en l’inclinant
vers l’arrière et le plaçant en position verticale. Le levier de
dégagement émet un déclic lorsque le bac est bien en place.
Production de glaçons arrêt
(bras de commande vers le HAUT)
Production de glaçons marche
(bras de commande vers le BAS)

13
Système de filtration de l’eau
Ne pas utiliser pour le filtrage d'une eau
microbiologiquement polluée ou de qualité inconnue en
l'absence d'un dispositif de désinfection adéquat avant ou
après le système. Les systèmes certifiés pour la réduction
de kyste peuvent être utilisés pour l'eau désinfectée qui
peut contenir des kystes filtrables.
Témoin lumineux de l’état du filtre à eau
Le témoin lumineux de l’état du filtre à eau vous aidera à savoir
quand changer le filtre à eau.
J Lorsque l’affichage de l’état du filtre à eau du panneau de
commande du distributeur change pour s’allumer, cela vous indique
qu’il est presque temps de changer la cartouche du filtre à eau.
J Il est recommandé de remplacer le filtre à eau lorsque le témoin
lumineux de l’état du filtre à eau passe au rouge OU lorsue le
débit d’eau à votre distributeur ou à la machine à glaçons diminue
de façon marquée.
REMARQUE : Le filtre doit être remplacé au moins tous les 6 mois
selon la qualité de l’eau et la fréquense d’utilisation.
Réinitialisation de l’état du filtre
J Après avoir changé le filtre, réinitialisez le voyant d’état du filtre en
appuyant sur la touche “Light & Ice Type” pendant 3 secondes.
Le témoin lumineux séteint lorsque le systeme est réinitialisé.
Changer le filtre à eau
A
A. Clapet de logement du ltre à eau
1. Repérer le clapet du logement du filtre à eau dans la grille de la base
et l’ouvrir en le tirant. Le filtre doit être libéré puis éjecté lorsqu’on
ouvre le clapet.
2. Une fois le clapet complètement ouvert, retirer le filtre en le tirant en
ligne droite.
REMARQUE : Il y aura peut-être de l’eau dans le filtre. Il est
possible que de l’eau se renverse. Utiliser une serviette pour
essuyer tout renversement.
3. Retirer le filtre neuf de son emballage, puis retirer les protections
des anneaux d’étanchéité. S’assurer que les anneaux d’étanchéité
sont toujours en place une fois que les protections sont retirées.
4. Avec la flèche orientée vers la gauche (vers la charnière du clapet
du logement du filtre), aligner le filtre neuf avec le logement du
filtre st l’insérer en le faisant glisser. Le clapet du logement du filtre
entame un mouvement automatique de fermeture à mesure que
l’on insère le filtre neuf.
5. Fermer complètement le clapet du logement du filtre pour
emboîter le filtre et le mettre en place. Il faudra peut-être appuyer
fortement.
6. Purger le circuit d’eau. Voir “Distributeurs d’eau et de glaçons”.
Changer le filtre à eau
Le style 2
1. Repérer le couvercle du logement du filtre à eau dans la grille de
la base, le tirer pour l’ouvrir.
A
A. Clapet de logement du ltre à eau
2. Faire tourner le filtre à eau de 90 dans le sens antihoraire pour le
déverrouiller.
3. Retirer le filtre du compartiment.
4. Retirer le capuchon du filtre à eau.
5. Installer le capuchon de filtre à eau sur le nouveau filtre. Aligner
les flèches pour que les rainures du filtre s’enlignent avec les
nervures du capuchon.

14
6. Placer le filtre dans le compartiment.
7. Faire tourner le filtre de 90° dans le sens horaire jusqu’à ce qu’il
soit verrouillé en place et que les èches soient alignées.
8. Refermer la porte du ltre à eau.
Les accessoires de réfrigérateur suivants sont disponibles. Pour
commander, composer le 1-800-442-9991 et demander le numéro
de pièce indiqué ou contacter votre marchand autorisé Whirlpool. Au
Canada, composer le 1-800-807-6777.
Nettoyant pour acier inoxydable affresh
®
:
Commander la pièce numéro W10355016
Au Canada, commander la pièce numéro W10355016B
Lingettes pour acier inoxydable affresh
®
:
Commander la pièce numéro W10355049
Au Canada, commander la pièce numéro W10355049B
Nettoyant pour appareil ménager et cuisine affresh
®
:
Commander la pièce numéro W10355010
Au Canada, commander la pièce numéro W10355010B
Filtre à eau :
Système de filtration de l’eau style 1:
Commander la pièce numéro EDR1RXD1
Système de filtration de l’eau style 2:
Commander la pièce numéro EDR2RXD1
Pour des conseils qui vous permettront peut-être d’éviter une intervention de dépannage, ou consultez www.whirlpool.com/product_help.
Pour une liste complète de dépannage (regroupant plus d’information sur d’autres sujets), voir les instructions d’installation et le manuel
d’utilisation fourni avec le réfrigérateur ou consulter notre site Web et télécharger les instructions d’utilisation correspondant au modèle utilisé.
ACCESSOIRES
DÉPANNAGE
AVERTISSEMENT
Risque de choc électrique
Brancher sur une prise à 3 alvéoles reliée à la terre.
Ne pas enlever la broche de liaison à la terre.
Ne pas utiliser un adaptateur.
Ne pas utiliser un câble de rallonge.
Le non-respect de ces instructions peut causer
un décès, un incendie ou un choc électrique.

15
Problème Causes possibles et/ou solutions recommandées
Le
réfrigérateur
ne fonctionne
pas
J Non raccordé à une alimentation électrique - Brancher le cordon d’alimentation dans une prise à 3 alvéoles reliée à la
terre. Ne pas utiliser de cordon de rallonge.
J Pas de courant dans la prise électrique - Brancher une lampe pour voir si la prise électrique fonctionne.
J Un fusible est grillé ou un disjoncteur s’est ouvert - Remplacer le fusible ou réenclencher le disjoncteur. Si le problème
persiste, contacter un électricien agréé.
J Nouvelle installation - Attendre 24 heures après l’installation pour permettre au réfrigérateur et au congélateur de
refroidir complètement.
REMARQUE : Le fait de placer la/les commande(s) de température au réglage le plus froid ne refroidira pas le
compartiment (de réfrigération ou de congélation) plus rapidement.
Le réfrigérateur
semble bruyant
Le compresseur de votre nouveau réfrigérateur régule la température plus efficacement et utilise moins d’énergie que les
modèles plus anciens. Au cours de différentes étapes du fonctionnement de l’appareil, vous entendrez peut-être des bruits de
fonctionnement normaux qui ne vous sont pas familiers.
Les bruitssuivants sont normaux :
J Bourdonnement/Cliquetis - Se produit lorsque le robinet d’eau s’ouvre et se referme pour distribuer de l’eau ou remplir
lamachine à glaçons. Si le réfrigérateur est raccordé à une canalisation d’arrivée d’eau, cela est normal. Éteindre la
machine àglaçons si le réfrigérateur n’est pas raccordé à une canalisation d’arrivée d’eau.
J Craquement/Écrasement - Se produit lorsque la glace est éjectée du moule à glaçons.
J Bruit d’éclatement - Se produit lors de la contraction/l’expansion des parois internes, particulièrement lors du
refroidissement initial.
J Pulsation/Frottement rythmique - Se produit lorsque les ventilateurs/le compresseur s’ajustent pour optimiser la
performancede l’appareil pendant son fonctionnement - cela est normal.
J Vibrations sonores - Se produit lorsque l’eau circule dans la canalisation d’arrivée d’eau ou lorsque le réfrigérant circule
dansl’appareil. Les vibrations peuvent aussi provenir d’objets posés sur le réfrigérateur.
J Bruit d’écoulement d’eau ou de gargouillement - Se produit lorsque la glace fond lors du programme de dégivrage et
quel’eau s’écoule dans le plateau de dégivrage.
J Grésillement - Se produit à mesure que de l’eau goutte sur l’élément de chauffage durant le programme de dégivrage.
Le moteur
semble
fonctionner
excessivement
J Votre nouveau réfrigérateur comporte un moteur haute efficacité - Il est possible qu’il fonctionne plus longtemps que
votreappareil précédent car le compresseur et les ventilateurs fonctionnent à des vitesses réduites plus éconergiques.
Ceci est normal.
REMARQUE : L’appareil peut fonctionner encore plus longtemps si la température de la pièce est élevée, si une grande
quantité de nourriture a été ajoutée, si les portes sont fréquemment ouvertes ou si elles ont été laissées ouvertes.
La est trop
élevée
J Nouvelle installation - Attendre 24 heures après l’installation pour permettre au réfrigérateur et au congélateur de
refroidir complètement.
REMARQUE : Le fait de placer la/les commande(s) de température au réglage le plus froid ne refroidira pas le
compartiment(de réfrigération ou de congélation) plus rapidement.
J Les portes sont ouvertes trop fréquemment ou ne sont pas complètement fermées - Ceci permet à l’air chaud
depénétrer dans le réfrigérateur. Minimiser les ouvertures de porte, garder les portes complètement fermées et s’assurer
quel’étanchéité des deux portes est assurée.
J Les ouvertures d’aération sont obstruées - Retirer les objets placés devant les ouvertures.
J Une grande quantité d’aliments chauds a été récemment ajoutée - Attendre quelques heures pour permettre
auréfrigérateur de revenir à une température normale.
J Le réglage des commandes n’est pas adapté à l’environnement de l’appareil - Ajuster les commandes à un réglage
plus froid. Contrôler à nouveau la température 24 heures plus tard.
La température
est trop basse
J Le réglage des commandes n’est pas adapté à l’environnement de l’appareil - Ajuster les commandes à un réglage
plus chaud. Contrôler à nouveau la température 24 heures plustard.
J La tablette supérieure du réfrigérateur est plus froide que les tablettes inférieures - Sur certains modèles, l’air
enprovenance du congélateur pénètre dans le compartiment de réfrigération par les évents situés à proximité de la
tablettesupérieure. La tablette supérieure peut donc être légèrement plus froide que les tablettes inférieures.
J Les ouvertures d’aération sont obstruées - Retirer les objets placés devant les ouvertures.
Accumulation
d’humidité à
l’intérieur de
l’appareil
REMARQUE : Une certaine accumulation d’humidité est normale. Nettoyer avec un linge doux et sec.
J La pièce est humide - Un environnement humide contribue à l’accumulation d’humidité. Utiliser le réfrigérateur à
l’intérieur dudomicile uniquement, dans un environnement aussi sec que possible.
J Les portes sont fréquemment ouvertes ou ne sont pas complètement fermées - Ceci permet à l’air humide de
pénétrerdans le réfrigérateur. Minimiser les ouvertures de porte, garder les portes complètement fermées et s’assurer que
l’étanchéitédes deux portes est assurée.
L’interface
utilisateur ne
fonctionne pas
J L’interface utilisateur ne fonctionne pas - Attendre 10 secondes, puis appuyer sur n’importe quel bouton pour changer
le point de réglage.
J L’interface utilisateur est en mode de verrouillage- Pour désactiver le mode verrouillage, maintenir enfoncé le bouton
verrouillage de commandes pendant 3 seconds.

SI VOUS AVEZ BESOIN DE SERVICE :
1. Avant de nous contacter pour obtenir un dépannage, veuillez déterminer si des réparations sont nécessaires pour votre produit. Certains
problèmes peuvent être résolus sans intervention de dépannage. Prenez quelques minutes pour parcourir la section Dépannage du
guide d’utilisation et d’entretien
ou rendez-vous sur le site whirlpool.ca.
2. Tout service sous garantie doit être effectué exclusivement par nos fournisseurs de dépannage autorisés Whirlpool. Aux É.-U. et au Canada,
dirigez toutes vos demandes de service sous garantie au :
Centre d’eXpérience de la clientèle Whirlpool
Aux É.-U., composez le 1 800 253-1301. Au Canada, composez le 1 800 807-6777.
Si vous résidez à l’extérieur du Canada et des 50 États des États-Unis, contactez votre marchand Whirlpool autorisé pour déterminer si une autre
garantie s’applique.
GARANTIE LIMITÉE DES
GROS APPAREILS
MÉNAGERS WHIRLPOOL
®
ATTACHEZ ICI VOTRE REÇU DE VENTE. UNE PREUVE D’ACHAT EST
OBLIGATOIRE POUR OBTENIR L’APPLICATION DE LA GARANTIE.
Lorsque vous appelez le centre d’eXpérience de la clientèle, veuillez
garder à disposition les renseignements suivants :
■ Nom, adresse et numéro de téléphone
■ Numéros de modèle et de série
■ Une description claire et détaillée du problème rencontré
■ Une preuve d’achat incluant le nom et l’adresse du marchand
ou du détaillant
GARANTIE LIMITÉE DE UN AN
CE QUI EST COUVERT
CE QUI N’EST PAS COUVERT
Pendant un an à compter de la date
d’achat, lorsque ce gros appareil
ménager est installé, utilisé et entretenu
conformément aux instructions jointes
à ou fournies avec le produit, Whirlpool
Corporation ou Whirlpool Canada, LP (ci-
après désignées “Whirlpool”) décidera
à sa seule discrétion de remplacer le
produit ou de couvrir le coût des pièces
spécifiées par l’usine et de la main-
d’œuvre nécessaires pour corriger les
vices de matériaux ou de fabrication qui
existaient déjà lorsque ce gros appareil
ménager a été acheté. S’il est remplacé,
l’appareil sera couvert pour la période
restant à couvrir de la garantie limitée
d’un an du produit d’origine.
LE SEUL ET EXCLUSIF RECOURS
DU CLIENT DANS LE CADRE DE
LA PRÉSENTE GARANTIE LIMITÉE
CONSISTE EN LA RÉPARATION
PRÉVUE PAR LA PRÉSENTE. Le service
doit être fourni par une compagnie de
service désignée par Whirlpool. Cette
garantie limitée est valide uniquement
aux États-Unis ou au Canada et
s’applique exclusivement lorsque le gros
appareil ménager est utilisé dans le pays
où il a été acheté. La présente garantie
limitée est valable à compter de la date
d’achat initial par le consommateur.
Une preuve de la date d’achat initial est
exigée pour obtenir un dépannage dans
le cadre de la présente garantie limitée.
1. Usage commercial, non résidentiel ou par plusieurs familles, ou non-respect des instructions de
l’utilisateur, de l’opérateur ou d’installation.
2. Visite d’instruction à domicile pour montrer à l’utilisateur comment utiliser l’appareil.
3. Visites de service pour rectifier une installation ou un entretien fautifs du produit, une installation non
conforme aux codes d’électricité ou de plomberie ou la rectification de l’installation électrique ou de
la plomberie du domicile (ex : câblage électrique, fusibles ou tuyaux d’arrivée d’eau du domicile).
4. Pièces consomptibles (ex : ampoules, batteries, filtres à air ou à eau, solutions de conservation).
5. Défauts ou dommages résultant de l’utilisation de pièces ou accessoires autres que d’origine
Whirlpool.
6. Conversion de votre produit du gaz naturel ou du gaz propane.
7. Dommages causés par : accident, mauvaise utilisation, abus, incendie, inondations, catastrophe
naturelle ou utilisation de produits non approuvés par Whirlpool.
8. Réparations aux pièces ou systèmes dans le but de rectifier un dommage ou des défauts résultant
d’une réparation, altération ou modification non autorisée faite à l’appareil.
9. Défauts d’apparence, notamment les éraflures, traces de choc, fissures ou tout autre dommage subi
par le fini de l’appareil ménager, à moins que ces dommages ne résultent de vices de matériaux ou
de fabrication et ne soient signalés à Whirlpool dans les 30 jours suivant la date d’achat.
10. Décoloration, rouille ou oxydation des surfaces résultant d’environnements caustiques ou corrosifs
incluant des concentrations élevées de sel, un haut degré d’humidité ou une exposition à des
produits chimiques (exemples non exhaustifs).
11. Perte d’aliments ou de médicaments due à la défaillance du produit.
12. Enlèvement ou livraison. Ce produit est conçu pour être réparé à l’intérieur du domicile.
13. Frais de déplacement et de transport pour le dépannage/la réparation dans une région éloignée où
une compagnie de service Whirlpool autorisée n’est pas disponible.
14. Retrait ou réinstallation d’appareils inaccessibles ou de dispositifs préinstallés (ex : garnitures,
panneaux décoratifs, plancher, meubles, îlots de cuisine, plans de travail, panneaux de gypse) qui
entravent le dépannage, le retrait ou le remplacement du produit.
15. Service et pièces pour des appareils dont les numéros de série et de modèle originaux ont été
enlevés, modifiés ou ne peuvent pas être facilement identifiés.
Le coût d’une réparation ou d’un remplacement dans le cadre de ces circonstances exclues est
à la charge du client.
03/17
CLAUSE D’EXONÉRATION DE RESPONSABILITÉ AU TITRE DES GARANTIES IMPLICITES
LES GARANTIES IMPLICITES, Y COMPRIS LES GARANTIES APPLICABLES DE QUALITÉ MARCHANDE OU D’APTITUDE À UN USAGE
PARTICULIER, SONT LIMITÉES À UN AN OU À LA PLUS COURTE PÉRIODE AUTORISÉE PAR LA LOI. Certains États et certaines provinces ne
permettent pas de limitation sur la durée des garanties implicites de qualité marchande ou d’aptitude à un usage particulier, de sorte que la limitation
ci-dessus peut ne pas être applicable dans votre cas. Cette garantie vous confère des droits juridiques spécifiques et vous pouvez également jouir
d’autres droits qui peuvent varier d’une juridiction à l’autre.
EXONÉRATION DE RESPONSABILITÉ DANS LES DOMAINES NON COUVERTS PAR LA GARANTIE
Whirlpool décline toute responsabilité au titre de la qualité, de la durabilité ou en cas de dépannage ou de réparation nécessaire sur ce gros appareil
ménager autre que les responsabilités énoncées dans la présente garantie. Si vous souhaitez une garantie plus étendue ou plus complète que la
garantie limitée fournie avec ce gros appareil ménager, adressez-vous à Whirlpool ou à votre détaillant pour obtenir les modalités d’achat d’une
garantie étendue.
LIMITATION DES RECOURS; EXCLUSION DES DOMMAGES FORTUITS OU INDIRECTS
LE SEUL ET EXCLUSIF RECOURS DU CLIENT DANS LE CADRE DE LA PRÉSENTE GARANTIE LIMITÉE CONSISTE EN LA RÉPARATION PRÉVUE
PAR LA PRÉSENTE. WHIRLPOOL N’ASSUME AUCUNE RESPONSABILITÉ POUR LES DOMMAGES FORTUITS OU INDIRECTS. Certains États
et certaines provinces ne permettent pas l’exclusion ou la limitation des dommages fortuits ou indirects de sorte que ces limitations et exclusions
peuvent ne pas être applicables dans votre cas. Cette garantie vous confère des droits juridiques spécifiques et vous pouvez également jouir
d’autres droits qui peuvent varier d’une juridiction à l’autre.
W11101942A
®
8
/™ ©2017 Whirlpool. All rights reserved. Used under license in Canada.
06/17
11/14
WHIRLPOOL
®
MAJOR APPLIANCE
LIMITED WARRANTY
ATTACH YOUR RECEIPT HERE. PROOF OF PURCHASE IS REQUIRED
TO OBTA IN WARRANTY SERVICE.
Please have the following information available when you call the
Customer eXperience Center:
Name, address and telephone number
Model number and serial number
A clear, detailed description of the problem
Proof of purchase including dealer or retailer name and address
IF YOU NEED SERVICE:
1. Before contacting us to arrange service, please determine whether your product requires repair. Some
questions can be addressed without service. Please take a few minutes to review the Troubleshooting or
Problem Solver section of the Use and Care Guide, scan the QR code on the right to access additional
resources, or visit www.whirlpool.com/product_help.
2. All warranty service is provided exclusively by our authorized Whirlpool Service Providers
. In the U.S. and
Canada, direct all requests for warranty service to:
Whirlpool Customer eXperience Center
In the U.S.A., call 1-800-253-1301. In Canada, call 1-800-807-6777.
If outside the 50 United States or Canada, contact your authorized Whirlpool dealer to determine whether another warranty applies.
ww
w.whirlpool.com/product_hel
p
ONE YEAR LIMITED WARRANTY
WHAT IS COVERED WHAT IS NOT COVERED
For one year from the date of purchase, when this major
appliance is installed, operated and maintained
according to instructions attached to or furnished with
the product, Whirlpool Corporation or Whirlpool Canada
LP (hereafter “Whirlpool”) will pay for Factory Specified
Replacement Parts and repair labor to correct defects in
materials or workmanship that existed when this major
appliance was purchased, or at its sole discretion
replace the product. In the event of product
replacement, your appliance will be warranted for the
remaining term of the original unit's warranty period.
YOUR SOLE AND EXCLUSIVE REMEDY UNDER THIS
LIMITED WARRANTY SHALL BE PRODUCT REPAIR AS
PROVIDED HEREIN. Service must be provided by a
Whirlpool designated service company. This limited
warranty is valid only in the United States or Canada and
applies only when the major appliance is used in the
country in which it was purchased. This limited warranty
is effective from the date of original consumer purchase.
Proof of original purchase date is required to obtain
service under this limited warranty.
1. Commercial, non-residential, multiple-family use, or use inconsistent with publishe
d
user, operator or installation instructions.
2. In-home instruction on how to use your product.
3. Service to correct improper product maintenance or installation, installation not in
accordance with electrical or plumbing codes or correction of household electrical or
plumbing (i.e. house wiring, fuses or water inlet hoses).
4. Consumable parts (i.e. lig
ht bulbs, batteries, air or water filters, preservation so
lutions,
etc.).
5. Defects or damage caused by the use of non-genuine Whirlpool parts or accessories.
6. Conversion of products from natural gas or L.P. gas.
7. Damage from accident, misuse, abuse, fire, floods, acts of God or use with products
not approved by Whirlpool.
8. Repairs to parts or systems to correct product damage or defects caused by
unauthorized service, alteration or modification of the appliance.
9. Cosmetic damage including scratches, dents, chips, and other damage to the
appliance finishes unless such damage results from defects in materials and
workmanship and is reported to Whirlpool within 30 days.
10. Discoloration, rust or oxidation of surfaces resulting from caustic or corrosive
environments including but not limited to high salt concentrations, high moisture or
humidity or exposure to chemicals.
11. Food or medicine loss due to product failure.
12. Pick-up or delivery. This product is intended for in-home repair.
13. Travel or transportation expenses for service in remote locations where an authorized
Whirlpool servicer is not available.
14. Removal or reinstallation of inaccessible appliances or built-in fixtures (i.e. trim,
decorative panels, flooring, cabinetry, islands, countertops, drywall, etc.) that interfe
re
with servicing, removal or replacement of the product.
15. Service or parts for appliances with or
iginal model/serial numbers removed, altered or
not easily determined.
The
cost of repair or replacement under these excluded circumstances shall be borne
by the customer.
DISCLAIMER OF IMPLIED WARRANTIES
IMPLIED WARRANTIES, INCLUDING ANY IMPLIED WARRANTY OF MERCHANTABILITY OR IMPLIED WARRANTY OF FITNESS FOR A
PARTICULAR PURPOSE, ARE LIMITED TO ONE YEAR OR THE SHORTEST PERIOD ALLOWED BY LAW. Some states and provinces do not allow
limitations on the duration of implied warranties of merchantability or fitness, so this limitation may not apply to you. This warranty gives you
specific legal rights, and you also may have other rights that vary from state to state or province to province.
DISCLAIMER OF REPRESENTATIONS OUTSIDE OF WARRANTY
Whirlpool makes no representations about the quality, durability, or need for service or repair of this major appliance other than the representations
contained in this warranty. If you want a longer or more comprehensive warranty than the limited warranty that comes with this major appliance,
you should ask Whirlpool or your retailer about buying an extended warranty.
LIMITATION OF REMEDIES; EXCLUSION OF INCIDENTAL AND CONSEQUENTIAL DAMAGES
YOUR SOLE AND EXCLUSIVE REMEDY UNDER THIS LIMITED WARRANTY SHALL BE PRODUCT REPAIR AS PROVIDED HEREIN. WHIRLPOOL
SHALL NOT BE LIABLE FOR INCIDENTAL OR CONSEQUENTI
AL DAMAGES. Some states and provinces do not allow the exclusion or limitation
of incidental or consequential damages, so these limitations and exclusions may not apply to you. This warranty gives you specific legal rights, and
you also may have other rights that vary from state to state or province to province.
-
 1
1
-
 2
2
-
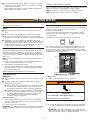 3
3
-
 4
4
-
 5
5
-
 6
6
-
 7
7
-
 8
8
-
 9
9
-
 10
10
-
 11
11
-
 12
12
-
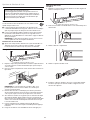 13
13
-
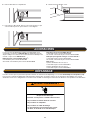 14
14
-
 15
15
-
 16
16


Whirlpool WRS555SIHW Manuel utilisateur
- Catégorie
- Frigos
- Taper
- Manuel utilisateur
- Ce manuel convient également à
dans d''autres langues
- English: Whirlpool WRS555SIHW User manual
Documents connexes
-
Whirlpool WRS586FIEM Mode d'emploi
-
Whirlpool WRS571CIHZ Mode d'emploi
-
Whirlpool WRSA15SNHN Manuel utilisateur
-
Whirlpool WRT111SFDM Mode d'emploi
-
-
Whirlpool WRF560SEHZ Mode d'emploi
-
Whirlpool W10407342A1 Manuel utilisateur
-
Whirlpool W11396854B-SP Mode d'emploi
-
-
Whirlpool WRX986SIHZ ECO Use and Care EN