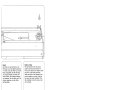
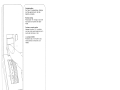
Pfaff tipmatic 1115 Le manuel du propriétaire
- Taper
- Le manuel du propriétaire
La page est en cours de chargement...
La page est en cours de chargement...
La page est en cours de chargement...

Dise
Seite
nach
auBen
kiappen
Fold
out
this
page
Rabattre
ce
volet
vers
extérieur
Girare
questa
pagina
verso
‘esterno
Sicherheitshinweise
für
Haushaltnähmaschinen
raeh
DIN
57700
Tell
28
bzw.
IEC
335
Tell
28
a)
Der
Benutzer
hat
wegen
der
auf-
und
abgehenden
Nadel
genugend
Vor
sicht
walton
zu
iassen
und
die
Näh
stelte
bei
der
Arbeit
standig
zu
beobachten.
b)
Beim
Verlassen
der
Maschine,
bei
Wartungsarbeiten
odor
beim
Wech
sein
von
rnechanischen
Teilen
odor
Zubehör,
st
die
Maschine
durch
Her
ausziehen
des
Netzsteckers
aus
der
Steckdose
vom
Netz
zu
trennen,
c)
Die
maximal
zulassige
Leistung
der
Lampe
botragt
15
Watt.
Some
safety
rules
a)
Take
care
to
avoid
injury
to
your
fin
gers
by
the
needle
during
sewing.
b)
Be
sure
to
unplug
the
power
cord
whenever
you
leave
the
machine
or
wish
to
clean
it,
oil
1
or
change
mechanical
and
accessory
parts.
C)
Be
sure
to
use
only
a
15-watt
light
bulb
in
the
sewing
lamp.
For
safety
rules
applicable
to
the
UK
please
see
page
34.
j
Mesures
do
sécurité
a)
Toujours
faire
preuve
de
prudence
et
continuellement
surveiller
le
travail.
b)
Toujours
débrancher
a
machine
du
secteur
avant
do
quitter
a
machine,
avant
les
travaux
dentretien
et
en
cas
de
remplacement
do
pièces
mécaniques
ou
d’accessoires,
c)
Puissance
maximale
admissible
do
l’ampouie:
15
Watts.
Norme
di
sicurezza
per
macchine
per
cucire
per
uso
famiglia
secondo
DIN
57700
parte
28
oppure
lEG
335
parte
28
a)
In
virtU
del
movimento
alternativo
dell’ago,
‘utente
deve
prestare
suffi
ciente
attenzione
e
tenere
costante
monte
d’occhio
1
punto
di
lavoro.
b)
Net
cambiare
ago,
piedino,
spotina
e
placca
dago,
nelle
interruzioni
non
custodite
del
avoro
e
durante
i
avon
di
manutenzione
si
deve
disinserire
la
corrente
della
macchina
togliendo
a
spina
dalla
presa
a
muro.
c)
La
potenza
massima
consentita
per
a
lampadina
è
di
15
Watt.
I
lndice
pagina
73
inhoud
pagina
75
nhaltsverzeichnis
Seite
69
Table
des
matières,
page
71
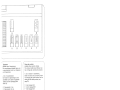
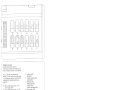
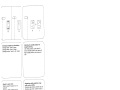
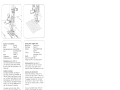
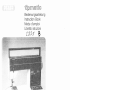
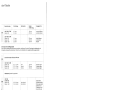
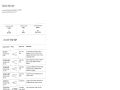
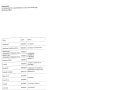
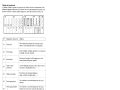
D

K
Pièces
de
Ia
machine
100
Poignee
101
Dévidoir
102
Volant
103
Bouton
de
debrayage
104
Interrupteur
general
105
Touches
de
réglage
106
Sélecteur
de
longueur
de
point
107
Socle
108
Compartiment
du
crochet
109
Support
du
pied
prosseur
avec
pied
presseur
110
Pince-aiguille
avec
vis
de
fixation
111
Fentes
denfitage
112
Tension
du
fit
daiguille
113
Releveur
de
fit
114
Pretension
do
dévidoir
115
Levier
du
pied
presseur
116
Barre
du
pied
presseur
avec
coupe-fit
117
Plaque
a
aiguille
118
Porte-bobine
avec
disque
dérouleur
119
Levier
de
marche
arrière
120
Plaque
de
base
121
Plaque
de
rangement
avec
bolte
a
accessoires
122
Cache
avec
compartiment
de
crochet
123
Compartiment
a
accessoires
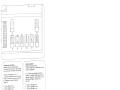
Elementi
di
comando
della
macchina
per
cucire
100
Maniglia
101
Annaspatoio
102
Volantino
103
Disco
di
disinnesto
del
volantino
104
Interruttore
principale
105
I
tasti
automatici
106
II
regolapunto
107
Lo
zoccolo
108
Sportellino
—
dietro
crochet
109
Portapiedino
con
piedino
1
10
Morsetto
d’ago
con
vite
di
fissaggio
111
Fessure
di
infilatura
112
La
tensione
superiore
113
Leva
tendifilo
114
lensione
per
Iannaspatoio
115
Leva
alzapiedino
116
Barra
premistoffa
con
tagliafilo
117
Placcadago
118
Portarocchetto
con
disco
di
scorrimento
119
Tasto
per
cucire
indietro
120
Base
della
macchina
121
Piano
di
lavoro
variable
con
scomparto
per
accessori
122
Sportellino
dietro
it
crochet
123
Scomparto
per
accessori
da
macchine
con
base
piana

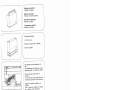
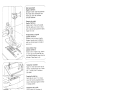
Eektrischer
AnschluB
Tragegriff
umklappen.
Machine
connection
Fold
down
the
carrying
handle.
Branchement
électrique
Basculer
Ia
poignée.
II
collegamento
elettrico
Ribaltare
a
maniglia.
}
N
Kofferhaube
abheben.
Lift
off
the
cover.
Enlever
le
couvercle
de
Ia
valisette.
Alzare
Ia
custodia.
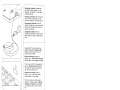
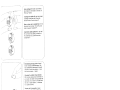
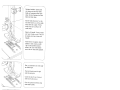
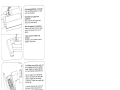
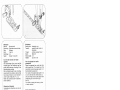
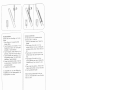
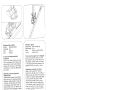
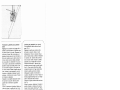
4
Den
Anlasser
aus
der
Maschine
neh
men.
Zum
Wegraumen
den
Anlasser,
wie
die
Abbildung
zeigt,
in
die
Maschine
stellen,
Remove
the
foot
control
from
the
machine.
To
store
the
foot
control
again
place
it
in
the
machine
as
shown
in
the
illustration.
Degager
le
rheostat
a
pédale
de
Ia
machine.
Pour
le
rangement,
disposer
le
rheostat
sur
le
plateau,
selon
illustration.
Togliere
ii
reostato
a
pedale
dalla
macchina.
Per
riporre
Ia
macchina,
sistemare
nou
vamente
ii
reostato
nella
macchina
come
si
mostra
nella
figura.
La page est en cours de chargement...
La page est en cours de chargement...

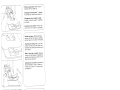
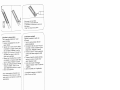
N
Zweiten
Garnrollenhalter
rechts
auf
den
Tragegriff
stecken.
Er
befindet
sich
im
ZubehOr.
Fit
the
second
reel
pin
at
the
right.
It
is
included
in
the
accessories.
Monter
Ia
deuxième
broche
a
bobines
a
droite.
Elle
se
trouve
parmi
les
accessol
res.
Inserire
ii
secondo
porta-rocchetto
a
destra
sulla
maniglia.
Esso
si
trova
nel
corredo.
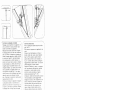
Garnrolle
aufschieben.
N
Place
the
thread
reel
on
the
pin.
Passer
Ia
bobine
de
fil
sur
Ia
broche.
Inserire
ii
rocchetto.
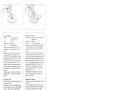
Spule
auf
den
Spuler
101
stecken
und
N
drehen,
bis
Stift
N
in
Schlitz
0
einrastet.
Place
the
bobbin
on
bobbin
winder
101
and
turn
it
so
that
pin
N
engages
in
slot
0.
Mettre
Ia
canette
en
place
sur
le
dévidoir
101;
tourner
Ia
canette
jusqu’à
ce
que
Ia
fente
0
passe
sur
Is
tenon
N.
lnserire
Ia
spolina
sullo
spolatore
101
e
girarla
finchè
1
porno
N
si
inserisce
nella
fessura
0.
4
Nähwerk
ausschalten:
Handrad
festhal
ten
und
Scheibe
103
nach
vorn
drehen.
Disengaging
the
sewing
mechanism:
Hold
the
hand
wheel
steady
and
turn
knob
103
towards
you.
Débrayer
e
mécanisme:
Retenir
le
volant
et
tourner
le
disque
103
vers
‘avant.
Disinnestare
ii
meccanismo
di
cucito:
Tenere
fermo
1
volantino
e
girare
ii
disco
103
in
avanti.
5
La page est en cours de chargement...

4
Bobinage
des
canettes
Tirer
le
fil
de
a
bobine,
autour
du
guide
fil
N,
dans
a
pretension
de
dévidoir
114.
Puis,
enrouler
le
hi
de
quelques
tours,
dans
le
sens
de
Ia
flèche,
sur
Ia
canette.
Pousser
Ia
canette
vers
a
droite.
Abais
ser
a
pédale
du
rheostat
et
garnir
Ia
canette.
Pousser
a
canette
remplie
vers
Ia
gauche,
Ia
retirer
et
couper
le
fil.
H
Avvolgere
Ia
spolina
Tirare
II
fib
dal
rocchetto
nella
guida
N
e
nella
tensione
dell’annaspatoio
114.
Por
tare
quindi
II
fib
aIb’annaspatoio,
avvol
gerlo
alcune
volte
attorno
alla
spolina
come
mostra
a
freccia
e
premere
Ia
spo
lina
verso
destra.
Premere
ii
pedale
e
bobinare.
Premere
a
spolina
piena
verso
sinistra,
toglierla
e
tagliare
ii
fib.
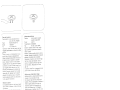
Nähwerk
einschalten:
Handrad
festhal
ten
und
Scheibe
103
nash
hinten
drehen.
Dann
Handrad
nach
vorne
drehen,
his
es
einrastet.
Engaging
the
sewing
mechanism:
Hold
the
hand
wheel
firmly
and
turn
disk
103
toward
the
back.
then
turn
the
hand
wheel
forward
again
until
it
snaps
in.
Embrayaqe
du
mécanisme:
Retenir
le
volant
et
burner
le
disque
103
vers
!‘arrière.
Tourner
Ic
volant
vers
‘avant
jusqu’à
cc
qu’ii
s’enclenche.
inserimento
meccanismo
di
cucito:
tenere
fermo
ii
volantino
e
girare
ii
disco
103
verso
dietro.
Girare
quindi
ii
volantino
in
avanti
finchè
s’innesta.

Spue
ebdegei
N
(Faden
nach
riinten),
-
-
,
Den
F-eden
in
den
Schlitz
0
und
bis
zur
-i--
)
\
Otinung
P
ziehen,
2
/
S
‘\
-
nerung
the
oabbn
(N),
with
the
thread
\
unreeling
toward
the
back.
Draw
the
-
)
j
th
cad
into
slot
0
and
into
eye
P.
/
Mse
eti
pae
de
d
cariette
(N)
Ic
ru
se
/
-
déroulant
vers
l’arrièie
Tirer
Ic
hi
par
Ia
_A-
j
fente
0
jusqu’á
‘ouverture
P.
—
Iriserimento
dea
spohrta
N
(il
capo
dci
bin
ye
rivoito
“euso
dietro).
Introdurre
ii
thu
nella
tessura
0,
quindi
turare
fino
aII’apertura
P
/
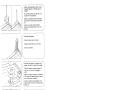
Unterfadeiispannuug
prüten:
Kapsel
teichi,
rui..kartig
autwaitsbewegen
Sic
mutt
stufenweise
niedersiuiken.
(Einsteli
I
schisuhe
0
nach
links
drehen
loser,
/
nach
rechts
drehen
fester.)
Checking
the
bobbin
thread
tenskrn:
-
-
With
d
hi
ct,
sharp
upward
movement
of
-
your
tend,
the
bobbin
must
gradually
slip
Jownwrds
(Turn
screw
0
counter-clock
wise
lur
a
weaker
tension,
(if
clockwise
tot
a
tighter
tension.)
fensuon
dL
ti
de
canette:
laisser
pendre
a
cenette
garnie
au
hi
de
a
—1
‘anolte
File
dolt
descendre
gradireile
l
\
—
rueni
uiand
on
imprime
a
Ia
main
de
J
I
I
légeres
saccades
ascendantes
Hotahori
de
a
‘irs
0
vers
a
gauche
reduction
de
a
to
isk)n
roLStrurr
‘jars
a
diode.
renfor
-
-
-‘
tflCt
1
(ontnifo
de!a
tesioue
unferiore:
Trraue
C
capsule
con
leggeti
uolpttI
ierso
I/rho
Deve
abbassarsi
gradatainente
(girarido
a
site
di
regolaggio
0
a
sinistra
S
itiltit,
‘esu
terra
ci
nntorza)
La page est en cours de chargement...
La page est en cours de chargement...
La page est en cours de chargement...
La page est en cours de chargement...
La page est en cours de chargement...

4
Contralto
della
tensone
det
ttto
La
tensione
normale
si
trova
nel
settore
bianco
da
3—5.
Piü
alto
ii
numero,
plU
forte
sara
a
tensione.
II
controllo
viene
fatto
con
Ia
zig-zag
plU
argo.
Cucire
una
breve
cucitura.
L’annodamento
del
fill
deve
avvenire
al
centro
della
spessore
del
materiale.
Tensions
des
Ills
Position
de
reglage
normale
dans
a
plage
blanche,
entre
3
et
5.
Tension
d’autant
plus
forte
que
le
chiftre
ost
grand.
ContrOler
a
‘aide
dun
point
zig
zag
large.
Coudre
quelques
points.
Les
fils
doivent
se
nouer
dans
l’épaisseur
des
tissus,
/
4
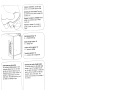
Stoffdrückerhebel
115
hochstellen.
Stoff
nach
hinten
herausnehmen.
Raise
presser
bar
lifter
115.
Remove
the
fabric
by
pulling
it
toward
the
back.
Relever
le
levier
115.
Degager
Ia
tissu
vers
l’arrière.
Alzare
Ia
leva
alzapiedino
115.
Togliere
Ia
stoffa
versa
dietro.
Fadenabschneider
N.
Fäden
einlegen
und
nach
unten
ziehen.
Thread
cutter
N.
Draw
the
threads
into
the
slot
and
pull
them
downwards.
Coupe-fit
N.
Coucher
es
fils
dans
Ia
fente
et
les
tirer
vers
le
bas.
Tagtiafito
N.
Inserire
I
fili
e
tirarli
verso
II
basso.

Stichlänge
einstellen
Die
Zahien
auf
dem
Stichlängen-Ein
steller
106
geben
die
Stichlãnge
in
mm
an.
Der
Einstellbereich
st
0
bis
6
mm
oder
0
bis
4
mm
Die
gewunschte
Such
lange
wird
an die
Einstellrnarkierung
N
gedreht,
De
Abbildung
0
unten
zeigt
die
Einstel
lung
des
Stichlängen-Einstellers
zurn
Nähen
der
rot
abgebildeien
Stretchstiche
auf
den
Tasten.
Regulating
the
stitch
length
The
numbers
on
stitch
length control
106
indicate
the
stitch
length
in
milli
meters.
The
stitch
length
range
is
0
to
6
mm
or
0
to
4
mm.
Turn
the
control
to
set
the
number
indicating
the
stitch.
length
at
mark
N.
Fig.
0
(bottom
shows
how
to
set
the
stitch
length
control
br
sewing
stretch
stdches
Oed
stitch
symbols
on
push
bur
tonsf.
RCglage
de
Ia
Iorgueur
du
point
Les
chiffres
sur
Is
disque
106
indiquent
Ia
longueur
du
point
en
mm.
La
longueur
du
point
est
reglable
entre
0
et
6
mm
ou
entre
0
et
4
mm.
La
longueur
de
point
choisie
est
indiquée
face
au
repére
N
Lillustratian
0
(en
bas)
montre
Ic
reglage
du
regis-point
pour
a
couture
des
points
Clastiques
marques
en
rouge
sur
es
touches.
Regolazione
della
lunghezza
del
punto
I
nurneri
sul
bottone
regolatore
della
lunghezza
del
punto
106
corrispondono
alla
lunghezza
del
punto
n
mm.
La
rego
lazione
si
estende
da
0
a
6
mm
oppure
do
0
a
4
mm.
La
lunghezza
del
punto
desiderata
si
regola
sulla
marcatura
N.
La
ligura
0
sotto
mostra
a
regolazione
del
bottone
regolatore
per
cucire
i
punti
flexi
(stretch>
raffigurati
ri
rosso
sui
tasti.
4
\
\\\
*\
‘4
15

7-
eDflD
EUfl4D3EW
e
onweid
euwu
OSEj
ii
6H-
OSE.
eJeWeJ
ojepu
Jnno
sq
iie
enueutw
se
aqDnoj
enb
sdwe5uoj
issnE
JJE
Lie
pflOD
Uf14OEW
i
6H.
eqono
El
.iessiqj
ejj
eqejew
ue
eJnno3
-)peq
SMES
euiLpEw
ciji
uonq
siq
poq
noA
se
6uoi
SV
6L
uop.nq
ssei
6uMes
asJaAa
SJEMN3flJ
eU!qoSE
e!p
qu
‘piim
pripe6
eisi
eip
ebuelog
ueNOnJpJepeiu
6[
esej
eia
uequsIçM)p
7-
9[
ll
111
spieM
La page est en cours de chargement...

7
M
EbHH
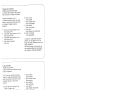
Touches
de
commande
(modèles
sans
points
elastiques)
Le
nombre
des
touches
at
des
program
mes
vane
salon
le
modèle
de
machine
Touches
boutonniêres:
A
8,
C
La
touche
boutonniere
8
sent
en
memo
temps
a
annular
las
touches
enfoncées
at
a
déporter
l’aiguille
a
ciauche
tpage
25).
D
Point
zigzag
2
mm
E
Point
zigzag
3,5
mm
F
Point
zigzag
5
mm
G
Point
droit
M
Point
zigzag
piqué
La
tableau
du
programme
des
points
prCsente,
sun
es
pages
84
a
87,
les
points,
es
points
combines
at
tours
pnin
cipates
utilisations.
Las
ettres
gravées
sur
las
touches
de
‘otre
machine
determinant
es
program
mes
simples
at
combines
rdatisables.
/
tast
automatid
(modelli
senza
punti
(taxi)
I
diversi
modelli
hanrio
ditfenente
numero
di
tasti
a
programmi.
A,
8,
C
tasti
per
occhiello
automatico
Tasto
B
e
contemporaneamente
anche
tasto
per
annutlare
i
tasti
inseriti
e
per
Ia
posizione
dell’ago
a
sinistra
(vedi
pag.
25).
0
punto
a
zig-zag
2
mm
E
punto
a
zig-zag
3,5
mm
F
punto
a
zig-zag
5
mm
6
punto
diritto
M
punto
elastico
Nella
tabelta
dei
programmi
a
pagine
88—91
sono
descritti
i
punti
a
le
possibili
combianazioni
con
accenni
per
Ia
oro
utilizzazione.
Le
lettere
dei
tasti
delta
sua
macchina
determinano
I
programmi
a
le
combina
zioni
che
ci
possono
cucire,
I
I
/1
La page est en cours de chargement...
La page est en cours de chargement...

Touches
de
commande
(modèles
avec
points
elastiques)
La
nombre
des
touches
et
des
program
mes
vane
solon
le
modèle
do
machine.
Touches
boutonnières:
A,
B,
C
La
touche
boutonniere
B
sort
en
mCme
temps
a
annuler
es
touches
enfoncées
at
a
déporter
l’aiguiNe
a
gauche
(page
25).
0
Triple
point
zigzag
Clastique
2
mm
Point
zigzag
2
mm
E
Triple
point
zigzag
Clastique
3,5
mm
Point
zigzag
3,5
mm
F
Triple
point
zigzag
elastique
5
mm
Point
zigzag
5
mm
G
Triple
couture
Ciastique
Point
droit
H
Point
de
tricot
Point
invisible
I
Point
overlock
fermé
Point
d’assemblage
K
Point
overlock
Point
bord
coquille
L
Point
d’Cpis
Point
elastique
dornementation
M
Point
nid
d’abeille
Point
zigzag
piqué
La
tableau
du
programme
des
points
prCsente,
sur
es
pages
84
A
87,
es
points,
las
points
combines
at
leurs
prin
cipales
utilisations.
Las
lettres
gravées
sur
es
touches
de
votre
machine
determinant
las
program
rnes
simples
at
combines
rCalisables.
I
tasti
automatici
(modelli
con
punti
flexi)
I
diversi
modelli
hanno
ditferente
numero
di
tasti
e
programmi.
A,
S.
C
tasti
per
occhiello
automatico
Tasto
B
C
contemporaneamente
anche
ii
tasto
per
annullare
i
tasti
inseriti
a
per
a
posizione
dell’ago
a
sinistra
(vedi
pag.
25).
0
punto
triplo
flexi
a
zig-zag
2
mm
punto
a
zig-zag
2
mm
F
punto
triplo
flexi
a
zig-zag
3.5
mm
punto
a
zig-zag
3,5
mm
F
punto
triple
flexi
a
zig-zag
5
mm
punto
a
zig-zag
5
mm
G
punto
diritto
flexi
triple
punto
diritto
H
punto
pullover
punto
invisible
I
punto
overlock
chiuso
punto
giuntura
K
punto
overlock
orb
a
conchiglia
L
punto
piuma
punto
elastico
ornamentale
M
punto
a
nido
d’ape
punto
elastico
Nella
tabella
dci
programmi
a
pagino
88—91
sono
descritti
i
punti
e
be
possibili
combinazioni
con
accenni
per
Ia
loro
uti
lizzazione,
La
lettere
dci
tasti
della
sua
macchina
determinano
programmi
e
e
combina
zioni
che
Si
POSSOflO
cucire.
)
21

I
_zziz:
Nutzstiche
enstehen
tweiBe
Syrnboe)
Taste
tippen
und
die
gewdnschte
Stich
lange
zwscnen
I
und
6
acer
I
und
4
eirstellen
Afle
Zlckzack
und
Nutzsticite
werden
dumb
zusätzliches
Tpen
ocr
laste
C
in
der
Emetic
haibteit
Setectng
itWty
stitches
(white
symbols)
PLSh
the
button
required
and
set
the
steen
length
between
1
and
6
or
1
and
4
All
iazaq
and
Jtflity
strtcbes
are
halved
in
wiath
when
button
C
is
piPssed.
j
Réglage
des
points
uitafres
(symboles
blancs)
Appuyer
sur
Ia
louche
et
ré2ler
IC
loft
gueut
de
potnt
désirée
entre
1
ci
6
ou
entre
1
et
4
En
appuyani
egalernenl
cut
a
tounhe
C,
tous
les
points
zigzag
et
uttittatres
soot
reduits
de
mottle.
I
punti
LtIt
(simboli
htancht)
Premere
II
tasto
e
regolare
a
lunghezza
del
punto
desiderata
tra
1—6
oppure
1
—4
1
utti
punti
a
ztgzag,
elasilci
e
stretch
vengono
dimezzati
gefla
arc
larghezza,
cc
at
oreme
in
aggiunta
ii
tasto
C
\‘I
\‘\
‘u
\\
\\
ft
\‘N
\
\\‘
l\
\!
/
22

(c’
\\
\\
\\
\\
\\\\
Stretchstiche
einsteflen
(rote
Symbole)
Taste
tippen
und
Stichiängen-Einsteller
bis
zum
Anschlag
auf
rates
Symbol
stel
len.
Alle
Stretchstiche
werden
durch
zusátzli
ches
Tippen
der
Taste
G
in
der
Breite
halbiert,
Selecting
stretch
stitches
(red
symbols)
Push
the
button
required
and
turn
the
stitch
length
control
as
tar
as
it
will
go
(red
symbol).
By
also
pressing
button
G,
all
stretch
stitches
can
be
halved
in
width.
)
Réglage
des
points
efastiques
(symboles
rouges)
Appuyer
sur
a
touche
et
régler
le
regle
point
de
a
longueur
de
points
sur
le
symbole
rouge,
usqu’a
a
butee,
Tous
es
points
élastiques
sont
éduits
de
moitie
en
appuyant
sur
a
touche
G.
Regolazione
dei
punti
flexi
(stretch)
(simboli
rossi)
Premere
il
tasto
a
girare
1
regolatore
per
a
lunghezza
del
punto
(mo
all’arresto
sul
simbolo
rosso.
Tutti
i
punti
flexi
si
dimezzano
in
ar
ghezza,
premendo
in
agglunta
1
tasto
G.
23

Nutz-
und
Stretchsticfl-Kombinationen
Die
Stichkombinationen
sind
auf
der
Pro
gramrntabelle
rn
Klappdeckel
und
am
Ende
dieser
Anleitung
mit
Nãhhinweisen
angegeben.
Zum
Beispiel
der
Eastische
Blindstich:
Taste
M
und
F
gleichzeitig
tippen.
Stichlänge
zwischen
1
und
4
wählen.
Utility-
and
stretch-stitch
combinations
The
various
stttch
combinations
are
shown
in
the
chart
on
the
inside
of
the
hinged
lop
cover
and
at
the
end
of
this
booklet,
together
with
sewing
instruc
tions,
For
example,
it
you
want
to
sew
an
elastic
blindstitch,
push
buttons
M
and
F,
select
a
stitch
ength
between
I
and
4.
Points
utliltaires
at
élastiques
combines
Les
combinaisons
de
points
possibles
sont
indiquées,
avec
des
conseils
et
idées,
sur
a
tableau
des
points
a
a
fin
de
ce
mode
dempioi.
Pour
le
pomi
invi
sible
elastique,
par
example,
ii
taut
entoncer
les
touches
F
at
M
at
choisir
une
longueur
de
point
entre
I
at
4.
La
combinaziom
del
punti
utlil
con
i
punti
flexi
(stretch)
Le
combinazioni
del
punti
sono
indicate
sulla
tabella
dei
programmi
ieI
coper
chio
a
al
termine
di
questo
libretto,
con
consigli
per
ii
cucito.
Ad
esempio
1
punto
invisibile
elastico:
tasto
M
e
F
pre
muti
insieme.
Scegilere
Iunghezza
dcl
punto
tra
1
e
4.
L
24

4
LJ
SticMage
&nstetlen
bel
Geradstich:
Stichlage
links:
Taste
B
tippen
Stichlage
Mitte:
Taste
G
tippen
Stichlage
rechts:
Taste
H
und
tippeR
Deport
du
point
droitc
Deport
a
gauche:
appuyor
sur
Ia
touche
B
Deport
au
milieu:
appuyer
sur
Ia
touche
G
Deport
a
droite:
appuyer
sur
es
touches
H
et
I
+11
LJ
H
S&ecthig
the
need’e
position
for
straight
stitching:
Left
needle
position:
push
button
B
Central
needle
position:
push
button
G
Right
needle
position:
push
buttons
H
and
I
4
Regolazione
della
posizione
d’ago
nella
cucitura
diritta:
Posizione
ago
sin
istra:
premere
tasto
B
Posizione
ago
centro:
premere
tasto
G
Posizione
ago
destra:
premere
tasti
H
eli
La page est en cours de chargement...
La page est en cours de chargement...
La page est en cours de chargement...

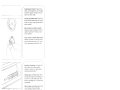
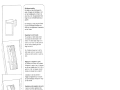
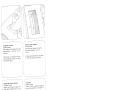
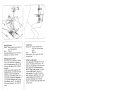
Nähfü6e
(Normalzubehär)
o
Stopffu6
4
BlindstichfuB
1
Normalnähfu6
5
Reil3verschluBfuf3
2
Klarsichtfu6
6
Knopflochful3
3
Sáumer
7
Lineal
Sewing
feet
(standard
accessories)
o
Darning
foot
4
Blindstitch
foot
1
Ordinary
sewing
5
Zipper
foot
foot
6
Buttonhole
foot
2
Clear-view
foot
7
Edge
guide
3
Hemmer
foot
Pieds
presseurs
(accessoires
standards)
O
Pied
a
repriser
4
Semelle
a
point
1
Semetle
invisible
normale
5
Sernelle
pour
2
Semelte
poser
a
fermeture
transparente
S
glissiere
3
Pied
ourleur
6
Semelle
pour
boutonniere
7
Guide-bord
Piedin
(corredo
normale)
O
piedino
per
4
piedino
per
punto
rammendo
invisibile
1
piedino
normale
5
piedino
per
2
piedino
cerniere
lampo
trasparente
6
piedino
per
3
piedino
ortatore
occhielli
7
lineale
2ct
La page est en cours de chargement...

----
-
I
/
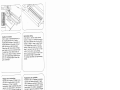
Surpiquage
Pied
presseur:
ri’ed
presseur
normal
cu
pied
a
semelle
en
olex:
glas
et
qude-drot
Pont
Bouton-poussoir
C
Le
quide-droit
N
convient
a
presque
tons
s
pieds
presseurs.
Fixation
du
guide-droll
Ghsser
le
guide
N
ear
Ic
trou
0
at
serre
a
vis
P.
Suivant
application,
régler
Ic
guide
sur
lécartement
dèsiré
Le
guide-droll
tacilite
considerablement
es
surpiqdres
paralleles
et
le
surpiquage
des
bords.
Ce
faisant,
Ic
bord
dii
tissu
(fig.
Q)
on
bieri
a
piqüre
précedente
suit
Ic
guide-droit
(fig.
R).
La
couture
sera
toujours
nette
et
reguuiere.
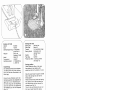
Lavori
di
impunture
Piedino.
piedino
normale
o
pedino
trasparenle
e
meals
di
guda
Pinto
Tasto
C
II
lineale
N
si
puô
usare
con
quasi
tutt
pedini
Fissagglo
dcl
lineale
(accessorin
hon
corredol
Passare
ii
ineale
N
attraverso
rt
torn
0
c
fissarlo
con
a
vile
P
a
seconda
della
neccessità
Si
UO
regolare
a
distanza
desiderata
E
facile
eseguire
cuciture
parallele
usando
ii
lineale.
II
bordo
del
tessuto
(fig
Q)
oppure
a
cucitura
parallela
precedente
(fig.
R)
servono
die
guida
La
direzione
delia
cucitura
sara
cos
sempre
corretta
31
La page est en cours de chargement...

H
-J
—
H
N
Point
invsible
Pied
presseur’
‘!Nnsion
Point:
ongueur
(e
point
Aiqullie.
flèlage
de
Is
jetée
dii
point
Poser
ocilet
prepare
sous
Ic
tied
C
points
invisibles.
La
cassure
du
tissu
etOneui
fonqe
(a
butCe
0
du
pied
C
points
invisibles.
A
aide
de
a
vis
de
rCglage
N.
déplacer
Ta
hiit.e
0
vars
Ia
gauche
de
sorte
qua
I
aiquilie,
au
point
gauche,
ne
saisisse
qu’un
tif
du
tissu
etérieur
(fig.
P
at
(M.
Realiser
tout
d’abord
one
couture
d’essai
sur
une
chute
de
tssu.
Point
invisible
Clastique
Preparer
Ia
machine
suivant
las
indies
tinns
ci-•dessus
Point:
rouches
M
et
F
La
point
invisible
Clastique
convient
tout
particulierernent
a
a
couture
de
tissus
elastiques.
II
est
possible
de
surtiler
Ia
bord
at
de
fixer
l’ourlet,
lorsque
le
point
zigzag
longs
le
bord
du
tissu
(fig.
R).
Hegler
Ia
penetration
de
‘aiguille
dans
le
tissu
extCrieur
suivant
es
indications
ctdessus.
piedino
per
punto
invisibile
allentare
Teqqertnente
(a
tensione
supertore
filato
per
cucire
Tasto
H
a-4
grossezza
70
o
80
Ecco
come
ci
reqola
l’entrata
deil’aqo
nd
tessuto
Pre
Toilo
preparato
sotto
ii
piedino
per
pmto
invisihile.
La
piegatura
della
stoffa
superiore
scorre
in
tal
rnaniera
lurgo
a
guirla
0
del
piedino
Girare
con
Ia
vitO
N
Ii
guida
0
verse
sinistra
in
modo
che
‘sqo
prenda
nell’entrata
a
sinistra
solo
on
Ho
della
stoffa
superiore
(fig.
P
e
0).
Si
consiglia
di
eseguire
prima
una
prova
50
un
ritaqlio
di
stoff
a.
Punts
invisibile
elastics
Preparazione
della
macchina
come
sopra.
Punto
largo:
tasti
M
+
F
Per
tessuti
elastici
è
particolarmente
indicato
1
pinto
invisibile
elestico.
Si
potrC
sortilare
e
cucire
lorlo
in
un’unica
fase
di
lavoro.
usando
il
punto
zig-zag
lungo
1
bordo
(fig.
R).
II
punto
cuT
tessu
to
della
parte
diritea
C
da
leqolare
come
sopra
descritto.
Pied
C
points
invisibles
Fil
daignille
moms
tendu
Ft
C
coudre
Louche
H
3
a4
Grosseur
70
ou
80
Pinto
invishUe
Piedino:
Tensione’
FiT
ate.
Punto:
i.unghezza
punto:
Ago:
/
33

1
Sicherheitshinweise
für
Haushaltnâhmaschinen
nach
DIN
57
700
Tail
28
baw.
IEC
335
Tell
28
a)
Der
Benutzer
hat
wegen
der
auf-
und
abgehenden
Nadel
genugend
Vor
sicht
waiten
zu
assen
und
die
Näh
stofle
bei
der
Arbeit
ständig
zu
beobachten.
b)
Beim
Verlassen
der
Maschine,
bei
Wartungsarbeiten
oder
beim
Wech
sein
von
mechanischen
Teilen
odor
Zubehör.
ist
die
Maschine
durch
Her
ausziehen
des
Netzsteckers
aus
der
Steckdose
vom
Netz
zu
trennen.
c)
Die
maximal
zulãssige
Leistung
der
Lampe
betrdgt
15
Watt.
Some
safety
rules
a
Take
care
to
avoid
injury
to
your
fin
gers
by
the
needle
during
sewing.
b)
Be
sure
you
unplug
the
power
cord
whenever
you
have
to
leave
the
machine
or
want
to
clean
it,
oil
it
or
change
mechanical
and
accessory
parts.
c)
Be
sure
to
use
only
a
15-watt
light
bulb
in
the
sewing
lamp.
Mesures
de
sêcurité
a)
Toujours
faire
preuve
do
orudence
et
continuellement
surveiiler
le
travail.
b)
Toujours
débrancher
Ia
machine
du
secteur
avant
de
quitter
Ia
machine,
avant
les
travaux
d’entretien
et
en
cas
de
remplacement
de
pièces
mécaniques
ou
d’accessoires.
c)
Puissance
maximale
admissible
de
‘ampoule:
15
Watts.
Norme
di
sicurezza
per
macchine
per
cucire
per
uso
famiglia
secondo
DIN
57700
parte
28
o
IEC
335
parte
28
a)
In
virtü
del
movimento
aiternativo
dellago,
lutente
deve
prestare
suffi
ciente
attenzione
e
tenere
costante
monte
d’occhio
1
punto
di
lavoro.
b)
Nel
cambiare
ago,
piedino,
spolina
e
placca
dago,
nelle
interruzioni
non
custodite
del
lavoro
e
durante
i
lavori
di
rnanutenzione
si
dove
disinserire
la
corrente
della
macchina
togliendo
Ia
spina
dalla
presa
a
muro.
c)
La
potenza
massima
consentita
per
Ia
lampadina
è
di
15
Watt.
Some
safety
rules
valid
for
the
United
Kingdom
only
The
wires
in
this
mains
lead
are
coloured
according
to
following
code:
Blue:
Neutral
Brown:
Live
As
the
colours
of
the
wires
in
the
mains
lead
of
this
appliance
may
not
corre
spond
with
the
colour
coding
of
the
ter
minals
in
your
plug,
proceed
as
follows:
the
wire
which
is
coloured
blue
must
be
connected
to
the
terminal
which
is
marked
with
the
letter
N
or
coloured
black.
The
wire
which
is
coloured
brown
must
be
connected
to
the
terminal
which
is
marked
with
the
letter
L
or
coloured
red.
Please
note:
When
a
13-ampere
plug
is
used
a
3-ampere
fuse
has
to
be
fitted.
34

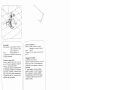
Knopfloch
einsteflen
raste
C
tippen.
Oberfadenspannung
in
den
KnopIlochbereich
bei
3
steHen.
Knopflochful3
anbringen.
Stichdichte
rn
Knopflochbereich
N
einsteflen.
Einlauf
faden
wie
folgt
rn
Nähfu6
einlegen:
Faden
über
die
hintere
Nocke
0
legen.
stratf
ziehen
und
in
der
vorderen
Nocke
P
einklemmen.
Beirn
Nähen
Iäuft
her
Pfeil
Q
an
der
Skala
R
entlang.
Dadurch
kann
die
Knopflochlange
bestimmt
wer
den.
Zurn
Knopflochnähen
feines
Näh
garn
verwenden.
Reglage
do
Ia
boutonniere
Appuyer
sur
a
touche
C
Régler
a
ten
sion
du
fil
daiguille
dans
a
zone
bou
tonnières
sur
3.
Fixer
a
sernelle
boutonniere.
Regler
ia
densité
des
points
hans
Ia
zone
boutonniere
N.
Introduire
le
hI
de
passe
dans
Ia
sernelle
comme
suit:
Coucher
le
fil
sur
le
pince-fil
P.
Pendant
Ia
crochet
0
arrière
et
to
pincer
dans
to
couture
ia
flèche
0
coulisse
le
long
do
lAchelle
graduée
B.
Ainsi,
ii
est
possible
he
determiner
a
iongueur
do
Ia
bouton
nière.
Utiliser
du
fil
a
coudre
fin.
4
Buttonhole
setting
Push
button
C.
Set
the
needle
thread
tension
at
range
3
for
buttonhole
sewing.
Attach
the
buttonhole
foot.
Set
the
stitch
density
at
range
N.
Insert
a
gimp
thread
in
the
sewing
foot
as
shown
in
the
illu
stration:
Place
the
thread
over
the
back
ridge
0
and
pull
it
taut
so
that
It
is
held
in
tab
P
at
the
front.
During
sewing,
arrow
0
runs
along
scale
R.
This
is
how
the
buttonhole
length
is
determined.
For
sewing
buttonholes
use
light
sewing
thread.
4
Regolazione
per
l’occhieflo
Premere
ii
tasto
C.
Regolare
Ia
tensione
superiore
nel
settore
occhielto
3
Appli
care
ii
piedino
per
occhielti.
Fittezza
del
punto
nel
settore
per
occhielli
N.
lnserire
come
segue
il
fib
nnforzo:
appoggiare
it
fib
sopra
1
ganclo
0
posteriore,
tenderlo
bone
e
fissarbo
net
gancio
anteriore
P.
Cucendo,
a
freccia
Q
scorre
lungo
a
scala
B.
In
tale
maniera
si
puo
determi
flare
con
esattezza
Ia
lunghezza
delI’
occhiello.
Usare
per
l’occhiello
del
filato
tine.
35
La page est en cours de chargement...
La page est en cours de chargement...
La page est en cours de chargement...
La page est en cours de chargement...
La page est en cours de chargement...
La page est en cours de chargement...
La page est en cours de chargement...
La page est en cours de chargement...
La page est en cours de chargement...
La page est en cours de chargement...
La page est en cours de chargement...
La page est en cours de chargement...
La page est en cours de chargement...
La page est en cours de chargement...
La page est en cours de chargement...
La page est en cours de chargement...
La page est en cours de chargement...
La page est en cours de chargement...
La page est en cours de chargement...
La page est en cours de chargement...
La page est en cours de chargement...
La page est en cours de chargement...
La page est en cours de chargement...
La page est en cours de chargement...
La page est en cours de chargement...
La page est en cours de chargement...
La page est en cours de chargement...
La page est en cours de chargement...
La page est en cours de chargement...
La page est en cours de chargement...
La page est en cours de chargement...
La page est en cours de chargement...
La page est en cours de chargement...
La page est en cours de chargement...
La page est en cours de chargement...
La page est en cours de chargement...
La page est en cours de chargement...
La page est en cours de chargement...
La page est en cours de chargement...
La page est en cours de chargement...
La page est en cours de chargement...
La page est en cours de chargement...
La page est en cours de chargement...
La page est en cours de chargement...
La page est en cours de chargement...
La page est en cours de chargement...
La page est en cours de chargement...
La page est en cours de chargement...
La page est en cours de chargement...
La page est en cours de chargement...
La page est en cours de chargement...
La page est en cours de chargement...
La page est en cours de chargement...
La page est en cours de chargement...
La page est en cours de chargement...
La page est en cours de chargement...
La page est en cours de chargement...
La page est en cours de chargement...
-
 1
1
-
 2
2
-
 3
3
-
 4
4
-
 5
5
-
 6
6
-
 7
7
-
 8
8
-
 9
9
-
 10
10
-
 11
11
-
 12
12
-
 13
13
-
 14
14
-
 15
15
-
 16
16
-
 17
17
-
 18
18
-
 19
19
-
 20
20
-
 21
21
-
 22
22
-
 23
23
-
 24
24
-
 25
25
-
 26
26
-
 27
27
-
 28
28
-
 29
29
-
 30
30
-
 31
31
-
 32
32
-
 33
33
-
 34
34
-
 35
35
-
 36
36
-
 37
37
-
 38
38
-
 39
39
-
 40
40
-
 41
41
-
 42
42
-
 43
43
-
 44
44
-
 45
45
-
 46
46
-
 47
47
-
 48
48
-
 49
49
-
 50
50
-
 51
51
-
 52
52
-
 53
53
-
 54
54
-
 55
55
-
 56
56
-
 57
57
-
 58
58
-
 59
59
-
 60
60
-
 61
61
-
 62
62
-
 63
63
-
 64
64
-
 65
65
-
 66
66
-
 67
67
-
 68
68
-
 69
69
-
 70
70
-
 71
71
-
 72
72
-
 73
73
-
 74
74
-
 75
75
-
 76
76
-
 77
77
-
 78
78
-
 79
79
-
 80
80
-
 81
81
-
 82
82
-
 83
83
-
 84
84
-
 85
85
-
 86
86
-
 87
87
-
 88
88
-
 89
89
-
 90
90
-
 91
91
-
 92
92
-
 93
93
-
 94
94
-
 95
95
-
 96
96
-
 97
97


Pfaff tipmatic 1115 Le manuel du propriétaire
- Taper
- Le manuel du propriétaire
dans d''autres langues
- italiano: Pfaff tipmatic 1115 Manuale del proprietario
- English: Pfaff tipmatic 1115 Owner's manual
- Deutsch: Pfaff tipmatic 1115 Bedienungsanleitung
Documents connexes
-
Pfaff tipmatic 1047 Le manuel du propriétaire
-
-
-
-
-
-
-
-
-
