Home Decorators Collection 27228 Mode d'emploi
- Taper
- Mode d'emploi

Page 1
INSTRUCTION MANUAL
1 Light Mini Pendant in Brushed Nickel
Finish
Madison Ave. ITEM 27028 (UPC 718212270288)
(Brushed Nickel
Finish)
LA-2714E/S/F

Page 2
Thank you for purchasing this Good Lumens interior light fixture. This
product has been manufactured with the highest standards of safety and
quality.
FEATURES:
1. Traditional 1 Light Mini Pendant in Brushed Nickel Finish
2. Timeless Elegant Design.
3. Easy to assemble and install.
QUESTIONS, PROBLEMS, MISSING PARTS:
Before returning to your local Good Lumens, please call our Customer
Service Team at (800)527-0998. Please reference your ITEM (27028
Brushed Nickel Finish) or UPC (718212270288 Brushed Nickel fixture).

Page 3
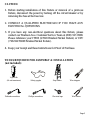
CAUTION:
1. Before starting installation of this fixture or removal of a previous
fixture, disconnect the power by turning off the circuit breaker or by
removing the fuse at the fuse box.
2. CONSULT A QUALIFIED ELECTRICIAN IF YOU HAVE ANY
ELECTRICAL QUESTIONS.
3. If you have any non-electrical questions about this fixture, please
contact our Madison Ave. Customer Service Team at (800) 527-0998.
Please reference your ITEM (27028 Brushed Nickel fixture) or UPC
(718212270288 Brushed Nickel fixture).
4. Keep your receipt and these Instructions for Proof of Purchase.
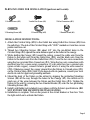
TOOLS REQUIRED FOR ASSEMBLY & INSTALLATION
(not included):
(40 watt maximum)
Light Bulb
Safety goggles
Step Ladder
Wire strippers
Flathead screwdriver
Phillips screwdriver
Electrical tape
Wire cutters

Page 4
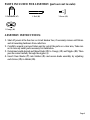
PARTS INCLUDED FOR ASSEMBLY (parts are not to scale):
1 Glass Shade (#7) 4 Rod (#3) 3 Screw (#5)
1 Canopy (#1)
ASSEMBLY INSTRUCTIONS:
1. Shut off power at the fuse box or circuit breaker box, if necessary remove old fixture
and all mounting hardware from outlet box.
2. Carefully unpack your new fixture and lay out all the parts on a clear area, Take care
not to lose any small parts necessary for installation.
3. Determine length desired and thread Rods (#3) to Canopy (#1) and Nipple (#4). Then
pass the wires carefully through the nipple (4).
4. Insert Glass Shade (#7) into Holder (#6) and secure shade assembly by adjusting
each Screw (#5) in Holder (#6).

Page 5
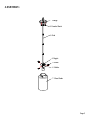
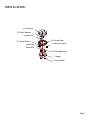
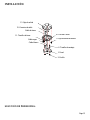
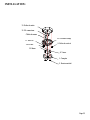
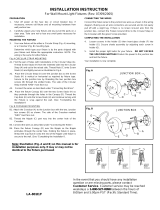
ASSEMBLY:
4. Nipple
5. Screw
6. Holder
3. Rod
1. Canopy
2. Knurled Knob
7. Glass Shade

Page 6
PARTS INCLUDED FOR INSTALLATION (parts are not to scale):
1 Ground Screw (#11) 2 outlet Box Screw (#9) 3 Wire Connectors (#12)
2 Mounting Screw (#8) 1 Circular Strap (#10) 2 Knurled Knob (#2)
INSTALLATION INSTRUCTIONS:
1. Attach the Circular Strap (#10) to the Outlet box using Outlet Box Screws (#9) from
the outlet box. The side of the Circular Strap with “GND” marked on it and two convex
points must face out.
2. Thread two Mounting Screws (#8) about 1/4” into the pre-drilled holes in the
Circular Strap (#10) spaced the same distance apart as the holes in the canopy.
3. While holding the Canopy (#1) toward the ceiling, connect the white wire from the
fixture to the white wire from the Outlet Box (#13), and the black wire from the
fixture to the black wire from the Outlet Box (#13). Cover the two wire connections
using the two provided Wire Connectors (#12). Wrap the two wire connections with
electrical tape for a more secure connection. If your outlet box has a ground wire
(green or bare copper), connect fixture’s ground wire to it using the wire connector
(#12). Otherwise connect the copper ground from the fixture to Ground screw (#11)
on the Circular Strap (#10). Note: If you have electrical questions, consult your local
electrical code for approved grounding methods.
4. Mount the body of the fixture on the ceiling by aligning the protruding Mounting
Screws (#8) all the way through the holes on the Canopy (#1). Be careful not to
pinch any of the wires between the fixture and the Outlet Box (#13). Tighten the
fixture to the wall by screwing the two Knurled Knobs (#2) onto the two protruding
Mounting Screws (#8).
5. Install Light bulbs (not included) in accordance with the fixture’s specifications. (DO
NOT EXCEED THE MAXIMUM WATTAGE RATING)
6. Installation is complete. Turn on the power at the circuit breaker or fuse box. Turn
the light switch on to activate the fixture.

Page 7
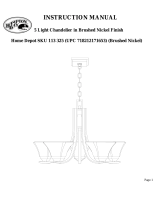
INSTALLATION:
13. Outlet Box
12. Wire Connector
Ground Wire
Black Wire
White Wire
10. Circular Strap
9. Outlet Box Screw
11. Ground Screw
8. Mounting Screw
1. Canopy
2. Knurled Knob

Page 8
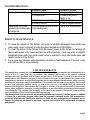
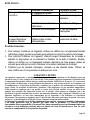
TROUBLESHOOTING:
PRODUCT MAINTENANCE:
1. To clean the outside of the fixture, use a dry or slightly dampened clean cloth (use
clean water, never a solvent) to wipe the glass and surface of the fixture.
2. To clean the inside of the fixture, first disconnect power to the fixture by turning off
the circuit breaker or by removing the fuse at the fuse box. Next, use a dry or slightly
dampened clean cloth (use clean water, never a solvent) to wipe the inside glass and
interior surface of the fixture.
3. Do not use any cleaners with chemicals, solvents or harsh abrasives. Use only a dry
soft cloth to dust or wipe carefully.
LIMITED WARRANTY
The manufacturer warrants this lighting fixture to be free from defects in materials and workmanship for a
period of five (5) years from date of purchase. This warranty applies only to the original consumer
purchaser and only to products used in normal use and service. If this product is found to be defective, the
manufacturer’s only obligation, and your exclusive remedy, is the repair or replacement of the product at the
manufacturer’s discretion, provided that the product has not been damaged through misuse, abuse, accident,
modifications, alterations, neglect or mishandling. This warranty shall not apply to any product that is found
to have been improperly installed, set-up, or used in any way not in accordance with the instructions
supplied with the product. This warranty shall not apply to a failure of the product as a result of an accident,
misuse, abuse, negligence, alteration, or faulty installation, or any other failure not relating to faulty material
or workmanship. This warranty shall not apply to the finish on any portion of the product, such as surface
and/or weathering, as this is considered normal wear and tear.
The manufacturer does not warrant and specially disclaims any warranty, whether express or implied,
of fitness for a particular purpose, other than the warranty contained herein. The manufacturer
specifically disclaims any liability and shall not be liable for any consequential or incidental loss or
damage, including but not limited to any labor / expense costs involved in the replacement or repair of
said product.
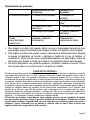
Possible Cause
Corrective Action
Bulb will not light.
1. Bulb is burned out.
1. Replace light bulb.
2. Power is off.
2. Make sure power
supply is on.
3. Faulty wire connection.
3. Check wiring.
4. Faulty switch.
4. Test or replace switch.
Fuse blows or circuit
breaker trips when light
is turned on.
Crossed wires or power wire
is grounding out.
Check wire connections.

Page 9
MANUAL DE INSTRUCCIONES
1 Mini Colgante de luz en Acabado de Níquel Cepillado
Madison Ave. ITEM 27028 (UPC 718212270288)
(Acabado Cepillado Níquel)
LA-2714E/S/F

Page 10
Gracias por la compra de este accesorio Good Lumens luz interior. Este
producto ha sido fabricado con los más altos niveles de seguridad y
calidad.
CARACTERÍSTICAS:
1. Tradicional 1 Mini Colgante de luz en Acabado de Níquel Cepillado.
2. Atemporal Elegante diseño.
3. Fácil de montar e instalar con Enlace rápido.
Preguntas, problemas, piezas faltantes:
Antes de regresar a su oficina local de Good Lumens, llame a nuestro
Servicio de Atención al (800)527-0998. Por favor, referir a ITEM (27028
Acabado Cepillado Níquel), UPC (718212270288 Acabado Cepillado
Níquel).

Page 11
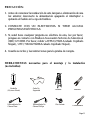
PRECAUCIÓN:
1. Antes de comenzar la instalación de este lampara o eliminación de una
luz anterior, desconecte la alimentación apagando el interruptor o
quitando el fusible en la caja de fusibles.
2. CONSULTE CON UN ELECTRICISTA SI TIENE ALGUNA
PREGUNTAS ELÉCTRICAS.
3. Si usted tiene cualquier pregunta no eléctrica de esta, luz por favor,
póngase en contacto con Madison Ave.nuestro Servicio de Atención al
(800) 527-0998. Por favor, referir a ITEM (27028 Acabado Cepillado
Níquel), UPC (718212270288 Acabado Cepillado Níquel).
4. Guarde su recibo y las instrucciones para la prueba de compra.
HERRAMIENTAS necesarias para el montaje y la instalación
(no incluidos):
Bombilla
(M
áximo 40watt)
Gafas De
Seguridad
Escalera
Pelacable
Destornillador De
Cabeza
Plana
Destornillador De
Cabeza
Phillips
Cita Aislante
Cortaalambres

Page 12
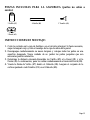
PIEZAS INCLUIDAS PARA LA ASAMBLEA (partes no están a
escala):
1 Vidrio (#7) 4 Varilla (#3) 1 Tornillo (#5)
1 Dosel (#1)
INSTRUCCIONES DE MONTAJE:
1. Corte la corriente en la caja de fusibles o en el circuito principal. Si fuera necesario,
saque la lampara vieja y todo el montaje de la caja de union de la pared.
2. Desempaque cuidadosamente su nueva lampara y coloque todas las partes en una
superfice despejada. Tenga cuidado de no perder las partes pequeñas que son
necesarias para la instalacion.
3. Determine la distancia deceada Ensamble los Varilla (#3) a la Dosel (#1) y el la
Pezón (#4). A continuación, pasar los cables cuidadosamente a través del Pezón (#4).
4. Ymeta la Panta de Vidrio (#7) dentro el Cubierta (#6). Asegure el conjunto de la
cortina ajustando cada Tornillo (# 5) en el Cubierta (#6).

Page 13
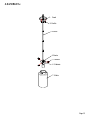
ASAMBLEA:
4. Pezón
5. Tornillo
6. Cubierta
3. Varilla
1. Dosel
2. Perilla
7. Vidrio

Page 14
PIEZAS INCLUIDAS para la instalación (las partes no están a escala):
1 Tornillo de tierra (#11) 2 Caja de salida de tornillo (#9) 3 Conector de cable (#12)
2 Tornillo de montaje (#8) 1 Circular Correa (#10) 2 Perilla (#2)
Instrucciones de instalación:
1. Una la Abrazadera Circular (#10) a la caja de union con los dos tornillos de la caja de
union (#9) como se muestra en la. El lado marcado “GND” deben quedar hacia afuera.
2. Atornille los Tachones (#8) en los agujeros de la Abrazadera Circular (#10),
separados en la misma distancia que los agujeros del la Cubierta.
3. Mientras mantiene el dosel (#1) hacia el techo, Conecte el cable blanco del la
lámpara al cable blanco de la caja de salida (#13), y el cable negro de la lámpara al
cable negro de la caja de salida (#13). Cubra las dos conexiones de cable con los dos
Conectores de alambre previstos (#12). Envuelva las dos conexiones de los cables
con cinta aislante para una conexión más segura. Si su caja de salida tiene un cable
de tierra (verde o desnudo de cobre), conecte el cable de tierra accesorio a la misma
utilizando el conector de cable (#12). De otra manera conecte el alambre de cobre al
tornillo de tierra (#11) en la Travesaño(#10). Nota: Si usted tiene preguntas
eléctricas, consulte a su código de electricidad local por los métodos aprobados de
puesta a tierra.
4. Monte el cuerpo de la lámpara en la pared, alineando los tornillos de montaje
salientes (#8) todo el camino a través de los agujeros en el dosel (#1). Tenga cuidado
de no pellizcar cualquiera de los cables entre la lámpara y la caja de salida (#13).
Apriete la lámpara a la pared atornillando los dos botones estriados (#2) en que
sobresalen los dos tornillos de montaje (#8).
5. Instale los focus (no incluidos) de acuerdo a las especificaciones. (NO EXCEDA
MAS DE LOS VATIOS ESPECIFICADOS!!).
6. La instalación está completa. Encienda la energía en la caja de fusibles. Encienda el
interruptor de la luz para activar el aparato.

Page 15
INSTALACIÓN:
SOLUCIÓN DE PROBLEMAS:
13. Caja de salida
12. Conector de cable
Cable de tierra
Cable negro
Cable blanco
10. Circular Correa
9. Caja de salida de tornillo
11. Tornillo de tierra
8. Tornillo de montaje
1. Dosel
2. Perilla

Page 16
Mantenimiento de productos:
1. Para limpiar el exterior del aparato, utilice un seca o ligeramente húmeda tela (use
agua limpia, nunca un disolvente) para limpiar el vidrio y la superficie de la lámpara.
2. Para limpiar el interior del aparato, primero desconecte la alimentación de la lámpara
de apagar el interruptor de circuito o quitando el fusible de la caja de fusibles. A
continuación, utilice una tela seca o ligeramente húmeda (use agua limpia, nunca un
disolvente) para limpiar el cristal en el interior y la superficie interior de la lámpara.
3. No utilice limpiadores con productos químicos, solventes o abrasivos severos. Utilice
sólo un paño suave y seco para el polvo o limpiar con cuidado.
GARANTÍA LIMITADA
El fabricante garantiza que este accesorio de iluminación a estar libre de defectos en materiales y mano de
obra durante un período de cinco (5) años a partir de la fecha de compra. Esta garantía se aplica sólo al
comprador original y sólo a los productos utilizados en condiciones normales de uso y servicio. Si se
encuentra que este producto está defectuoso, la única obligación del fabricante, y su solución exclusiva, es la
reparación o sustitución del producto, a discreción del fabricante, siempre que el producto no ha sido dañado
por el mal uso, abuso, accidentes, modificaciones, alteraciones , negligencia o mal manejo. Esta garantía no
se aplicará a cualquier producto que se demuestre que ha sido instalado incorrectamente, puesta a punto, o
utilizado en cualquier manera no conforme con las instrucciones suministradas con el producto. Esta
garantía no se aplicará a una falla del producto como consecuencia de un accidente, mal uso, abuso,
negligencia, alteración o instalación defectuosa, o cualquier otro fallo que no se refieran a los materiales o
ejecución defectuosa. Esta garantía no se aplicará a la meta en cualquier parte del producto, tales como la
superficie y / o la intemperie, ya que se considera uso y desgaste normal.
El fabricante no garantiza y especialmente niega cualquier garantía, expresa o implícita, de aptitud
para un propósito particular, excepto la garantía contenida en este documento. El fabricante rechaza
específicamente cualquier responsabilidad y no será responsable por cualquier pérdida consecuente o
incidental o daños, incluyendo pero no limitado a cualquier mano de obra Gastos de gastos que
implica la sustitución o reparación de dicho producto.
Posible causa de Acción
Correctiva
Bombilla no se
encenderá
la oferta está encendido.
1. Bombilla está quemada
1. Reemplace la
bombilla.
2. Está apagada.
2. Asegúrese de que el
poder .
3. Conexión del cable
defectuoso.
3. Verifique el cableado.
4. Interruptor defectuoso.
4. Pruebe o cambiar el
interruptor.
Funde un fusible o
circuito
viajes interruptor
cuando la luz
Está encendida. Cables
cruzados o cables de
alimentación
Es tierra hacia fuera.
Compruebe las
conexiones de cables.

Page 17
MANUEL D'INSTRUCTIONS
1 Mini pendentif en Nickel Brossé Finition
Madison Ave. ITEM 27028 (UPC 718212270288)
(Nickel Brossé Finition)
LA-2716E/S/F

Page 18
Nous vous remercions d'avoir acheté ce Good Lumens appareil
d'éclairage à l'intérieur. Ce produit a été fabriqué avec des niveaux plus
élevés de sécurité et de qualité.
CARACTÉRISTIQUES:
1. Traditionnel 1 Mini pendentif en Nickel Brossé Finition.
2. Design élégant et intemporel.
3. Facile à assembler et installer.
Questions, des problèmes, des pièces manquantes:
Avant de retourner à votre Good Lumens local, appelez notre Service
Center au (800)527-0998. S'il vous plaît se référer àITEM (27028 Nickel
Brossé Finition), UPC (718212270288 Nickel Brossé Finition).

Page 19
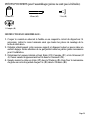
ATTENTION:
1. Avant d'installer cette lampe ou la suppression d'un jour précédent,
Mettez l'interrupteur ou en enlevant les fusibles dans la boîte à fusibles.
2. Consultez un électricien qualifié SI VOUS AVEZ DES
ELECTRIQUE QUESTIONS.
3. Si vous avez des questions, ce pouvoir, de la lumière s'il vous plaît
contacter notre Madison Ave. Service Center au (800) 527-0998. S'il
vous plaît se référer àITEM (27028 Nickel Brossé Finition), UPC
(718212270288 Nickel Brossé Finition).
4. Conservez votre reçu et des instructions pour preuve d'achat.
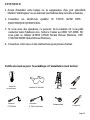
Outils nécessaires pour l'assemblage et l'installation (non inclus):
Coupe-file
Ampoule
(40 watt max)
Lunettes De Sécurité
Ladder
Strippers
Tourenvis
À
TêtePlate
Tourenvis
À
Tête Cruciforme
Ruban isolant

Page 20
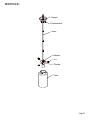
PIÈCES FOURNIES pour l'assemblage (pièces ne sont pas à l'échelle):
1 Verre (#7) 4 Barre (#3) 1 Vis (#5)
1 Canopée (#1)
INSTRUCTIONS D'ASSEMBLAGE:
1. Couper le courant en enlevant le fusible ou en coupant le circuit du disjoncteur. Si
nécessaire, retirer le vieux luminaire ainsi que toutes les pièces de montage de la
boîte de dérivation.
2. Déballez attentivement votre nouveau support et disposez toutes les pieces dans un
endroit degage. Faites attention de ne pas perdre toutes les petites pièces nécessaires
pour l’installation.
3. Déterminer la longueur désirée et bars Barre (# 3) Canopée (# 1) et du Graisseur (#
4). Passez ensuite soigneusement les fils dans le Graisseur (# 4).
4. Ensuite insérer le globe en Verre (#7) dans le Titulaire (#6). Bien fixer le mécanisme
du globe en verre en ajustant chaque Vis (#5) dans le Titulaire (#6).
La page est en cours de chargement...
La page est en cours de chargement...
La page est en cours de chargement...
La page est en cours de chargement...
-
 1
1
-
 2
2
-
 3
3
-
 4
4
-
 5
5
-
 6
6
-
 7
7
-
 8
8
-
 9
9
-
 10
10
-
 11
11
-
 12
12
-
 13
13
-
 14
14
-
 15
15
-
 16
16
-
 17
17
-
 18
18
-
 19
19
-
 20
20
-
 21
21
-
 22
22
-
 23
23
-
 24
24


Home Decorators Collection 27228 Mode d'emploi
- Taper
- Mode d'emploi
dans d''autres langues
Documents connexes
Autres documents
-
Good Lumens by Madison Avenue 29838 Mode d'emploi
-
-
-
-
-
-
-
 Hampton Bay 05660 Mode d'emploi
-
 Hampton Bay 17165 Mode d'emploi
-

