Intellinet 523974 Quick Install Guide
- Catégorie
- Jouets
- Taper
- Quick Install Guide

WARRANTY INFORMATION
ENGLISH
:
For warranty information, go to intellinet-network.com/warranty.
DEUTSCH:
Garantieinformationen finden Sie unter intellinet-network.com/warranty.
ESPAÑOL:
Si desea obtener información sobre la garantía, visite intellinet-network.com/warranty.
FRANÇAIS:
Pour consulter les informations sur la garantie, visitez intellinet-network.com/warranty.
PORTUGUÊS:
Para informações sobre garantia, ir para
intellinet-network.com/warranty.
ITALIANO:
Per informazioni sulla garanzia, accedere a intellinet-network.com/warranty.
SLOVENSKY:
Pre informácie týkajúce sa záruky navštívte
intellinet-network.com/warranty.
EN MÉXICO: Póliza de Garantia INTELLINET — Datos del importador y responsable ante el consumidor
IC Intracom México, S.A. de C.V. • Av. Interceptor Poniente # 73, Col. Parque Industrial La Joya, Cuautitlan
Izcalli, Estado de México, C.P. 54730, México. • Tel. (55)1500-4500
La presente garantía cubre este producto por 3 años contra cualquier defecto de fabricación en sus
materiales y mano de obra, bajo las siguientes condiciones:
1.
Todos los productos a que se reere esta garantía, ampara su cambio físico, sin ningún cargo para el
consumidor.
2. El comercializador no tiene talleres de servicio, debido a que los productos que se garantizan no cuentan con
reparaciones, ni refacciones, ya que su garantía es de cambio físico.
3. La garantía cubre exclusivamente aquellas partes, equipos o sub-ensambles que hayan sido instaladas
de fábrica y no incluye en ningún caso el equipo adicional o cualesquiera que hayan sido adicionados al
mismo por el usuario o distribuidor.
Para hacer efectiva esta garantía bastará con presentar el producto al distribuidor en el domicilio donde fue
adquirido o en el domicilio de IC Intracom México, S.A. de C.V., junto con los accesorios contenidos en su
empaque, acompañado de su póliza debidamente llenada y sellada por la casa vendedora (indispensable
el sello y fecha de compra) donde lo adquirió, o bien, la factura o ticket de compra original donde se mencione
claramente el modelo, n
ú
mero de serie (cuando aplique) y fecha de adquisición. Esta garant
í
a no es válida en
los siguientes casos: Si el producto se hubiese utilizado en condiciones distintas a las normales; si el producto
no ha sido operado conforme a los instructivos de uso; o si el producto ha sido alterado o tratado de ser
reparado por el consumidor o terceras personas.
REGULATORY STATEMENTS
Federal Communications Commission (FCC) Class B
This equipment has been tested and found to comply with the limits for a Class B digital device, pursuant to Part 15
of Federal Communications Commission (FCC) Rules. These limits are designed to provide reasonable protection
against harmful interference in a residential installation. This equipment generates, uses and can radiate
radio frequency energy, and if not installed and used in accordance with the instructions
may cause harmful interference to radio communications. However, there is no guarantee that
interference will not occur in a particular installation. If this equipment does cause harmful interference
to radio or television reception, which can be determined by turning the equipment o and on, the
user is encouraged to try to correct the interference by one or more of the following measures:
• Reorient or relocate the receiving antenna.
• Increase the separation between the equipment and the receiver.
• Connect the equipment to an outlet on a circuit dierent from the receiver.
• Consult the dealer or an experienced radio/TV technician for help.
European Commission (CE / R&TTE)
ENGLISH:
This device complies with the requirements of R&TTE Directive 1999/5/EC. The
Declaration of Conformity for this product is available at:
DEUTSCH: Dieses Gerät enspricht der Direktive R&TTE Direktive 1999/5/EC. Die
Konformitätserklärung für dieses Produkt finden Sie unter::
ESPAÑOL: Este dispositivo cumple con los requerimientos de la Directiva R&TTE 1999/5/EC. La
declaración de conformidad para este producto esta disponible en:
FRANÇAIS: Cet appareil satisfait aux exigences de la directive R&TTE 1999/5/CE. La Déclaration
de Conformité pour ce produit est disponible à l’adresse :
ITALIANO: Questo dispositivo è conforme alla Direttiva 1999/5/EC R&TTE. La dichiarazione di
conformità per questo prodotto è disponibile al:
PORTUGUÊS:
Este dispositivo está em conformidade com a Directiva R&TTE 1999/5/EC.
SLOVENSKY:
Toto zariadenie vyhovuje požiadavkám smernice R&TTE 1999/5/EC.
intellinet-network.com
WIRELESS N
ADAPTER
QUICK INSTALL
GUIDE
INT-ADAPTER-BB-QIG-ML-0712-05
ENGLISH
DEUTSCH
ESPAÑOL
FRANÇAIS
PORTUGUÊS
ITALIANO
SLOVENSKY
© IC INTRACOM. All rights reserved.
INTELLINET is a trademark of IC INTRACOM, registered in the U.S. and other countries.
North & South America
IC INTRACOM AMERICAS
550 Commerce Blvd.
Oldsmar, FL 34677
USA
Asia & Africa
IC INTRACOM ASIA
Far Eastern Technology Center
7-F No. 125, Section 2, Da Tong Rd.
Shijr, Taipei
Taiwan, ROC
Europe
IC INTRACOM EUROPE
Löhbacher Str. 7
D-58553 Halver
Germany
All trademarks and trade names are the property of their respective owners.
Alle Marken und Markennamen sind Eigentum Ihrer jeweiligen Inhaber.
Todas las marcas y nombres comerciales son propiedad de sus respectivos dueños.
Toutes les marques et noms commerciaux sont la propriété de leurs propriétaires respectifs.
Tutti i marchi registrati e le dominazioni commerciali sono di proprietà dei loro rispettivi proprietari.
Todos as marcas comerciais e nomes comerciais são de propriedade dos seus respectivos proprietários.
Všetky ochranné známky a obchodné názvy sú majetkom ich príslušných vlastníkov.
WASTE ELECTRICAL & ELECTRONIC EQUIPMENT
Disposal of Electric and Electronic Equipment
(applicable in the European Union and other European countries with separate collection systems)
ENGLISH: This symbol on the product or its packaging indicates that this product shall not be treated as
household waste. Instead, it should be taken to an applicable collection point for the recycling of electrical
and electronic equipment. By ensuring this product is disposed of correctly, you will help prevent
potential negative consequences to the environment and human health, which could otherwise be
caused by inappropriate waste handling of this product. If your equipment contains easily removable
batteries or accumulators, dispose of these separately according to your local requirements. The
recycling of materials will help to conserve natural resources. For more detailed information about
recycling of this product, contact your local city oce, your household waste disposal service or the shop
where you purchased this product. In countries outside of the EU: If you wish to discard this product, contact
your local authorities and ask for the correct manner of disposal.
DEUTSCH: Dieses auf dem Produkt oder der Verpackung angebrachte Symbol zeigt an, dass dieses Produkt
nicht mitdem Hausmüll entsorgt werden darf. In Übereinstimmung mit der Richtlinie 2002/96/EG des
Europäischen Parlaments und des Rates über Elektro- und Elektronik-Altgeräte (WEEE) darf dieses Elektrogerät
nicht im normalen Hausmüll oder dem Gelben Sack entsorgt werden. Wenn Sie dieses Produkt entsorgen
möchten, bringen Sie es bitte zur Verkaufsstelle zurück oder zum Recycling-Sammelpunkt Ihrer Gemeinde.
ESPAÑOL: Este símbolo en el producto o su embalaje indica que el producto no debe tratarse como residuo
doméstico. De conformidad con la Directiva 2002/96/CE de la UE sobre residuos de aparatos eléctricos y
electrónicos (RAEE), este producto eléctrico no puede desecha se con el resto de residuos no clasicados
.
Deshágase de este producto devolviéndolo al punta de venta o a un punta de recogida municipal para su reciclaje.
FRANÇAIS: Ce symbole sur Ie produit ou son emballage signie que ce produit ne doit pas être traité comme
un déchet ménager. Conformément à la Directive 2002/96/EC sur les déchets d’équipements électriques et
électroniques (DEEE), ce produit électrique ne doit en aucun cas être mis au rebut sous forme de déchet
municipal non trié. Veuillez vous débarrasser de ce produit en Ie renvoyant à son point de vente ou au
point de ramassage local dans votre municipalité, à des fins de recyclage.
PORTUGUÊS:
Este símbolo no produto ou na embalagem indica que este produto não deve ser tratado como
lixo doméstico. Em vez disso, deve ser levado para um ponto de recolha adequado à reciclagem de equipamento
eléctrico ou electrónico. Ao garantir a eliminação correcta deste produto, ajuda a evitar potenciais consequências
negativas para o ambiente e a saúde humana, que poderiam resultar do manuseamento inadequado de resíduos
deste produto Caso o seu equipamento inclua baterias ou acumuladores facilmente removíveis, elimine-os
separadamente de acordo com os requisitos locais. A reciclagem de materiais ajuda a conservar os recursos
naturais. Para informações mais detalhadas sobre reciclagem deste produto, contacte as autoridades locais, o
serviço de recolha de lixo doméstico ou a loja onde adquiriu o produto. Nos países fora da UE: se quiser eliminar
este produto, contacte as autoridades locais e informe-se sobre o procedimento a adoptar.
ITALIANO: Questo simbolo sui prodotto o sulla relativa confezione indica che il prodotto non va trattato come
un riuto domestico. In ottemperanza alla Direttiva UE 2002/96/EC sui riuti di apparecchiature elettriche
ed elettroniche (RAEE), questa prodotto elettrico non deve essere smaltito come riuto municipale misto.
Si prega di smaltire il prodotto riportandolo al punto vendita o al punto di raccolta municipale locale per un
opportuno riciclaggio.
SLOVENSKY:
Tento symbol na produkte alebo jeho balení naznačuje, že sa s produktom nesmie zaobchádzať ako s
domácim odpadom. Namiesto tohoby malo byť zariadenie vzaté do zberného miesta pre recykláciuelektrických
a elektronických zariadení. Zabezpečením správnej likvidácie napomáhate odstraňovať negatívne vplyvy na
prostredie a ľudské zdravie, ktoré by mohli byť spôsobené nevhodnou likvidácioutohto výrobku. Pokiaľ vaše
zariadenie obsahuje jednoducho odnímateľné batérie alebo akumulátory, likvidujte ich oddelene podľa mi-
estnych požiadaviek. Recykláciou materiálov pomôžete zachovávať prírodné zdroje. Pre podrobnejšie infor-
mácie o recyklácii tohto výrobku, kontaktujte príslušný miestny obecný úrad, podniky komunálnych služieb
alebo obchod, v ktorom ste si zakúpili tento produkt.

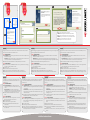
This guide presents the basic steps to set up and operate this device. For detailed instructions and specifications, refer to the user
manual on the CD enclosed with this product or at intellinet-network.com.
Step 1 - Hardware Installation
1.1 • For USB Adapters: With the computer on, gently insert the adapter into a USB 2.0 port. If it doesn’t easily slide into the port,
flip the adapter over and try again.
• For PCI Cards: Turn off your computer and unplug the power cord from the AC outlet. Remove the cover and insert the card
into an empty PCI slot. Replace the cover and attach any included antennas to the card.
1.2 The Welcome to the Found New Hardware Wizard screen will display automatically. Click “Cancel” to continue.
Step 2 - Software Installation
2.1 Place the included setup CD in your CD/DVD-ROM drive and run the “Setup.exe” program. When the Choose Setup Language
screen displays, select a language and click “Next” to continue.
2.2 Click “Next” to continue.
2.3 Allow the installation to continue as indicated by the Setup Status bar.
2.4 If you encounter a warning about driver incompatibility during the installation, click “Continue Anyway.“
2.5 When the Wizard Complete screen displays, select “Yes, I want to restart my computer now” and click “Finish.”
Ce guide décrit les bases pour configurer et opérer cet appareil. Pour des instructions
et spécifications détailées, veuillez lire le manuel de l’utilisation sur le CD inclus ou sur
intellinet-network.com.
Étape 1 - Installation du Matériel
1.1 • Pour les adaptateurs USB: Après avoir démarré l’ordinateur, connectez
l’adaptateur à un port USB. Si ça ne marche pas facilement tournez-le et essayez
à nouveau.
• Pour les cartes PCI: Éteignez votre ordinateur et débranchez le cordon
d’alimentation. Enlevez le couvercle et insérez la carte dans un emplacement PCI
disponible. Replacez le couvercle et attachez chaque antenne incluse à la carte.
1.2 L’assistant de matériel apparaît automatiquement. Cliquez “Cancel” afin de
continuer.
Étape 2 - Logiciel d’Installation
2.1 Insérez le CD d’installation et démarrez le programme “Setup.exe”. Choisissez une
langue du menu respectif et cliquez sur “Next” pour continuer.
2.2 Cliquez “Next” afin de continuer.
2.3 La barre d’état vous informe sur le progrès de l’installation.
2.4 Si un message d‘incompatibilité s’affiche pendant l’installation, cliquez sur
“Continuer néanmoin.”
2.5 Sur l’affichage-écran “Installation complete”, choissisez “Yes, I want to restart my
now” et cliquez “Finish.”
Diese Kurzanleitung zeigt die grundlegenden Schritte zur Einrichtung und Inbetriebnahme dieses Geräts. Für genauere Anweisungen nutzen Sie
bitte das beiliegende Handbuch auf CD oder auf intellinet-network.com.
Schritt 1 - Hardwareinstallation
1.1 • Für USB-Adapter: Nach dem Einschalten des Computers, stecken Sie den Adapter in einen USB 2.0 Port. Sollte er nicht einfach
einrasten, drehen Sie Ihn um und versuchen Sie es erneut.
• Für PCI-Karten: Schalten Sie Ihren Computer aus und trennen Sie den Netzstecker. Entfernen Sie die Abdeckung und stecken
Sie die Karte in einen verfügbaren PCI-Slot. Setzen Sie die Abdeckung wieder auf und befestigen Sie beiliegende Antennen an der Karte.
1.2 Der Assistent zur Hardwareinstallation wird automatisch geöffnet. Klicken Sie auf “Cancel”.
Schritt 2 - Softwareinstallation
2.1 Legen Sie die beiliegende Installations-CD in Ihr Laufwerk und starten das “Setup.exe”-Programm. Wählen Sie im Sprachmenü eine
Sprache aus und klicken Sie dann auf “Next”.
2.2 Klicken Sie dann auf “Next”.
2.3 Der Fortschrittsbalken informiert Sie über den Status der Installation.
2.4 Sollten während der Installation Treiberinkompatibilitäten auftreten, klicken Sie auf „Trotzdem fortsetzen“.
2.5 Auf dem “Installation complete”-Bildschirm, wählen Sie “Yes, I want to restart my computer now” und klicken Sie auf “Finish.”
Esta guía presenta los pasos básicos para instalar y operar este dispositivo. Para obtener instrucciones detalladas y especificaciones,
consulte el manual de usuario en el CD adjunto ó en intellinet-network.com.
Paso 1 - Instalación de Hardware
1.1 • Para los adaptadores USB: Con la PC encendida, inserte el Adaptador suavemente en el puerto USB 2.0. Si no lo hace
facilmente, gire el adaptador e intente de nuevo.
• Para las tarjetas PCI: Apague el ordenador y desconecte el cable de alimentación de la toma de CA. Retire la tapa e inserte la
tarjeta en una ranura PCI disponible. Coloque de nuevo la tapa e inserte las antenas incluidas con la tarjeta.
1.2 Se mostrara la pantalla de bienvenida del asistente para agregar nuevo hardware, haga click en continuar.
Paso 2 - Instalación de Software
2.1 Coloque el CD de intalación incluido en su unidad de CD/DVD-ROM y ejecute el “Setup.exe”. Cuando el programa de instalación
muestre la pantalla de Idioma, selección un idioma y haga clic en “siguiente” para continuar.
2.2 Haga clic en siguiente para continuar.
2.3 Permita que la instalación continúe como se indica en la barra de instalación.
2.4 Si se encuentra con una advertencia sobre la incompatibilidad de controladores durante la instalación, haga clic en “Continuar”.
2.5 Cuando se muestre la pantalla Instalación completa, seleccione “Yes, I want to restart my computer now” y haga clic en “Finish.”
Este guia apresenta os passos básicos para configuração e operação deste dispositivo. Para instruções e
especificações detalhadas, consulte o manual do utilizador no CD fornecido com este produto ou em intellinet-
network.com.
Passo 1 - Instalação do Hardware
1.1 • Para Transformadores USB: com o computador ligado, insira suavemente o transformador numa
porta USB 2.0. Se não conseguir fazê-lo deslizar facilmente para dentro da porta, volte-o ao contrário e
tente novamente.
• Para Placas PCI: desligue o computador e desligue o cabo de alimentação da tomada de corrente.
Remova a tampa e insira o cartão numa slot PCI vazia. Volte a colocar a tampa e, se houver antenas
incluídas, ligue-as ao cartão.
1.2 O ecrã Bem-vindo ao ‘Assistente de novo hardware encontrado’ é apresentado automaticamente. Clique
em “Cancelar” para continuar.
Passo 2 - Instalação do Software
2.1 Coloque o CD de configuração incluído na unidade de CD/DVD-ROM e execute o programa “Setup.exe”.
Quando abrir a opção de escolha de Idioma, selecione o idioma desejado e clique em “Próximo” para
continuar.
2.2 Clique em “Seguinte” para continuar.
2.3 Permitir que a instalação continue como indicado pela barra de status de instalação.
2.4 Se encontrar um aviso sobre incompatibilidade de um controlador durante a instalação, clique em
“Continuar Mesmo Assim“.
2.5 Quando aparecer o ecrã Assistente, seleccione “Yes, I want to restart my computer now” e clique em
“Terminar”.
ENGLISH
FRANÇAIS
DEUTSCH ESPAÑOL
ITALIANO
PORTUGUÊS
STEP
1
STEP
2
2.1
intellinet-network.com
1.1
1.2
2.2
2.3
2.4 2.5
NOTE: Screen images on all compatible operating systems are similar.
HINWEIS: Die Bildschirmabbildungen sind auf allen kompatiblen Betriebssystemen ähnlich.
NOTA: Las imágenes de la pantalla son similares en todos los sistemas operativos compatibles.
REMARQUE: Les images à l’écran sont similaires sur tous les systèmes d’exploitation compatibles.
NOTA: As imagens de ecrã são semelhantes em todos os sistemas operativos.
NOTA: Le immagini dello schermo sono simili per tutti i sistemi operativi.
Tento sprievodca popisuje základné kroky pre nastavenie a prevádzku tohto zariadenia. Podrobné
inštrukcie a špecifikácie nájdete v užívateľskom manuáli na CD priloženom k tomuto produktu alebo na
stránke intellinet-network.com.
Krok 1 - Inštalácia hardvéru
1.1 • Pre USB adaptéry: Nechajte zapnutý počítač a jemne zasuňte adaptér do USB 2.0 portu. Ak
adaptér nejde ľahko zasunúť, prevráťte ho na opačnú stranu a skúste to znova.
• Pre PCI karty: Vypnite počítač a vyberte napájací kábel z AC zásuvky. Odnímte kryt a do
prázdneho PCI slotu vložte kartu. Nasaďte kryt naspäť na počítač a ku karte pripojte všetky
príslušné antény.
1.2 Automaticky sa zobrazí obrazovka sprievodcu novo nájdeným hardvérom Welcome to the Found
New Hardware Wizard. Pre pokračovanie stlačte “Cancel” (Zrušiť).
Krok 2 - Inštalácia softvéru
2.1 Do mechaniky CD/DVD-ROM vložte priložené inštalačné CD a spustite program “Setup.exe”.
Po zobrazení okna Choose Setup Language pre výber jazyka inštalácie, si zvoľte jazyk a pre
pokračovanie stlačte “Next” (Ďalej).
2.2 Pre pokračovanie stlačte “Next” (Ďalej).
2.3 V stavovom riadku Setup Status sa zobrazuje priebeh procesu inštalácie, nechajte ju bežať.
2.4 Ak sa počas inštalácie zobrazí upozornenie o nekompatibilite ovládačov, stlačte “Continue
Anyway“(Aj tak pokračovať).
2.5 Keď sa po dokončení inštalácie zobrazí Wizard Complete obrazovka, zvoľte “Yes, I want to restart
my computer now”(Áno, chcem teraz reštartovať počítač); a kliknite na “Finish”(Dokončiť).
SLOVENSKY
Questa guida fornisce i passaggi basilari per settare e far funzionare l’apparecchio. Per istruzioni dettagliate
e ulteriori specifiche, fare riferimento al manuale d’istruzione contenuto nel CD incluso al prodotto o su
intellinet-network.com.
Passo 1 - Installazione dell’Hardware
1.1 • Per gli adattatori USB: Con il computer acceso, inserire delicatamente l’adattatore all’interno della
porta USB 2.0. Se questo non dovesse scivolare agevolmente all’interno della porta, ruota l’adattatore
e riprova nuovamente.
• Per le schede PCI: Spegnere il computer e scollegare il cavo di alimentazione dalla presa di corrente.
Rimuovere il coperchio e inserire la scheda in uno slot PCI vuoto. Riposizionare il coperchio e collegare
alla scheda l’antenna se inclusa.
1.2 Il messaggio di benvenuto della procedura di installazione guidata del nuovo hardware rilevato apparirà
automaticamente sullo schermo. Cliccare “Cancel (Cancella)” per continuare.
Passo 2 - Installazione del Software
2.1 Inserire il CD di settaggio incluso nel lettore CD/DVD-ROM e avviare il programma “Setup.exe.” Quando
compare la schermata con la richiesta di scegliere la lingua, selezionare la lingua desiderata e cliccare su
“successivo” per continuare.
2.2 Cliccare “Next” per continuare.
2.3 Permette di proseguire l’installazione come indicato dalla barra di stato.
2.4
Se dovesse comparire un avviso di incompatibilità durante l’installazione, cliccare “Continua comunque.“
2.5 Quando appare sullo schermo che l’installazione della procedura guidata è completa, selezionare “Yes, I
want to restart my computer now” e cliccare su “Finish (Finito).”
-
 1
1
-
 2
2


Intellinet 523974 Quick Install Guide
- Catégorie
- Jouets
- Taper
- Quick Install Guide
dans d''autres langues
- italiano: Intellinet 523974
- español: Intellinet 523974
- português: Intellinet 523974
- slovenčina: Intellinet 523974