
FARA 312
High airflow and high capacity mATX gaming chassis
www.silverstonetek.com

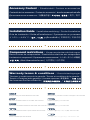
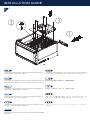
Accessory Content/ Zubehörinhalt / Contenu en accessoires
Contenido de los accesorios / Contenuto accessorio / ส่วนประกอบของอุปกรณ์เสริม
Дополнительные элементы/付属品内容 / 配件 / 配件
Installation Guide / Installationsanleitung / Guide d'installation
Guía de instalación / Guida all'installazione / Руководство по установке
インストールガイド / คู่มือการติดตั้ง / 安裝說明 / 安装说明
Component restrictions/ Komponentenbeschränkungen
Restricciones de componentes / Restrictions relatives aux composants
Limitazioni ai componenti / Ограничения компонентов / コンポーネントの制約
ขีดจำกัดของส่วนประกอบ / 元件限制 / 元件限制
Warranty terms & conditions / Garantiebedingungen
Términos y condiciones de la garantía /Termes et conditions de la garantie /
Termini e Condizioni della garanzia / Условия гарантии / 保証条件 /
ข้อกำหนดและเงื่อนไขการรับประกัน /
Montageanleitung nach diesem Modell: SST-FA312-BG Инструкция по установке на основе этой модели : SST-FA312-BG
คำแนะนำการติดตั้งตามรุ่นนี้: SST-FA312-BG
ไทย
Instrucciones de instalación basadas en este modelo: SST-FA312-BG 安装说明以此型号为主 : SST-FA312-BG
Istruzioni di installazione basate su questo modello: SST-FA312-BG このモデルに基づいたインストール手順 : SST-FA312-BG
安裝說明以此型號為主 : SST-FA312-BG
Instructions d'installation basées sur ce modèle: SST-FA312-BG

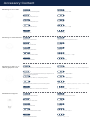
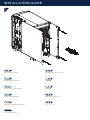
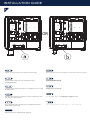
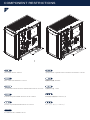
Accessory Content
Montage für 2,5-Zoll-Festplatte Крепления для 2,5" SSD
การยึด SSD 2.5"
ไทย
Fixation pour disque dur 2,5" 锁固2.5"硬碟
Supporto per SSD da 2,5" 2.5" SSDインストール用
鎖固2.5"硬碟
Fixation pour disque dur 2,5"
Mounting for 2.5" SSD
Montage für motherboard Крепления для материнской платы
การยึด การยึดเมนบอร์ด
ไทย
Montaje para placa base 锁固主板
Supporto per scheda madre マザーボードのインストール用
鎖固主板
Fixation pour carte mère
Mounting for motherboard
Montage für Netzteil, 3,5-ZollFestplatte & Grafikkarte Крепление для блока питания , 3,5" HDD & видеокарты
การยึด PSU, HDD 3.5" й платы & กราฟฟิกการ์ด
ไทย
Montaje para FA, HDD 3,5" & tarjetas gráficas 锁固电源, 3.5" 硬碟 & 显卡
Supporto per PSU, HDD da 3,5" & scheda grafica PSU、3.5" HDD、グラフィックスカードのイ ンストール用
鎖固電源, 3.5" 硬碟 & 顯卡
Fixation pour bloc d’alimentation électrique, disque dur de
3,5" po & cartes graphiques
Mounting for PSU, 3.5"
HDD & graphics card
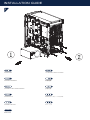
Motherboard-Abstandhalter Стойка для материнской платы
น็อตหกเหลี่ยมยึดเมนเบอร์ด
ไทย
Soporte de placa base 支撑主板
Distanziatore della scheda madre マザーボードスタンドオフ
支撐主機板
Entretoise pour carte mère
Motherboard support

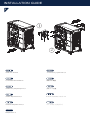
Accessory Content
Abstandhalter installieren Установочные стойки
ติดตั้งน็อตหกเหลี่ยม
ไทย
Soporte de instalación 旋钮螺柱
Installare il distanziatore スタンドオフ取り付け用
旋紐螺柱
Installer l’entretoise
Install standoffs
Kabelbinder Кабельные стяжки
เคเบิ้ลไทร์
ไทย
Bridas para cables 束线带
Fascette per cavi ケーブルタイ
束線帶
Attaches de cable
Cable ties
Garantiekarte Гарантийный талон
ใบรับประกัน
ไทย
Tarjeta de garantía 保固卡
Certificato di garanzia 保証書
保固卡
Carte de garantie
Warranty card

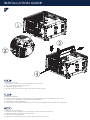
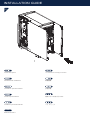
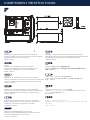
INSTALLATION GUIDE
1
Seitenblende entfernen
Enlevez le panneau lateral
Retire el panel lateral
Rimuovere il pannello laterale
Remove side panels Снимите боковую панель
拆除側板
拆除侧板
側面パネルを外します
แกะแผงด้านข้างออก
ไทย

2
INSTALLATION GUIDE
Motherboard installieren (wenn die E/A-Abschirmung in das
Motherboard integriert ist, überspringen Sie bitte Schritt 1)
Installez la carte mère (si le bouclier d'E/S est intégré à la
carte mère, veuillez ignorer l'étape 1)
Instale la placa base (si el protector de E/S está integrado
con la placa base, omita el paso 1)
Installa la scheda madre (se lo scudo I/O è integrato con la
scheda madre, salta il passaggio 1)
Install motherboard (if the I/O shield is integrated with the
motherboard, please skip step 1)
Установите материнскую плату (если экран ввода-вывода
интегрирован с материнской платой, пропустите шаг 1)
裝主板 (主板如為一體式I/O,請跳過步驟1)
装主板 (主板如为一体式I/O,请跳过步骤1)
マザーボードを取り付けます (I/O シールドがマザーボードに
統合されている場合は、手順 1 をスキップしてください)
ติดตั้งเมนบอร์ด (หากแผง I/O ถูกรวมเข้ากับเมนบอร์ด โปรดข้ามขั้
นตอนที่ 1)
ไทย
1
23

3
INSTALLATION GUIDE
Netzteil installieren
Installez le bloc d’alimentation
Instale la FA
Installare la PSU
Install PSU Установите блок питания
安裝電源
安装电源
PSUをインストールします
ติดตั้ง PSU
ไทย

4
INSTALLATION GUIDE
Install graphics card
1. Loosen the screw, shift the PCI bracket cover to the left
2. Then remove the PCI bracket cover
3. Install the graphics card
4. Shift the PCI bracket to the right, then secure it with screws
Grafikkarte einbauen
1. Lösen Sie die Schraube, verschieben Sie die Abdeckung der PCI-Halterung nach links
2. Entfernen Sie dann die Abdeckung der PCI-Halterung
3. Installieren Sie die Grafikkarte
4. Verschieben Sie die PCI-Halterung nach rechts und befestigen Sie sie dann mit Schrauben
Installer la carte graphique
1. Desserrez la vis, déplacez le couvercle du support PCI vers la gauche
2. Retirez ensuite le couvercle du support PCI
3. Installez la carte graphique
4. Déplacez le support PCI vers la droite, puis fixez-le avec des vis

5
Установить видеокарту
1. Ослабьте винт, сдвиньте крышку кронштейна PCI влево
2. Затем снимите крышку кронштейна PCI.
3. Установите видеокарту
4. Сдвиньте скобу PCI вправо и закрепите ее винтами
安裝顯卡
1. 鬆開螺絲,將檔片蓋推向左側板方向
2. 拆除檔片
3. 安裝顯卡
4. 將檔片蓋推向右側方向,並鎖固螺絲
安装显卡
1. 松开螺丝,将档片盖推向左侧板方向
2. 拆除档片
3. 安装显卡
4. 将档片盖推向右侧方向,并锁固螺丝
Installa la scheda grafica
1. Allentare la vite, spostare il coperchio della staffa PCI a sinistra
2. Quindi rimuovere il coperchio della staffa PCI
3. Installare la scheda grafica
4. Spostare la staffa PCI verso destra, quindi fissarla con le viti
ติดตั้งการ์ดจอ
1. คลายสกรู เลื่อนที่ครอบตัวยึด PCI ไปทางซ้าย
2. จากนั้นถอดที่ครอบตัวยึด PCI
3. ติดตั้งการ์ดจอ
4. เลื่อนโครงยึด PCI ไปทางขวา จากนั้นยึดด้วยสกร
ไทย
INSTALLATION GUIDE
グラフィックカードを取り付ける
1. ネジを緩め、PCI ブラケット カバーを左にずらします。
2. PCI ブラケット カバーを取り外します。
3. グラフィックカードを取り付ける
4. PCI ブラケットを右にずらし、ネジで固定します
Instalar tarjeta gráfica
1. Afloje el tornillo, mueva la cubierta del soporte PCI hacia la izquierda
2. Luego retire la cubierta del soporte PCI
3. Instale la tarjeta gráfica
4. Mueva el soporte PCI hacia la derecha y asegúrelo con tornillos

There are two positions to install the drive cage Есть два места для установки отсека для жёсткого диска
Es gibt zwei Positionen zur Installation eines
Festplattenkäfigs
硬碟架有兩個安裝位置
Existen dos posiciones posibles para la instalación de la
carcasa para dispositivos
ハードドライブケージの設置場所は2箇所あります
Il existe deux emplacements pour l’installation de la cage
de disque dur
硬碟架有两个安装位置
Sono disponibili due posizioni per l’installazione della
gabbia del disco rigido
ิ
มีสองตำแหน่งในการติดตั้งโครงฮาร์ดไดรฟ
ไทย
6
INSTALLATION GUIDE
OR

Install 3.5” and 2.5” devices into the drive trays, then insert
them into the bottom drive cage
Установите устройства 3,5”и 2,5” в лотки для ди сков ,
затем вставьте их в нижнюю корзину
Installieren Sie 3,5- und 2,5-Zoll-Geräte in den Laufwerkschächten
und stecken Sie sie dann in den unteren Laufwerkskäfig
安裝 3.5”及 2.5”裝置於硬碟架
Instale los dispositivos de 3,5” y 2,5” en las bahías para
dispositivos, luego insértelos en la carcasa para
dispositivos inferior
3.5”および 2.5”デバイスをドライブトレイにイ ンストール後、
こ れを底部ドライブケージに挿 します
Installez les périphériques 3,5” et 2,5” sur les plateaux de
lecteurs, puis insérez-les dans la cage de lecteur inférieure
安装 3.5”及 2.5”装置于硬盘架
Installare dispositivi da 3,5” e 2,5” nei cassetti del disco
rigido, quindi inserirli nella gabbia inferiore dell'unità
ิ
ติดตั้งอุปกรณ์ 3.5” และ 2.5” ลงในถาดใส่ไดรฟ์ จากนั้นเสียบเข้า
ไปที่โครงไดรฟ์ด้านล่าง
ไทย
INSTALLATION GUIDE
7

Install 2.5" devices Установите устройства 2,5"
2,5-Zoll-Geräte installieren 安装 2.5"装置
Instalar dispositivos 2,5" 2.5"デバイスのインストール
Installer les périphériques 2,5" 安装 2.5"装置
Installare dispositivi da 2,5"
ิ
ดตั้งอุปกรณ์ 2.5"
ไทย
8
INSTALLATION GUIDE

Vordere I/O-Kabel verbinden
Connectez les câbles d'E/S en façade
Conecte los cables de E/S frontales
Collegare i cavi I/O anteriori
Connect front I/O cables Подключите передние I/O кабели
安裝前置IO線材
安装前置IO线材
フロントI/Oケーブルを接続します
เชื่อมต่อสายเคเบิล I/O ด้านหน้า
ไทย
9
INSTALLATION GUIDE

Seitenblende installieren
Installez le panneau latéral
Instale el panel lateral
Installare il pannello laterale
Install side panel Установите боковую панель
安裝側板
安装侧板
側面パネルを取り付けます
ติดตั้งแผงด้านข้าง
ไทย
10
INSTALLATION GUIDE

Lüfter installieren
Lüfter installieren
Instale los ventiladores
Installare le ventole
Install fans Установите вентиляторы
安裝風扇
安装风扇
ファンを取り付けます
ติดตั้งพัดลม
ไทย
11
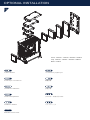
OPTIONAL INSTALLATION
Front: 120mm x 3 / 140mm x 2
Top: 120mm x 2 / 140mm x 2
Rear: 120mm x 1

Kühlkörper installieren
Installez les radiateurs
Instale los disipadores
Installare i radiatori
Install radiators Установите радиаторы
安裝水排
安装水排
ラジエターを取り付けます
ติดตั้งตัวระบายความร้อน
ไทย
12
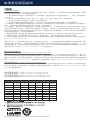
OPTIONAL INSTALLATION
Front: 120mm / 140mm / 240mm / 280mm
Top: 120mm / 140mm / 240mm / 280mm
Rear: 120mm

Die maximale CPU-Kühlerhöhe beträgt 173 mm,
der Kühler darf um 18 mm an der Kante des
Motherboards hervorstehen
La limite de hauteur du refroidisseur de CPU est de
173 mm, le refroidisseur peut dépasser du bord de la carte
mère de 18 mm
El límite de altura del disipador de la CPU es de 173mm,
el disipador puede sobresalir más allá del extremo de la
placa base en 18mm
Il limite di altezza del dissipatore di calore della CPU è di
173 mm. Il dissipatore di calore può sporgere di 18 mm dal
bordo della scheda madre
CPU cooler height limit is 173mm, cooler is allowed to
protrude the edge of the motherboard by 18mm
Ограничение по высоте процессорного кулера
составляет 173 мм, кулер может выступать за край
материнской платы на 18 мм
塔式散熱器限高173mm; 允許散熱器超出主板邊緣 18mm
塔式散热器限高173mm; 允许散热器超出主板边缘 18mm
CPUクーラー高さ限度は173mmで、クーラーはマザーボード
の縁から18mmまではみ出せます
ความสูงของ CPU คูลเลอร์จำกัดที่ 173 มม. ตัวทำความเย็นสามา
รถยื่นออกมาจากขอบเมนบอร์ดได้ 18 มม
ไทย
COMPONENT RESTRICTIONS
13
Maximum 173mm
Maximum

Max. Tiefe des Netzteils: 170 mm
La profondeur limite du bloc d’alimentation est de 170 mm
El límite de profundidad de la FA es de 170mm
Il limite di profondità della PSU è di 170 mm
PSU depth limit is 170mm
Предельная глубина блока питания составляет 170 мм
電源最大長度 170mm
电源最大长度 170mm
PSU奥行き限度は170mmです
ความลึกของ PSU จำกัดที่ 170 มม.
ไทย
14
COMPONENT RESTRICTIONS

Länge:
365mm (mit installiertem 25 mm Frontlüfter)
350mm (nur geeignet bei zwischen Gehäuse und
Frontblende installierten 120-mm-Frontlüftern)
Breite: 182mm
Longeur:
365mm (avec ventilateur avant de 25 mm installé)
350mm (Convient uniquement aux ventilateurs frontaux de
120 mm installés entre le châssis et le panneau avant)
Largeur: 182mm
Longitud:
365mm (con ventilador frontal de 25 mm instalado)
350mm (Solo es apropiado para ventiladores frontales de
120mm instalados entre el chasis y el panel frontal)
Ancho: 182mm
Lunghezza:
365mm (con ventola anteriore da 25 mm installata)
350mm (Adatto solo per ventole anteriori da 120 mm
installate tra lo chassis e il pannello anteriore)
Larghezza: 182mm
Length:
365mm (incl. front 25mm thickness fan installed)
350mm (applies only to 120mm front fans when installed
between the front panel and chassis)
Width: 182mm
Длина:
365 мм (с установленным передним вентилятором 25 мм)
350 мм (Подходит только для 120 мм фронтальных вентиляторов,
установленных между корпусом и передней панелью)
Ширина: 182 мм
長度:
365mm (包括 25mm 厚度前置风扇)
350mm (僅適用120mm前風扇安裝於 前面板與鐵機身中間)
寬度: 182mm
长度:365mm (包括 25mm 厚度前置风扇)
350mm (仅适用120mm前风扇安装于 前面板与铁机身中间)
宽度: 182mm
長さ:
365mm (25mmフロントファン搭載時)
350mm (ケースとフロントパネルの間には120mmフロント
ファンのみが装着可能です。)
幅: 182mm
ความยาว:
365mm (พร้อมติดตั้งพัดลมด้านหน้า 25 มม.)
350mm (เหมาะสำหรับติดตั้งพัดลมด้านหน้าขนาด 120 มม.
ระหว่างตัวเครื่องและแผงด้านหน้าเท่านั้น)
ความกว้าง: 182mm
ไทย
15
COMPONENT RESTRICTIONS

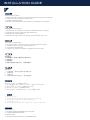
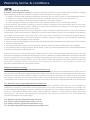
Warranty terms & conditions
Warranty terms & conditions
1. Product component defects or damages resulted from defective production is covered under warranty. Defects or damages
with the following conditions will be fixed or replaced under SilverStone Technology’s jurisdiction.
a. Usage in accordance with instructions provided in the manual, with no misuse, overuse, or other inappropriate actions*.
b. Damage not caused by natural disaster (thunder, fire, earthquake, flood, salt, wind, insect, animals, etc…)
c. Product is not modified or components replaced resulting in out of spec. operation.
d. Loss or damages resulted from conditions other than ones listed above are not covered under warranty.
2. Under warranty, SilverStone Technology’s maximum liability is limited to the current market value for the product
(depreciated value, excluding shipping, handling, and other fees). SilverStone Technology is not responsible for other
damages or loss associated with the use of product.
3. Under warranty, SilverStone Technology is obligated to repair or replace its defective products. Under no circumstances
will SilverStone Technology be liable for damages in connection with the sale, purchase, or use including but not limited to
loss of data, loss of business, loss of profits, loss of use of the product or incidental or consequential damage whether or
not foreseeable and whether or not based on breach of warranty, contract or negligence, even if SilverStone Technology
has been advised of the possibility of such damages.
4. Warranty covers only the original purchaser through authorized SilverStone distributors and resellers and is not transferable
to a second hand purchaser
5. You must provide sales receipt or invoice with clear indication of purchase date to determine warranty eligibility.
6. If a problem develops during the warranty period, please contact your retailer/reseller/SilverStone authorized distributors
or SilverStone http://www.silverstonetek.com.
Please note that: (i) You must provide proof of original purchase of the product by a dated itemized receipt; (ii) You shall
bear the cost of shipping (or otherwise transporting) the product to SilverStone authorized distributors. SilverStone authorized
distributors will bear the cost of shipping (or otherwise transporting) the product back to you after completing the warranty
service; (iii) Before you send the product, you must be issued a Return Merchandise Authorization (“RMA”) number from
SilverStone. Updated warranty information will be posted on SilverStone’s official website. Please visit
http://www.silverstonetek.com. for the latest updates.
Additional info & contacts
For North America usasupport(at)silverstonetek.com
SilverStone Technology in North America may repair or replace defective product with refurbished product that is not new
but has been functionally tested. Replacement product will be warranted for remainder of the warranty period or thirty days,
whichever is longer. All power supplies should be sent back to the place of purchase if it is within 30 days of purchase,
after 30 days, customers need to initiate RMA procedure with SilverStone Technology in USA by first downloading the
“USA RMA form for end-users” form from the below link and follow its instructions. http://silverstonetek.com/contactus.php
For Australia only support(at)silverstonetek.com
Our goods come with guarantees that cannot be excluded under the Australian Consumer Law. You are entitled to a
replacement or refund for a major failure and for compensation for any other reasonably foreseeable loss or damage. You
are also entitled to have the goods repaired or replaced if the goods fail to be of acceptable quality and the failure does not
amount to a major failure. Please refer to above “Warranty terms & conditions” for further warranty details. SilverStone
Technology Co., Ltd. 12F No. 168 Jiankang Rd., Zhonghe Dist., New Taipei City 235 Taiwan R.O.C. +886-2-8228-1238
(standard international call charges apply)
For Europe support.eu(at)silverstonetek.de
For China support(at)silverstonetek.com.cn
For Japan support_jp(at)silverstonetek.co.jp
For all other regions support(at)silverstonetek.com
La page est en cours de chargement...
La page est en cours de chargement...
La page est en cours de chargement...
La page est en cours de chargement...
La page est en cours de chargement...
La page est en cours de chargement...
La page est en cours de chargement...
La page est en cours de chargement...
La page est en cours de chargement...
La page est en cours de chargement...
La page est en cours de chargement...
-
 1
1
-
 2
2
-
 3
3
-
 4
4
-
 5
5
-
 6
6
-
 7
7
-
 8
8
-
 9
9
-
 10
10
-
 11
11
-
 12
12
-
 13
13
-
 14
14
-
 15
15
-
 16
16
-
 17
17
-
 18
18
-
 19
19
-
 20
20
-
 21
21
-
 22
22
-
 23
23
-
 24
24
-
 25
25
-
 26
26
-
 27
27
-
 28
28
-
 29
29
-
 30
30
-
 31
31


dans d''autres langues
- italiano: SilverStone FARA 312 Manuale utente
- Deutsch: SilverStone FARA 312 Benutzerhandbuch
- 日本語: SilverStone FARA 312 ユーザーマニュアル
Documents connexes
-
SilverStone ARM Manuel utilisateur
-
-
-
-
SilverStone ML06 Le manuel du propriétaire
-
-
-
-
SilverStone Grandia GD09 Guide d'installation
-