

2
ENGLISH
TABLE OF CONTENTS
THANKS FOR CHOOSING TOTO!
The mission of TOTO is to provide the world with healthy, hygienic and more
comfortable lifestyles. We design every product with the balance of form and
function as a guiding principle. Congratulations on your choice.
Thanks for Choosing TOTO
®
! ...............2
Before Installation ...................................2
Common Tools Needed .........................2
Before Installation ...................................2
Included Parts .........................................3
Care and Cleaning ..................................3
Installation Procedure ............................4
Maintenance Instructions .......................6
Warranty ..................................................8
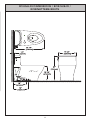
Rough-In Dimensions ..........................23
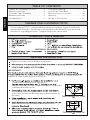
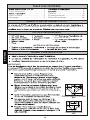
COMMON TOOLS NEEDED
MATERIALS REQUIRED:
64
5
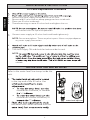
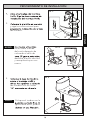
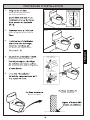
BEFORE INSTALLATION
Read instruction manual before installation.
unobstructed operation of equipment
beforehand may result in incorrect product installation
and possible malfunction.
Proceed to install the supply hose to the tank and
make sure you do not damage the end connection of
the hose.
working properly.
be filled with mold-resistant silicone-based seal
IMPORTANT!
additional information prior to installation.
YES
NO

3
ENGLISH
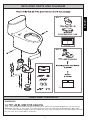
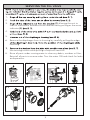
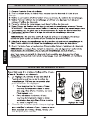
INCLUDED PARTS AND DIAGRAM
Box 2
Manual
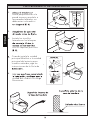
WARNING!
The use of high concentration of chlorine or chlorine-related products can seriously
damage fittings in the tank. This damage can cause leakage and property damage.
TOTO
®
shall not be responsible or liable for any tank fitting failure or damage caused
by the use of in-tank bowl cleaners.
CARE AND CLEANING
Box 1
Rough-In Instructions
Template

4
ENGLISH
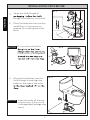
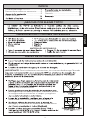
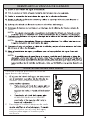
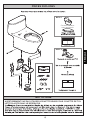
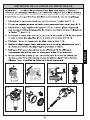
Open the Unifit Rough-In
Rough-In Installation instruction.
2. Place the template into position
and follow its instructions to
prepare for installing the toilet
bowl.
3. Place the toilet bowl over the
Unifit Rough-In and align the
holes on the side of the toilet
INSTALLATION PROCEDURE
Ill. 1
Ill. 2
Ill. 3
Do not move the Unifit
If this notice is disregarded,
NOTICE
Insert the toilet all the way
into position. If this notice
is disregarded, leakage may
result.
NOTICE

5
ENGLISH
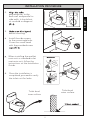
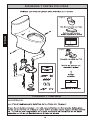
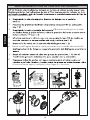
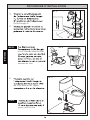
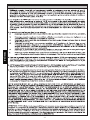
4.
perpendicular to the
back wall and parallel to
side walls; it should not
sit crooked or diagonal
INSTALLATION PROCEDURE
5.
before securing.
6. Install the side screws
to the mounting blocks.
Cover the screw head
with the provided screw
When installing the washlet
main unit or standard toilet
seat main unit, follow the
instructions on the Installation
Guide.
8. Once the installation is
completed, proceed to verify
the toilet unit for leaks.
Connection
Connection
Toilet bowl
inner surface
Toilet bowl
outer surface
Ill. 4
Ill. 5

6
ENGLISH
MAINTENANCE INSTRUCTIONS
Fill Valve Replacement Procedure
2.
3. Remove the water supply connection at the fill valve.
4. Remove old fill valve and use damp sponge to clean inside tank.
5. Place new fill valve inside tank.
6. Thread mounting nut onto fill valve shank and tighten the nut.
not interfere with the trip lever operation.
Connect water supply to fill valve shank and hand-tighten only.
NO TE: Do not overtighten. These are plastic parts. Never use pipe dope on
any water supply connection.
8.
9. Turn water supply ON and check for leaks outside the tank.
NO TE:
subside.
Refer to the water level line stamp inside the
tank.
in the top end of the fill valve. Use
screwdriver clockwise, or towards
screwdriver counter-clockwise, or
2.
the water level. When satisfied with the
ADJUSTING THE WATER LEVEL
Ill. 1
water level adjuster

ENGLISH
1
2
1
2
3
2.
3. (1) allowing the unit to
slide to the bottom and remove the retainer tab by pulling as the arrow
indicates (3)
4.
5.
6. Remove the diaphragm from its housing by carefully pulling the edge
removing.
Use twisting motion while pulling to help with removal.
8. Rinse all parts under running water to clear any debris, residues or films.
Reinstall all parts in reverse order. Turn the water ON and check for leaks
and operation.
Ill. 1 Ill. 2 Ill. 3
Ill. 6
SERVICING THE FILL VALVE
Ill. 4
Ill. 5
-
1
2
Ill. 7


9
ESPAÑOL
ÍNDICE
¡GRACIAS POR ELEGIR TOTO!
¡Gracias por elegir TOTO!.....................9
Herramientas comunes necesarias .......9
...........................9
Partes incluidas .....................................
...............................
..............
Mantenimiento .....................................
Garantía .................................................
...............................................23
HERRAMIENTAS COMUNES NECESARIAS
MATERIALES NECESARIOS:
64
5
ANTES DE LA INSTALACIÓN
posible mal funcionamiento.
descargarlas de suciedad y residuos. Proceda a instalar
la manguera de suministro en el tanque y asegúrese
electricidad estén funcionando correctamente.
descarga y el suelo con un material de sellado a base
¡IMPORTANTE! Para instalaciones consecutivas, los sistemas de descarga Tornado
SI
NO

ESPAÑOL
DIAGRAMA Y PARTES INCLUIDAS
Caja 2
Manual
¡ADVERTENCIA!
-
-
CUIDADO Y LIMPIEZA
Caja 1
Plantilla

ESPAÑOL
2.
y siga sus instrucciones para
del inodoro.
3.
del inodoro con las líneas
PROCEDIMIENTO DE INSTALACIÓN
Ill. 1
Ill. 2
Ill. 3
Unifit sobre la brida
del suelo después de
colocado el sello de
deseche el anillo de cera
y reemplácelo por uno
nuevo.
AVISO
Coloque el inodoro en la
ignora este aviso, podría
AVISO

ESPAÑOL
4.
forma perpendicular a la
pared trasera y paralelo a
las paredes laterales; no
debe estar inclinado ni
PROCEDIMIENTO DE INSTALACIÓN
5.
6. Instale los tornillos
laterales en los bloques
con los tapones provistos
Cuando instale la unidad
principal Washlet o la unidad
principal del asiento para
inodoro estándar, siga las
instrucciones de la Guía de
8.
unidad del inodoro no tenga
filtraciones.
asiento estándar
asiento Washlet™
Ill. 4
Ill. 5

ESPAÑOL
REEMPLAZO LA VÁLVULA DE LLENADO
AJUSTE DEL NIVEL DEL AGUA
Ill. 1
Consulte la marca que indica el nivel de
agua dentro del tanque.
llenado. Use un destornillador plano
destornillador en el sentido de las
el destornillador en el sentido
2. Descarge el inodoro déspues de cada
esté satisfecho con el nivel del agua,
vuelva a descargar el inodoro para
verificarlo.
palanca de agua
orificio del tanque.
tuerca.
NO TA:
manualmente.
NO TA:
tanque.
NO TA:
-
el suministro de agua se interrumpe, es probable que caigan algunas gotas de
caer.

ESPAÑOL
MANTENIMIENTO DE LA VÁLVULA DE LLENADO
1
2
1
2
3
2.
3. (1) permitiendo que la unidad
(3)
4.
5.
6. Retire la diafragma desde la cubierta tirando con cuidado del borde del
8.
el suministro de agua y verifique si hay fugas y si funciona.
Il. 1 Il. 2 Il. 3
Il. 6
Il. 4
Il. 5
agua del tubo de llenado.
1
2
Il. 7

ESPAÑOL
GARANTÍA
®
del Producto y no es transferible a una tercera persona, incluyendo, pero sin limitarse a, cualquier compra-
derecho de hacer tantas inspecciones como sean necesarias para determinar la causa del defecto. TOTO
tormenta eléctrica, etc.
de TOTO o que el Producto no esté especificado para tolerar.
-
féricas.
4. Para que esta garantía limitada sea válida, prueba de compra es necesaria. TOTO anima el registro de la
registro del producto es totalmente voluntario y la falta a registrar no disminuirá sus derechas de garantía
limitada.
escoger entre reparar el Producto en el domicilio del comprador o pagar el transporte del Producto a un
-
-
-
del producto causados por cloraminas en el tratamiento del suministro de agua público o en los limpiadores
-

FRANÇAIS
TABLE DES MATIÈRES
MERCI D’AVOIR CHOISI TOTO!
plus confortable. Comme principe de base, nous concevons chaque produit avec un
...................2
Outils nécessaires ...................................2
..................................2
Pièces incluses ........................................3
Nettoyage ...............................................3
.........................4
..................................................6
Garantie ...................................................8
Dimensions brutes ...............................25
Pièces de rechange .............................26
OUTILS NÉCESSAIRES
MATÉRIAUX NÉCESSAIRES:
AVANT L’INSTALLATION
pas endommager le bout du tuyau où le raccord se
fait.
IMPORTANT!
OUI
NON
64
plancher de bois
5

FRANÇAIS
PIÈCES INCLUSES
Boîte 2
Manuel
Cuvette chinoise
avec couvercle
AVERTISSEMENT! NE PAS UTILISER LES NETTOYEURS POUR CUVETTE DE TOI-
LETTE PLACÉS DANS LE RÉSERVOIR.
NETTOYAGE
Boîte 1
Instructions de
Gabarit

FRANÇAIS
Unifit Rough-In.
2.
3.
de la toilette et les lignes
PROCÉDURE D’INSTALLATION
Ill. 1
Ill. 2
Ill. 3
In sur la bride de plancher
anneau en cire.
AVIS
peut y avoir fuite.
AVIS

FRANÇAIS
4.
perpendiculairement
au mur arrière et
PROCÉDURE D’INSTALLATION
5.
bien alignée avant de la
6.
vis avec les capuchons
principale de washlet ou
les instructions dans le guide
8.
Raccord de
siège standard
Raccord de
siège Washlet™
de la cuvette
de la cuvette
Ill. 4
Ill. 5

FRANÇAIS
REMPLACEMENT DE LA VALVE DE REMPLISSAGE
AJUSTER LE NIVEAU D’EAU
Ill. 1
pour effectuer les réglages.
2. Chasser les toilettes après chaque réglage
fois de plus pour vérifier.
éponge.
manuellement.
supplémentaire est essentiel pour remplir la cuvette du toilette. Une fois
rapidement.
La page est en cours de chargement...
La page est en cours de chargement...
La page est en cours de chargement...
La page est en cours de chargement...
-
 1
1
-
 2
2
-
 3
3
-
 4
4
-
 5
5
-
 6
6
-
 7
7
-
 8
8
-
 9
9
-
 10
10
-
 11
11
-
 12
12
-
 13
13
-
 14
14
-
 15
15
-
 16
16
-
 17
17
-
 18
18
-
 19
19
-
 20
20
-
 21
21
-
 22
22
-
 23
23
-
 24
24


Toto MS642 Guide d'installation
- Taper
- Guide d'installation
- Ce manuel convient également à
dans d''autres langues
- English: Toto MS642 Installation guide
- español: Toto MS642 Guía de instalación
Documents connexes
-
Toto MS442124CUFG#01 Manuel utilisateur
-
Toto MW4463074CEMGN#01 Mode d'emploi
-
Toto CST646F Installation and Owner's Manual
-
-
-
-
Toto MS626214CEFG#01 Mode d'emploi
-
Toto MS624234CEF(G) Guide d'installation