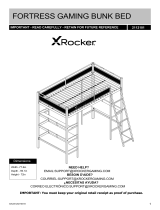
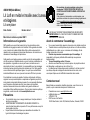
Dorel Home 4663019N Assembly Manual
- Catégorie
- Meubles de bébé
- Taper
- Assembly Manual

4663019N(Black&White)
B344663019N00-KT
Date of Purchase
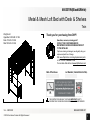
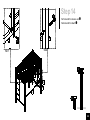
Metal & Mesh Loft Bed with Desk & Shelves
S.L. - 2023/6/30
If parts are missing or damaged, we will gladly ship your
replacement parts free of charge.
Lot Number (TAKEN FROM CARTON)
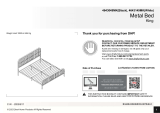
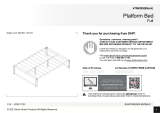
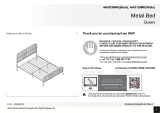
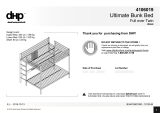
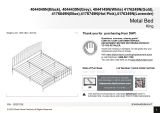
Thank you for purchasing from DHP!
THIS INSTRUCTION BOOKLET CONTAINS IMPORTANT SAFETY
INFORMATION. PLEASE READ AND KEEP FOR FUTURE REFERENCE.
1
2023 Dorel Home Products All Rights Reserved
Twin
Visit www.dhpfurniture.com/eng/replacement-parts
or call Toll-Free 1-800-267-1739
You can also chat with us at www.dhpfurniture.com
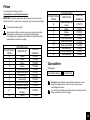
Weight Limit:
Upper Bed: 200 LBS / 91 KG
Desk: 70 LBS / 32 KG
Shelf: 50 LBS / 23 KG Questions, concerns, missing parts?
CONTACT OUR CUSTOMER SERVICE
DEPARTMENT BEFORE RETURNING PRODUCT
TO THE RETAILER.

2
Limited 1 year Warranty
DHP warrants this product to be free from defects in material and
workmanship and agrees to remedy any such defect. This warranty covers
one year from the date of original purchase from authorized retailers. This is
solely limited to the repair or replacement of defective parts and assembly
labor is not included.
This warranty does not apply to any product which has been improperly
assembled, subjected to misuse or abuse or which has been altered or
repaired in any way.The warranty does not cover wearing, tearing, fading or
splitting of the fabric (where applicable). Liability for consequential damages
is excluded to the extent exclusion is permitted by law. This warranty gives
you specific legal rights and you may also have other rights which vary from
state to state or province to province.
To obtain warranty service, purchaser must present original bill of sale.
Components repaired or replaced are warranted through the remainder of
the original warranty period only. The defective components will be repaired
or replaced without charge, subject to the terms and conditions described
above.
The terms and conditions of the limited warranty are subject to change
without notice. For the latest warranty policy, please visit
www.dhpfurniture.com.
Contact Us!
cs@dhpfurniture.com
1-800-267-1739
DHP Consumer Services
12345 Albert Hudon, Suite 100,
Montreal, Quebec H1G 3L1
For help with assembly, identifying parts, product information or to order parts,
please contact us:
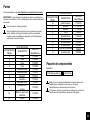
Read Before Beginning Assembly
Work in a spacious area and near where the unit will be used, preferably
on a carpet, or use a piece of the cardboard packaging to protect your floor
and product.
Make sure all parts are included. Most parts are labeled or stamped on the
raw edge.
Read each step carefully. It is very important that each step of the
instructions is performed in the correct order. If these steps are not followed in
sequence, assembly difficulties will occur.
This product may contain small components. Please ensure that they are
kept away from small children.
This product is designed for home use and is not intended for commercial
use.
www.dhpfurniture.com
Chat
with us
Chat
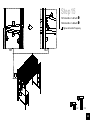
with us
This product is shipped in
1 carton
2 hours
Do NOT use
powertools
Two persons and adult assembly required

3
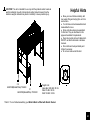
WARNING
Loft bed: Twin
STRANGULATION HAZARD - Never attach or hang items to any part of the bunk bed that are not designed for use with the bed; for example, but not
limited to, hooks, belts and jump ropes.
Follow the information on the warnings appearing on the upper bunk end structure and on the carton. Do not remove warning label from bed.
The mattress platform is designed to support a mattress without the need for a posture board or box spring.
Always use the recommended size mattresses or mattress supports, or both, to help prevent the likelihood of entrapment or falls.
Use only mattresses which are 74" - 75" long and 37" - 38" wide on upper bed. Ensure thickness of mattress does not exceed 6". Surface of mattress
must be at least 5" (127 mm) below the upper edge of guardrails. For your comfort, we suggest a minimum mattress thickness of 4".
Do not allow children under 6 years of age to use the upper bunk.
Always use guardrails on both long sides of the upper bunk. If the bunk bed will be placed next to the wall, the guardrail that runs the full length of the bed
should be placed against the wall to prevent entrapment between the bed and wall (applicable for bunk beds with full length guardrails on one side).
Periodically check and ensure that the guardrail, ladder, and other components are in their proper position, free from damage, and that all connectors are
tight.
Do not allow horseplay on or under the bed and prohibit jumping on the bed.
Do not use substitute parts. Contact the manufacturer or dealer for replacement parts.
Replacement parts, including additional guardrails, may be obtained from DHP by contacting customer service at 1-800-267-1739.
Use of a night light may provide added safety precaution for a child using the upper bunk.
The use of water or sleep flotation mattresses is prohibited.
Always use the ladder for entering and leaving the upper bunk.
Prohibit more than one person on upper bunk.
Keep these instructions for future reference.

4
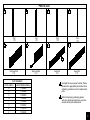
PARTS LIST
N
T
T1
A
B
C
D
Z
I1
I
K
W
F
E
J
O
M
R
K1
K2
Y
Q

5
Each part has a unique part number. Please
reference the appropriate part number when
contacting customer service for replacement
parts.
Before throwing any packaging, please
verify all contents and make sure you have
received all the parts listed above!
Leg Cap
T393370
X 4
Leg Cap
T393370
X 4
End Guard Rail
1 PC
End Guard Rail
1 PC
Post
1 PC
Post
1 PC
Post
1 PC
Guard Rail
1 PC
A B C
I I1E
PARTS LIST
PART LABELS 4663019N(Black&White)
AT1030050
BT1030060
CT1030070
D T1030080
IT1030090
I1 T1030100
ET1030110
FT1030120
PART NUMBERS
D
Post
1 PC
Guard Rail
1 PC
F

6
Each part has a unique part number. Please
reference the appropriate part number when
contacting customer service for replacement
parts.
Before throwing any packaging, please
verify all contents and make sure you have
received all the parts listed above!
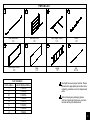
JK1
O
Z
Ladder
1 PC
PARTS LIST
N
K
Desk Side Panel
1 PC
M
K2
Lower Back Brace
1 PC
Shelf Support Frame
1 PC Brace
1 PC
Desk Support Frame
1 PC Desk
1 PC Slat
22 PCS
PART LABELS 4663019N(Black&White)
J T1030130
KT1030140
K1 T1030150
K2 T1030160
MT1030170
NT1030180
ZT1030190
OT919600
PART NUMBERS

7
Each part has a unique part number. Please
reference the appropriate part number when
contacting customer service for replacement
parts.
Before throwing any packaging, please
verify all contents and make sure you have
received all the parts listed above!
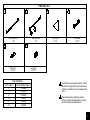
T
YW
Corner Shelf
2 PCS Slat Spacer
21 PCS
Plastic Plug
44 PCS Slat Spacer
22 PCS
PARTS LIST
Q
T1
Side Lower Rail
1 PC
R
Side Lower Rail
1 PC
PART NUMBERS
PART LABELS 4663019N(Black&White)
TT1030200
T1 T1030210
RT1030220
QT919490
YT392590
WT919480

8
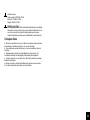
Please do not completely tighten all the hardware,
until the entire assembly is complete, unless
otherwise indicated in the step-by-step instructions.
The screw(s), bolt(s) to be used at each step are
shown in actual size in the lower right corner of the
page.
HARDWARE LIST
Hardware Pack
4663019N(Black&White) HP#: T4663019N-00
2
5/16" X 2 25/32"
4 PCS
3
4
1
4mm
1 PC
1/4" X 1 1/16
4 PCS
5
1/4" X 25/32"
12 PCS
1/4" X 7/8"
12 PCS
678
1/4" X 3/8"
2 PCS
910
1/4" X 2 3/16"
4 PCS
1/4" X 2 3/16"
6 PCS
1/4" X 1 3/8
6 PCS
1/4" X 2 25/32"
4 PCS

EF
EG
9
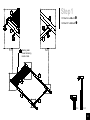
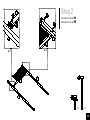
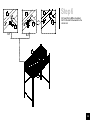
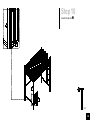
Step1
X 4
1.1 Attach I to A/B with .
1.2 Attach T to A/B with .
4
X 4
1.1 1.2
Warning label
should be facing
inside of bed.
4
4
7
7
B
B
I
A
T
T
A
I
7

EH
EJ
10
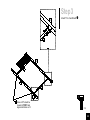
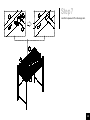
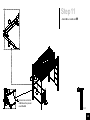
Step2
X 2
2.1 2.2
X 2
2.1 Attach I1 to D with .
2.2 Attach I1 to C with .
4
4
4
7
7
C
I1
D
I1
7
I1
D
C

EK
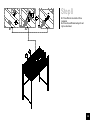
11
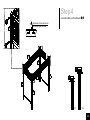
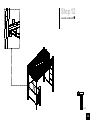
Step3
X 4
Attach T1 to C and D with .
Holes on T1 should be
closest to POST D and
aligned with holes on I1.
C
D
T1
T1
7
I1
C

EL
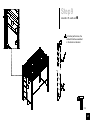
12
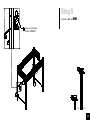
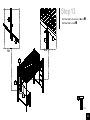
Step4
X 4
Attach E to B/C and F to A/D with ,.
The hole is in
this position
The hole is in
this position
X 4
3
3
1
E
E
C
D
A
B
F
B
Wide side of the slot should
be facing up and inside!
1

EM
13
Step5
X 2 X 2
Attach J to B/C with ,.
Holes on J should be
closest to POST B.
7
2
J
J
B
B
C
7
2

14
Step6
EE
6.1 6.2
O
6.1 Insert O into E/F as illustrated.
6.2 Put the slat O downwards to the
shorter slot.
O
E
O
O
E
F

15
Step7
EE
O
Lock O into place with Y on the longer slot.
Y
O
E
Y
F

16
Step8
WQ
O
W
8.1 Press W onto the middle of O as
illustrated.
8.2 Press Q onto W alternating left and
right as illustrated.
8.1 8.2
O
W
Q

EN
17
Step9
X 4
Attach Z to T1 and I1 with .
8
I1
Z
I1
Z
T1
8
For better performance, the
ladder Z shall be assembled
in the direction indicated.

EP
18
Step10
X 2
Attach K to A with .
A
K
A
K
5

ET
FE
19
Step11
X 4
2
Attach M to J and K with .
J
M
J
M
K
5
Screw hole on bottom
of M should be placed
near Post B.
M
B
B

EU
20
Step12
Attach N onto M with .
X 4
M
N
N
6
La page charge ...
La page charge ...
La page charge ...
La page charge ...
La page charge ...
La page charge ...
La page charge ...
La page charge ...
La page charge ...
La page charge ...
La page charge ...
La page charge ...
La page charge ...
La page charge ...
-
 1
1
-
 2
2
-
 3
3
-
 4
4
-
 5
5
-
 6
6
-
 7
7
-
 8
8
-
 9
9
-
 10
10
-
 11
11
-
 12
12
-
 13
13
-
 14
14
-
 15
15
-
 16
16
-
 17
17
-
 18
18
-
 19
19
-
 20
20
-
 21
21
-
 22
22
-
 23
23
-
 24
24
-
 25
25
-
 26
26
-
 27
27
-
 28
28
-
 29
29
-
 30
30
-
 31
31
-
 32
32
-
 33
33
-
 34
34


Dorel Home 4663019N Assembly Manual
- Catégorie
- Meubles de bébé
- Taper
- Assembly Manual
dans d''autres langues
- English: Dorel Home 4663019N
- español: Dorel Home 4663019N
Documents connexes
-
 Dorel Home 4706019 Assembly Manual
-
 Dorel Home 4643049MK Assembly Manual
-
 Dorel Home 4706029 Assembly Manual
-
 Dorel Home 4643139MK Assembly Manual
-
 Dorel Home 4106019 Le manuel du propriétaire
-
 Dorel Home 3266198 Guide d'installation
-
 Dorel Home 4704339WE Assembly Manual
-
 Dorel Home 4176749N Assembly Manual
-
 Dorel Home 4718349 Assembly Manual
-
 Dorel Home 2553359 Assembly Manual