
INSTALLATION INSTRUCTIONS
GUIDE D’INSTALLATION
GUÍA DE INSTALACIÓN
FOR RIGHT AND LEFT SIDE DOOR INSTALLATION
POUR INSTALLATION DE PORTE CÔTÉ DROIT ET GAUCHE
PARA LA INSTALACIÓN DE LA PUERTA DEL LADO DERECHO E IZQUIERDO
SAVE THIS GUIDE FOR FUTURE REFERENCE.
CONSERVER CE GUIDE POUR UN USAGE ULTÉRIEUR.
CONSERVE ESTE MANUAL COMO REFERENCIA.
Read all instructions carefully before proceeding.
Lire attentivement toutes les instructions avant de commencer l’installation.
Leer detenidamente todas las instrucciones antes de comenzar la instalación.
Serial number • Numéro de série • Número de Serie
IMPORTANT • Record the serial number
IMPORTANT • Noter le numéro de série
IMPORTANTE • Registre el número de serie
MODEL • MODÈLE • MODELO
Pivot shower door
Porte pivot de douche
Puerta pivote de ducha
135325 • 135326
Maintenance guide p.22
Guide d'entretien p.22
Guía de mantenimiento p.22

2
PARTS
AND COMPONENTS
PIÈCES
ET COMPOSANTES
PIEZAS
Y COMPONENTES
ST4X30
4mm
2.5mm
x
1
1
x
9 10
1
x
11
2
x
12
1
x
13
1
x
14
2
x
15
x
1
16
8
x
1
8
x
2
1
x
3
1
x
4
1
x
5
1
x
6
1
x
7
x
1
8
1
x
24
x
1
23
x
2
2221
x
1
20
x
1
19
x
1
1817
1
x
8
x
2
x
25
ST4X40
short
long
2
5
12
4
9
7
14
24
3
15
11
1
20
22
8
6
10
13
18
17
16
19
21
23

3
PARTS
AND COMPONENTS
PIÈCES
ET COMPOSANTES
PIEZAS
Y COMPONENTES
3
5
2
4
1
7
8
12
13 14
15
16
21
19
page 3
Page 14
Page 18
5 7 mm
p aral el l
-
20
24
25
2.5mm
4mm
10 11
Short
Court
Corta
17
18
Long
Larga
23
22

4
PARTS
AND COMPONENTS
PIÈCES
ET COMPOSANTES
PIEZAS
Y COMPONENTES
XXX 084=Chrome, Cromo
305=Brushed nickel, Nickel brossé, Níquel cepillado
173=Dark bronze, Bronze foncé, Bronce oscuro
340=Matte black, Noir mat, Negro mate
# Part Nom de la pièce Pieza
Qt
Cant.
Code
Código
1 Wall anchor Ancrage mural Anclaje mural 8 10039898-000-600
2 Wall jamb screw Vis pour montant mural Tornillo para montante mural 8 10039898-000-600
3 Wall jamb (xed panel) Montant mural (panneau xe) Montante mural (panel jo) 1 10039885-XXX-002
4 U-shape gasket Joint d'étanchéité en U Junta de estanqueidad en U 1 10039889-XXX-002
5 Wedge seal Joint de coin Junta de cuña 1 10039890-XXX-002
6 Fixed glass panel Panneau xe en verre Panel jo de vidrio 1
10044968-901 (48" door)
10044977-901 (60" door)
7 Fixed panel gasket
Joint d'étanchéité du
panneau xe
Junta de estanqueidad
del panel jo
1 10039893-XXX-002
8 Top pivot Pivot supérieur Pivote superior 1 10039896-XXX-600
9 Door glass panel Panneau de porte en verre Panel de puerta en vidrio 1 10044969-901
10 Bottom pivot Pivot inférieur Pivote inferior 1 10039896-XXX-600
11 Gasket Joint Junta 2
10039894-XXX-001 (48" door)
10039894-XXX-002 (60" door)
12 Bottom track Rail inférieur Riel inferior 1
10039887-XXX-602 (48" door)
10039887-XXX-604 (60" door)
13 Bottom gasket Joint inférieur Junta inferior 1 10039892-XXX-600
14 Header cover Capuchon du rail Cubierta del riel 1 10039888-XXX-001
15 Drip shield
Joint d'etanchéité
inférieure de porte
Protector de goteo 1 10039892-XXX-600
16 Wall jamb (door panel)
Montant mural
(panneau de porte)
Montante mural
(panel de puerta)
1 10039886-XXX-002
17 Magnetic jamb (long) Montant magnétique (long) Junta magnética (larga) 1 10039891-XXX-601
18 Magnetic jamb (short) Montant magnétique (court) Junta magnética (corta) 1 10039891-XXX-601
19 Handle Poignée Manija 1 10039895-XXX-600
20 Header screws Vis pour rail Tornillos para riel 2 10039898-000-600
21 Door jamb cap
Capuchon pour
montant de porte
Tapa de la jamba de la puerta 1 10039897-XXX-600
22 Header Rail Riel 1
10039887-XXX-601 (48" door)
10039887-XXX-603 (60" door)
23 Screw cover cap Cache vis Cubretornillo 8 10039897-XXX-600
24 Fixed panel jamb cap
Capuchon pour montant
de panneau xe
Tapa de la jamba
del panel jo
1 10039897-XXX-600
25 2.5mm / 4mm allen keys Clés allen 2.5mm / 4mm Llaves allen 2.5mm / 4mm 2 10039898-XXX-600
DOOR | PORTE | PUERTA

55
TOOLS
REQUIRED
OUTILS
REQUIS
HERRAMIENTAS
NECESARIAS
Electric drill
Perceuse électrique
Taladro eléctrico
Level
Niveau
Nivel
Pencil
Crayon
Lápiz
Clear silicone sealant
Silicone claire
Sellador de silicona
transparente
Measuring tape
Ruban à mesurer
Cinta métrica
Hand-file
Lime
Lima
Cutting pliers
Pince coupante
Alicate de
corte
Hacksaw
Scie à métaux
Sierra para
metal
Square
Équerre
Escuadra
Utility knife
Couteau à lame
rétractable
Cuchillo multiuso
Security equipment
Équipement de sécurité
Equipamiento
de seguridad
¼''ceramic drill bit
Mèche à céramique
de ¼ po.
Broca para
ceramica
⅛" drill bit
Mèche de ⅛ po.
Broca de ⅛"

6
BEFORE
YOU BEGIN
AVANT
DE COMMENCER
ANTES
DE COMENZAR
Alcove/Nicho
Min. Max.
48"
45"
(1143mm)
47"
(1194mm)
60"
57"
(1448mm)
59"
(1499mm)
A
Make sure that the door and panel t within the shower enclosure. To do so, measure the height and width of the shower threshold, and
compare these measures to those of the door.
S’assurer que la porte s’ajuste bien par rapport à l’ouverture prévue pour la douche. Pour ce faire, il faut mesurer la hauteur
et la largeur du seuil et comparer les mesures prises à celles dans l'encadré ci-dessous.
Asegúrese de que la puerta se ajuste a la cabina de ducha. Mida la altura y el ancho del umbral de ducha y compare esas medidas con
las de la puerta.
B
Compare the X measurement to the chart below. If X is MORE than the maximal measurement below you won't be able to
install this door in your shower alcove.
Comparer la mesure X prise précédement avec les valeurs du tableau ci-dessous. Si X est PLUS élevé que la mesure
maximale ci-dessous, vous ne pourrez pas installer cette porte dans votre cabine de douche.
Comparar la medida X con las de la tabla abajo. Si X es MÁS que la medida máxima mostrada abajo, no podrá instalar esta
puerta en su cabina de ducha.
C
Horizontal and vertical studs are needed in order to install the water fixtures. See appropriate installation guides.
Des 2' x 4' horizontaux et verticaux sont necessaires pour l’installation des composantes de robinetterie. Voir les guides
d’installation correspondants.
Se necesitan montantes horizontales y verticales para poder instalar los accesorios de plomería. Ver las guías de instalación
apropiadas.
D
A two person installation is recommended.
Une installation par deux personnes est recommandée.
Se recomienda realizar la instalación entre dos personas.
STANDARD
L
Door
opening
H
Walk thru
L
Scale 1:32
All dimensions are approximate. Structure measurements
must be verified against the unit to ensure proper fit.
Code
Description
H
L
Adjustable
Door
Opening
Wall
Adjustment
Walk thru
135325
Uptown Pivot 76" x 45" - 47"
76"
45" - 47"
22 3/4"
1/2"
73 7/8"
135326
Uptown Pivot 76" x 57" - 59"
76"
57" - 59"
22 3/4"
1/2"
73 7/8"
X

7
BEFORE
YOU BEGIN
AVANT
DE COMMENCER
ANTES
DE COMENZAR
Doubled stud
Montant double
Montante doble
E
Double the studs (2x4) where the wall jambs will be installed.
Doubler les montants de bois (2x4) là où les montants muraux seront installés.
Duplique los montantes (2x4) en los lugares en los que se instalarán las jambas murales.
E
F
Verify that the shower base is perfectly leveled.
Vérifier que la base est parfaitement de niveau.
Verificar que la base de lucha esta complemente nivelada.
F
TOP VIEW
VUE DE DESSUS
VISTA SUPERIOR
E
G
Place cardboard at the bottom of base to protect nish.
Placer le carton à l'intérieur de la base pour protéger la
finition.
Coloque el cartón en la parte inferior de la base para
proteger el acabado.
G

8
BOTTOM TRACK INSTALLATION
INSTALLATION DU RAIL INFÉRIEUR
INSTALACIÓN DEL RIEL INFERIOR
Parts required:
Pieces requises:
Partes requeridas:
1
3
x 1
B. Cut the track to the recently taken measurement on the
same edge of the big slot.
B. Couper le rail selon la mesure calculée précédement
sur le même bord de la grande fente.
B. Cortar el riel según la medida tomada recientemente en el
mismo borde de la gran ranura.
X-3/16''
X-5mm
A
A. Measure the distance wall to wall at the top and substract 3/16".
A. Prendre la mesure du mur au mur en haut et soustraire 3/16 po.
A. Medir la distancia de pared a pared en la parte superior y restar 3/16".
X
-
5
mm
X - 3/16”
B
C. Place the wall jamb over the track and against the wall.
C. Placer le montant mural sur le rail et contre le mur.
C. Colocar el montante mural sobre el riel y contra el muro.
X
-
5
mm
X - 3/16”
X
-
5
mm
X - 3/16”
12
x 1
Cut on the side of the big slot
ONLY.
Couper sur le côté de la grande
fente SEULEMENT.
Corte en el costado de la ranura
grande SOLAMENTE.
Teeth on the inside.
Dents à l'intérieur.
Dientes hacia el interior.
INSIDE
INTÉRIEUR
INTERIOR

9
B2
*B3
Parts required:
Pieces requises:
Partes requeridas:
2
B1
B. Drill the holes. Apply silicone inside the holes.
*Insert the wall anchors if there is no stud behind the wall jamb.
B. Percer les trous. Appliquer du silicone dans les trous.
*Insérer des ancrages muraux s'il n'y a pas de montants en bois à
l'arrière des montants muraux.
B. Taladrar los agujeros. Aplique silicona dentro de los agujeros.
*Inserte los anclajes de pared, si no hay montantes detras de los
montantes murales.
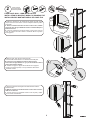
FIXED PANEL WALL JAMB INSTALLATION
INSTALLATION DU MONTANT MURAL DU PANNEAU FIXE
INSTALACIÓN DEL MONTANTE MURAL DEL PANEL FIJO
A. Place the wall jamb on the threshold and against the wall, 20mm
(3/4") from the end of the radius. Level the wall jamb. Mark the position
of the holes.
A. Placer le montant mural dans le seuil et contre le mur, à 20mm
(3/4 po) de la n du rayon. Mettre de niveau le montant. Marquer la
position des trous.
A. Colocar el montante mural sobre el umbral y contra el muro a 20 mm
(3/4") del comienzo del radio. Nivelar el montante. Marcar la posición
de los agujeros.
A1
A2
C. Place the wall jambs back against the wall and fasten with the
provided screws.
C. Mettre à nouveau les montants muraux contre le mur et visser à
l'aide des vis fournies.
C. Colocar de nuevo los montantes murales contra la pared y sujetar
con los tornillos suministrados.
20mm
A3
x 4
2 1
x 4
C
3
x 1

10
DOOR WALL JAMB INSTALLATION
INSTALLATION DU MONTANT MURAL DE LA PORTE
INSTALACIÓN DEL MONTANTE MURAL DE LA PUERTA
Parts required:
Pieces requises:
Partes requeridas:
3
x 4
A4
B2
*B3
B1
A3
20mm
x 1
B. Drill the holes. Apply silicone inside the holes.
*Insert the wall anchors if there is no stud behind the wall jamb.
B. Percer les trous. Appliquer du silicone dans les trous.
*Insérer des ancrages muraux s'il n'y a pas de montants en bois à
l'arrière des montants muraux.
B. Taladrar los agujeros. Aplique silicona dentro de los agujeros.
*Inserte los anclajes de pared, si no hay montantes detras de los
montantes murales.
C. Place the wall jamb back over the rail and against the wall and
fasten with the provided screws.
C. Mettre à nouveau le montant mural sur le rail et contre le mur et
visser à l'aide des vis fournies.
C. Colocar de nuevo el montante mural sobre el riel contra la pared y
sujetar con los tornillos suministrados.
2
1
16
A1
A2
C
A. Place the wall jamb on the threshold and against the wall, 20mm
(3/4") from the end of the radius. Level the wall jamb. Mark the position
of the holes.
A. Placer le montant mural dans le seuil et contre le mur, à 20mm
(3/4 po) de la n du rayon. Mettre de niveau le montant. Marquer la
position des trous.
A. Colocar el montante mural sobre el umbral y contra el muro a 20 mm
(3/4") del comienzo del radio. Nivelar el montante. Marcar la posición
de los agujeros.
x 4

11
FIXED PANEL INSTALLATION
INSTALLATION DU PANNEAU FIXE
INSTALACIÓN DEL PANEL FIJO
Parts required:
Pieces requises:
Partes requeridas:
4
x 1
B. Fully insert the xed glass panel in the wall jamb and on
the bottom track.
B. Insérer complètement le panneau de verre dans le
montant mural et dans le rail inférieur.
B. Insertar completamente el panel de vidrio jo en el
montante mural y en el riel inferior.
4
A
A. Fully insert the U-shape gasket in the wall jamb.
A. Insérer complètement le joint d'étanchéité en U dans le
montant mural.
A. Insertar completamente la junta de estanqueidad en U en
el montante mural.
B
C. Fully insert the gasket in the xed glass panel and the long
magnetic jamb in the wall jamb.
C. Insérer complètement le joint d'étanchéité sur le bord
du panneau de verre xe et le montant magnétique long
dans le montant mural.
C. Insertar completamente la junta de estanqueidad en el
panel de vidrio jo y la junta magnética larga en el montante
mural.
X
-
5
m
m
6
X - 3/16”
X
-
5
m
m
6
X - 3/16”
X
-
5
m
m
6
X - 3/16”
C1
C2
C1
X
-
5
m
m
6
X - 3/16”
C2
x 1
7
17
x 1

12
HEADER CUT INSTALLATION
INSTALLATION DU RAIL SUPÉRIEUR
INSTALACIÓN DEL RIEL INFERIOR
Parts required:
Pieces requises:
Partes requeridas:
5
B. Cut the track to the recently taken measurement on the
same edge of the big slot.
B. Couper le rail selon la mesure calculée précédement
sur le même bord de la grande fente.
B. Cortar el riel según la medida tomada recientemente en el
mismo borde de la gran ranura.
X-3/16''
X-5mm
A
A. Measure the distance wall to wall at the top and substract 3/16".
A. Prendre la mesure du mur au mur en haut et soustraire 3/16 po.
A. Medir la distancia de pared a pared en la parte superior y restar 3/16".
X
-
5
m
m
6
X - 3/16”
B
X
-
5
mm
X - 3/16”
X
-
5
mm
X - 3/16”
22
x 1
Cut on the side of the big slot
ONLY.
Couper sur le côté de la grande
fente SEULEMENT.
Corte en el costado de la ranura
grande SOLAMENTE.
Teeth on the inside.
Dents à l'intérieur.
Dientes hacia el interior.
INSIDE
INTÉRIEUR
INTERIOR

13
Parts required:
Pieces requises:
Partes requeridas:
6
B. Assemble top pivot and bottom pivot on the
door panel. Use the 4mm allen key.
B. Assembler le pivot supérieur et le pivot
inférieur sur le panneau de porte. Utiliser la
clé allen de 4mm.
B. Ensamblar el pivote superior y el pivote
inferior en el panel de la puerta. Use la llave
allen 4mm
DOORS PREPARATION
PREPARATION DE PORTES
PREPARACION DE PUERTAS
C. Install the handle on the door. Use the 2.5mm allen key.
C. Installer la poignée sur la porte. Utiliser la clé allen de 2.5mm.
C. Instalar la manija en la puerta. Use la llave allen 2.5mm.
A. Insert the short magnetic gasket in the
door panel.
A. Insérer le montant magnétique court
sur le bord du panneau de porte.
A. Insertar la junta magnética corta en el
panel de la puerta.
2.5mm
19
x 1
25
x 1
8
x 1
4mm
10
B1
B2
A1
A2
B1
B2
C
18
x 1
4mm
4mm
2.5mm
Pivot with clearance always on the
bottom.
Pivot avec dégagement toujours
en bas.
Pivote con espacio siempre abajo.

14
Parts required:
Pieces requises:
Partes requeridas:
7
DOOR FRAME ASSEMBLY
ASSEMBLAGE DU CADRE DE LA PORTE
ENSAMBLE DEL MARCO DE LA PUERTA
B. Lower the door pivot on the bottom track hole. Lower
the header on the wall jambs and on the door upper
pivot. Secure with the provided screws.
B. Abaisser le pivot de la porte sur le trou de rail
inférieur. Abaisser le rail sur les montants muraux
et sur le pivot supérieur de la porte. Fixer avec les
vis fournies.
B. Baje el pivote de la puerta en el oricio del riel infe-
rior. Baje el riel en los montantes murales y en el pivote
superior de la puerta. Asegure con los tornillos provistos.
A. Loose the set screw on the header and on the bottom
track.
A. Dévisser la vis de serrage dans le rail supérieur et
dans le rail inférieur.
A. Desatornillar el tornillo de ajuste en el riel superior y
en el riel inferior.
A2
A1
B3
B1
B2
B4
B4
B3
C2
C1
C. fasten the set screw on the header and
on the bottom track.
C. Visser la vis de serrage dans le rail
supérieur et dans le rail inférieur.
C. Atornillar el tornillo de ajuste en el riel
superior y en el riel inferior.
x 2
20
8
x 1
10
2.5mm
page 3
Page 14
Page 18
5 7 mm
paral el l
-
CUT VIEW
VUE DE COUPE
VISTA DE CORTE
Parallel
Parallèle
Paralelo

15
Parts required:
Pieces requises:
Partes requeridas:
8
A. Open the door and verify it closes seamlessly. Also
verify that the gap when opened on bottom and top is
equal. IF NOT, PROCEED WITH STEPS 8B-8C-8D.
A. Ouvrir la porte et vérifier qu'elle se ferme parfai-
tement. Vérifier également que l’écart lorsqu’il est
ouvert en bas et en haut est égal. SINON, PASSER
AUX ÉTAPES 8B-8C-8D.
A. Abrir la puerta y verificar que cierre a la perfección.
También verifique que la separación cuando se abre
sea igual en la parte inferior y superior. SI NO, PRO-
CEDA CON LOS PASOS 8B-8C-8D.
=
=
A
C. Adjust the pivot until door closes seamlessly and the
gap on top and bottom is equal.
C. Ajuster le pivot jusqu'à ce que la porte se ferme par-
faitement et que l'espace entre le haut et le bas soit égal.
C. Ajuste el pivote hasta que la puerta se cierre a la perfección
y la brecha en la parte superior e inferior sea igual.
B. Loose the lower or upper pivot support.
B. Desserrer le support de pivot inférieur ou supérieur.
B. Afloje el soporte del pivote inferior o superior.
DOOR PANEL ADJUSTMENT
AJUSTEMENT DU PANNEAU DE PORTE
AJUSTE DEL PANEL DE LA PUERTA
=
OK!
=
A<B
A
B
NO!
A>B
A
B
NO!
A1
=
OK!
=
A<B
A
B
NO!
A>B
A
B
NO!
=
OK!
=
A<B
A
B
NO!
A>B
A
B
NO!
A2
A3
=
=
=
OK!
=
A<B
A
B
NO!
A>B
A
B
NO!
A
=
OK!
=
A<B
A
B
NO!
A>B
A
B
NO!
B
C
=
OK!
=
A<B
A
B
NO!
A>B
A
B
NO!
D
4mm
D. Fasten the pivot support.
D. Serrer le support de pivot.
D. Apretar el soporte del pivote.
=
OK!
=
A<B
A
B
NO!
A>B
A
B
NO!
=
OK!
=
A<B
A
B
NO!
A>B
A
B
NO!
=
OK!
=
A<B
A
B
NO!
A>B
A
B
NO!

16
Parts required:
Pieces requises:
Partes requeridas:
9
5
x 1
GASKETS INSTALLATION
INSTALLATION DES JOINTS D'ÉTANCHÉITÉ
INSTALACIÓN DE JUNTAS DE ESTANQUEIDAD
A. From inside the shower, insert the wedge seal in the wall jamb
of the fixed panel.
A. De l'intérieur de la douche, insérer le joint de coin sur le
montant mural du panneau fixe.
A. Del interior de la ducha, insertar la junta de cuña en el montante
mural del panel jo.
=
OK!
=
A<B
A
B
NO!
A>B
A
B
NO!
B1
B2
B3
A1
A2
B. From inside the shower, insert the gasket between the glass
panel and the header, and between the glass and the bottom track.
Cut the excess.
B. De l'intérieur de la douche, insérer le joint entre le panneau
en verre et le rail supérieur, et entre le panneau en verre et le rail
inférieur. Couper l'excédent.
B. Desde el interior de la ducha, insertar la junta entre el panel de
vidrio y el riel superior, y entre el panel de vidrio y el riel inferior. Cortar
el exceso.
11
x 2
B4

13
1
x
17
Parts required:
Pieces requises:
Partes requeridas:
10
GASKETS INSTALLATION
INSTALLATION DES JOINTS D'ÉTANCHÉITÉ
INSTALACIÓN DE JUNTAS DE ESTANQUEIDAD
A1
A2
B1
B2
A. According to the door opening cut the notch as shown.
A. Selon l'ouverture de la porte, coupez l'encoche comme
indiqué.
A. De acuerdo con la apertura de la puerta, corte la muesca
como se muestra.
B. Apply silicone on the notch. Insert the drip shield on the lower
edge of the door.
B. Appliquer du silicone sur l'encoche. Insérer le joint d'étan-
chéité sur le bord inférieur de la porte.
B. Aplicar silicona en la muesca. Insertar el protector de goteo en el
borde inferior de la puerta.
15
x 1

18
13
1
x
Parts required:
Pieces requises:
Partes requeridas:
11
GASKETS INSTALLATION
INSTALLATION DES JOINTS D'ÉTANCHÉITÉ
INSTALACIÓN DE JUNTAS DE ESTANQUEIDAD
A1
A2
B1
B2
A. Cut the notch and cut the excess if needed.
A. Couper l'encoche et couper l'excédent au besoin.
A. Cortar la muesca y cortar el excedente en caso de necesidad.
B. Insert the bottom gasket on the lower edge of the door.
B. Insérer le joint inférieur sur le bord inférieur de la porte.
B. Insertar la junta inferior en el borde inferior de la puerta.
13
x 1
page 3
Page 14
Page 18
5 7 mm
paral el l
-
1/4"
6mm

19
Parts required:
Pieces requises:
Partes requeridas:
12
HEADER COVERS INSTALLATION
INSTALLATION DES CAPUCHONS DU RAIL
INSTALACIÓN DE LAS CUBIERTAS DE RIEL
A. Measure the distance between the gasket and the wall jamb. Cut
both header covers to this measurement.
A. Mesurer la distance entre le joint et le montant mural. Couper
le capuchon du rail à cette mesure.
A. Medir la distancia entre la junta y el montante mural. Corta la cubierta
de riel a esa medida.
14
x 2
=
X
X
cut
couper
cortar
A1
B. Insert the covers in the header and on the bottom track.
B. Insérer les capuchons dans le rail supérieur et inférieur.
B. Insertar las cubiertas en el riel superior e inferior.
A2
=
X
X
cut
couper
cortar
=
X
X
cut
couper
cortar
B1
B2

20
=
X
X
cut
couper
cortar
FINISHING DETAILS
DÉTAILS DE FINITION
DETALLES DE ACABADO
Parts required:
Pieces requises:
Partes requeridas:
A. Install the screw covers.
A. Installer les cache-vis.
A. Instalar los cubretornillos.
13
B. Install the wall jamb caps.
B. Installer les capuchons des montants muraux.
B. Instalar las tapas de los montantes murales.
21
x 1
L R
23
x 8
=
X
X
cut
couper
cortar
=
X
X
cut
couper
cortar
INSIDE VIEW
VUE INTÉRIEURE
VISTA INTERIOR
INSIDE VIEW
VUE INTÉRIEURE
VISTA INTERIOR
A1
A2
=
X
X
cut
couper
cortar
=
X
X
cut
couper
cortar
B1
B2
=
X
X
cut
couper
cortar
24
x 1
La page est en cours de chargement...
La page est en cours de chargement...
La page est en cours de chargement...
La page est en cours de chargement...
-
 1
1
-
 2
2
-
 3
3
-
 4
4
-
 5
5
-
 6
6
-
 7
7
-
 8
8
-
 9
9
-
 10
10
-
 11
11
-
 12
12
-
 13
13
-
 14
14
-
 15
15
-
 16
16
-
 17
17
-
 18
18
-
 19
19
-
 20
20
-
 21
21
-
 22
22
-
 23
23
-
 24
24


MAAX 135325-900-084-000 Uptown Pivot Shower Door 45-47 x 76 in. 8 mm Guide d'installation
- Taper
- Guide d'installation
- Ce manuel convient également à
dans d''autres langues
Documents connexes
-
MAAX 135324-900-084-000 Uptown Slider Shower Door 56-59 x 76 in. 8 mm Guide d'installation
-
-
-
-
-
-
-
-
-
