
La page est en cours de chargement...

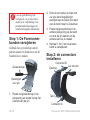
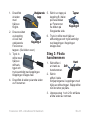
EN-2 Forerunner 405 Wrist Strap Instructions
See the Important Safety and
Product Information guide in
the product box for product
warnings and other important
information.
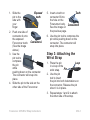
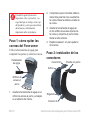
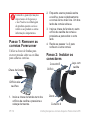
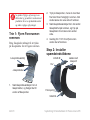
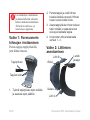
Step 1: Removing the
Forerunner Bands
Use the pin tool to compress the pins
in order to release the bands.
Pin tool
Pin-access
holes
1. Insert the pin tool into a pin-
access hole, and t it onto the end
of the pin.
2. Compress the pin while using
your free hand to gently pull the
band. One side of the band should
release.
3. Insert the pin tool into the other
pin-access hole on the band and
compress the pin to release the
other side.
4. Repeat steps 1 through 3 to
remove the other band.
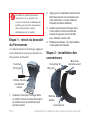
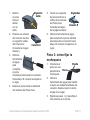
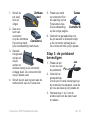
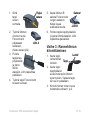
Step 2: Installing the
Connectors
Loop with
pin
Connector B
Connector A
Tooth
Hole
Exposed
tooth
Exposed
tooth

Forerunner 405 Wrist Strap Instructions EN-3
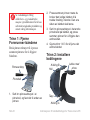
1. Slide the
pin to the
side with
your
nger.
2. Push one side of
connector A onto
the exposed
Forerunner tooth.
(See the image
above.)
3. Use the
pin tool to
compress
the pin
while
pushing down on the connector.
The connector will snap into
place.
4. Slide the pin to the side on the
other side of the Forerunner.
5. Insert a tooth on
connector B into
the hole on the
Forerunner body.
See the image on
the previous page.
6. Use the pin tool to compress the
pin while pushing down on the
connector. The connector will
snap into place.
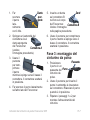
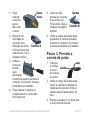
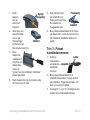
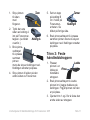
Step 3: Attaching the
Wrist Strap
1. Place the pin
in a loop of the
wrist strap.
2. Use the pin
tool to insert
the pin into both indentations on
the connector. Release the pin
when it is in place.
3. Repeat steps 1 and 2 to attach
the other side of the strap.
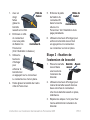
Connector AConnector A
Connector B
Teeth
Connector B
Teeth
Pin
Loop
Pin
Loop
See the Important Safety and
Product Information guide in
the product box for product
warnings and other important
information.
Step 1: Removing the
Forerunner Bands
Use the pin tool to compress the pins
in order to release the bands.
Pin tool
Pin-access
holes
1. Insert the pin tool into a pin-
access hole, and t it onto the end
of the pin.
2. Compress the pin while using
your free hand to gently pull the
band. One side of the band should
release.
3. Insert the pin tool into the other
pin-access hole on the band and
compress the pin to release the
other side.
4. Repeat steps 1 through 3 to
remove the other band.
Step 2: Installing the
Connectors
Loop with
pin
Connector B
Connector A
Tooth
Hole
Exposed
tooth
Exposed
tooth
La page est en cours de chargement...

Instructions sur l’extension de bracelet du Forerunner 405 FR-5
Consultez le guide Informations
importantes sur le produit et la
sécurité inclus dans l’emballage du
produit, pour prendre connaissance
des avertissements et autres
informations sur le produit.
Etape 1 : retrait du bracelet
du Forerunner
A l’aide du tournevis d’horloger, appuyez
sur les barrettes ressort pour détacher les
deux parties du bracelet.
Tournevis
d’horloger
Orices d’accès
à la barrette
ressort
1. Insérez le tournevis d’horloger dans
un orice d’accès à la barrette ressort
et positionnez-le à l’extrémité de la
barrette ressort.
2. Appuyez sur la barrette ressort tout en
tirant doucement sur le bracelet avec
votre main libre. L’un des côtés du
bracelet devrait se détacher.
3. Insérer le tournevis d’horloger dans
l’autre orice d’accès à la barrette
ressort et appuyez sur la barrette
pour détacher l’autre côté.
4. Répétez les étapes 1 à 3 pour défaire
l’autre partie du bracelet.
Etape 2 : installation des
connecteurs
Boucle de
barrette ressort
Connecteur B
Connecteur A
Patte de
xation
Encoche
Patte de
xation
Patte de
xation
1. Avec un
doigt,
faites
glisser la
barrette
ressort sur le côté.
2. Enfoncez un côté
du connecteur
A sur une patte
de xation du
Forerunner.
(Voir l’illustration ci-dessus.)
3. Utilisez le
tournevis
d’horloger
pour
enfoncer la
barrette tout
en appuyant sur le connecteur.
Le connecteur se met en place.
4. Faites glisser la barrette de l’autre
côté du Forerunner.
5. Enfoncez la patte
de xation du
connecteur B
dans l’encoche
situé sur le
Forerunner. Voir l’illustration de la
page précédente.
6. Utilisez le tournevis d’horloger pour
enfoncer la barrette ressort tout
en appuyant sur le connecteur.
Le connecteur se met en place.
Etape3:xationde
l’extensiondebracelet
1. Placez la barrette
ressort dans
une boucle de
l’extension de
bracelet.
2. Utilisez le tournevis d’horloger pour
insérer la barrette ressort dans les
deux encoches du connecteur.
Une fois la barrette ressort en place,
relâchez-la.
3. Répétez les étapes 1 et 2 pour xer
l’autre extrémité de l’extension de
bracelet.
Connecteur AConnecteur A
Connecteur B
Pattes de
xation
Connecteur B
Pattes de
xation
Barrette
ressort
Boucle
Barrette
ressort
Boucle

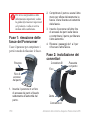
IT-6 Istruzioni del cinturino da polso Forerunner 405
Per avvisi sul prodotto e altre
informazioni importanti, vedere
la guida Informazioni importanti
sul prodotto e sulla sicurezza
inclusa nella confezione.
Fase 1: rimozione delle
fasce del Forerunner
Usare il punzone per comprimere i
perni in modo da rilasciare le fasce.
Punzone
Foro di
accesso
del perno
1. Inserire il punzone in un foro
di accesso dei perni e ssarlo
saldamente all’estremità del
perno.
2. Comprimere il perno e usare l’altra
mano per slare delicatamente la
fascia. Viene liberata un’estremità
della fascia.
3. Inserire il punzone nell’altro foro
di accesso dei perni sulla fascia
e comprimere il perno per liberare
l’altra estremità.
4. Ripetere i passaggi da 1 a 3 per
rimuovere l’altra fascia.
Fase 2: installazione dei
connettori
Passante
con perno
Connettore B
Connettore A
Dente
Foro
Dente
spor-
gente
Dente
spor-
gente
La page est en cours de chargement...
La page est en cours de chargement...
La page est en cours de chargement...
La page est en cours de chargement...
La page est en cours de chargement...
La page est en cours de chargement...
La page est en cours de chargement...
La page est en cours de chargement...
La page est en cours de chargement...
La page est en cours de chargement...
La page est en cours de chargement...
La page est en cours de chargement...
La page est en cours de chargement...

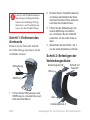
NO-20 Instruksjoner til håndleddstropp for Forerunner 405
Se veiledningen Viktig
sikkerhets- og produktinfor-
masjon i produktesken for å lese
advarsler angående produktet og
annen viktig informasjon.
Trinn1:Fjerne
Forerunner-båndene
Bruk pinneverktøyet til å presse
sammen pinnene for å frigjøre
båndene.
Pinneverktøy
Pinnehull
1. Sett inn pinneverktøyet i et
pinnehull, og fest det til enden av
pinnen.
2. Press sammen pinnen mens du
bruker den ledige hånden til å
trekke forsiktig i båndet. Den ene
siden av båndet skal løsne.
3. Sett inn pinneverktøyet i det andre
pinnehullet på båndet, og press
sammen pinnen for å frigjøre den
andre siden.
4. Gjenta trinn 1 til 3 for å fjerne det
andre båndet.
Trinn 2: Installere
koblingene
Løkke med
pinne
Kobling B
Kobling A
Tapp
Hull
TannTann
La page est en cours de chargement...
La page est en cours de chargement...

Forerunner 405 - instruktioner för handrem SV-23
I guiden Viktig säkerhets- och
produktinformation, som med-
följer i produktförpackningen,
nns det viktig information och
produktvarningar.
Steg 1: Ta bort
Forerunner-remmarna
Tryck in stiften med hjälp av
stiftverktyget så att remmarna
lossnar.
Stiftverktyg
Stifthål
1. Sätt in stiftverktyget i ett stifthål
och se till att det fäster i änden
på stiftet.
2. Tryck in stiftet medan du försiktigt
drar i remmen med den lediga
handen. Ena sidan av remmen
lösgörs.
3. Sätt in stiftverktyget i det andra
stifthålet på remmen och tryck in
stiftet så att andra sidan lossnar.
4. Upprepa steg 1 till 3 för att lösgöra
den andra remmen.
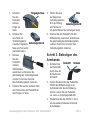
Steg 2: Montera
kopplingarna
Hank
med stift
Koppling B
Koppling A
Tapp
Hål
Utskjutande
tapp
Utskjutande
tapp
1. Dra stiftet
åt sidan
med
hjälp av
ngret.
2. Dra ena sidan
av koppling
A över den
utskjutande
Forerunner-
tappen. (Se bilden ovan.)
3. Tryck in
stiftet med
hjälp av
stiftverk-
tyget och
tryck samtidigt ned kopplingen.
Kopplingen knäpps fast.
4. Dra stiftet åt sidan på andra sidan
av Forerunner.
5. Sätt in en tapp på
koppling B i hålet
på huvuddelen
av Forerunner.
Se bilden på
föregående sida.
6. Tryck in stiftet med hjälp av
stiftverktyget och tryck samtidigt
ned kopplingen. Kopplingen
knäpps fast.
Steg 3: Fästa
handremmen
1. Sätt stiften i
en hank av
handremmen.
2. Sätt in
stiftet i båda
fördjupningarna i kopplingen med
hjälp av stiftverktyget. Släpp stiftet
när det sitter på plats.
3. Upprepa steg 1 och 2 för att fästa
andra sidan av remmen.
Koppling AKoppling A
Koppling B
Tappar
Koppling B
Tappar
Stift
Hank
Stift
Hank
-
 1
1
-
 2
2
-
 3
3
-
 4
4
-
 5
5
-
 6
6
-
 7
7
-
 8
8
-
 9
9
-
 10
10
-
 11
11
-
 12
12
-
 13
13
-
 14
14
-
 15
15
-
 16
16
-
 17
17
-
 18
18
-
 19
19
-
 20
20
-
 21
21
-
 22
22
-
 23
23
-
 24
24


Garmin Forerunner 405 Le manuel du propriétaire
- Taper
- Le manuel du propriétaire
- Ce manuel convient également à
dans d''autres langues
- italiano: Garmin Forerunner 405 Manuale del proprietario
- English: Garmin Forerunner 405 Owner's manual
- español: Garmin Forerunner 405 El manual del propietario
- Deutsch: Garmin Forerunner 405 Bedienungsanleitung
- Nederlands: Garmin Forerunner 405 de handleiding
- português: Garmin Forerunner 405 Manual do proprietário
- dansk: Garmin Forerunner 405 Brugervejledning
- svenska: Garmin Forerunner 405 Bruksanvisning
- suomi: Garmin Forerunner 405 Omistajan opas
Documents connexes
-
Garmin Forerunner® 310XT Manuel utilisateur
-
Garmin Forerunner 910XT Le manuel du propriétaire
-
Mode d'Emploi pdf Garmin 910XT Manuel utilisateur
-
Garmin Forerunner® 50 Mode d'emploi
-
Garmin 010-01058-00 Mode d'emploi
-
Garmin Forerunner® 301 Manuel utilisateur
-
Garmin Foot Pod - Small Manuel utilisateur
-