
INSTALLATION
INSTALLATIONINSTALLATION
INSTALLATION
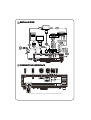
CONNECTEUR INTERFACE
CONNECTEUR INTERFACECONNECTEUR INTERFACE
CONNECTEUR INTERFACE
Remarque : l'interface connecteur est soumis aux spécifications du modèle
1
USB B
RS232
VGA OUT
S-VIDEO
AUDIO IN
AUDIO OUT
VIDEO
VGA IN 1
VGA IN 2
RS232
RBG
RBG
HDTV adapter
D-Sub
D-Sub
7
8
D-Sub
D-Sub
2
5
5
6
4
5
2
USB
USB
1
R
W
9
3
Y
Y
2
USB B
RS232
VGA OUT
S-VIDEO
AUDIO IN
AUDIO OUT
VIDEO
VGA IN 1
VGA IN 2
E62405SP
R

Quick Start
Quick StartQuick Start
Quick Start
INSTALLATION
INSTALLATIONINSTALLATION
INSTALLATION
1. Power cord
2. VGA cable
3. VGA to component video/HDTV
adapter
4. Composite video cable
5. Audio cable
6. S-Video cable
7. RS232 cable
8. USB cable
9. 3 RCA component cable
Note: Connector interface is subject to model's specifications
INTERFACE CONNECTOR
INTERFACE CONNECTORINTERFACE CONNECTOR
INTERFACE CONNECTOR
1. Ensure the projector and your
computer are turned off.
2. Connect one end of the VGA cable
to the "VGA IN" connector on the
projector; connect the other end to
the VGA connector on the computer
and tighten the screws.
3. Connect one end of the power cord
into the AC power socket on the
projector; connect the other end to
an electrical outlet.
1. Remove the lens cap.
2. Turn on the projector first and then
the computer.
3. Adjust the position, focus and
zoom.
4. Run your presentation.
1. Press the power button twice.
2. Do not remove AC power cord from
outlet until the projector fans shut
down.
Démarrage rapide
Démarrage rapideDémarrage rapide
Démarrage rapide
INSTALLATION
INSTALLATIONINSTALLATION
INSTALLATION
1. Cordon d'alimentation
2. Câble VGA
3. Adaptateur VGA vers Composant
vidéo/HDTV
4. Câble Vidéo Composite
5. Câble audio
6. Câble S-Vidéo
7. Câble RS232
8. Câble USB
9. Câble de composant 3 RCA
Remarque : l'interface connecteur est soumis aux spécifications
du modèle
CONNECTEUR INTERFACE
CONNECTEUR INTERFACECONNECTEUR INTERFACE
CONNECTEUR INTERFACE
1. Assurez-vous que le projecteur et
votre ordinateur sont hors tension.
2. Branchez l'une des extrémités du
câble VGA au connecteur "VGA IN"
du projecteur ; branchez l'autre
extrémité du connecteur VGA à
l'ordinateur puis serrez les vis.
3. Branchez l'une des extrémités du
cordon d'alimentation dans la prise
d'alimentation CA du projecteur ;
branchez l'autre extrémité dans une
prise électrique.
1. Enlevez le protège-objectif.
2. Allumez d'abord le projecteur et
ensuite l'ordinateur.
3. Ajustez la position, la mise au point
et le zoom.
4. Lancez votre présentation.
1. Appuyez deux fois sur le bouton
Marche/Arrêt.
2. Ne débranchez pas le cordon
d'alimentation CA de la prise tant
que les ventilateurs du projecteur
fonctionnent.
1
2
Connecting to a Computer
Powering On the Projector
Powering Off the Projector
1
2
Connexion à un ordinateur
Mise sous tension du projecteur
Mise hors tension du projecteur
English Français
-
 1
1
-
 2
2


Acer X1110A Guide de démarrage rapide
- Taper
- Guide de démarrage rapide
dans d''autres langues
- English: Acer X1110A Quick start guide