Boston Bravo 20 Le manuel du propriétaire
- Catégorie
- Haut-parleurs de la barre de son
- Taper
- Le manuel du propriétaire

~Boston

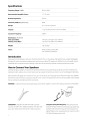
Specifications
- -
---·
----
---
·-
··
Frequency Range (±3dB):
80
Hz
to
20
kHz
Recommended
Amplifier
Power:
15-125 watts
Nominal Impedance:
8 ohms
Sensitivity
SSdB
[SPU2.8v at 1m):
89dB
Woofer:
4
V/
(
11
5mm)
copolymer
Tweeter:
Crossover Frequency
Dimensions:
(H
x W x
D)
with
corner
fillers
without
corner
fillers
Weight:
1
"(25mm)
VR®
a
lu
minum dome with
AMD
2500
Hz
1414
X
6V2X
514
"
(362
X
1
66
X
1
34
mm
)
1414
X
6\12
X
4\4"
(362
X
166
X
1 08mm)
5
l
bs
(2.25kg)
Finish:
White or
bl
ack,
textured
ABS
with matching me
ta
l gri
lle
Introduction
Th
ank
you
for choosing
Bo
sto
n
Acou
stic
s.
Th
e
Bosto
n
Bra
vo®
20
is a
multi-purpose,
high performan
ce
co
mpact
loudspeaker.
Th
e
Br
avo
20,
whi
ch
u
ses
Boston
's patented one-inch
aluminum
dome
VR"
tweeter with
AMD
and
a
4V
2·i
nch
woofer,
ca
n
be
combined with i
ts
supplied mounti
ng
bra
cke
t or
rear
stand to
be
mounted or
pl
aced
virtually
anywhere in any room.
How
to
Connect Your Speakers
Correct
ly
wiring
yo
ur
speake
rs
is
im
portant
fo
r achieving t
he
best
so
und
qua
lit
y.
Wir
in
g
sho
uld
t
ake
just a few minutes,
but
it's
important to do it
ca
re
fu
ll
y,
s
in
ce
incorrect wir
in
g
(such
as
r
eve
r
se
d connection
s)
ca
n
r
esu
lt
in
a poor
soun
dstage a
nd
poor
ba
ss
.
We
re
commend 18
-ga
uge w
ir
e or t
hi
cker for
run
s up to
15
fee
t
(4.5
m
),
and
16
-
gau
ge
wire or t
hi
cker
for
longer
run
s.
Se
pa
rate
the first few inc
he
s
of
the wire condu
ct
ors.
Str
ip
off
V2
-inch (12mm)
of
in
sulation
from the e
nd
s of
eac
h sp
eake
r wire to e
xpose
the
tw
o conductors
and
tightly twist the wire
strands.
WARNING:
To
prevent
el
ect
r
ica
l
sh
oc
k
haza
rd
,
al
ways
sw
i
tch
off
the
amp
l
ifi
er
or
rece
i
ve
r wh
en
mak
i
ng
con
ne
c
tions
to the
speake
r.
IMPORTANT:
Typ
i
ca
ll
y,
one s
id
e
of
the wire is smooth.
Connect
this s
id
e to
the-
(b
lac
k)
conn
ec
tio
n.
The other si
de
h
as
a rib or strip
e.
Co
nne
ct
this to th
e+
(red)
co
nn
ec
tion.
2
U
si
ng
the
spring
terminal
posts:
Th
e
sp
ring
terminal
posts
permit
easy
connecti
on
to banana plugs,
spade
l
ugs,
and
bare
wire.
Pus
h
the the top
of
the terminal down
by
approxima
te
ly
14
-
in
ch,
exposing t
he
h
ole.
In
se
rt
the
w
ir
e
in
the
hole
and
rel
ease
the
termi
na
l.

Connecting
the
Boston Bravo
to
Your Amplifier
or
Receiver
1.
Connect
the
speaker terminals
to
the amplifier speaker outputs.
2.
Make sure
the
speaker cable is correctly routed
throug
h
the
mounting
bracket.
(see
Mount
ing Options)
3.
When making
al
l connections,
be
sure
to
connect+
to + (red)
and-
to-
(bl
ack)
.
4.
If
using
the
Bravo
20
with
a subwoofer, set
the
receiver's
bass
management
to
SMALL
in the speaker setup menu. This w
il
l
divert very
low
frequenci
es
away from the center channel
to
th
e main speakers
and/or
subwoofer.
speaker terminal
~
+-
+-
amplifier or receiver
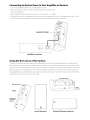
Using
the
Bravo
20
on a Flat Surface
T
he
Bravo
20
ca
n be used on a fiat surfa
ce
, such as a table,
she
lf
or the
floor
.
For
horizontal placement
that
angles
up
at 45°,
both corner fille
rs
must be u
se
d and t
he
br
ac
ket must be
re
mov
ed. For until ted horizontal placeme
nt
,
th
e r
ea
r
sta
nd must be
used w
it
h
the
mounting
br
acket attached (
see
"Mo
unt
th
e Speaker
to
the
Bra
cket" and the "
Re
ar Stand
In
stallation
In
structions"
found on page 6.
For
vertical
app
lications
mount
th
e fo
ur
supplied rubber feet
to
the
bottom
of
the
speake
r.
Attach t
wo
of
the supplied self-ad
he
sive r
ubb
er feet
so
that
its edge contacts
the
back
edg
e
of
the cabinet. Apply
two
more self-adhesive
rubber feet to the
re
c
es
s
es
at
the
fr
ont
of
the
cabinet.
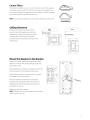
filler cap removed
~
-=:::::;;;/7'--...,_
.
Ill~§
1
~
;/1!
!d
if
! 1!!
1/.
_d_
_
__
L
~
__
. __
j(
/ /ll
I
f//
1!
------------r!'·
·:::....~
1!
I
bracket ;
!?
,.
_ . -
!¥
'\
, 1
II
removed
---11!-
;Y
I/
I
jli
If!
f~d
~
;IJ
;JI
71~
1
/
.
f/;
1/jf
1/L
I
1
1
~
!II
Jh
k I
1
f/
II/
'I f
i'l'
/;
- I /i
·
'
'
~
'
1: 1
self-adhes1ve
ii/
!r
IT
! 'I
I
ff
J"
I I I
rubber
feet
1!·
41
'--
- -
·f-r.
..
1/
tif!l
If
~'>
;jf
applied 1 i
jh-
--
----
-
-··
"].1
; i ;
1
I
·
1
!£1
l' I •
if
//
1
/L..
_ ..
~
I
If•
/
I I
/:
. / I I
I I
.
-=
~-===
=i
'-"
.
,
/ I
;I
I I
',
,~
'
Ill
~
'
"•iii
·w
.
•
corner fillers facing in
~
-if-
-
-
-+
bracket
--
-"'--
-
~
removed
~l
Vertical Placement
Horizontal Placement-Angled
Up
3

Mounting
the
Bravo
20
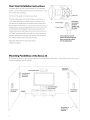
Identify
the
Bracket
In
its packing
material,
the Bravo
20's
mounting
bracket
is
fitted
into
the back
H--+
-----1ft-
angle/
corner
mounting
holes (4)
2 per side
flat mounting
holes
(4)
2
per
side
of
the speake
r.
Remove
the
tape
that
is
temporarily holding
the bracket
to
th
e
speaker, and
then
pull
the bracket away
from
the
back
of
the speake
r.
Determi
ne
how
the Bravo
20
is
to
be mounted
to
the
wall or
ceilin
g.
It
can
be mounted either
horizontally
or
verti
cally,
either on
an
open
section
of
wall,
or where
two
or three room
surfaces meet.
Refer
to
the
illustration
here to
determine what screw
holes
on
the
Bravo
20
bracket
should
be
used
for your
applicatio
n.
single
gang
-----11f----+++-+-H-
NOTE:
The large rectangular hole
in
the
middle
of
the
bracket
will
fit
a
single
gang
electrical
outlet
to route
the
speaker wire
thr
ough
a conduit.
electric
outlet
opening
Mount
the
Bracket
to
the
Wall
Deci
de
where
to
mount
bracket.
IMPORTANT: See"Ceiling Clearance"
on page
6.
Determine what
mounting
ho
l
es
in the bracket
wi
ll
be u
sed
.
Mark
the
holes
on
the
wa
ll
or
ceiling
using bracket
as
a
template.
speaker-to-bracket
mounting
holes (2)
1 per side
-t---t+----t----"-,--!11---"
single
gang
electrical
box mounting holes
speaker
cable
run
holes
(2)
on
top
and
bottom
Drill
th
e
hol
es
us
i
ng
th
e appropriate dri
ll
bit
si
ze
to
accommodate
the
mount
i
ng
hardware
that
you
pl
an
to
use
(ie,
V2
-inch
diamet
er
to
clear
th
e
toggle
bo
lt
s
for
holl
ow
surfaces
or
sma
ll
eno
ugh
to
al
low
se
lf-ta
pping
screws in a
so
lid
s
urf
ace).
Mount
the
bracket flat
or
int
o a corner
as
shown
below.
We
r
ecommend
the use
of
four fasteners
whe
rever
possible. Consult
a
knowledgeable installer
regarding the proper hardwa
re
to
use
on
your
wall.
Strip
the
speaker wires ends, and feed
the
speaker
wi
re
thr
ough
the appropriate bracket opening.
Co
nnect
the
wire
to
th
e spe
ak
er
's
term
inal
s,
taking care
to
maintain speaker
polarity.
(See
"How
to
Conn
ect
Your
Speakers"
on
page 2
).
Both
the
Bravo
20
a
nd
it
s bracket are
sy
mm
etri
ca
l, so
the
speaker can be
mount
ed
wi
th either
it
s woofer
or
tweete
r
on top. In general,
bass
performance
will
be enhanced wi
th
the
woofer as
close to
as
many
ro
om
su
rfaces
as
possible.
Flat
Mount
Example
Corner
Mount
Example
4

Corner Fillers
If
the
Bravo 20
is
being
mounted
in a corne
r,
then one or
both
of
the
supplied
corner fillers may be inserted
int
o the slots on the back of the speaker. Th
ese
accessories
wi
ll
enhance
the
ap
pearance
of
the
installation by making it appear
that
the back
of
Bravo
20 extends
into
the corner.
NOTE:
Up
to
16-gauge sp
ea
ker wire will fit be
tw
een the fille
rs
and
th
e corner.
Ceiling Clearance
If
th
e
Br
avo 20
is
to
be mo
unt
ed so
th
at
th
e
~~
r /
///
ceiling /
///
\
\ /
,/
/ or wall / / / i
top
or
the
side
of
the speaker will meet a flush
surface, either a wall (horizontall
y)
or
the ceiling
(v
ertically),
then
measure
th
e exact
di
stance
as
sh
o
wn
here fr
om
th
at
su
rface to the top or
sid
e
of
th
e br
ac
ket.
t
5
/sinches (16mml
_L
___
_
Mount
the
Speaker
to
the
Bracket
Re
move the speaker's grille by gra
sp
ing
the
ba
ck of the
cabinet in one han
d,
while
ge
ntly pulling the g
ri
lle away
with
th
e o
th
er
ha
nd
.
Align the ope
ning
s
in
the
back of
the
speaker
wit
h the two
p
os
ts pro
tr
ud
ing from
the
bracket
as
sh
ow
n below.
Gently
re
move a
ny
slack in
th
e sp
ea
ker
wir
e as you push
the speaker firmly onto the
br
acket.
Attach the speaker
to
the
br
acket by in
se
rting
th
e
supplied screws
th
ro
ugh
th
e hol
es
in the front of
th
e
speaker and into the
br
acket
as
shown
below
(
do
n
ot
over-tigh
te
n the screws).
Replace
th
e grille on
th
e speaker.
NOTE:
The Bravo 20 is not
sec
urely a
tt
ached to
it
s b
ra
cket
unless the screws are used.
corner filler (2)
5

Rear Stand
Installation Instructions
Th
e
Bos
ton
Bravo
20
ca
n be u
sed
horizontally
on an untilted
Aat
surfac
e,
su
ch as a
table, shelf
or
th
e
top
of a
re
ar proJection
TV
using
the
included
r
ea
r bracket stand.
Fir
st
mo
unt
th
e
sp
ea
ker to
th
e brac
ke
t
(see
above).
Ne
x
t,
pl
ace
th
e speaker in
the
location
that you
int
end to
us
e it
in (i
e,
c
or
rect
grille/ logo
and
tweeter/
woo
fer o
ri
e
nt
a
ti
on).
Hol
d
the stand in an
upright
position
as
indicated
(n
ot
e that
the
stand
angles
away fr
om
the bracket).
Li
ne
up
the stand w
ith
the
l
ow
er slot
in the
brack
et
so that
th
e 2
mi
ddle
"fingers"
are on e
it
her side
of
the
web
th
at bisects
th
e
slot. Sl
ight
ly angle
the stand away from the
bracket and
pu
sh
th
e stand fingers
up
i
nto
th
e slot
so
that
the 4 in-
ner"fingers"
are
placed
inside the
slot
and
the
2 outer
"thumbs"
are
placed
out
side the
slot. Gently
pu
sh
the stand
up
into the
bra
cket
sl
ot
unt
il
the
"finger
s"
and
"thumbs" snap i
nt
o
place.
Attach the ru
bbe
r feet
to
the stand and cabinet
(deta
il
ed
on
page
4)
Mounting
Possibilities
of
the
Bravo
20
4
inner
"fingers"
2 outer
"thumbs"
Push stand
into bracket
slot
until
"fingers" and
"thumbs" click
into
place
Stick a rubber
foot
to
both
pads on
the
stand and
to
both
lower
corners
of
the
cabinet
(do
not
apply
to
grille}
We designed the Bravo 20
to be
mou
nt
ed or
placed
in a wide
va
riety of configurations. Shown bel
ow
are seven
of
the
most
co
mm
on possibiliti
es
for you
to
consider.
6
rear surround
flat
mount
horizontal
flat
mount
front main corner
mount
(or
any
other
corner)
~
--
-
1
horizontal untilted
horizontal
floor
or
shelf placement
angled
up
rear surround
angled
back

Rotating
the
Logo for Horizontal
Mounting
or
Placement
The
logo plate on the Bravo
20's
gril
le
can
be rotated
90°
in either
direction
to
enhance the speaker's appearance when
mo
unt
ing
or
placing
it in a
horizontal
position.
To
rotate the
logo:
Remove
the
gr
ille and turn
it
over.
Locate
the
logo's
spring loaded
post protruding
through
the
bottom
inside portion
of
the
grille.
Place
your
thumb
against
the
post and press
firmly until
the
logo
pops forward.
Rotate
the
logo
to
the desired position and release
pre
ssur
e
on
the
post
allowing
it
to
snap back
int
o
the
seated position.
Listening
Levels
and Power
Handling
11~
II
Th
e
listed
power
recommendations in
the
Specifications section assume you will
operate your
sys
tem in a way
that
will not
produce distortion.
Even
these rugged spea
kers
can be damaged by a
mod
est
amplifier
if
it
p
ro
du
ces
distortion. If
you hear a
harsh,
gritty
noise, turn
down
the
volume. Prolonged
or
repeated
ope
ration of your speaker
with
a distorted signal
from
the
amplifier can
ca
us
e damage
that
is
not
covered by
th
e warranty.
Limited Warranty
Boston Acoustics warrants
to
the
or
igi
nal
purchaser
of
ou
r
pass
ive
loudspeakers
that
they
will
be fr
ee
of
defects in
materi
als
a
nd
workmanship for a period
of
5 years from
the
date
of
pur
chase. Your
res
ponsibilities are
to
in
sta
ll and use them according
to the instructions
supp
li
ed,
to
provide
safe
and
sec
u
re
transportation
to
an
authori
ze
d
Bost
on Acousti
cs
service repre
sen
tativ
e,
and
to
present
proof
of
purchase in
the
form of your
sales
slip
when requesting service.
Excluded
f
ro
m this warranty is
dam
-
age
that
results
from abuse, misuse, improper
installation,
accidents, shipping, or repairs/modi
fi
ca
tions
by
anyone
other
than
an
authorized Boston Acoustics
ser
vi
ce representative. This warranty
is
limited
to
the
Boston Acousti
cs
product
and does
not
cover damage
to
any associated
equ
ip
ment
This warranty
doe
s
not
cover
the
cost
of
removal or
re
in
sta
llation.
This warran
ty
is void if the
se
ri
al
number
h
as
been removed or defaced. This warranty gives
yo
u specific
legal
right
s,
and you may
also
h
ave
othe
r rights,
wh
ich vary fr
om
state
to
state.
If
Service
Seems
Necessary
United States
First,
contact
th
e
dealer
from
whom
you purchased
the
product.
If
that
is
not
po
ss
ibl
e,
se
nd
an
email
to
:
or
wr
it
e t
o:
Bo
s
ton
Acoustics,
In
c.
1
00
Corporate Drive
Mahwah,
NJ
07490
USA
All
Other
Countries
Canada
First, contact
th
e
dealer
from
who
m
you purchased
the
product.
If
that is
not
possibl
e,
se
nd an
em
ai
l
to:
or
writ
e t
o:
D&M Canada
5-505
App
le Creek
Blvd
Markham,
ON
L3R
5B
1
C
on
t
act
the
dealer
fr
om
whom
you
purchased
th
e
product
or
contact
your
lo
cal
distributor
.
For
more
inform
a
tion,
pl
ease
vis
it
bostona
co
us
ti
cs.co
m/support
7

to
www.bo
st
onacoust
ics.com

P4TS
Table/Floor
Stand
• Stylish
and
sleek metal
construction
•
Hides wires
for
a
clean
appearance
• Sturdy cast base ensures
stability
• Designed
for
table
or
floor
placement
To
purchase
P4TS
Table
Stands,
consult
your
authorized
Boston
dealer
or
visit bostonacoustics.com
,---
~
!
!
l
-
•
!
'
•
•
~
•
•
d.
~
c._
u
'
-'
142-002207-1

Boston
acoustics®
ATTN: PRODUCT REGISTRATION
BOSTON ACOUSTICS INC
300 JUBILEE DR
PEABODY
MA
01960-4030
111
••••••
111.1
•••
11
••
11
••••
1
••
111
•••••
11.11
•••
11
•••
11
•••
1
•••
11
Postage
Required
Post Office will
, not deliver
without proper
postage.

~
Boston
Acoustics®
Product Registration
for
U.S.
and Canada purchases
only.
BOStOn
Thank you for purchasing a Boston Acoustics product. Your feedback
will
help us to continue providing
acoustics•
consumers with the best possible products and service. Data
provided
is
the
confidential
property
of
Boston
Acoustics,
Inc.
and
is
not
distributed
or
sold
to
third
parties.
Please print below, or register your new product online at: bostonacoustics.com/prodreg
Fi~tName
__
~--------------------------------------
Last Name
________________
~--------------------------------
Street
Address-----------------------------------·--------------------------------------
Apt.#
__________
_
City
__
--'-----------------
State
_____
_
ZIP--------------
E-mail Phone
---------------------------------------------------------------------------
--
Age Group: Under
20 20
to
29
30
to 39
40
to
49
50
to
59
60
to
69
70
to
79
80
and over
Marital Status:
Single
_ Married _
Gender:
Male
Female
Education:
High
School _
Some College
_ Associate/
Jr.
College
Degree _ 4-Year
College
Degree _ Graduate
School
What type
of
Boston Acoustics product did you purchase? Home Stereo/Theater
Car
In-Wall/In-Ceiling
_ Multimedia/PC
Date
of
Purchase
I
/
___
_
Model
Name
Serial #
______________________________________
_
(Located on a silver label
on the
outside
of
packaging.)
Store
Name
City-----------------------------
State
___
_
How did you hear about this product? Boston Acoustics advertisement
Store display
_ Online teview
Other
What other brand(s) and model(s) did you consider when making this purchase?
Store salesperson _
Store
advertisement _ Magazine review _
Trade show
PC
manufacturer
Friend/family
_
Bffind(s)
______________________________________________________________________________________
_
Model(s)
----------------------------------------------------------------------------------------
Thank
you
for
completing
this
form.
If
you
have
any
technical
questions
or
are interested in
other
Boston
Acoustics
products,
visit
us
on the
Web
at
bostonacoustics.com,
or
call (978)
538-5000.
©2007
Boston Acoustics,
In~.
All
Rights Reserved.
142-001601-3

This symbol found
on
the
product indicates
that
the
product
must
not
be disposed
of
with
household waste. Instead,
it
may be
placed in a separate collection facility
for
electronic waste or returned
to
a retailer when purchasing similar product. The producer
paid
to
recycle this product. Doing this contributes
to
reuse and recycling, minimizes adverse effects on
the
environment and
human health and avoids any fines
for
incorrect disposal.
Este
sfmbolo que encuentra en
el
producto, indica que este producto
no
debe ser desechado en
el
cestode
basura domestica.
En
su
Iugar, debera ser depositado en forma separada
yen
depositos destinados a esta clase de desechos electr6nicos o devueltos
a
su
proveedor con
el
que regularmente adquiere productos similares.
El
fabricante pagara
por
el
reciclado de este producto.
Hacienda esto contribuimos
al
rehuso y reciclado minimizando de esta forma los efectos adversos
al
medio ambiente, a
Ia
salud
de
las
personas y previniendo
el
incorrecto desecho.
Ce
symbole une fois sur le produit indique que celui-ci ne
doit
pas etre
jete
avec les dechets menagers.
Au
contraire, il
doit
etre
place dans un lieu separe collectant les dechets electroniques, ou retourne
au
lieu de vente lorsque vous achetez un produit
similaire.Le fabricant finance le recyclage de
ce
produit. Ainsi, en incitant a
Ia
reutilisation
ou
au
recyclage, les effets negatifs sur
l'environement
et
Ia
sante publique sont minimises,
et
tout
risque de poursuite
du
client
pour
non-respect
de
Ia
legislation sur
les
dechets est evite.
II
simbolo
sui
prodotto
indica che il
prodotto
stesso non
puo
essere smaltito gettandolo semplicemente fra i rifiuti domestici.
Esso
deve
essere
smaltito in una struttura abilitata alia raccolta di apparati elettronici oppure,
se
viene sostituito
da
un altro
apparecchio similare, deve
essere
consegnato
al
negoziante presso cui
si
effettua il nuovo acquisto.ll costruttore
ha
gia pagato
peril
riciclo di questa prodotto. Seguendo queste raccomandazioni contribuirete a recuperare e riciclare, minimizzando l'impatto
nocivo dei rifiuti sulla natura e sulla salute pubblica. Eviterete inoltre il rischio di essere multati per una incorretta procedura di
smaltimento.
Dieses Symbol, welches sich
auf
dem Produkt befindet, zeigt
an,
dal3
das Produkt nicht
mit
dem Hausmi.ill entsorgt
werden darf. Stattdessen sollte
es
in einen separaten Sammelbehalter
fUr
elektronische Gerate, oder
zu
einem Einzelhandler
zuri.ickgebracht werden, bei welchem man ahnliches Produkt kauft.
De
r Hersteller i.ibernimmt
in
diesem
Fall
die Kosten der
Beseitigung. Diese vorgehensweise
tragt
zur Wiederverwendung und zur Wiederverwertung bei, setzt schadliche Wirkungen
auf
das
Klima und die menschliche Gesundheit herab
und
vermeidet mogliche Geldstrafen fUr falsche Entsorgung.
Symbolen som aterfinns
pa
produkten betyder
att
varan inte far kastas med hushallsavfall. Vid kassering maste produkten
overlamnas till de faciliteter som
din
kommun erbjuder
for
atervinning av hemelektronik eller till den aterforsaljare dar produkten
inhandlats. Producenten har betalat
for
denna atervinningshantering. Genom
att
folja dessa regler bidrar
du
som konsument till
en effektiv atervinning och minimerar negativa effekter pa miljon och var hal
sa
samt undviker bater for oriktig hantering av
miljofarligt avfall.
Ce
symbole une fois sur le produit indique que celui-ci ne
do
it
pas etre
jete
avec les dechets menagers.
Au
contra ire, il
do
it
etre
place dans un lieu separe collectant les dechets electroniques, ou retourne
au
lieu de vente lorsque vous achetez un
produit
similaire.Le fabricant finance le recyclage de
ce
produit. Ainsi, en incitant a
Ia
reutilisation
ou
au
recyclage,
les
effets negatifs sur
l'environement
et
Ia
sante publique sont minimises,
et
tout
risque de poursuite
du
client
pour
non-respect de
Ia
legislation sur
les
dechets est evite.
3
00
Jubilee
Drive,
Peabody, MA
01
96
0 USA
bostonacoustics.com
s C
opyright
2008. All rights r
es
erved. 142-002519-2

Boston
Boston
Acoustics
Passive Speaker
Limited
Warranty
Information
for
the
United
States and Canada
Boston
Acoustics
warrants
to
the
original
purchaser
of
any
home,
custom,
or
outdoor
passive
(nonpowered)
speaker
purchased
from
an
authorized
dealer
after
January
1,
2003,
against
defects
in
materials
and
workmanship
for
a
period
of
5
years
from
the
date
of
purchase
and
will
repair
without
charge
for
parts
and
labor.
Your
responsibilities,
on
which
this
limited
warranty
is
conditioned,
are
to
install
and
use
the
system
according
to
the
instructions
supplied,
to
provide
safe
and
secure
transportation
to
an
authorized
Boston
Acoustics
service
representative,
and
to
present
proof
of
purchase
in
the
form
of
your
sales
receipt
when
requesting
service.
The
customer's
sales
receipt
must
note
the
model,
serial
number,
and
date
of
purchase
from
an
authorized
Boston
Acoustics
dealer.
Excluded
from
this
limited
warranty
is
damage
that
results
from
abuse,
misuse,
improper
installation,
accidents,
shipping,
or
repairs/modifications
by
anyone
other
than
an
authorized
Boston
Acoustics
service
representative.
Thi
s
limited
warranty
is
limited
to
th
e
Boston
A
co
ustics
product
a
nd
does
not
cover
damage
to
any
associated
equipment.
This
limited
warranty
does
not
cover
the
cost
of
removal
or
reinstallation.
Thi
s
limited
warranty
is
null
and
void
if
e
ith
er
of
the
followin
g
ha
s
occurred
:
•
Serial
numbers
are
defaced
or
removed.
•
The
date
s
ti
cker
IS
re
moved
from
the
produ
ct .
Thi
s
limit
ed
warranty
gives
you
spec
if-
ic
l
ega
l
rig
hts,
and
you
may
also
h
ave
other
righ
ts
t h
at
are
provided
for
under
local
warranty
laws.
300
Jubilee
Drive
P
ea
body,
MA
01960
USA
978.538.5000
www
.bosto
n
aco
u
st
ics.com
Product
Information
Use the
space
below
to record inform
at
ion
on
your
product.
Model
Name:
__
__
___
_ _
__
___
_ _
Serial
Number
:
__
____
___
_
__
___
_
Date
of
Purchase:
______________
_
Boston and Boston Acoustics are registered trademarks of Boston
Acou
st
ics,
In
c.
©
2003
Boston Acoustics,
Inc.
042-001718-0
-
 1
1
-
 2
2
-
 3
3
-
 4
4
-
 5
5
-
 6
6
-
 7
7
-
 8
8
-
 9
9
-
 10
10
-
 11
11
-
 12
12
-
 13
13


Boston Bravo 20 Le manuel du propriétaire
- Catégorie
- Haut-parleurs de la barre de son
- Taper
- Le manuel du propriétaire
dans d''autres langues
- English: Boston Bravo 20 Owner's manual