Ariston Dishwasher L 63 B-S-W Manuel utilisateur
- Catégorie
- Lave-vaisselle
- Taper
- Manuel utilisateur
Ce manuel convient également à

L 63 B-S-WL 63 B-S-W
ENG
F
SP
Dishwasher
Care and Use Manual
Lave-vasseille
Guide d’utilisation et d’entretien
Lavavajillas
Manual de uso y cuidado


ARISTON DISHWASHER - User Manual 1
www.aristonappliances.us
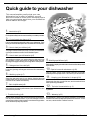
Quick guide to your dishwasher
1. Introduction (p.2)
Find important safety instructions to best utilize your valuable purchase.
2. Control panel at a glance (p.3)
Learn to get to know the parts which make up your dishwasher. This is
where you will find the description of the controls and the internal parts.
3. How to load your dishes (p.4)
This page includes useful tips to help you load your dishwasher
correctly and make the most of all the available space.
4. How to start your dishwasher (p.5)
After loading the dishes, you need to select the right wash cycle
and measure out the correct dose of detergent and rinse aid.
Reading these pages will help you through all the wash phases.
5. Detergent and rinse aid (p.6)
Learn the right usage of detergent and rinse aid for best washing
results.
6. Washing cycles (p.7)
Select the right wash cycle for your dishes. Selecting the most
suitable wash cycle for the load ensures clean dishes and a more
convenient use of water and electricity.
7. Salt: a helpful extra (p.8)
Using salt can improve the performance of your dishwasher. Learn
more about its potential.
8. Troubleshooting (p.8)
Before calling customer care, have a look here: a lot of problems
can have an immediate solution. If you can't manage to solve it
yourself, then call the Ariston customer care line and any problem
will be solved as quickly as possible.
9. Washing special items (p.9)
Before washing anything in the dishwasher check the information provided
by this section.
10. Special care and maintenance (p.10)
Once in a while, once a month, spend a little time on the filter
assembly and the sprayer arms. This is where you can learn how.
11. Keeping your dishwasher in shape (p.10)
Respect the few rules you will find here, and the result will be a
better performing dishwasher.
12. Technical characteristics (p. 3)
All your appliance's technical data, in accordance with norms and
regulations.
13. Warranty (p.11)
Ariston supports its products by means of after-sales services
and assistance, offering you special warrantees, professional
assistance as well as quality spare parts and accessories. To find
out more, call the Ariston Customer care line.
This manual explains easily what your new
dishwasher has to offer. In addition, you will
discover a world of useful hints and handy tips to
help you get a better wash from your dishwasher
and to make it last longer.

2 ARISTON DISHWASHER - User Manual
www.aristonappliances.us
Important Safety Instructions
Introduction
Read through this
guide before using
your new dishwasher
Read and obey all
safety messages.
For Your Records
Write model and serial
numbers here.
You can find them on
the front of the machine
and inside of the door
opening.
Model #: ................................................
Serial #: .................................................
Save these instructions
Your safety and that of your children
Read all instructions before using your new
dishwasher. Ariston dishwashers are providing two
manuals:one Installation Instruction manual and
one Care and Use manual. Read them carefully
and save them for future references.
Use the dishwasher only for household use and
for its intended function.
Use only detergents or wetting agents
recommended for use in a dishwasher and keep
them out of the reach of children.
When loading items to be washed:
a) locate sharp items so that they are not likely
to damage the door seal; and
b) load sharp knives with the handles up to
reduce the risk of cut-type injuries.
Do not wash plastic items unless they are marked
dishwasher safe or the equivalent. For plastic
items not so marked check the manufacturers
recommendations.
Do not operate your dishwasher unless all
enclosure panels are properly in place.
Do not tamper with controls.
Do not abuse, sit on, or stand on the door or dish
rack of the dishwasher.
WARNING -When using your dishwasher follow basic precautions including the following:
Do not allow children to play in or on the dishwasher
to avoid risk of injury.
Under certain conditions, hydrogen gas may be
produced in a hot water system that has not been
used for two weeks or more. HYDROGEN GAS IS
EXPLOSIVE. If the hot water system has not been
used for such a period, before using the dishwasher
turn on all hot water faucets and let the water flow
from each for several minutes. This will release any
accumulated hydrogen gas. As the gas is flammable,
do not smoke or use an open flame during this time.
Remove the door to the washing compartment when
removing an old dishwasher from service or
discarding it.
Dishwashers must be electrically grounded. Read the
Installation Instructions for details.
Do not run the dishwasher while you are out of home.
A qualified technician should do all repair work.
Do not touch the heating element during or
immediately after use
Congratulations on the purchase of your new Dishwasher. Please spend a few moments reading
the User Manual. This will show you ways to best utilize your valuable purchase.

ARISTON DISHWASHER - User Manual 3
www.aristonappliances.us
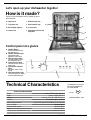
Control panel at a glance
How is it made?
E. Upper rack
F. Top spray arm
G. Rack height adjuster
H. Lower rack
I. Bottom spray arm
J. Salt container cap
K. 4 piece filter
L. Detergent and rinse aid
dispenser
Technical Characteristics
Get to know the parts which make up your
dishwasher.
A. ON-OFF Button
Press this button to turn
the appliance on.
B. ON-OFF Indicator light
Indicates that the
appliance is turned on
C. Door opening handle
Use this handle to open
the dishwasher door.
D. Cycle selection knob
Use this knob to select a
wash cycle.
G. Cycle phase indicator
lights
pre-wash, wash, rinses,
drying.
S. Low salt indicator light
This light warns you that it
is time to add more salt.
Let's open up your dishwasher together
G
J
I
L
K
H
F
E
This dishwasher conforms to
the following Standards for
U.S.A and Canada:
UL 749
ANSI/AHAM DW-1-1992
Technical characteristics
Width inches 23,62 -24* (60 cm.)
Depth inches 23,62 (60 cm.)
Height inches 32
1/4
-34
1/2
(82-87,5 cm.)
Capacity 12 standard place settings
Mains water pressure 4,3 psi-145 psi 30 KPa÷1MPa (0,3 ÷10 bar)
Power voltage See data plate
Total absorber power See data plate
Fuse See data plate
* with the pre-installed filler strips

4 ARISTON DISHWASHER - User Manual
www.aristonappliances.us
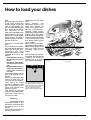
How to load your dishes
First.
Before placing the dishes
in the racks, remove the
largest scraps of food left
over on your plates, you
will thus avoid blocking the
filter, which would reduce
the efficiency of the
wash.If the saucepans and
frying pans are very dirty,
allow them to soak before
being washed. To make it
easier to load your dishes,
pull the racks out.
What goes into the lower
rack?
We recommend you place
the most difficult dishes to
wash into the lower rack:
saucepans, lids, soup
bowls and plates (a load
example is shown in the
photo).
Serving dishes and large
lids: place them on the sides of
the rack.
Saucepans, salad bowls:
must always be placed upside
down
Very deep dishes: place them
obliquely, thus allowing water to
run down them and cleaning
them better
The cutlery basket can be
split up by pulling out the
handle.
When you only have little
cutlery to wash, you can
use just half the basket;
save space for other
crockery or place the other
half of the basket in the
upper rack instead (see
figures A and B).
This basket is equipped
with two removable grids:
insert the cutlery one by
one into the slots.
Warning:
knives and utensils
with sharp blades or tips
should be positioned with
the sharp parts at the
bottom.
Position all cutlery items so
that they don't touch.
What goes into the upper
rack?
Place delicate and
lightweight dishes in the
upper rack: glasses, tea
cups and coffee cups,
saucers - but plates too -
shallow salad bowls,
slightly dirty frying pans and
shallow pans (the photo
illustrates a few examples).
Position lightweight dishes
in such a way as to avoid
their being moved by the
spray of water.
After loading the dishes,
remember to check that the
blades on the sprayer arms
can turn freely without
knocking against any
dishes.
How to adjust the top rack.
The upper rack can be set
in high or low position to
enable you to organize
your dishes effortlessly.
lower rack
upper rack
How to use our racks
Open the rail stop flaps and pull the rack
out completely. Now place it in high or low
position, then slide it along the guide rails
until the front wheels also go in. Now
close the rail stop flaps. Follow the
sequence of actions illustrated in figure
"F".

ARISTON DISHWASHER - User Manual 5
www.aristonappliances.us
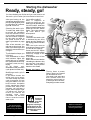
You have loaded your dishes and you now have to set
the wash cycle. It takes just one minute to learn how
Starting the dishwasher
Ready, steady, go!
You can cancel the
wash cycle in progress,
if it has only just started.
Make sure the wash
cycle has ended before
removing the dishes!
If opening
the door
soon after
the end of the
program, or during it,
stand away from the
Dishwasher, to avoid
possible injury from
hot steam.
After performing all the
operations described in the
previous paragraphs press
on-off button "A": indicator
light "B" comes on.
Selecting the wash cycle.
To select the wash cycle,
turn knob "D" clockwise
until the reference notch
on the knob corresponds
with the number or symbol
for the cycle you wish to
set (have a look at the
wash cycle table on page
7).
After a few seconds, you
will hear a short beep: the
wash cycle has begun and
we do not recommend you
change it.
The dishwasher keeps you
informed.
Your dishwasher is fitted
with indicator lights (G)
which light up to indicate
the cycle phase under way.
prewash,wash,rinsing,
drying.
At all times, your
dishwasher tells you which
cycle phase is under way.
Modifying a wash cycle in
progress.
If you have chosen the
wrong cycle, not to worry!
You can modify the wash
cycle in progress, if it has
only just started. Turn the
knob counter clockwise
until it reaches the Reset
position and, after a few
seconds, you will hear 4
beeps and indicator light
"G" will turn off. This is to
inform you that all the
settings have been
cancelled. You are now
free to re-set the correct
wash cycle.
You've left out a dish?
Well, it happens to
everyone.Interrupt the
wash cycle by pressing the
ON-OFF button, insert the
dish you had forgotten and
press the ON-OFF button
again. The cycle will start
up from where you
interrupted it.
Finished?
The end of the wash cycle
is indicated by two short
beeps and the flashing of
the drying phase indicator
light.
Turn the knob counter
clockwise to Reset in order
to reset all the settings.
Press the ON-OFF button
as well, thus cutting off the
electricity supply to the
appliance.
If accessible turn off the
water tap.
Wait a few minutes before
unloading the dishes: they
are very hot! If you wait a
little while, they dry better
thanks to the steam.
Empty the lower rack
first.
There's been a power
failure? Have you opened
the dishwasher door?
The wash cycle stops and
then restarts when the
electricity comes back on
or when you shut the door.
Everything is under control!

6 ARISTON DISHWASHER - User Manual
www.aristonappliances.us
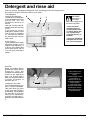
Detergent and rinse aid
Rnse aid.
Rinse Aid makes dishes
sparkle and improves the
drying.The rinse aid
container is situated on the
inside of the appliance
door; you should refill it
when you see the container
is empty by means of
indicator eye D.
Loading the rinse aid.
To open the dispenser, turn
cap C counter clockwise.
Take care when you pour
in the rinse aid to avoid it
overflowing. You can adjust
the amount of rinse aid
used by the dishwasher:
regulate the adjuster F
which you will find under lid
C.
Only use specific dishwasher detergents. Pour the detergent into the dispenser on
the inside of the door. Before the wash cycle starts!
The detergent
Loading the detergent
To open lid A, press button
B. The detergent should be
poured into the two
containers C and D up to
the rim.
Now you can close the lid:
press it down until you hear
it click.
If you prefer to use the
detergent in tablets, place
one of these in container
"D". Now you can close the
lid: press it down until you
hear it click.
It won't close!
Check whether there is any
detergent residue on the
edges of the dispenser. It
is due to this residue that
the lid won't close. Get rid
of it and you'll see that it
closes.
You can choose from six different
positions. It is normally set to 4.
Using too much
detergent does not
provide a better wash
or cleaner dishes. Use
only a proportional
amount to the size of
the wash.
Keep your dishwasher
detergent and rinse aid
in a cool and dry place.
Proper dosage of the
rinse aid improves
drying.
If drops of water remain
on the dishes or
spotting occurs, turn
the dosage adjuster to
a higher setting.
If, on the other hand,
the dishes have white
streaks, then turn the
dosage adjuster down
to a lower setting.
WARNING!
Detergent is
corrosive!
Take care to keep it out
of reach of children
F
D
C
C
D
A
B

ARISTON DISHWASHER - User Manual 7
www.aristonappliances.us
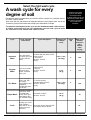
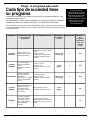
A wash cycle for every
degree of soil
Select the right wash cycle
Salt, rinse aid, the right amount of detergent and the correct wash cycle: this is the
formula to get the best results and to keep your dishwasher in shape
Select the right wash
cycle for your dishes.
Selecting the most
suitable wash cycle for the
load ensures clean dishes
and a more convenient
use of water and
electricity.
Dishwasher washing guarantees your dishes will be cleaned in a sanitized setting
for safer, cleaner results.
To optimise consumption levels, try to use the dishwasher with a full load only.
If it takes some time to fill up your dishwasher, use the soak cycle to avoid
the formation of bad odours and caked-on food.
&\FOH &\FOHVHOHFWLRQ
LQVWUXFWLRQV
&\FOHGHVFULSWLRQ 'HWHUJHQWIRU
SUHZDVK
ZDVK
5LQVH
$LG
:DVKF\FOH
GXUDWLRQ
WROHUDQFH
ZLWKRXW
H[WUD
GU\LQJ
,QWHQVLYH
:D V K
Very dirty dishes
and pans (not to be
used for delicate
items)
Pre-wash with hot water at 95°F
Wash at 140°F
2 cold rinses
Hot rinse at 149°F
Drying
R]
J
5HJXODU
:DVK
Cycle for normally
dirty pans and
dishes. Standard
daily cycle.
Wash at 122°F
Cold rinse
Hot rinse at 153°F
Drying
R]
J
(FR:DVK
Environmentally-fri-
endly cycle, with
low energy
consumption levels,
suitable for
normally dirty pans
and dishes.
2 Cold pre-washes
Extended wash at 113°F
Hot rinse at 149°F
Drying
R]
J
5D SLG:DVK
Economic and fast
cycle to be used
for slightly dirty
dishes. Run cycle
immediately after
use. Without drying.
Short wash at 113°F
Hot rinse at 122°F
R]
J
6RDN
Rinsing cycle used
while awaiting
more dishes to be
loaded from the
next meal.
Short cold wash to prevent food
from drying onto the dishes

8 ARISTON DISHWASHER - User Manual
www.aristonappliances.us
The dishwasher won't
start
■ Is the water supply tap turned
on?
■ Is the water supply tap
connected to the hose
properly?
■ Has the water in your home
been cut off?
■ Is the pressure of the water
supply sufficient?
■ Is the hose bent?
■ Is the filter on the water supply
hose blocked?
■ Is the dishwasher door open?
The dishes are not clean.
■ Have you put the right amount
of detergent into the
dispenser?
■ Is the wash cycle suitable for
the dishes you have placed
inside the appliance?
■ Are the filter and microfilter
clean?
■ Can the sprayer arms turn
freely?
The dishwasher won't drain.
■ Is the drain hose bent?
Limescale deposits or a
white film form on the
dishes.
■ Is the lid on the salt container
closed properly?
■ Is the rinse aid dosage
correct?
Error messages.
Your dishwasher is equipped with
a safety system which is able to
detect any operating problems.
These anomalies are reported by
one or two wash cycle indicator
lights "G" will flash rapidly.
Take a note of which lights are
flashing, turn the appliance off
and call for technical assistance.
Tap off alarm
If you have forgotten to turn the
water tap on, your appliance will
remind you of this by sounding a
few short beeps for a few
minutes.Turn the tap on and your
appliance will start up again after
a few minutes.If you were not
home when these beeps are
sounded,the appliance will be
blocked automatically the 2nd
and 3rd light from the right will
flash rapidly.Turn the appliance
off at the ON-OFF button, turn
on the water tap and wait
approximately 20 seconds before
turning the appliance back on; the
selected wash cycle will start up
again.
Clogged filter alarm
If the appliance is blocked and the
2nd and the 4th light from the right
flash rapidly, this means the filter
is clogged by large particles of
food residue. Turn the appliance
off, clean the filter thoroughly and
reposition it in its seat as
illustrated on page 10. Then turn
it back on. The selected wash
cycle will start up again.
Water load solenoid valve
malfunction alarm.
If the 3rd light from the right
flashes rapidly, turn the
dishwasher off and back on
again after one minute. If the
alarm persists, first turn off the
water tap to avoid any flooding
and then cut off the electricity
supply and call for technical
assistance.
You have checked
everything, but the
dishwasher still doesn't
work and the problem
persists?
Call the Ariston Customer Care
(1-888-426-0825) and remember
to mention:
the type of malfunction
the model mark (Mod.) and
the serial number (S/N.)
indicated on the rating plate
located on the inner door, to
one side.
Never without salt
Loading the salt.
You can use special water
softening salt or normal rock salt.
The salt container is situated
underneath the lower rack, fill it
up as follows:
1. Pull out the lower rack
completely, unscrew and
remove the container cap
2. Is it the first time you load the
salt? First fill the container up
with water (you won't have to
do this again next time)
3. Put the dishwasher funnel on
the hole and pour in
approximately 70 oz. of salt.
It is normal that some water
comes out of the container.
4. Screw the cap back in place
carefully.
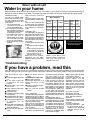
Water in your home
When should I load the
salt?
The salt container must be filled
when the softener indicator light
"S".
Once you have loaded the salt
for the first time, it is normal that
the low salt indicator light stays
on or flashes for 5 consecutive
cycles.
Intelligent salt.
Your dishwasher can adjust its
salt consumption according to the
hardness of the water in your
home. This way, you can optimise
and customise your dishwasher's
salt consumption (not too much,
nor too little).
To adjust salt consumption, do as
follows:
1. Unscrew the salt container
cap
2. There is an arrow on the neck
of the container (see figure):
if necessary, turn the arrow
anti-clockwise from the "-"
setting to the "+" setting.
Select the arrow position
depending on the water
hardness, referring to the table
provided.
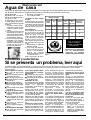
Water hardness varies according to where you live. If the water in your home is hard you have the possibility to
add salt in order to soften your water. The softer the water the better will be your washing and drying results.
Water Hardness
Clarke
degrees
°fH mmol/l
Selector
position
Salt
consum-
ption
(Oz/cycle)
Auto-
nomy
(cycles\
70oz.)
0 - 14 0 - 17 0 -1,7 / 0 /
14 - 36 18 - 44 1,8 - 4,4 "-" 0.7 60
36 - 71 45 - 89 4,5 - 8,9 MED 1.4 40
>71 > 89 > 8,9 "+" 2.1 25
NOTE: if you dont find
special water softening
salt you can also use
normal rock salt.
If you have a problem, read this
Your dishwasher may not work or not function properly. In many cases, these are problems which can be solved
without having to call for a technician. Before calling the Customer Care Center, always check the points below.
Troubleshooting
If you dont know your
water hardness ask your
local water supplier.

ARISTON DISHWASHER - User Manual 9
www.aristonappliances.us
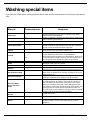
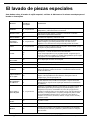
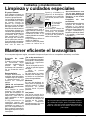
Washing special items
If you have any doubts about washing particular items check with the manufacturer to see if they are dishwasher
safe.
0DWHULDO 'LVKZDVKHUVDIH &RPPHQWV
$OXPLQLXP
Yes, with caution
Anodized Aluminium may fade or darken by high water
temperatures and detergents.
%RWWOHVDQG&DQV
No Lables could loosen and clog the spray arms or pump and
reduce washing performance.
&DVW,URQ
No
Seasoning will be removed and the iron will rust.
&KLQD6WRQHZDUH
Yes, with caution Always check manufacturer’s recommendations before
washing. Antiques and hand painted china with a pattern
on top or with gold leaf decoration may fade.
&RSSHU
Yes, with caution Do not wash copper in the same load as siver of silver
plate because the silver items could discolor.
&U\VWDO
No
Yes
Certain types of lead crystal may etch if machine washed.
Check with the manufacturer’s reommendations.
Wash with special program at low temperature. Make sure
crystal dishware is loaded securely and will not fall over or
knock against other dishwasher while being washed.
'LVSRVDEOH3ODVWLFV
No Cannot withstand machine washing.
*ODVV
Yes
Exception: Milk glass may yellow.
,URQ
No
Iron will rust.
.QLYHV
No Wood handles may wrap, crack, or loosen. Plastic handles
may discolor. Check manufacturer’s washing instructions.
1RQGLVKZDUHLWHPV
No Use ONLY standard household dishware. Never wash
items such as electronic air cleaners, air filters of any kind,
paint brushes, etc.
1RQVWLFNFRDWLQJV
Yes If marked dishwasher safe. After washing apply a light
coating of vegetable oil to maintain non-stick quality.
6WDLQOHVV6WHDO
6LOYHUDQG6LOYHU
3ODWHV
Yes, with caution Exceptions: Old silverware and silverware decorated with
an oxidising agent. Hot water can loosen the handles on
old silverware and wear off the decoratinos on the other.
Never let silverware come into contact with other metals:
you will thus avoid stains and blackening. Silver plates and
serving dishes should be washed immediately after use,
specially if they have contained salt, eggs, olives, mustard,
vinegar, fruit juices and cooked vegetables.
3HZWHU%UDVV
%URQ]H
No
Pewter will tarnish.
7LQ
No
Tin will rust.
:RRG
No Unless marked dishwasher safe by the manufacturer.
Wood can wrap, crack or lose shape with any kind of
washing.

10 ARISTON DISHWASHER - User Manual
www.aristonappliances.us
Once in a while, once a
month, spend a little time
on the filter assembly and
the sprayer arms.
Keep your dishwasher in shape
After every wash.
When the wash cycle has
ended, always remenber to
leave the appliance door
ajar. This way, moisture
and bad odours will not be
trapped inside.
Unplug the appliance.
Before carrying out any
cleaning or maintenance
on the dishwasher, always
remove the plug from the
electricity socket. Do not
run risks.
No solvents! No abrasives!
To clean the exterior and
rubber parts of your
appliance, do not use
solvents or abrasive
cleaning products. Use a
cloth dampened with
lukewarm soapy water only.
If there are any stains on
the surface of the
appliance interior, use a
cloth dampened with water
and a little white vinegar,
or a cleaning product
specifically made for
dishwashers.
Going on holiday?
When you go away for an
extended period of time, we
recommend you do the
following:
run a cycle with the
dishwasher empty
turn off the water inlet tap.
leave the appliance door
ajar
This will help the seals last
longer and prevent
unpleasant odours from
forming inside the
appliance.
Moving the appliance.
Should the appliance have
to be moved, try to keep it
in a vertical position. If
absolutely necessary, it can
be positioned on its back.
The seals.
One of the factors that
cause unpleasant odours
to form inside the
dishwasher is food that
remains trapped in the
seals. Periodic cleaning
using a damp sponge will
prevent this from occurring.
Do not worry about removing every single bit of
food residue from your dishes, but do get rid of
bones, peel and rind and any other left-overs
before placing them in the racks. Empty out all
glasses and cups.
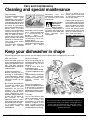
Care and maintenance
Respecting these few rules ensures you will always have a reliable work companion by your side.
Filter assembly
If you want consistent good
results from your
dishwasher, you need to
clean the filter assembly.
Food particles are removed
from the wash water, when
the water is recirculated
during the cycle filtering the
water 100%. For this
reason, it is a good idea to
remove the larger food
particles trapped inside the
cup C and the semi-
circular filter A after each
wash; pull the cup handle
upwards to remove them.
Just rinse them under
running water.
The entire filter assembly
should be cleaned
thoroughly once a month:
cup C + semi-circular filter
A + cylindrical filter B.
Rotate filter B
anticlockwise to remove it.
For cleaning, use a non
metallic brush.
Reassemble the filter parts
(as shown in the figure) and
reinsert the whole
Cleaning and special maintenance
Cleaning the sprayer arms.
Food residue may become
encrusted onto the sprayer
arms and block the holes
where water comes out.
Check the sprayer arms
regularly and clean them
once in a while (letters F
and I How is it made?).
assembly into the
dishwasher. Position it into
its housing and press
downwards.
Never use the
dishwasher
without the
filter in place.
Improper replacement of
the filters may reduce the
efficiency of the wash and
even damage your
dishwasher.
1
2
A
B
C

ARISTON DISHWASHER - User Manual 11
www.aristonappliances.us
Statement of Warranties
Ariston Dishwasher
The warranties provided by (Ariston) in this statement of warranties apply only to Ariston Dishwashers sold to the
first using purchaser by Ariston or its authorized distributors, dealers, retailers or service centers in the United
States or Canada. The Warranties provided herein are not transferable.
Length of Warranty
2 Years Full Limited Warranty from the date of installation*
Ariston will repair or replace, free of charge, any component part that proves defective in conditions of normal
home use. Shipping and labor costs included. Warranty repair service must be performed by an authorized Ariston
Service Center.
3
rd
Year Limited Warranty on racks from the date of installation*
Ariston will replace your racks, free of charge, with the same rack or a current rack that is equivalent or better in
functionality if the racks should rust under conditions of normal home use (excluding any rack accessories), shipping
charges excluded.
3
rd
-5
th
Year Limited Warranty on Electronics from the date of installation*
Ariston will repair or replace free of charge, any microprocessor or circuit board that proves defective under conditions
of normal home use 3
rd
year through 5
th
year from the date of original installation, labor charges excluded.
3
rd
-5
th
Year Limited Warranty on main motor from the date of installation*
Ariston will repair or replace free of charge, circulation motor or component part of that motor that proves defective
under conditions of normal home use, 3
rd
year through 5
th
year, from the date of original installation, labor charges
excluded.
Lifetime Limited Warranty against Stainless Steel Rust Through from the date of installation*
Ariston will replace your Dishwasher, free of charge, with the same model or a current model that is equivalent or
better in functionality if the dishwasher tub should rust through under conditions of normal home use, labor, shipping,
and installation charges excluded. In the event the door should rust it will be replaced labor, shipping and installation
charges excluded.
10 day warranty after purchase on cosmetic damages.
Ariston will replace any cosmetic parts, free of charge including service call, which are found and reported
damaged within 10 days after purchase. Any damages caused by improper handling, shipping, or installation will
not be covered under this clause.
* Date of installation shall refer to the earlier of the date the Dishwasher is installed or ten business days after
delivery date.
Exclusions:
This warranty does not cover repair or service calls to correct the installation, to provide instructions on the use of
your product, to replace house fuses or correct plumbing or the electric wiring in your home. In addition any repair
to the products thats use was in a manner other than what is normal for home use is void of any warranty claim.
The warranties exclude any defects or damage arising form accident, alteration, misuse, abuse, improper installation,
unauthorized service work, or external forces beyond Ariston control, such as fire, flood, and other acts of God, or
installation not in accordance with local electric or plumbing codes. Labor, shipping, and installation charges
incurred in the repair or replacement of any product after a period of one year from the date of installation shall not
be covered by this warranty. Any and all replaced or repaired parts shall assume the identity of the original for the
purposes of the applicable warranty period. To the extent permitted by law, this warranty is in lieu of all other
express and implied warranties, including the implied warranties of merchantability and fitness for a particular
purpose. Ariston does not assume any responsibility for incidental or consequential damages.
To obtain warranty services call 1-888-426-0825, or write to:
Ultra 8 International, 2505 Anthem Village Drive, Suite E Box 562, Henderson Nevada 89052
Be sure to provide; model number, serial number, purchase date, and the sellers name and address.

12 LAVE-VAISSELLE ARISTON Mode demploi
www.aristonappliances.us
Un guide rapide pour tout savoir
sur votre lave-vaisselle
1. Introduction (page 13)
Vous trouverez dans cette page des renseignements
importants pour une utilisation performante de votre lave-
vaisselle en toute sécurité.
2. Le tableau de bord vu de près (page 14)
Apprenez à bien connaître les pièces qui composent
votre lave-vaisselle, vous vous en servirez mieux. Vous
trouverez ci-après la description détaillée de ses com-
mandes et de ses composants intérieurs.
3. Comment sy prendre pour charger la
vaisselle (page 15)
Cette page contient des renseignements utiles qui vous
aideront à bien ranger votre vaisselle à lintérieur du lave-
vaisselle en profitant à plein de la moindre place.
4. Démarrage du lave-vaisselle (page 16)
Après avoir rangé votre vaisselle, choisissez le pro-
gramme approprié et dosez correctement les produits
de lavage et de rinçage. La lecture de ces pages vous
aidera à bien maîtriser toutes les phases de lavage.
5. Produit de lavage et de rinçage (page
17)
Apprenez à doser correctement la quantité de produit
de lavage et de rinçage pour obtenir des résultats de
lavage impeccables.
6. Cycles de lavage (page 18)
Choisissez le bon programme pour votre vaisselle. Le
choix dun programme mieux approprié à la charge que
vous avez effectuée vous garantit une vaisselle propre et
une consommation optimale deau et de courant.
7. Le sel : un supplément utile (page 19)
Lutilisation de sel peut rendre votre lave-vaisselle plus
performant. Pour en savoir plus sur ses potentialités.
8. Problèmes et solutions (page 19)
Avant de faire appel à un technicien, lisez ce qui suit:
bon nombre de problèmes trouveront une solution im-
médiate. Si vous narrivez pas à les résoudre, appelez
votre service après-vente Ariston et toute panne sera
réparée, dans la mesure du possible, en un rien de temps.
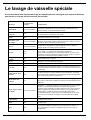
9. Le lavage de vaisselle particulière (page 20)
Avant de laver quoi que ce soit au lave-vaisselle, con-
sultez les conseils fournis dans ce paragraphe.
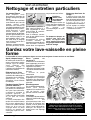
10. Soin et entretien particuliers (page 21)
De temps en temps, au moins une fois par mois, occu-
pez-vous plus particulièrement du groupe filtrant et des
bras de lavage. Voyez ici comment vous y prendre.
11. Gardez votre lave-vaisselle en forme
(page 21)
Suivez les quelques règles qui suivent et votre lave-
vaisselle sera toujours en pleine forme.
12. Caractéristiques techniques (page 14)
Toutes les données techniques de votre électroména-
ger toujours conformes à la réglementation en vigueur.
13. Garantie (page 22)
Ariston suit ses produits en fournissant des services et
une assistance même après lachat sous forme de ga-
ranties spéciales, de service après-vente, de pièces
détachées et daccessoires de qualité. Pour davantage
de renseignements, appelez le numéro de lassistance
Ariston.
Cette notice vous explique clairement tout ce que
votre nouveau lave-vaisselle vous offre de mieux.
Vous découvrirez, en plus, un tas de curiosités et
de petites astuces pour mieux laver votre vaisselle
et prolonger la durée de vie de votre machine.

LAVE-VAISSELLE ARISTON Mode demploi 13 www.aristonappliances.us
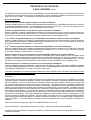
Normes de sécurité importantes
Introduction
Félicitations pour votre nouveau lave-vaisselle. Consacrez quelques minutes à la lecture de cette
notice. Vous y trouverez des conseils utiles pour utiliser au mieux votre précieux achat.
Avant dutiliser votre
nouveau lave-
vaisselle, lisez
attentivement les
conseils fournis par ce
guide à lemploi.
Lisez et respectez
toutes les consignes
de sécurité.
Annotation Ecrivez ci
contre le numéro de
série et le modèle de
votre appareil.
Vous trouverez ces
numéros sur la face
avant de lappareil et à
lintérieur de la porte.
N° modèle : ................................................
N° de série : .................................................
Conservez soigneusement cette notice
Votre sécurité et celle de vos enfants
Avant dutiliser votre nouveau lave-vaisselle, li-
sez attentivement les instructions. Les deux
notices qui accompagnent les lave-vaisselle
Ariston : une notice dinstallation et un mode
demploi et dentretien. Lisez-les attentivement
et conservez-les pour pouvoir les consulter en
cas de besoin.
Nutilisez votre lave-vaisselle que pour un usage
domestique et pour les fonctions prévues.
Nutilisez que des produits de lavage ou des
agents mouillants spéciaux lave-vaisselle et
gardez-les loin de la portée des enfants.
Lors du chargement de la vaisselle :
a) rangez les objets tranchants de manière à
ce quils ne risquent pas dendommager le joint
de la porte;
b) rangez les couteaux tranchants manche
tourné vers le haut pour réduire le plus possible
le risque de coupures.
Ne lavez pas dobjets en plastique à moins quils
aient lindication lavable au lave-vaisselle ou
toute autre indication similaire. Pour les objets
plastique dépourvus détiquette, conformez-
vous aux instructions du fabricant.
Ne mettez pas votre lave-vaisselle en marche
si les panneaux de fermeture ne sont pas tous
montés.
Nintervenez pas sur les commandes.
Ne surchargez pas le panier de rangement de
la vaisselle, ne vous asseyez pas et ne montez
ATTENTION - Lors de lutilisation de votre lave-vaisselle, conformez-vous aux instructions
suivantes :
pas sur la porte de votre lave-vaisselle.
Ne permettez pas aux enfants de jouer sur le lave-
vaisselle ou à lintérieur pour éviter quils ne se
fassent mal.
Il peut arriver que, dans certains cas, du gaz hy-
drogène se forme à lintérieur dune installation
domestique deau chaude inutilisée pendant deux
ou plusieurs semaines. LE GAZ HYDROGENE
EST EXPLOSIF. Si votre installation deau chaude
reste inutilisée pendant une ou deux semaines,
avant de réutiliser votre lave-vaisselle, ouvrez tous
les robinets deau chaude et laissez couler leau
pendant quelques minutes. Cette opération per-
mettra déliminer toute accumulation dhydrogène.
Ce gaz étant inflammable, ne fumez pas et nutili-
sez pas de flamme libre pendant cette opération.
Lors de la mise au rebut de votre lave-vaisselle,
noubliez pas de démonter la porte daccès au com-
partiment de lavage.
Le lave-vaisselle doit être raccordé à la terre. Pour
tous autres renseignements, consultez la notice
dinstallation.
Ne faites pas fonctionner votre lave-vaisselle quand
il ny a personne à la maison.
Toutes les réparations doivent être effectuées par
un professionnel du secteur.
Ne touchez pas à la résistance pendant et à la fin
dun programme de lavage.

14 LAVE-VAISSELLE ARISTON Mode demploi
www.aristonappliances.us
Tableau de bord vu de près
Caractéristiques techniques
Ce lave-vaisselle est con-
forme aux Normes en vi-
gueur aux Etats-Unis et
au Canada :
UL 749
ANSI/AHAM DW-1-
1992
A. Touche ON-OFF
Appuyez sur cette
touche pour allumer
votre machine.
B. Lampe-témoin ON-
OFF
Elle vous signale que
le lave-vaisselle est
sous tension.
C. Poignée douverture
de la porte
Elle sert à ouvrir la
porte du lave-vaisselle.
D. Bouton sélection
programmes
Tournez-le pour choisir
un programme
G. Voyants départ différé
Ils vous renseignent
sur les phases du
programme en cours
(prélavage, lavage,
rinçages, séchage).
S. Voyant manque de
sel
Il vous signale quil faut
ajouter du sel.
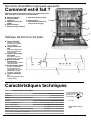
&DUDFWp ULV WLTXH V WKH FQLTXH V
Largeur 23.62-24* pouces (60 cm.)
Profondeur 23.62 pouces (60 cm.)
Hauteur 32
1/4
-
34
1/2
(82-87,5 cm.)
Capacité 12 couverts standard
Pression eau alimentation 4,3 psi - 145 psi (30 KPa÷ 1MPa) (0,3 ÷10 bar)
Tension d'alimentation Voir étiquette des caractéristiques
Puissance totale absorbée Voir étiquette des caractéristiques
Fusible Voir étiquette des caractéristiques
D YHFM R LQWV GH UHP SOLVVDJHSUp LQVW DOOp V
G
J
I
L
K
H
F
E
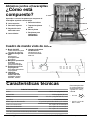
Comment est-il fait?
Ouvrons ensemble votre lave-vaisselle
E. Panier supérieur
F. Bras de lavage
supérieur
G. Réglage hauteur du
panier
H. Panier inférieur
I. Bras de lavage inférieur
J. Bouchon réservoir à sel
K. filtre 4 pièces
L. Distributeur produits de
lavage et de rinçage
Apprenez à bien connaître les pièces qui composent votre
lave-vaisselle, vous vous en servirez mieux.

LAVE-VAISSELLE ARISTON Mode demploi 15 www.aristonappliances.us
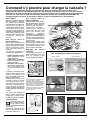
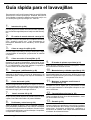
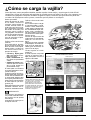
Comment sy prendre pour charger la vaisselle?
Tout dabord.
Avant de ranger la vaisselle
dans les paniers, éliminez
les déchets de nourriture,
ainsi les filtres ne se bouche-
ront pas et le lavage nen
sera que plus efficace. Si les
casseroles et les poêles
sont très sales, mettez-les
tremper en attendant de les
laver au lave-vaisselle. Pour
charger votre vaisselle plus
facilement, sortez les
paniers.
Que ranger dans le
panier supérieur :
Nous vous conseillons de
placer dans le panier infé-
rieur la vaisselle plus difficile
à laver: casseroles, couver-
cles, assiettes plates et
creuses.
Les photos illustrent un
exemple de chargement.
Plats et grands couver-
cles: rangez-les sur les
côtés du panier.
Casseroles, saladiers:
placez-les toujours sens
dessus dessous.
Vaisselle très creuse:
rangez-la en position obli-
que, leau pourra ainsi
sécouler et mieux les la-
ver.
Le panier à couverts se sé-
pare en deux quand vous
enlevez la poignée et la
pince en métal qui unit ses
deux compartiments.
Quand vous avez peu de
couverts à laver, nutilisez
que moitié panier, vous
aurez plus de place pour le
reste de votre vaisselle,
vous pouvez dailleurs
ranger lautre moitié dans le
panier supérieur (voir figures
A et B).
Ce panier est équipé de
deux grilles amovibles:
rangez les couverts un par
un dans les fentes prévues.
Avertissement:
les pointes des cou-
teaux et des ustensi-
les de cuisine tran-
chants doivent être tournées
vers le bas.
Rangez les couverts de ma-
nière à ce quils ne se tou-
chent pas entre eux.
Que ranger dans le
panier supérieur :
Chargez votre vaisselle fra-
gile et légère dans le panier
supérieur: verres, tasses à
thé et à café, soucoupes
mais aussi assiettes
saladiers bas, poêles et
casseroles basses peu
sales (les photos vous
montrent quelques
exemples de chargement).
Placez la vaisselle légère de
manière à ce quelle ne ris-
que pas dêtre déplacée par
les jets deau.
Après avoir chargé votre
lave-vaisselle, noubliez pas
de contrôler si les bras de
lavage tournent bien, sans
buter contre la vaisselle.
Réglage du panier
supérieur.
Le réglage en hauteur du
panier supérieur vous per-
met de charger votre
vaisselle plus facilement.
panier inférieur
panier supérieur
Des examples pour utilisez nos paniers
A
Prenez lhabitude de faire quelques simples gestes avant de remplir votre lave-vaisselle, vous
obtiendrez de meilleurs résultats de lavage et vous prolongerez la durée de vie de votre lave-vaisselle.
Eliminez les déchets les plus gros, mettez tremper vos casseroles et vos poêles particulièrement sales.
Une fois que vous avez chargé votre vaisselle, contrôlez que les bras de lavage tournent bien. Ne
superposez pas vos verres et vos tasses, veillez à ce que les assiettes ne se touchent pas.
B
K
A
1
2
3
4
F
Ouvrez les ailettes d'arrêt des rails
et sortez le panier. Placez-le
maintenant dans la position désirée,
plus haute ou plus basse, faites-le
ensuite glisser le long des glissières
jusqu'à ce que les roulettes avant
entrent elles aussi. Refermez les
ailettes pour bloquer le tout. Suivez
le déroulement des opérations
illustré figure "F".

16 LAVE-VAISSELLE ARISTON Mode demploi
www.aristonappliances.us
Vous avez chargé votre lave-vaisselle, il vous faut
à présent choisir un programme de lavage. Basta
un minuto per imparare
Démarrage
Allons-y!
Vous pouvez modifier
le programme en
cours, à condition
quil vienne juste de
commencer.
Contrôlez que le
programme est bien
achevé avant de sortir
votre vaisselle!
Choisissez un
programme.
Pour choisir un programme
tournez le bouton "D" dans
le sens des aiguilles d'une
montre jusqu'à amener le
repère du bouton en face
du symbole ou du numéro
du programme que vous
désirez sélectionner
(consultez le tableau des
programmes page 18).
Au bout de quelques
secondes vous entendrez
un bref signal acoustique:
le lavage a commencé et il
vaut mieux ne pas le
modifier.
Le lave-vaisselle vous
renseigne.
Les 4 indicateurs lumineux
"G" du lave-vaisselle
s'allument, un après l'autre,
au fur et à mesure que la
machine effectue la phase
de programme
correspondante à chacun
d'eux.
Les phases sont:
prélavage, lavage,
rinçages, séchage.
Votre lave-vaisselle vous
dit à tout moment où il en
est.
Modification du
programme en cours.
Si vous vous êtes trompé
de programme, aucun
problème! Vous pouvez
modifier le programme en
cours s'il vient juste de
commencer. Tournez le
bouton dans le sens
inverse des aiguilles d'une
montre jusqu'à la position
de Reset, au bout de
quelques secondes vous
entendrez 4 bips et le
voyant "G" s'éteindra: cela
signifie que toutes les
sélections ont été
annulées. Vous pouvez
alors resélectionner le bon
programme.
Vous avez oublié
dintroduire de la
vaisselle?
Ouvrez la porte avec
précaution pour
interrompre le cycle de
lavage et introduisez la
vaisselle oubliée. Dès
fermeture de la porte, le
cycle redémarrera de
lendroit où vous lavez
interrompu.
Fini?
La fin du cycle est signalée
par 2 brefs signaux
acoustiques et par le
clignotement du voyant
correspondant au
séchage.
Tournez le bouton dans le
sens inverse des aiguilles
d'une montre jusqu'à la
position de Reset
Appuyez sur la touche A
pour éteindre la machine,
vous couperez ainsi
l'arrivée de courant.
Fermez le robinet de l'eau.
Attendez quelques
minutes avant de sortir
votre vaisselle: elle brûle!
Si vous attendez un peu,
elle séchera mieux à la
vapeur.
Videz dabord le panier
inférieur.
Il y a une coupure de
courant? Vous avez
ouvert la porte du lave-
vaisselle?
Le programme sinterrompt
et repart dès que le courant
revient ou que vous
refermez la porte. Tout a
été prévu!
Après avoir effectué toutes
les opérations décrites
dans les chapitres
précédents et avoir ouvert
le robinet de leau sil est
accessible, ouvrez la porte
et appuyez sur la touche
ON-OFF A: le voyant B
sallume.
Votre lave-vaisselle est
allumé et en attente dêtre
programmé.
En cas douver-
ture de la porte
pendant ou dès
la fin du
programme,
restez à bonne distance du
lave-vaisselle car le nuage
de vapeur chaude qui
séchappe pourrait vous
brûler.

LAVE-VAISSELLE ARISTON Mode demploi 17 www.aristonappliances.us
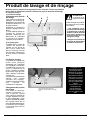
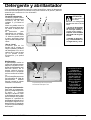
Produit de lavage et de rinçage
Produit de rinçage
Le produit de rinçage fait
briller votre vaisselle
davantage car il améliore
son séchage. Le réservoir
à produit de rinçage est
situé à lintérieur de la
porte, il faudra le remplir
quand vous voyez quil est
vide à travers lindicateur
optique «D»
(Si votre lave-vaisselle est
équipé dun voyant
«produit de rinçage»,
remplissez le réservoir dès
quil sallume ou
commence à clignoter).
Chargement du produit
de rinçage.
Pour ouvrir le réservoir,
tournez le bouchon C
vers la gauche. Quand
vous versez le produit de
rinçage, attention à ne pas
le faire déborder. Pour
régler la quantité de produit
de rinçage utilisé par le
lave-vaisselle:agissez avec
un tournevis sur le régleur
F que vous voyez sous le
couvercle C.
Le produit de lavage
Chargement du produit
de lavage
Pour ouvrir le couvercle A,
appuyez sur la touche B.
Remplissez de produit de
lavage les deux bacs C et
D jusquau bord.
Refermez le couvercle à
présent: appuyez jusquau
déclic.
Si vous préférez utiliser un
produit de lavage en
pastilles, mettez-en une
dans le bac D. Refermez
le couvercle à présent:
appuyez jusquau déclic.
Il ne ferme pas!
Contrôlez quil ny a pas de
résidus de produit de
lavage sur les bords du
bac. Cest à cause deux
que le couvercle narrive
pas à fermer. Eliminez-les
et vous verrez, il fermera
bien.
Vous pouvez choisir parmi six
positions. Normalement il est réglé
sur 4.
Une utilisation exces-
sive de produit de lavage
ne garantit pas un lavage
meilleur ou de la vaisselle
plus propre. Utilisez une
quantité adaptée à la
charge de lavage.
Rangez les produits de
lavage et de rinçage dans
un endroit frais et sec.
Le réglage de la
quantité de produit
de rinçage utilisé
améliore le séchage.
Si vous remarquez
des gouttes deau ou
des traces sur votre
vaisselle, tournez le
dispositif de réglage
vers les chiffres plus
élevés.
Tandis que si vous
remarquez des
traces blanches,
tournez le régleur
vers les chiffres plus
bas.
ATTENTION!
Le produit de la-
vage est corrosif !
Veillez à ranger les produits
de lavage loin de la portée
des enfants
F
D
C
C
D
A
B
Nutilisez que du produit de lavage spécial lave-vaisselle. Versez le produit de
lavage dans le distributeur situé à lintérieur de la porte. Avant le démarrage
du cycle de lavage!

18 LAVE-VAISSELLE ARISTON Mode demploi
www.aristonappliances.us
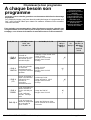
A chaque besoin son
programme
Choisissez le bon programme
Sel, produit de rinçage, une juste dose de produit de lavage et le programme quil
faut: voilà la formule idéale pour obtenir de meilleurs résultats et bien entretenir
votre lave-vaisselle.
Le lavage en lave-vaisselle garantit un environnement désinfecté et davantage
de propreté.
Pour optimiser vos consommations, faites fonctionner votre lave-vaisselle à sa
charge maximale. Sil vous faut un peu de temps pour le remplir, utilisez le cycle
trempage, vous éviterez la formation de mauvaises odeurs et dincrustations.
Choisissez le bon
programme pour votre
vaisselle.
Choisir le programme
le plus approprié à la
charge que vous avez
effectuée vous
garantit une vaisselle
propre et une
meilleure utilisation de
l'eau et du courant.
3URJUDPP H , QGLFDWLRQVVXUO H
FKRL [GHV
SURJU DPPHV
'HVFUL SWLRQGXF\FOH 3URGXL WGH
O DY DJH
SUpODYDJH
O DY DJH
3URGXL W
GH
ULQoDJH
'XUpH GX
SURJUDP P H
WROpUDQFH
VDQV
VpFKDJH
VXSHU
/DYDJH
,QWHQVLI
Vaisselle et
casseroles très sales
(déconseillé pour la
vaisselle fragile)
Prélavage à l'eau chaude 95°F
Lavage à 140°F
2 rinçages à l'eau froide
Rinçage chaud à 149°F
Séchage
R]
J
/DYDJH
1RUPDO
Cycle pour vaisselle
et casseroles
normalement sales.
Programme standard
quotidien.
Lavage à 122°F
Rinçage froid
Rinçage chaud à 153°F
Séchage
R]
J
/DYDJH
(FR
Lavage écologique à
faible consommation
d'électricité pour
vaisselle et
casseroles
normalement sales.
2 prélavages froids
Lavage prolongé à 113°F
Rinçage chaud à 149°F
Séchage
R]
J
/DYDJH
5DSLGH
Cycle économique et
rapide conseillé en
cas de vaisselle peu
sale.
Cycle à effectuer
aussitôt. Séchage
exclu
Lavage bref à113°F
Rinçage chaud à 122°F
R]
J
7UHPSDJH
Cycle de rinçage en
attente du chargement
de la vaisselle du
repas suivant.
Lavage bref froid pour éviter
que les déchets ne sèchent sur
la vaisselle
La page charge ...
La page charge ...
La page charge ...
La page charge ...
La page charge ...
La page charge ...
La page charge ...
La page charge ...
La page charge ...
La page charge ...
La page charge ...
La page charge ...
La page charge ...
La page charge ...
La page charge ...
La page charge ...
-
 1
1
-
 2
2
-
 3
3
-
 4
4
-
 5
5
-
 6
6
-
 7
7
-
 8
8
-
 9
9
-
 10
10
-
 11
11
-
 12
12
-
 13
13
-
 14
14
-
 15
15
-
 16
16
-
 17
17
-
 18
18
-
 19
19
-
 20
20
-
 21
21
-
 22
22
-
 23
23
-
 24
24
-
 25
25
-
 26
26
-
 27
27
-
 28
28
-
 29
29
-
 30
30
-
 31
31
-
 32
32
-
 33
33
-
 34
34
-
 35
35
-
 36
36


Ariston Dishwasher L 63 B-S-W Manuel utilisateur
- Catégorie
- Lave-vaisselle
- Taper
- Manuel utilisateur
- Ce manuel convient également à