La page est en cours de chargement...

THANK YOU
We appreciate the trust and confidence you have placed in Good Lumens through the purchase of this lighting fixture. We strive to continually create
quality products designed to enhance your home. Visit us online to see our full line of products available for your home improvement needs. Thank
you for choosing Good Lumens!
Model # 29838
USE AND CARE GUIDE
1 LIGHT WALL SCONCE
(WHITE CERAMIC FINISH)
Questions, problems, missing parts? Before returning to the store,
call Good Lumens Customer Service
8 a.m. – 7 p.m., EST, Monday – Friday, 9 a.m. – 6 p.m., EST, Saturday
800-527-0998

2 Please contact (800)527-0998 for further assistance
Table of Contents
Table of Contents .......................................................... 2
Safety Information ......................................................... 2
Limited Warranty ........................................................... 2
WHAT IS COVERED ..................................................................
2
WHAT IS NOT COVERED ...........................................................
2
Pre-installation .............................................................. 3
Tools required (not included) ..................................................
3
Package Contents ...................................................................
5
Installation ..................................................................... 6
Maintenance .................................................................. 9
Care and Cleaning ........................................................ 9
Troubleshooting ............................................................ 9
Service Parts ............................................................... 10
Safety Information
□ Before you begin, make sure you carefully read and understand the instructions in this manual. Please follow the instructions in the order
presented in this manual and observe all warnings and cautions.
WARNING: To reduce the risk of fire, Consult a qualified
electrician before installation.
WARNING: Before beginning installation, turn off electricity at
the circuit breaker box or the main fuse box.
WARNING: Uses (1) standard bulbs up to 100 Watts or CFL or
LED Equivalent (not included) specified by the markings and/or
labels on the fixtures.
WARNING: Be careful not to damage or cut the wire insulation
(covering) during fixture installation. Do not permit wires to
contact any surface having a sharp edge. To do so may damage
or cut the wire insulation, which could cause serious injury or
death from electric shock.
WARNING: Do not use the fixture on dimming circuits when
using non-dimmable CFL bulbs.
WARNING: If a dimmer control switch is used with this
fixture, obtain professional advice to determine the correct
type to use as well as the electrical rating required.
CAUTION: All electrical connections must be in agreement
with local codes, ordinances, or the National Electric Code
(NEC). Contact your municipal building department to learn
about your local codes, permits and/or inspections.
CAUTION: Turn off electricity to the fixture before
replacing the bulb(s) (100 watt maximum).
CAUTION: Consult a qualified electrician before
installation.
Limited Warranty
WHAT IS COVERED
The manufacturer warrants this lighting fixture to be free from defects in materials and workmanship for a period of three (3) years from
date of purchase. This warranty applies only to the original consumer purchaser and only to products used in normal use and service. If this
product is found to be defective, the manufacturer’s only obligation, and your exclusive remedy, is the repair or replacement of the product
at the manufacturer’s discretion, provided that the product has not been damaged through misuse, abuse, accident, modifications,
alterations, neglect or mishandling. This warranty shall not apply to any product that is found to have been improperly installed, set-up, or
used in any way not in accordance with the instructions supplied with the product. This warranty shall not apply to a failure of the product
as a result of an accident, misuse, abuse, negligence, alteration, or faulty installation, or any other failure not relating to faulty material or
workmanship. This warranty shall not apply to the finish on any portion of the product, such as surface and/or weathering, as this is
considered normal wear and tear.
WHAT IS NOT COVERED
The manufacturer does not warrant and specially disclaims any warranty, whether express or implied, of fitness for a particular purpose,
other than the warranty contained herein. The manufacturer specifically disclaims any liability and shall not be liable for any consequential
or incidental loss or damage, including but not limited to any labor / expense costs involved in the replacement or repair of said product.
Contact the Customer Service Team at (800)527-0998.

3 Please contact (800)527-0998 for further assistance
Pre-installation
TOOLS REQUIRED FOR ASSEMBLY & INSTALLATION (NOT INCLUDED)
Light bulb (100
watt maximum)
Electrical
tape
Phillips
screwdriver
Flathead
screwdriver
Wire strippers
Wire
cutters
Step ladder
Silicon Rubber Sealant
for exterior use

4 Please contact (800)527-0998 for further assistance
Pre-installation (continued)
HARDWARE INCLUDED
Part Description Quantity
AA Wire connectors 3
BB Ground screw 1
CC Knurled knobs 2
DD Circular strap 1
EE Outlet box screws 2
FF Mounting screws 2
NOTE: Hardware not shown to actual size.
A
A
BB
CC
DD
EE
FF

5 Please contact (800)527-0998 for further assistance
Pre-installation (continued)
PACKAGE CONTENTS
Part Description Quantity
A Fixture body 1
A

6 Please contact (800)527-0998 for further assistance
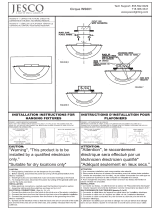
Installation
1
Installing the mounting screws to
circular strap
2
Installing the circular strap
□ Thread mounting screws (FF
)
into the pre-drilled holes in
the circular strap (DD) spaced the same distance apart as
the holes in the back of the fixture body (A)
□
A
ttach the circular strap
(
DD) to the outlet box using outlet
box screws (EE). The side of the circular strap with “GND”
marked on it and two convex points must face out.
FF
DD
Outlet Box
DD
EE

7 Please contact (800)527-0998 for further assistance
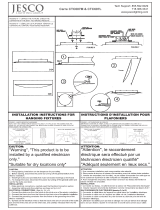
Installation (continued)
3
Connecting the wires
4
Installing the fixture
NOTE: If you have electrical questions, consult your local
electrical code for approved grounding methods.
□ While holding the fixture body (A) toward the wall, connect
the white wire from the fixture to the white wire from the
outlet box, and the black wire from the fixture to the black
wire from the outlet box. Cover the two wire connections
using the two provided wire connectors (AA). Wrap the two
wire connections with electrical tape for a more secure
connection. If your outlet box has a ground wire (green or
bare copper), connect fixture’s ground wire to it using the
wire connector (AA). Otherwise connect the copper ground
from the fixture to ground screw (BB) on the circular strap.
□ Mount the body of the fixture on the ceiling by aligning the
protruding mounting screws (FF) all the way through the
holes on the back of the fixture body (A). Be careful not to
pinch any of the wires between the fixture and the outlet
box. Tighten the fixture to the ceiling by screwing the two
knurled knobs (CC) onto the two protruding mounting
screws (FF).
Outlet Box
FF
A
CC
Black wire
BB
Ground wire
Outlet box
Black wire
AA
White wire
White wire
A

8 Please contact (800)527-0998 for further assistance
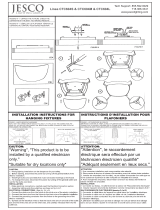
Installation (continued)
5
Installing the light bulb
6
Playing the clear caulking
□ Installing the standard light bulbs (not included) for your
fixture. (DO NOT EXCEED THE SPECIFIED WATTAGE!).
□ The Installation is complete. Turn on the power at the
circuit breaker or fuse box. Turn the light switch on to
activate the fixture.
□ To prevent moisture from entering the outlet box and
causing a short, use clear caulking (i.e. Indoor/Outdoor
Silicone Sealant) to outline the outside of fixture back plate
where it meets the wall leaving a space at bottom to allow
moisture a means to escape.
Bulb
Wall
Back plate
Caulking

9 Please contact (800)527-0998 for further assistance
Maintenance
□ Shut off the main power supply before performing any maintenance on the light.
□ Wipe with damp cloth or use window cleaner. Do not use abrasives.
Care and Cleaning
□ To clean the outside of the fixture, use a dry or slightly dampened clean cloth (use clean water, never a solvent) to wipe the glass and
surface of the fixture.
□ To clean the inside of the fixture, first disconnect power to the fixture by turning off the circuit breaker or by removing the fuse at the
fuse box. Next, use a dry or slightly dampened clean cloth (use clean water, never a solvent) to wipe the inside glass and interior
surface of the fixture.
□ Do not use any cleaners with chemicals, solvents or harsh abrasives. Use only a dry soft cloth to dust or wipe carefully.
Troubleshooting
Problem Possible Cause Corrective Action
The bulb will not light. The bulb is burned out. Replace the bulb.
The power is off. Make sure power supply is on.
There is a faulty wire connection. Check the wiring.
There is a faulty switch. Test or replace the switch.
The fuse blows or circuit breaker
trips when the light is turned on.
There are crossed wires or the power
wire is grounding out.
Chec
k
the wire connections.

10 Please contact (800)527-0998 for further assistance
Service Parts
Part Description Quantity
Part Description Quantity
A
A Wire connectors 3
A
Fixture body 1
BB Ground screw 1
CC Knurled knobs 2
DD Circular strap 1
EE Outlet box screws 2
FF Mounting screws 2
A
A
BB
CC
DD
EE
FF
A

Questions, problems, missing parts? Before returning to the store,
call Good Lumens Customer Service
8 a.m. – 7 p.m., EST, Monday – Friday, 9 a.m. – 6 p.m., EST, Saturday
800-527-0998
Retain this manual for future use.
LA-3093-E/S/F

GRACIAS
Apreciamos la confianza que usted ha puesto en la bahía de
Good Lumens
con la compra de este accesorio ligero. Nos esforzamos para crear
continuamente productos de calidad diseñados para mejorar su hogar. Visítenos en línea para ver nuestra línea completa de productos disponibles
para sus necesidades de mejoras para el hogar. ¡Gracias por elegir
Good Lumens
!
Modelo # 29838
GUÍA DE USO Y CUIDADOS
1 LÁMPARA DE PARED DE LUZ
(
ACABADO DE CERÁMICA BLANCA)
Preguntas, problemas, partes faltantes ? Antes de regresar a la tienda,
Llamar al servicio de atención al cliente de Good Lumens
8 a.m. - 7 p.m., EST, de lunes a viernes, de 9 a.m. a 6 p.m., EST, el sábado
800-527-0998

2 Comuníquese con el (800)527-0998 para obtener más ayuda
Tabla De Contenido
Tabla De Contenido ...................................................... 2
Información De Seguridad ........................................... 2
Garantía limitada ........................................................... 2
QUE ESTA CUBIERTO ...............................................................
2
LO QUE NO ESTÁ CUBIERTO ....................................................
2
Pre-instalación .............................................................. 3
HERRAMIENTAS LA INSTALACIÓN (NO INCLUIDOS) ..................3
PIEZAS INCLUIDAS PARA LA INSTALACIÓN .............................
4
CONTENIDO DEL PAQUETE ......................................................
5
Instalación ..................................................................... 6
Mantenimiento .............................................................. 9
Cuidado y limpieza ....................................................... 9
Solución de problemas ................................................ 9
Partes de servicio ....................................................... 10
Información De Seguridad
□ Antes de comenzar, asegúrese de leer detenidamente y comprender las instrucciones de este manual.Siga las instrucciones en el orden
que se presenta en este manual y observe todas las advertencias y precauciones.
ADVERTENCIA: Para reducir el riesgo de incendio, consulte a
un electricista calificado antes de la instalación.
ADVERTENCIA: Antes de comenzar la instalación,
desconecte el interruptor de circuito o la caja de fusibles
principal.
A
DVERTENCIA: Utiliza (1) bombillas estándar de hasta 100
vatios o CFL o LED Equivalente (no incluir) especificado por las
marcas y / o etiquetas en los accesorios.
ADVERTENCIA: Tenga cuidado de no dañar o cortar el
aislamiento del conductor (cubierta) durante la instalación
de la lámpara. No permita que los cables entren en
contacto con superficies que tengan un borde con filo, ya
que esto podría dañar o cortar el aislamiento del
conductor y ocasionar lesiones graves o la muerte debido
a una descarga eléctrica.
ADVERTENCIA: No use la lámpara en circuitos
reguladores cuando use bombillas CFL que no se puedan
regular
A
DVERTENCIA: Si se utiliza un regulador de control de
intensidad con esta lámpara, solicite asesoría
profesionalpara determinar el tipo y laclasificación eléctrica
correcta que se requiere.
A
DVERTENCIA: Todas las conexiones eléctricas deben
cumplir con los códigos locales, las ordenanzas o el
CódigoNacional de Electricidad (NEC, por sus siglas en
inglés). Póngase en contacto con su Departamento de
construcción municipal para consultar sobre sus códigos,
permisos y/o inspecciones locales.
ADVERTENCIA: Desconecte la alimentación eléctrica
a la lámpara antes de reemplazar las bombillas.
ADVERTENCIA: Consulte a un electricista calificado
antes de instalar.
Garantía limitada
QUE ESTA CUBIERTO
El fabricante garantiza que este accesorio de iluminación a estar libre de defectos en materiales y mano de obra durante un período de tres
(3) años a partir de la fecha de compra. Esta garantía se aplica sólo al comprador original y sólo a los productos utilizados en condiciones
normales de uso y servicio. Si se encuentra que este producto está defectuoso, la única obligación del fabricante, y su solución exclusiva,
es la reparación o sustitución del producto, a discreción del fabricante, siempre que el producto no ha sido dañado por el mal uso, abuso,
accidentes, modificaciones, alteraciones , negligencia o mal manejo. Esta garantía no se aplicará a cualquier producto que se demuestre
que ha sido instalado incorrectamente, puesta a punto, o utilizado en cualquier manera no conforme con las instrucciones suministradas
con el producto. Esta garantía no se aplicará a una falla del producto como consecuencia de un accidente, mal uso, abuso, negligencia,
alteración o instalación defectuosa, o cualquier otro fallo que no se refieran a los materiales o ejecución defectuosa. Esta garantía no se
aplicará a la meta en cualquier parte del producto, tales como la superficie y / o la intemperie, ya que se considera uso y desgaste normal.
LO QUE NO ESTÁ CUBIERTO
El fabricante no garantiza y especialmente niega cualquier garantía, expresa o implícita, de aptitud para un propósito particular, excepto la
garantía contenida en este documento. El fabricante rechaza específicamente cualquier responsabilidad y no será responsable por
cualquier pérdida consecuente o incidental o daños, incluyendo pero no limitado a cualquier mano de obra Gastos de gastos que implica la
sustitución o reparación de dicho producto.
Comuníquese con el Equipo de Servicio al Cliente al 1-800-986-3460 o visite www.HOMEDEPOT.COM/HOMEDECORATORS.

3 Comuníquese con el (800)527-0998 para obtener más ayuda
Pre-instalación
HERRAMIENTAS NECESARIAS PARA EL MONTAJE Y LA INSTALACIÓN (NO INCLUIDOS)
Bombilla
(Mximo 100watt)
Cita
Aislante
Destornillador
de
Cabeza Phillips
Destornillador
De
Cabeza Plana
Pelacables
Cortaalambres
Escalera
Sellador de
caucho de
silicona para uso
exterior

4 Comuníquese con el (800)527-0998 para obtener más ayuda
Pre-instalación (continuado)
PIEZAS INCLUIDAS PARA LA INSTALACIÓN
Parte Descripción Cantidad
AA Conectores de cable de 3
BB Tornillo de tierra 1
CC Perilla 2
DD Circular correa 1
EE Caja de salida de tornillo 2
FF Ornillo de montaje 2
NOTE: Piezas no eatan mostradas al tamaño real.
A
A
BB
CC
DD
EE
FF

5 Comuníquese con el (800)527-0998 para obtener más ayuda
Pre-instalación (continuado)
CONTENIDO DEL PAQUETE
Parte Descripción Cantidad
A Cuerpo del aparato 1
A

6 Comuníquese con el (800)527-0998 para obtener más ayuda
Instalación
1
Instalación de los tornillos de
montaje en la correa circular
2
Instalación de la correa circular
□ Enrosque los Tornillos de montaje (FF) en los orificios pre-
perforados de la Correa Circular (DD) espaciados a la
misma distancia que los orificios en el Dosel (A).
□ Una la Abrazadera Circular (DD) a la caja de union con los
dos tornillos de la caja de union (EE) como se muestra en
la. El lado marcado “GND” deben quedar hacia afuera.
FF
DD
Caja de salida
DD
EE

7 Comuníquese con el (800)527-0998 para obtener más ayuda
Instalación (continuado)
3
Quitar la placa de montaje
4
Instalación de la placa de
montaje
NOTA: Si usted tiene preguntas eléctricas, consulte a su
código de electricidad local por los métodos aprobados de
puesta a tierra.
□ Mientras mantiene el dosel (A) hacia el techo, Conecte el
cable blanco del la lámpara al cable blanco de la caja de
salida, y el cable negro de la lámpara al cable negro de la
caja de salida. Cubra las dos conexiones de cable con los
dos Conectores de alambre previstos (AA). Envuelva las dos
conexiones de los cables con cinta aislante para una
conexión más segura. Si su caja de salida tiene un cable de
tierra (verde o desnudo de cobre), conecte el cable de
tierra accesorio a la misma utilizando el conector de cable
(AA). De otra manera conecte el alambre de cobre al tornillo
de tierra (BB) en la Travesaño.
□ Monte el cuerpo de la lámpara en la pared, alineando los
tornillos de montaje salientes (FF) todo el camino a través
de los agujeros en el dosel (A). Tenga cuidado de no
pellizcar cualquiera de los cables entre la lámpara y la caja
de salida (CC). Apriete la lámpara a la pared atornillando los
dos botones estriados (CC) en que sobresalen los dos
tornillos de montaje (FF).
FF
A
CC
Caja de salida
A
lambre negro
BB
Cable de tierra
Caja de salida
Alambre negro
AA
Alambre blanco
A
lambre blanco
A

8 Comuníquese con el (800)527-0998 para obtener más ayuda
Instalación (continuado)
5
Instalación de bombilla
6
Tocando el calafateo claro
□ Instale las bombillas estándar (no incluidas) para su
lámpara. (NO EXCEDA EL AGUA ESPECIFICADA!).
□ Instale las bombillas de luz, de conformidad con las
especificaciones de la lámpara de. La instalación está
completa. Encienda la energía en la caja de fusibles.
Encienda el interruptor de la luz para activar el aparato.
□ Para evitar que la humedad ingrese a la caja de salida y
cause un cortocircuito, use una masilla transparente (es
decir, sellador de silicona para interiores / exteriores) para
delinear el exterior de la placa posterior del accesorio
donde se encuentra con la pared, dejando un espacio en la
parte inferior para permitir que la humedad sea un medio.
□
Bombilla
Pared
Placa trasera
Calafateo

9 Comuníquese con el (800)527-0998 para obtener más ayuda
Mantenimiento
□ Apague la fuente de alimentación principal antes de realizar cualquier mantenimiento en la luz.
□ Limpie con un paño húmedo o utilice limpiacristales. No utilice abrasivos.
Cuidado y limpieza
□ Para limpiar el exterior del aparato, utilice un seca o ligeramente húmeda tela (use agua limpia, nunca un disolvente) para limpiar el
vidrio y la superficie de la lámpara.
□ Para limpiar el interior del aparato, primero desconecte la alimentación de la lámpara de apagar el interruptor de circuito o quitando el
fusible de la caja de fusibles. A continuación, utilice una tela seca o ligeramente húmeda (use agua limpia, nunca un disolvente) para
limpiar el cristal en el interior y la superficie interior de la lámpara.
□ No utilice limpiadores con productos químicos, solventes o abrasivos severos. Utilice sólo un paño suave y seco para el polvo o limpiar
con cuidado.
Solución de problemas
Problema Causa posible Acción correctiva
La oferta está encendido. Bombilla está quemada. Reemplace la bombilla.
Está apagada. Asegúrese de que el poder.
Conexión del cable defectuoso. Verifique el cableado.
Interruptor defectuoso. Pruebe o cambiar el interruptor.
Funde un fusible o circuito
viajes interruptor cuando la luz.
Está encendida. Cables cruzados o
cables de alimentación.
es tierra hacia fuera. Compruebe
las conexiones de cables.
/