Kichler Lighting 43224NI Manuel utilisateur
- Taper
- Manuel utilisateur

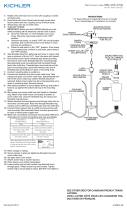
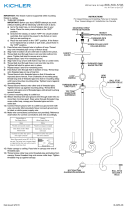
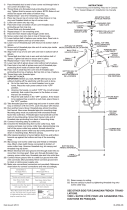
1) Screwcenterstemintocouplingontopofxturebody.
2) Passholeinbottomofsidearmdownoverthreadedstudonbottomarm.
3) Threadballknobontothreadedstud.
4) Alignholeintopofarmwithholeincenterstem.
5) Threadballstudthroughholeinarm.Tightenballstudtosecurearmin
place.
6) Repeatabovestepsforremainingarms.
7) Screwloopontotopofcenterstem.
8) TURN OFF POWER.
IMPORTANT:Beforeyoustart,NEVERattemptanyworkwithout
shuttingofftheelectricityuntiltheworkisdone.
a) Gotothemainfuse,orcircuitbreaker,boxinyourhome.Place
themainpowerswitchinthe“OFF”position.
b) Unscrewthefuse(s),orswitch“OFF”thecircuitbreakerswitch(s),
thatcontrolthepowertothextureorroomthatyouareworkingon.
c) Placethewallswitchinthe“OFF”position.Ifthexturetobe
replacedhasaswitchorpullchain,placethoseinthe“OFF”
position.
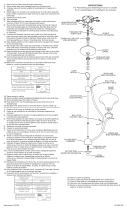
9) Takethreadedpipefrompartsbagandscrewinscrewcollarloopa
minimumof6mm(1/4”).Lockintoplacewithhexnut.
10)Runanotherhexnutdownthreadedpipealmosttouchingrsthexnut.
Nowscrewthreadedpipeintomountingstrap.Mountingstrapmustbe
positionedwithextrudedthreadfacedintooutletbox.Threadedpipe
mustprotrudeoutthebackofmountingstrap.Screwthirdhexnutonto
endofthreadedpipeprotrudingfrombackofmountingstrap.
11) Connectmountingstraptooutletbox.
12)Unscrewthethreadedringfromscrewcollarloop.Takecanopyand
passoverscrewcollarloop.Approximatelyonehalfofthescrewcollar
loopexteriorthreadsshouldbeexposed.Adjustscrewcollarloopby
turningassemblyupordowninmountingstrap.Removecanopy.
13)Afterdesiredpositionisfound,tightenbothtopandbottomhexnutsup
againstthebottomandtopofthemountingstrap.
14)Slipcanopyoverscrewcollarloopandthreadonthreadedring.Attach
chain(withxtureconnected)tobottomofscrewcollarloop.Unscrew
threadedring,letcanopyandthreadedringslipdown.
15)Weaveelectricalwireandgroundwirethroughchainlinksnomorethan
3inchesapart.Passwirethroughthreadedring,canopy,screwcollar
loop,threadedpipeandintooutletbox.
16)Connectxturegroundwiretooutletboxgroundwirewithwireconnector.
(Notprovided.)Neverconnectgroundwiretoblackorwhitepower
supplywire.
17)Makewireconnections(connectorsnotprovided).Referencechart
belowforcorrectconnectionsandwireaccordingly.
18)Raisecanopytoceiling.
19)Securecanopyinplacebytighteningthreadedringontoscrewcollar
loop.
20)Setglassdownoversocket.
21) Threadsocketringontosocket.Tightensocketringtosecureglassin
place.(DONOTovertighten.)
DateIssued:4/27/12 IS-43224-CB
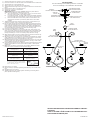
Connect Black or
Red Supply Wire to:
Connect
White Supply Wire to:
Black White
*Parallel cord (round & smooth) *Parallel cord (square & ridged)
Clear, Brown, Gold or Black
without tracer
Clear, Brown, Gold or Black
with tracer
Insulated wire (other than green)
with copper conductor
Insulated wire (other than green)
with silver conductor
*Note: When parallel wires (SPT I & SPT II)
are used. The neutral wire is square shaped
or ridged and the other wire will be round in
shape or smooth (see illus.)
Neutral Wire
INSTRUCTIONS
For Assembling and Installing Fixtures in Canada
Pour L’assemblage et L’installation Au Canada
MOUNTINGSTRAP
PATTEDEFIXATION
HEXNUT
ECROUHEXAGONAL
THREADEDPIPE
TUBEFILETÉ
SCREWCOLLARLOOP
COLLIER-ÉCROU
CANOPY
CACHE
THREADEDRING
BAGUEFILETÉE
LOOP
ANNEAU
GLASS
VERRE
ARM
BRAS
BALLSTUD
GOUJONÀBILLE
SOCKETRING
ANNEAUDELADOUILLE
SEE OTHER SIDE FOR CANADIAN FRENCH TRANS-
LATIONS.
VOIR L’AUTRE CÔTÉ POUR LES CANADIENS TRA-
DUCTIONS EN FRANÇAIS.
CENTERSTEM
TIGECENTRALE
BALLKNOB
BOULE
THREADEDSTUD
GOUJONFILETÉ

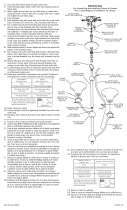
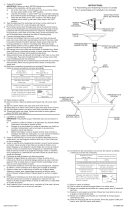
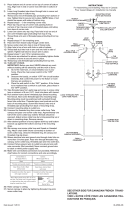
1) Visserlatigecentraledansl’accouplementsurl’extrémitésupérieuredu
luminaire.
2) Passerletrousituéenbasdubraslatéralsurlegoujonletédubras
inférieur.
3) Visserleboutonàbillesurlegoujonleté.
4) Alignerletrousituéenhautdubrasautrousituésurdanslatige
centrale.
5) Visserlegoujonàbilleparletroudanslebras.Serrerlegoujonàbille
pourxerlebras.
6) Répéterlesétapesci-dessuspourlesautresbras.
7) Visserl’anneaudansla tige centrale.
8) COUPERLECOURANT.
IMPORTANT:TOUJOURScouperl’électricitéavantdecommencerle
travail.
a) Localiserlecoffretàfusiblesouledisjoncteurdudomicile.Mettre
l’interrupteurprincipalenpositiond’Arrêt.
b) Dévisserleoulesfusibles(oumettreledisjoncteursurArrêt)qui
contrôlentl’alimentationversleluminaireoulapiècedans
laquelleletravailesteffectué.
c) Mettrel’interrupteurmuralenpositiond’Arrêt.Sileluminaireà
remplacerestdotéd’uninterrupteuroud’unechaîneconnectéeà
l‘interrupteur,placercesélémentsenpositiond’Arrêt.
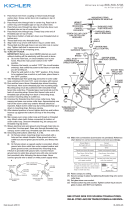
9) Visserletubeleté(quisetrouveaveclespiècesdétachées)dansle
collier-écrou,surunelongueurminimumde6mm(1/4po).Fixeravec
unécrouhexagonal.
10)Visserunsecondécrouhexagonaldemanièreàcequ’iltouchepresque
lepremier.Visserensuiteletubeletésurlapattedexation,enle
faisantdépasseretendirigeantlapartieletéedesvisverslaboîtede
jonction.Visseruntroisièmeécrouhexagonalsurl’extrémitédutube
letésortantdel’arrièredelasangledemontage.Visseruntroisième
écrouhexagonalsurl’extrémitédutubeletésortantdel’arrièredela
sangledemontage.
11) Connecterlapattedexationàlaboîtedejonction.
12)Dévisserlabagueletéeducollier-écrou.Passerlecachesurle
collier-écrou.Environlamoitiédeletageextérieurdecelui-cidoitêtre
apparent.Fixerlecollier-écrouenfaisantpivoterl’assemblageversle
hautouverslebas.Enleverlecache.
13)Unefoisbienpositionné,serrerlesdeuxécroushexagonaux,supérieur
etinférieur,contreledessousetledessusdelasangledemontage.
14)Glisserlecachesurlecollier-écrouetenlersurlabagueletée.
Attacherlachaine(avecl’assemblageconnecté)aubasducollier-
écrou.Dévisserlabagueletéeetlaisserglisserlecacheetlabague
letée.
15)Entrelacerlelélectrqueetleldemiseálaterreetfairepasserletout
danslesanneauxdelachaîneenespaçantaumaximumde3po.
Passerleldanslabagueletée,lecache,lecollier-écrou,letube
letéetlaboîtedejonction.
16)Avecl’attache-l(quin’estpasfourni),connecterleldemiseálaterre
auld’alimentationnoirouáceluiquiestblanc.
17)Connecterlesls(connecteursnonfournis).Sereporterautableau
ci-dessouspourfairelesconnexions.
18)Placerlecacheauplafond.
19)Fixerlecacheenserrantlabagueletéesurlecollier-écrou.
20)Installerleverresurladouille.
21)Serrerl’anneaudeladouillesurladouille.(NEPASserreravecexcès).
DateIssued:4/27/12 IS-43224-CB
INSTRUCTIONS
For Assembling and Installing Fixtures in Canada
Pour L’assemblage et L’installation Au Canada
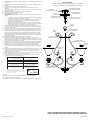
Connecter le fil noir ou
rouge de la boite
Connecter le fil blanc de la boîte
A Noir A Blanc
*Au cordon parallèle (rond et lisse)
*Au cordon parallele (à angles droits el strié)
Au bransparent, doré, marron, ou
noir sans fil distinctif
Au transparent, doré, marron, ou
noir avec un til distinctif
Fil isolé (sauf fil vert) avec
conducteur en cuivre
Fil isolé (sauf fil vert) avec
conducteur en argent
*Remarque: Avec emploi d’un fil paralléle
(SPT I et SPT II). Le fil neutre est á angles
droits ou strié et l’autre fil doit étre rond ou
lisse (Voir le schéma).
Fil Neutre
SEE OTHER SIDE FOR ENGLISH TRANSLATIONS.
VOIR L’AUTRE CÔTÉ DES TRADUCTIONS EN ANGLAIS.
MOUNTINGSTRAP
PATTEDEFIXATION
HEXNUT
ECROUHEXAGONAL
THREADEDPIPE
TUBEFILETÉ
SCREWCOLLARLOOP
COLLIER-ÉCROU
CANOPY
CACHE
THREADEDRING
BAGUEFILETÉE
LOOP
ANNEAU
GLASS
VERRE
ARM
BRAS
BALLSTUD
GOUJONÀBILLE
SOCKETRING
ANNEAUDELADOUILLE
CENTERSTEM
TIGECENTRALE
BALLKNOB
BOULE
THREADEDSTUD
GOUJONFILETÉ
-
 1
1
-
 2
2


Kichler Lighting 43224NI Manuel utilisateur
- Taper
- Manuel utilisateur
dans d''autres langues
- English: Kichler Lighting 43224NI User manual
Documents connexes
-
 Kichler Lighting 43074NI Manuel utilisateur
-
 Kichler Lighting 2520NI Manuel utilisateur
-
 Kichler Lighting 2020AB Manuel utilisateur
-
 Kichler Lighting 43255DAW Manuel utilisateur
-
 Kichler Lighting 42882NI Manuel utilisateur
-
 Kichler Lighting 43234OZ Manuel utilisateur
-
Kichler Lighting 43226NI Manuel utilisateur
-
 Kichler Lighting 42568BK Manuel utilisateur
-
 Kichler Lighting 42566BK Manuel utilisateur
-
Kichler Lighting 43076NIL18 Manuel utilisateur


