Avermedia C875 Guide de démarrage rapide
- Taper
- Guide de démarrage rapide

C875
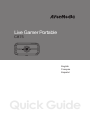
Quick Guide
Live Gamer Portable
English
Français
Español

FCC NOTICE (Class B)
This device complies with Part 15 of the FCC Rules. Operation is subject to
the following two conditions: (1) this device may not cause harmful
interference, and (2) this device must accept any interference received,
including interference that may cause undesired operation.
Federal Communications Commission Statement
NOTE- This equipment has been tested and found to comply with the limits for a Class B
digital device, pursuant to Part 15 of the FCC Rules. These limits are designed to provide
reasonable protection against harmful interference in a residential installation. This
equipment generates, uses and can radiate radio frequency energy and, if not installed
and used in accordance with the instructions, may cause harmful interference to radio
communications. However, there is no guarantee that interference will not occur in a
particular installation. If this equipment does cause harmful interference to radio or
television reception, which can be determined by tuning the equipment off and on, the user
is encouraged to try to correct the interference by one or more of the following measures:
‧ Reorient or relocate the receiving antenna.
‧ Increase the separation between the equipment and receiver.
‧ Connect the equipment into an outlet on a circuit different from that to which the
receiver is connected.
‧ Consult the dealer or an experienced radio/television technician for help.
CAUTION ON MODIFICATIONS
To comply with the limits for the Class B digital device, pursuant to Part 15 of the FCC
Rules, this device must be installed in computer equipment certified to comply with the
Class B limits. All cables used to connect the computer and peripherals must be shielded
and grounded. Operation with non-certified computers or non-shielded cables may result in
interference to radio or television reception. Changes and modifications not expressly
approved by the manufacturer could void the user’s authority to operate this equipment.
ICES-003
This Class B digital apparatus complies with Canadian ICES-003.
Cet appareil numerique de la Class B est conforme a la norme NMB-003 du Canada.
The mark of crossed-out wheeled bin indicates that this product must not be disposed
of with your other household waste. Instead, you need to dispose of the waste
equipment by handing it over to a designated collection point for the recycling of waste
electrical and electronic equipment. For more information about where to drop off your
waste equipment for recycling, please contact your household waste disposal service
or the shop where you purchased the product.
Model No.: C875
P/N: 300AC875-D2R
Made in Taiwan

Disclaimer
All the screenshots in this documentation are only example images. The images may vary
depending on the product and software version. Information presented in this
documentation has been carefully checked for reliability; however, no responsibility is
assumed for inaccuracies. The information contained in this documentation is subject to
change without notice.
Copyright
©2013 by AVerMedia Technologies, Inc. All rights reserved.
No part of this document may be reproduced or transmitted in any form, or by any means
(Electronic, mechanical, photocopy, recording, or otherwise) without prior written
permission of AVerMedia Technologies, Inc. Information in this document is subject to
change without notice. AVerMedia Technologies, Inc. reserves the right to modify, change,
improve or enhance its products and to make changes in the content without obligation to
notify any person or organization of such changes. Please visit www.avermedia.com to get
the updates of the operation and use of AVerMedia products. "AVerMedia" is a trademark
and logo of AVerMedia Technologies, Inc. Other trademarks used herein for description
purpose only belong to each of their companies. Made in Taiwan (Expect Accessories).
Picture shown may vary from actual product

English - 1
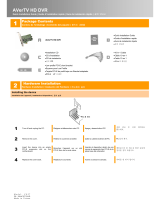
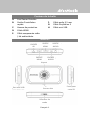
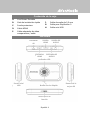
Package Contents
A. Live Gamer Portable
B. Quick Installation Guide
C. Protective Bag
D. HDMI Cable
E. Component Video /
Stereo Audio Dongle
Cable
F. 3.5mm Audio Cable
G. PlayStation 3 Cable
H. Mini USB Cable
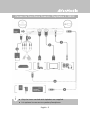
Hardware

English - 2
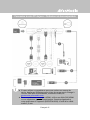
Installation (PC Mode)
Step 1: Slide the switch on the front of the device to the LEFT.
The LED indicator glows solid BLUE when the device is ready.
Step 2: According to your video/audio source, choose one of the
connections below.
Step 3: Download and install the latest driver and RECentral
from
gamerzone.avermedia.com
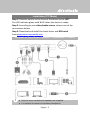
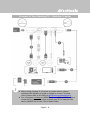
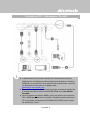
Connect to Your Game Console – PlayStation 3 / XBOX
Only the items marked with alphabets are supplied.
It is optional to connect to speakers/headphone.

English - 3
Connect to Your Gaming PC – Desktop / Laptop
When using a laptop, if you want to output source, please
duplicate the displays to avoid no image on screen. To know
more, please refer to the FAQ on
gamerzone.avermedia.com
To capture from the other computer, please connect the
computer of your video source to the HDMI IN port on the Live
Gamer Portable.
For a computer without an HDMI Port, use a DVI to HDMI cable or
converter for connection. Also connect your PC or laptop to the
device (AUDIO IN) via the 3.5mm Audio Cable.

English - 4
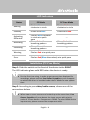
LED Indicators
Status
PC Mode PC-Free Mode
Booting
Flashes Blue
clockwise in circle
Flashes Red
clockwise in circle
Standby
Glows solid Blue
Glows solid Red
Activating
RECentral
Flashes Blue clockwise
in circle at a quick
pace
---
Recording
Glows Red with a
breathing pattern
Glows Red with a
breathing pattern
Streaming
Glows Blue with a
breathing pattern
---
Warning Flashes Red at a quick pace
Error Flashes Red/Blue alternatively at a quick pace
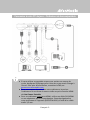
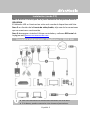
Installation (PC-Free Mode)
Step 1: Slide the switch on the front of the device to the RIGHT.
The LED indicator glows solid RED when the device is ready.
Step 2: According to your video/audio source, choose one of the
connections below.
When two or more sources are hooked up at the same time, Live
Gamer Portable will auto-detect the input source with priority
order of 3.5mm Audio > Component > HDMI. To select HDMI as the
input source, please remove the component cable.
For the first-time using, in order to get correct time displayed for
recordings, please connect Live Gamer Portable to your computer
on which the driver is installed under the PC Mode to auto update
time.

English - 5
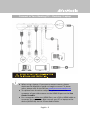
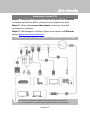
Connect to Your Game Console - PlayStation 3 / XBOX
Only the items marked with alphabets are supplied.
It is optional to connect to speakers/headphone.

English - 6
Connect to Your Gaming PC – Desktop / Laptop
When using a laptop, if you want to output source, please
duplicate the displays to avoid no image on screen. To know
more, please refer to the FAQ on
gamerzone.avermedia.com
For a computer without an HDMI Port, use a DVI to HDMI cable or
converter for connection. Also connect your PC or laptop to the
device (AUDIO IN) via the 3.5mm Audio Cable.

Français- 1
Contenu de la boîte
A. Live Gamer Portable
B. Guide d’installation
rapide
C. Housse de protection
D. Câble HDMI
E. Câble composante vidéo
/ clé audio stéréo
F. Câble audio 3,5 mm
G. Câble PlayStation 3
H. Câble mini USB
Matériel
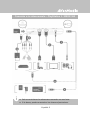
ENTRÉE
AV
SORTIE
AUDIO
ENTRÉE
HDMI
ENTRÉE
AUDIO
Voyant
Bouton Hot
Fente pour
carte SD
SORTIE
HDMI
Sélecteur de
mode
Port mini USB

Français- 2
Installation (mode PC)
Étape 1 : Faites glisser le sélecteur à l'avant de l'appareil vers la GAUCHE.
Le voyant s'allume en BLEU, indiquant que l'appareil est prêt.
Étape 2 : Selon votresource vidéo/audio, choisissez l'une des
connexions ci-dessous.
Étape 3 : Téléchargez et installez le plus récent pilote et RECentral
depuis
gamerzone.avermedia.com
Connexion à votre console de jeux – PlayStation 3 / XBOX 360
Seuls les éléments indiqués avec des lettres sont fournis.
La connexion aux hauts-parleurs/écouteurs est facultative.

Français- 3
Connexion à votre PC de jeux – Ordinateur de bureau/portable
Si vous utilisez un portable et que vous voulez une source de
sortie, dupliquez l'affichage pour éviter de ne pas avoir d'image à
l'écran. Pour plus d'information, consultez la FAQ sur
gamerzone.avermedia.com
Pour une capture à partir d'un autre ordinateur, branchez
l'ordinateur où se trouve la source vidéo au port d'entrée HDMI
de Live Gamer Portable.
Pour un ordinateur sanst port HDMI, utilisez un câble DVI/HDMI
ou un adaptateur pour le branchement. Branchez également
votre ordinateur à l'appareil (ENTRÉE AUDIO) à l'aide d'un câble
audio 3,5 mm.

Français- 4
Voyants
Statut
Mode PC Mode sans PC
Initialisation
Clignote en bleu
en cercle vers la gauche
Clignote en rouge en
cercle vers la gauche
En veille
Allumé en bleu
Allumé en rouge
Activation de
RECentral
Clignote rapidement en
bleu en cercle vers la
gauche
---
Enregistrement
Allumé en rouge sur un
un rythme respiratoire
Allumé en rouge sur
un un rythme
respiratoire
Diffusion en
flux
Allumé en bleu sur un un
rythme respiratoire
---
Avertissement Clignote rapidement en rouge
Erreur Clignote rapidement en rougeet bleu
Installation (mode sans PC)
Étape 1 : Faites glisser le sélecteur à l'avant de l'appareil vers la
DROITE. Le voyant s'allume en ROUGE, indiquant que l'appareil
est prêt.
Étape 2 : Selon votresource vidéo/audio, choisissez l'une des
connexions ci-dessous.
Lorsque deux sources ou plus sont branchées en même temps, Live
Gamer Portable détectera automatiquement la source d'entrée
dans l'ordre de priorité suivant : audio 3,3 mm > Composante >
HDMI. Pour sélectionner HDMI comme source d'entrée, débranchez
le câble composante.
Pour la première utilisation, afin que l'heure juste s'affiche pour les
enregistrements, branchez Live Gamer Portable à l'ordinateur sur
lequel le lecteur est installé au mode PC pour ajuster
automatiquement l'heure.

Français- 5
Connexion à votre console de jeux – PlayStation 3 / XBOX 360
Seuls les éléments indiqués avec des lettres sont fournis.
La connexion aux hauts-parleurs/écouteurs est facultative.

Français- 6
Connexion à votre PC de jeux – Ordinateur de bureau/portable
Si vous utilisez un portable et que vous voulez une source de
sortie, dupliquez l'affichage pour éviter de ne pas avoir d'image à
l'écran. Pour plus d'information, consultez la FAQ sur
gamerzone.avermedia.com
Pour un ordinateur sanst port HDMI, utilisez un câble DVI/HDMI
ou un adaptateur pour le branchement. Branchez également
votre ordinateur à l'appareil (ENTRÉE AUDIO) à l'aide d'un câble
audio 3,5 mm.

Español- 1
Contenido de la caja
A. Live Gamer Portable
B. Guía de instalación rápida
C. Funda protectora
D. Cable HDMI
E. Cable adaptador de video
componentes / audio
F. Cable de audio de 3,5 mm
G. Cable para PlayStation 3
H. Cable mini USB
Hardware
ENTRADA
AV
SALIDA DE
AUDIO
ENTRADA
HDMI
ENTRADA DE
AUDIO
Indicador LED
Botón Acceso
Ranura de la
tarjeta SD
SALIDA
HDMI
Interruptor de
función
Puerto mini
USB
Botón Acceso Rápido

Español- 2
Instalación (modo PC)
Paso 1: deslice el interruptor de la parte delantera del dispositivo hacia la
IZQUIERDA.
El indicador LED se iluminará en color azul cuando el dispositivo esté listo.
Paso 2: en función de la fuente de vídeo/audio, elija una de las conexiones
que se muestran a continuación.
Paso 3: descargue e instale el último controlador y software RECentral de
la página web
gamerzone.avermedia.com
Conexión a videoconsola – PlayStation 3 / XBOX 360
Solo se suministran los elementos marcados con una letra.
Si lo desea, puede conectarlo a los altavoces/auriculares.

Español- 3
Conexión al PC – Sobremesa / Portátil
Si desea mostrar la fuente cuando esté utilizando un portátil,
duplique las visualizaciones para asegurarse de que se muestran
imágenes en la pantalla. Para obtener más información, consulte
las preguntas frecuentes en la página web
gamerzone.avermedia.com
Para realizar capturas desde el otro equipo, conecte el equipo de
la fuente de vídeo al puerto ENTRADA HDMI en el Live Gamer
Portable.
Para un equipo sin puerto HDMI, utilice un cable o un conversor
DVI a HDMI para realizar la conexión. También puede conectar el
PC o el portátil al dispositivo (ENTRADA DE AUDIO) con el cable
de audio de 3,5 mm.

Español- 4
Indicadores LED
Estado
Modo PC Modo sin PC
Iniciando
Parpadea en azul
en círculos de derecha
a izquierda
Parpadea en rojo en
círculos de derecha a
izquierda
En suspensión
Se iluminará en color
azul
Se iluminará en
colorrojo
Activación
de
RECentral
Parpadea en azul en
círculos de derecha a
izquierda rápidamente
---
Grabación
Se ilumina en rojo de
manera pausada
Se ilumina en rojo de
manera pausada
Transmisión
Se ilumina en azul de
manera pausada
---
Advertencia Parpadea en rojo rápidamente
Error
Parpadea en rojo/azul alternativamente de forma
rápida
Instalación (modo sin PC)
Paso 1: deslice el interruptor de la parte delantera del dispositivo hacia la
DERECHA. El indicador LED se iluminará en color ROJO cuando el
dispositivo esté listo.
Paso 2: en función de la fuente de vídeo/audio, elija una de las conexiones
que se muestran a continuación.
La primera vez que utilice el dispositivo, con el fin de que se muestre
la hora correcta para las grabaciones, conecte el Live Gamer
Portable al equipo donde esté instalado el controlador en el modo
PC para actualizar la hora automáticamente.
Cuando dos o más fuentes se enlacen al mismo tiempo, Live Gamer
Portable detectará automáticamente la fuente de entrada con el
orden de prioridad de Audio de 3,5 mm > Componente > HDMI. Para
seleccionar HDMI como la fuente de entrada, quite el cable de
componente.

Español- 5
Conexión a la videoconsola – PlayStation 3 / XBOX 360
Solo se suministran los elementos marcados con una letra.
Si lo desea, puede conectarlo a los altavoces/auriculares.
La page est en cours de chargement...
-
 1
1
-
 2
2
-
 3
3
-
 4
4
-
 5
5
-
 6
6
-
 7
7
-
 8
8
-
 9
9
-
 10
10
-
 11
11
-
 12
12
-
 13
13
-
 14
14
-
 15
15
-
 16
16
-
 17
17
-
 18
18
-
 19
19
-
 20
20
-
 21
21


Avermedia C875 Guide de démarrage rapide
- Taper
- Guide de démarrage rapide
dans d''autres langues
- English: Avermedia C875 Quick start guide
- español: Avermedia C875 Guía de inicio rápido