
Model/Modèle/Modelo:
WHAW050BW
®/™ ©2018 Whirlpool. All rights reserved. Manufactured under license by XLS Products, Pennsylvania.
®/™ ©2018 Whirlpool. Tous droits réservés. Fabriqué sous licence par XLS Products, Pennsylvanie.
®/™ ©2018 Whirlpool. Todos los derechos reservados. Fabricado bajo licencia por XLS Products, Pennsylvania.
For questions about features, operation/performance,
parts or service, call: 1-800-207-1156.
In Canada, for assistance, installation or service,
call: 1-800-207-1156.
Si tiene pr
eguntas respect o a las características,
funcionamiento, rendimiento, partes o servicio técnico,
llame al: 1-800-207-1156.
Room Air Conditioner
Use and Care Guide
Table of Contents
Acondicionador de aire
para habitación
Manual de uso y cuidado
Índice
AIR CONDITIONER SAFETY ........................................... 2
INSTALLA
TION REQUIREMENTS
................................... 3
INSTALLA
TION INSTRUCTIONS
..................................... 5
USING YOUR AIR CONDITIONER .................................. 9
AIR CONDITIONER CARE ............................................. 10
TROUBLESHOOTING .................................................... 11
ASSISTANCE OR SER
VICE
........................................... 13
XLS PRODUCTS WARRANTY FOR WHIRLPOOL
®
AIR CONDTIONERS ....................................................... 14
Table des matièr
es
SÉCURITÉ DU CLIMATISEUR....................................... 15
EXIGENCES D’INST
ALLATION
..................................... 16
INSTRUCTIONS D’INSTALLA
TION
............................... 18
UTILISATION DE VOTRE CLIMA
TISEUR
..................... 22
ENTRETIEN DU CLIMATISEUR .................................... 23
DÉPANNAGE .................................................................. 24
ASSISTANCE OU SER
VICE
........................................... 26
GARANTIE DE XLS PRODUCTS
POUR LES CLIMATISEURS WHIRLPOOL
®
.................. 27
Au Canada, pour assistance, installation ou service,
composez le : 1-800 207-1156.
Climatiseur
Guide d’utilisation et d’entretien
SEGURIDAD DEL ACONDICIONADOR DE AIRE ........ 28
REQUISITOS DE INSTALACIÓN ................................... 29
INSTRUCCIONES DE INSTALACIÓN ........................... 31
USO DE SU ACONDICIONADOR DE AIRE .................. 35
CUIDADO DEL ACONDICIONADOR DE AIRE ............. 36
SOLUCIÓN DE PROBLEMAS ........................................ 37
AYUDA O SER
VICIO TÉCNICO
..................................... 39
GARANTÍA DE XLS PRODUCTS PARA
ACONDICIONADORES DE AIRE WHIRLPOOL
®
.......... 40

2
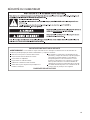
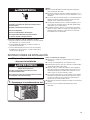
AIR CONDITIONER SAFETY
IMPORTANT SAFETY INSTRUCTIONS
WARNING:
To reduce the risk of fire, electrical shock or injury when using your air conditioner, follow these basic precautions:
SAVE THESE INSTRUCTIONS
Unplug air conditioner before servicing.
Use two or more people to move and install air conditioner.
Plug into a grounded 3 prong outlet.
Do not remove ground prong.
Do not use an adapter.
Do not use an extension cord.
This appliance is not intended for use by persons
(including children) with reduced physical, sensory or
mental capabilities, or lack experience and knowledge,
unless they have been given supervision or instruction
concerning the use of the appliance by a person
responsible for their safety.
Children should be supervised to ensure that they do
not play with the appliance.

3
INSTALLATION REQUIREMENTS
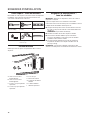
Tools Required—All Models
Gather the required tools and parts before starting installation.
Read and follow the instructions provided with any tools
listed here.
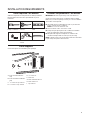
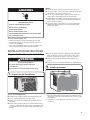
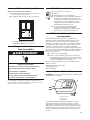
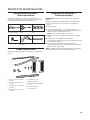
Parts Supplied
Check that all parts are included in parts package.
A. Foam seal with adhesive
strip
B. Foam seal without adhesive
strip
C.
3
⁄8" screws x 4 top channel
D. ½" screws x 3 top channel
E.
3
⁄4" screws x 4
F. Sash lock
G. Side curtain bracket x 2
H. Side curtains x 2
I. Top channel
Phillips screwdriver
Tape measure
Scissors
Cordless drill and
1/8" bit
Level
Pencil
Location Requirements—All Models
IMPORTANT: Observe all governing codes and ordinances.
Check the location where the air conditioner will be installed.
Make sure you have everything necessary for correct installation.
The location should provide:
■ Grounded electrical outlet within 6 ft (183 cm) of where the
power cord exits the air conditioner.
NOTE: Do not use an extension cord.
■ Free movement of air in room to be cooled.
■ A large enough opening for the air conditioner. Installation
parts are supplied for double-hung windows.
■ Adequate wall support for weight of air conditioner. Air
conditioner weighs 50 lbs to 75 lbs (22.7 kg to 34 kg).
NOTE: Cabinet louvers must not be obstructed. Air must be able
to pass freely through the cabinet louvers.
A
B
C
D
H
I
G
E
F

4
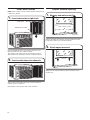
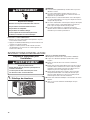
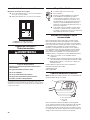
A. 5,000 BTUs: 22" (550 mm) minimum
B. 5,000 BTUs: 14½" (368 mm) minimum
Window Installation
Window Opening Measurements:
■ 22" (550 mm) minimum to 35" (914 mm) maximum
opening width
■ 14½" (368 mm) minimum opening height
Electrical Requirements
■ 115 volts (103.5 min. - 126.5 max.)
■ 0-12 amps
■ 15-amp time-delay fuse or circuit-breaker
■ If there is a “Single Circuit Only” label on the unit,
use on a dedicated single-outlet circuit only. If a
dedicated single-outlet circuit is not available, then
it is the customer’s responsibility to have a single-
outlet circuit installed by a qualied electrician.
■ If there is no “Single Circuit Only” label on the
unit, the unit may be used on any branch circuit
of correct voltage and adequate current
protection rating.
Recommended Grounding Method
This air conditioner must be grounded. This air conditioner is
equipped with a power supply cord having a grounded 3 prong
plug. To minimize possible shock hazard, the cord must be
plugged into a mating, grounded 3 prong outlet, grounded in
accordance with all local codes and ordinances. If a mating
outlet is not available, it is the customer’s responsibility to have
a properly grounded 3 prong outlet installed by a qualied
electrical installer. It is the customer’s responsibility:
■ To contact a qualied electrical installer.
■ To assure that the electrical installation is adequate and
in conformance with National Electrical Code, ANSI/NFPA
70—latest edition, and all local codes and ordinances.
Copies of the standards listed may be obtained from:
National Fire Protection Association
1 Batterymarch Park
Quincy, MA 02269
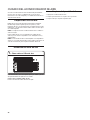
Power Supply Cord
NOTE: Your air conditioner’s power supply cord may differ from
the one shown.
This room air conditioner is equipped with a power supply cord
required by UL. This power supply cord contains state-of-the-art
electronics that sense leakage current. If the cord is crushed,
the electronics detect leakage current and power will be
disconnected in a fraction of a second.
Electrical Requirements—All Models
The electrical ratings for your air conditioner are listed on the
model and serial number label. The model and serial number
label is located on the right-hand side of the air conditioner
cabinet.
Electrical Shock Hazard
Plug into a grounded 3 prong outlet.
Do not remove ground prong.
Do not use an adapter.
Do not use an extension cord.
Failure to follow these instructions can result in death,
�re, or electrical shock.
WARNING
A
B
A. Test button
B. Reset button
A
B

5
Prepare Air Conditioner for Installation
NOTES:
■ The Reset button must be pushed in for proper operation.
■ The power supply cord must be replaced if it fails to trip when
the test button is pressed or fails to reset.
■ Do not use the power supply cord as an off/on switch. The
power supply cord is designed as a protective device.
■ A damaged power supply cord must be replaced with a new
power supply cord obtained from the product manufacturer
and must not be repaired.
■ The power supply cord contains no user-serviceable parts.
Opening the tamper-resistant case voids all warranty and
performance claims.
INSTALLATION INSTRUCTIONS
WARNING
Excessive Weight Hazard
Use two or more people to move and install
air conditioner.
Failure to do so can result in back or other injury.
■ Do not use sharp instruments, rubbing alcohol, ammable
uids, or abrasive cleaners to remove tape or glue. These
products can damage the surface of your air conditioner.
■ Remove any packaging materials inserted into the side
louvers.
■ Dispose of/recycle packaging materials in an appropriate way.
1. Unpack the Air Conditioner
Remove Packaging Materials:
■ Handle the air conditioner gently while unpacking the unit.
■ Cut the 4 plastic bands that secure the carton.
■ Remove the carton top and lift the air conditioner from the
base pad.
■ Remove tape and glue residue from surfaces before turning
on the air conditioner. Rub a small amount of liquid dish soap
over the adhesive with your ngers. Wipe with a damp cloth
and dry.
To test your power supply cord:
1. Plug power supply cord into a grounded 3 prong outlet.
2. Pressing TEST (listen for click) button will trip and cut all
power to air conditioner.
3. Press and release RESET (listen for click; Reset button will
latch). The power supply cord is ready for operation.
Electrical Shock Hazard
Plug into a grounded 3 prong outlet.
Do not remove ground prong.
Do not use an adapter.
Do not use an extension cord.
Failure to follow these instructions can result in death,
�re, or electrical shock.
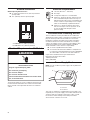
WARNING
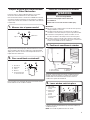
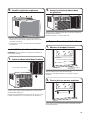
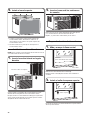
1. Place the top channel on the top of the air conditioner, lining
up the holes in the top channel with the holes in the top of the
air conditioner.
2. Using four
3
⁄8" screws, attach the top channel to the air
conditioner.
2. Install top channel

6
Place the tabbed side of the side curtain in the track on the
right-hand side of the air conditioner cabinet.
Then slide the side curtain down the track until the curtain is
aligned with the top and bottom of the air conditioner cabinet.
Install Side Curtains
NOTE: Attach curtains to the air conditioner before placing the air
conditioner in window.
1. Insert side curtain in right track
Slide the side curtain frame into the top channel and bottom
channels of the air conditioner.
Repeat steps 1 and 2 for other side curtain and frame.
2. Insert curtain frame into channels
Curtain frame
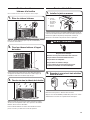
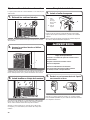
Prepare Window Opening
Measure the width of the window opening (A). Mark the center
line (B) of the window on the inside windowsill.
A
B
1. Measure and mark center line
Attach the foam seal with adhesive strip to the bottom of the
window sash.
2. Attach upper foam seal
Foam seal
Tabbed side of curtain
Center line
Width of window opening

7
Install Air Conditioner in Window
IMPORTANT:
■ Be sure your air conditioner does not fall out of the opening
during installation or removal.
■ The place where the power cord exits the air conditioner
should be no more than 6 ft (183 cm) from a grounded outlet .
■ To maximize cooling efciency and air circulation, do not
block the air intake or discharge louvers in the front panel.
■ To reduce cycling on and off of the compressor and reduce
the risk of freezing up or damage to the unit, do not block the
louvers on the outside of the air conditioner.
Prepare Window with Storm Window
or Other Obstruction
Follow the steps in “Prepare Window Opening”. If possible,
remove the storm window frame or other obstruction.
If the storm window frame or obstruction CANNOT be removed,
a wood spacer will be required to ensure that the air conditioner
slopes to the outside. This will allow condensation and rainwater
to drain away.
Using a level and measuring tape, determine thickness of wood
spacer needed to allow the air conditioner to slope downward
slightly to the outdoors. The block should provide at least
1
⁄2" of
height above the obstruction.
Place wood block on windowsill. Wood block should be at least
the full width of the air conditioner cabinet.
1
/2"
Min.
1
/2"
Min.
1. Measure size of spacer needed
A
B
C
1
/2"
Min.
1
/2"
Min.
E
D
2. Place wood block on windowsill
A. Wood block
B. Windowsill
C Indoors
D. Outdoors
E. Storm window frame
or other obstruction
WARNING
Excessive Weight Hazard
Use two or more people to move and install
air conditioner.
Failure to do so can result in back or other injury.
A
B
C
D
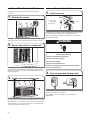
1. Position air conditioner in window
Using two or more people, place the air conditioner into the
window opening and center it according to the center line
marked earlier. Check that the bottom channel of the air
conditioner is against the windowsill.
A. Air conditioner
B. Bottom channel
C Windowsill
D. Outside
C
B
A
2. Lower window sash into place
Lower the window sash behind the top channel to hold the air
conditioner in place.
NOTE: Your model may differ from the one shown.
A. Side curtain
against window
channel
B. Window sash
behind top
channel
C. Bottom
channel behind
windowsill
Spacer
Obstruction

8
Attach Side Curtains to Window
The steps for installing the side curtains are the same for
both sides.
1. Extend side curtains
Extend side curtains out until they t into the window channels.
3. Install screws into window sash
Use a
1
⁄8" drill bit to drill a starter hole through the holes in the top
rail and the top corners of the side curtains into the window sash.
Secure with three ½" screws through the holes in the top rail and
side curtain and into the window sash.
Complete Installation
A
B
1. Install foam seal
A. Top of lower
window sash
B. Foam seal
Insert the foam seal without adhesive strip between the top of the
lower window sash and the glass of the upper window.
Remove any remaining clear plastic lm from the control panel
and plastic front panel.
2. Plug into grounded 3 prong outlet
Plug into a grounded 3 prong outlet
Press RESET on the power supply cord. See “Electrical
Requirements.”
Electrical Shock Hazard
Plug into a grounded 3 prong outlet.
Do not remove ground prong.
Do not use an adapter.
Do not use an extension cord.
Failure to follow these instructions can result in death,
�re, or electrical shock.
WARNING
2. Secure side curtains to windowsill
Place the frame lock between the extended side curtain and the
window sill. Screw a ¾" locking screw through the frame lock and
into the window sill.

9
Operating your air conditioner properly helps you to obtain the
best possible results.
This section explains proper air conditioner operation.
IMPORTANT:
■ If you turn off the air conditioner, wait at least 3 minutes
before turning it back on. This prevents the air conditioner
from blowing a fuse or tripping a circuit breaker.
■ Do not try to operate your air conditioner in Cool mode
when outside temperature is below 65°F (18°C). The inside
evaporator coil will freeze up, and the air conditioner will not
operate properly.
NOTE: In the event of a power failure, your air conditioner will
operate at the previous settings when the power is restored.
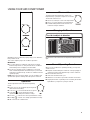
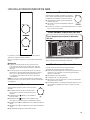
Operation
Turn the Operation knob to the desired operating
mode.
■ Power—Turn on air conditioner by turning mode
dial to the desired setting.
■ Cool Low ( )—Cools with the fan at low speed.
■ Cool High ( )—Cools with the fan at high
speed. Use this setting for maximum cooling.
■ Fan Low ( )—The fan runs at low speed without cooling.
■ Fan High ( )—The fan runs at high speed without cooling.
■ Off—Turns the air conditioner off.
Thermostat
The thermostat will automatically control room
temperature by cycling the compressor on and off.
The fan will continue to run.
■ Turn to 6 (coolest) for cooler room temperatures.
■ Turn to 1 (cool) for warmer room temperatures.
■ A middle setting with the knob turned to 5 is
normal for average conditions.
USING YOUR AIR CONDITIONER
Changing Air Direction
Use tab to adjust air direction
Normal Operating Sounds
When your air conditioner is operating normally, you may hear
sounds such as:
■ Droplets of water hitting the condenser, causing a pinging or
clicking sound. The water droplets help cool the condenser.
■ Air movement from the fan.
■ Clicks from the thermostat cycle.
■ Vibrations or noise due to poor wall or window construction.
■ A high-pitched hum or pulsating noise caused by the modern
high-efciency compressor cycling on and off.
Use the lever on the vent louvers to adjust the air direction left or
right.

10
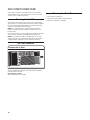
Your new air conditioner is designed to give you many years
of dependable service. This section tells you how to clean and
care for your air conditioner properly.
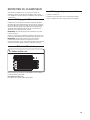
Remove the lter by grasping the tab on the lter and pulling it
out of the grille to the side.
Reinstalling the air filter:
Slide the lter back into the grille.
AIR CONDITIONER CARE
Cleaning the Front Panel
1. Turn off the air conditioner.
2. Wipe the front panel with a soft, damp cloth.
3. Air dry the front panel completely.
Cleaning the Air Filter
The air lter is removable for easy cleaning. A clean lter helps
remove dust, lint, and other particles from the air and is important
for best cooling and operating efciency. Check the lter every
2 weeks to see whether it needs cleaning.
NOTE: Do not operate the air conditioner without the lter
in place. Cooling performance will be effected when the coil
becomes dirty.
Use a vacuum cleaner to clean air lter. If the air lter is very dirty,
wash it in warm water with a mild detergent and rinse well.
NOTE: Do not wash the air lter in the dishwasher or use any
chemical cleaners; it may damage the lter. Air dry the air lter
completely before replacing to ensure maximum efciency.
Air Filter Removal
Remove the air filter

11
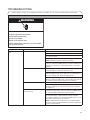
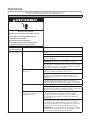
Air conditioner will not operate
Before calling for service, try the suggestions below to see whether you can solve your problem without outside help.
Electrical Shock Hazard
Plug into a grounded 3 prong outlet.
Do not remove ground prong.
Do not use an adapter.
Do not use an extension cord.
Failure to follow these instructions can result in death,
fire, or electrical shock.
WARNING
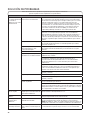
If you experience Possible Causes Solution
Air conditioner will not
start
Check electrical supply. Plug the power cord into a grounded 3 prong outlet.
Do not use an extension cord.
Make sure there is power to the outlet. Plug in a lamp to see if
the outlet is working.
Reset a tripped circuit breaker. Replace any blown fuses.
NOTE: If problems continue, contact an electrician.
The power supply cord has tripped (Reset button has popped
out). Press and release RESET (listen for click; Reset button will
latch and on some devices, a green light will turn on) to resume
operation.
Blows fuses or trips circuit breakers. Too many appliances are being used on the same circuit. Unplug
or relocate appliances that share the same circuit.
Use time-delay fuse or circuit breaker of the wrong capacity is
being used. Replace with a time-delay fuse or circuit breaker of
the correct capacity. See “Electrical Requirements.”
You are trying to restart the air conditioner too soon after turning
off the air conditioner. Wait at least 3 minutes after turning off the
air conditioner before trying to restart the air conditioner.
Power failure Air conditioner will restart when power is restored.
Time-delay fuse (approx. 3 minutes) to prevent tripping of the
compressor. Wait at least 3 minutes before trying to restart the
air conditioner.
Power supply cord trips (Reset
button pops out).
Disturbances in your electrical current can trip (Reset button will
pop out) the power supply cord. Press and release RESET (listen
for click; Reset button will latch to resume operation.
Electrical overload, overheating, a pinched cord, or aging can
trip the power supply cord (Reset button will pop out). After
correcting the problem, press and release RESET (listen for click;
Reset button will latch to resume operation.
NOTE: A damaged power supply cord must be replaced with a
new power supply cord obtained from the product manufacturer
and must not be repaired.
TROUBLESHOOTING

12
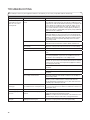
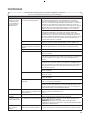
If you experience Possible Causes Solution
Air conditioner cycles
on and off too much or
does not cool room in
Cooling mode
Air conditioner seems to run too
much.
The current air conditioner replaced an older model. The use of
more efcient components may cause the air conditioner to run
longer than an older model, but the total energy consumption will
be less. Newer air conditioners do not emit the “blast” of cold
air you may be accustomed to from older air conditioners, but
this is not an indication of lesser cooling capacity or efciency.
Refer to the efciency rating (EER) and capacity rating (in BTU/h)
marked on the air conditioner.
The air conditioner is in a heavily occupied room, or heat-
producing appliances are in use in the room. Use exhaust vent
fans while cooking or bathing and try not to use heat-producing
appliances during the hottest part of the day. A higher-capacity
air conditioner may be required, depending on the size of the
room being cooled.
Airow is restricted. The louvers are blocked. Install the air conditioner in a location
where the louvers are free from curtains, blinds, furniture, etc.
The temperature control may not be
set correctly.
The temperature setting is not set to a cool-enough setting.
Adjust the cooling mode and/or thermostat to a cooler setting.
The air lter is dirty. The lter is dirty or obstructed by debris. Clean the lter.
The room may be too warm. Allow extra time for the air conditioner to cool off a very hot
room.
The air conditioner is not properly sized for your room. Check
the cooling capabilities of your room air conditioner. Room air
conditioners are not designed to cool multiple rooms.
There is excessive heat or moisture (open container cooking,
showers, etc.) in the room. Use a fan to exhaust heat or moisture
from the room. Try not to use heat-producing appliances during
the hottest part of the day.
Windows or doors to the outside are open. Close all windows
and doors.
Cold air is escaping. Check for open furnace registers and cold-air returns.
Windows or doors to the outside are open. Close all windows
and doors.
The cooling coils are frozen. The inside evaporator and outside condenser coils are dirty or
obstructed by debris.
The outside temperature is below 65°F (18°C ). Do not try to
operate your air conditioner in the cooling mode when the
outside temperature is below 65°F (18°C). This reduces the risk
of freezing up or damage to the unit.
The air conditioner is
freezing up
Ice blocks the air ow and stops the
air conditioner from cooling the room.
Set Mode dial to high fan or high cool and set Temp dial to
1 or 2. You may have to turn off the air conditioner to allow ice to
thaw before using.
Water is dripping outside Hot and humid weather. This is normal.
Water is dripping inside
the room
The air conditioner is not properly
leveled.
For proper water drainage, make sure the air conditioner is
slightly tilted downward toward the outside.
NOTE: Do not drill a hole into the bottom of the metal base and
condensate pan; doing so will reduce cooling performance.
Water collects in the
base pan
Moisture removed from the air is
draining into the base pan.
This is normal for a short period in areas with low humidity and
normal for a longer period in areas with high humidity.
Air conditioner will not operate
Before calling for service, try the suggestions below to see whether you can solve your problem without outside help.
TROUBLESHOOTING

13
Before calling for assistance or service, please check
“Troubleshooting.” It may save you the cost of a service call.
If you still need help, follow the instructions below.
When calling, please know the purchase date and the complete
model and serial numbers of your appliance. This information will
help us to better respond to your request.
Call XLS Products Customer Service toll free:
1-800-207-1156.
Our consultants provide assistance with:
■ Features and specications on our full line of appliances.
■ Installation information.
■ Use and maintenance procedures.
■ Accessory and repair parts.
■ Specialized customer assistance.
■ Referrals to local dealers, repair parts distributors, and service
companies. XLS Products-designated service technicians
are trained to fulll the product warranty and provide after-
warranty service, anywhere in the United States.
For further assistance:
If you need further assistance, you can write to XLS Products
with any questions or concerns at:
XLS Products, Inc.
Customer Service
P.O. Box 16262
Philadelphia, PA 19114-0262
Please include a daytime phone number in your correspondence.
Call XLS Products Customer Service toll free:
1-800-207-1156.
Our consultants provide assistance with:
■ Features and specications on our full line of appliances.
■ Use and maintenance procedures.
■ Accessory and repair parts.
■ Referrals to local dealers, repair parts distributors, and service
companies. XLS Products-designated service technicians
are trained to fulll the product warranty and provide after-
warranty service, anywhere in Canada.
For further assistance:
If you need further assistance, you can write to XLS Products
with any questions or concerns at:
XLS Products, Inc.
Customer Service
P.O. Box 16262
Philadelphia, PA 19114-0262
Please include a daytime phone number in your correspondence.
ASSISTANCE OR SERVICE
In the USA
In Canada

14
XLS PRODUCTS WARRANTY FOR
WHIRLPOOL
®
AIR CONDITIONERS
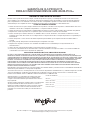
ONE YEAR LIMITED WARRANTY
For one year from the date of purchase, when this product is operated and maintained according to instructions attached to
or furnished with the product, XLS Products will pay for replacement parts and repair labor to correct defects in materials or
workmanship or replace the product at our discretion. Service must be provided by a XLS Products designated service company.
This warranty does not cover the air lter.
ITEMS XLS PRODUCTS WILL NOT PAY FOR
1. Service calls to correct the installation of your product, instruct you how to use your product, to replace house fuses or reset circuit
breakers, replace or clean lters, or correct house wiring.
2. Service calls to repair or replace air lters. Those consumable parts are excluded from warranty coverage.
3. Repairs when your product is used for other than normal, single-family household use.
4. Damage resulting from accident, alteration, misuse, abuse, re, ood, acts of God, improper installation, installation not in
accordance with electrical or plumbing codes, or use of products not approved by XLS Products.
5. Replacement parts or repair labor costs for units operated outside the United States or Canada.
6. Pickup and delivery. This product is designed to be repaired in the home.
7. Repairs to parts or systems resulting from unauthorized modications made to the appliance.
8. Expenses for travel and transportation for product service in remote locations.
9. The removal and reinstallation of your appliance if it is installed in an inaccessible location or is not installed in accordance with
published installation instructions.
DISCLAIMER OF IMPLIED WARRANTIES; LIMITATION OF REMEDIES
CUSTOMER’S SOLE AND EXCLUSIVE REMEDY UNDER THIS LIMITED WARRANTY SHALL BE PRODUCT REPAIR AS PROVIDED
HEREIN. IMPLIED WARRANTIES, INCLUDING WARRANTIES OF MERCHANTABILITY OR FITNESS FOR A PARTICULAR PURPOSE,
ARE LIMITED TO ONE YEAR OR THE SHORTEST PERIOD ALLOWED BY LAW. XLS PRODUCTS SHALL NOT BE LIABLE FOR
INCIDENTAL OR CONSEQUENTIAL DAMAGES. SOME STATES AND PROVINCES DO NOT ALLOW THE EXCLUSION OR
LIMITATION OF INCIDENTAL OR CONSEQUENTIAL DAMAGES, OR LIMITATIONS ON THE DURATION OF IMPLIED WARRANTIES OF
MERCHANTABILITY OR FITNESS, SO THESE EXCLUSIONS OR LIMITATIONS MAY NOT APPLY TO YOU. THIS WARRANTY GIVES
YOU SPECIFIC LEGAL RIGHTS AND YOU MAY ALSO HAVE OTHER RIGHTS, WHICH VARY, FROM STATE TO STATE OR PROVINCE
TO PROVINCE.
Outside the 50 United States and Canada, this warranty does not apply. Contact your authorized XLS Products dealer to determine if
another warranty applies.
If you need service, rst see the “Troubleshooting” section of the Use & Care Guide. After checking “Troubleshooting,” additional
help can be found by checking the “Assistance or Service” section or by calling XLS Products. In the U.S.A., call 1-800-207-1156. In
Canada, call 1-800-207-1156.
Keep this book and your sales slip together for future reference.
You must provide proof of purchase or installation date for
in-warranty service.
Write down the following information about your air conditioner
to better help you obtain assistance or service if you ever need
it. You will need to know your complete model number and serial
number. You can nd this information on the model and serial
number label located on the product.
Dealer name _____________________________________________
Address _________________________________________________
Phone number ___________________________________________
Model number ___________________________________________
Serial number ____________________________________________
Purchase date ___________________________________________
®/™ ©
2018 Whirlpool. All rights reserved. Manufactured under license by XLS Products, Pennsylvania.
Limited warranty provided by XLS Products.

15
SÉCURITÉ DU CLIMATISEUR
IMPORTANTES INSTRUCTIONS DE SÉCURITÉ
AVERTISSEMENT :
Pour réduire les risques d'incendie, de choc électrique ou des blessures lors de l'utilisation du
climatiseur
, prendre quelques précautions fondamentales, y compris les suivantes :
CONSERVEZ CES INSTRUCTIONS
Débrancher le climatiseur avant l'entretien.
Cet appareil ne convient pas à une utilisation par des
personnes (y compris des enfants) à capacités physiques,
sensorielles ou mentales réduites, ou possédant un
manque d'expérience et de connaissances, à moins
qu'elles ne soient placées sous supervision ou qu'elles
aient reçu des instructions concernant l'utilisation de
l'appareil par une personne responsable de leur sécurité.
Brancher sur une prise à 3 alvéoles reliée à la terre.
Ne pas enlever la broche de liaison à la terre.
Ne pas utiliser un adaptateur.
Ne pas utiliser un câble de rallonge.
Utiliser deux ou plus de personnes pour déplacer et
installer le climatiseur.
Les enfants doivent être placés sous surveillance afin de
s'assurer qu'ils ne jouent pas avec l'appareil.

16
EXIGENCES D’INSTALLATION
Outils requis – tous les modèles
Rassembler les outils et pièces nécessaires avant d’entreprendre
l’installation. Lire et observer les instructions fournies avec
chacun des outils de la liste ci-dessous.
Pièces fournies
Vérier que toutes les pièces sont présentes dans le sachet
de pièces.
Tournevis Phillips
Ruban à mesurer
Ciseaux
Perceuse sans l et
foret de
1
⁄8 po
Niveau
Crayon
Exigences d’emplacement –
tous les modèles
IMPORTANT : Observer les dispositions de tous les codes et
règlements en vigueur.
Inspecter l’emplacement où le climatiseur sera installé.
S’assurerd’avoir tout le nécessaire pour une installation correcte.
L’emplacement d’installation doit disposer de:
■ Une prise électrique avec liaison à la terre située à moins de
6pi (183cm) du point de sortie du cordon d’alimentation du
climatiseur.
REMARQUE : Ne pas utiliser de rallonge.
■ Une libre circulation de l’air dans la pièce à refroidir.
■ Une ouverture de taille sufsante pour le climatiseur.
Lespièces d’installation sont fournies pour des fenêtres
à guillotine à deux châssis mobiles.
■ Un support mural adéquat pour le poids du climatiseur.
Lepoids du climatiseur est compris entre 50lb et 75lb
(22,7kg et 34kg).
REMARQUE : Les évents de l’appareil ne doivent pas être
obstrués. L’airdoit pouvoir circuler librement à travers les évents.
A. Joint en mousse avec
bande adhésive
B. Joint en mousse sans
bande adhésive
C. 4 vis de
3
⁄8po pour glissière
supérieure
D. 3 vis de ½ po pour glissière
supérieure
E. 4 vis de
3
⁄4po
F. Fermoir de châssis
G. 2 supports de rideaux
latéraux
H. 2 rideaux latéraux
I. Glissière supérieure
A
B
C
D
H
I
G
E
F

17
A. 5 000BTU: Minimum 22
3
⁄8po (57cm)
B. 5 000BTU: Minimum 11
3
⁄8po (29cm)
Installation dans la fenêtre
Mesures de l’ouverture dans la fenêtre :
■ Largeur d’ouverture minimum de 22
3
⁄8po (57cm)
etmaximum de 37
3
⁄8 po (85cm)
■ Hauteur d’ouverture minimum de 11
3
⁄8 po (29cm)
Spécifications électriques
■ 115 V (103,5min – 126,5max.)
■ 0 à 12 A
■ Fusible temporisé 15 A ou disjoncteur
■ Si une étiquette “Circuit indépendant seulement”
est apposée sur l’appareil, utiliser l’appareil sur
uncircuit où rien d’autre n’est branché. Si ce n’est
pas possible, ilincombe à l’utilisateur de faire
installer par un électricien qualié un circuit où
l’appareil pourra être branché seul.
■ Si aucune étiquette “Circuit indépendant
seulement” n’est apposée sur l’appareil,
l’appareilpeut être branché à toute prise offrant
labonne tension et la protection adéquate.
Méthode de liaison à la terre
recommandée
Ce climatiseur doit être relié à la terre. Ce climatiseur est
équipé d’un cordon d’alimentation électrique à trois broches
pour la liaison à la terre. Pour minimiser les risques de choc
électrique, on doit brancher le cordon sur une prise de courant
de conguration correspondante, à 3 alvéoles, reliée à la terre
et installée conformément à tous les codes et règlements
locaux. Siune prise de courant compatible n’est pas disponible,
ilincombe au client de faire installer par un électricien qualié une
prise de courant à 3 alvéoles convenablement reliée à la terre.
Ilincombe au client de:
■ Contacter un électricien qualié.
■ Veiller à ce que l’installation électrique soit réalisée de
façon adéquate et en conformité avec le code national de
l’électricité, ANSI/NFPA 70 – plus récente édition, et tous
les codes et règlements locaux en vigueur.
On peut obtenir des exemplaires des normes mentionnées à
l’adresse suivante:
National Fire Protection Association
1 Batterymarch Park
Quincy, MA 02269
Cordon d’alimentation
REMARQUE : Le cordon d’alimentation de votre climatiseur peut
être différent de celui illustré.
Exigences électriques –
tous les modèles
Les caractéristiques électriques du climatiseur sont indiquées sur la
plaque signalétique. La plaque signalétique des numéros de modèle et
desérie est située du côté droit du climatiseur.
AVERTISSEMENT
Risque de choc électrique
Brancher sur une prise à 3 alvéoles reliée à la terre.
Ne pas enlever la broche de liaison à la terre.
Ne pas utiliser un adaptateur.
Ne pas utiliser un câble de rallonge.
Le non-respect de ces instructions peut causer
un décès, un incendie ou un choc électrique.
A
B
A. Bouton de test
B. Bouton de
réinitialisation
A
B
Ce climatiseur individuel Whirlpool est équipé d’un cordon
d’alimentation conforme aux exigences de l’UL. Ce cordon
d’alimentation comporte des circuits électroniques de pointe
détectant les courants de fuite. Encas d’écrasement du cordon
d’alimentation, les circuits électroniques détectent les courants
de fuite et l’alimentation est interrompue en une fraction de
seconde.

18
Préparer le climatiseur pour
l’installation
Pour tester le cordon d’alimentation :
1. Brancher le cordon d’alimentation électrique dans une prise
à trois alvéoles reliée à la terre.
2. Appuyer sur RESET (réinitialisation) (un témoin lumineux vert
s’illumine sur certains modèles).
3. Appuyer sur TEST (un déclic se fait entendre, le bouton
deréinitialisation s’enclenche et sur certains appareils, une
lumière verte s’allume).
AVERTISSEMENT
Risque de choc électrique
Brancher sur une prise à 3 alvéoles reliée à la terre.
Ne pas enlever la broche de liaison à la terre.
Ne pas utiliser un adaptateur.
Ne pas utiliser un câble de rallonge.
Le non-respect de ces instructions peut causer
un décès, un incendie ou un choc électrique.
REMARQUE :
■ Le bouton Reset (réinitialisation) doit être enfoncé pour une
utilisation correcte.
■ Le cordon d’alimentation doit être remplacé s’il ne se
déclenche pas lorsqu’on appuie sur le bouton de test ou si
l’appareil n’est pas réinitialisé.
■ Ne pas utiliser le cordon d’alimentation comme interrupteur.
Lecordon d’alimentation est conçu pour remplir les fonctions
de dispositif de protection.
■ Un cordon d’alimentation endommagé ne doit pas être réparé,
maisremplacé par un cordon d’alimentation neuf que l’on
peut se procurer auprès du fabricant du produit.
■ Le cordon d’alimentation ne comprend aucune pièce
utilisable. Ouvrir le boîtier inviolable annule toute garantie et
réclamation pour mauvaise performance.
INSTRUCTIONS D’INSTALLATION
AVERTISSEMENT
Risque du poids excessif
Utiliser deux ou plus de personnes pour déplacer et
installer le climatiseur.
Le non-respect de cette instruction peut causer
une blessure au dos ou d'autre blessure.
Enlever les matériaux d’emballage
■ Manipuler le climatiseur avec soin pendant le déballage.
■ Couper les 4bandes de plastique qui tiennent le carton
enplace.
■ Enlever le carton du dessus et soulever le climatiseur
dusocle.
■ Enlever tout résidu de ruban adhésif et de colle des surfaces
avant de mettre le climatiseur en marche. Frotter une petite
quantité de savon liquide à vaisselle sur l’adhésif avec les
doigts. Essuyer avec un linge propre et sécher.
■ Ne pas utiliser d’instruments coupants, d’alcool à friction,
de liquides inammables ou de nettoyants abrasifs pour
enlever le ruban adhésif ou la colle. Ces produits peuvent
endommager la surface de votre climatiseur.
■ Enlever tout matériel d’emballage se trouvant dans les évents
latéraux.
■ Jeter ou recycler les matériaux d’emballages de façon
convenable.
1. Déballage du climatiseur

19
1. Placer la glissière supérieure au sommet du climatiseur;
aligner les trous de la rainure supérieure avec les trous au
sommet du climatiseur.
2. À l’aide des trois vis de
3
⁄8po, xer la glissière supérieure
auclimatiseur.
Placer le côté à onglet du rideau latéral dans la rainure située
du côté droit du climatiseur.
Faire glisser le rideau latéral le long de la rainure jusqu’à ce que
le rideau soit aligné avec le sommet et le bas du climatiseur.
2. Installer la glissière supérieure
Installation des rideaux latéraux
REMARQUE : Fixer les rideaux au climatiseur avant de placer
celui-ci dans la fenêtre.
1.
Insérer le rideau latéral dans la rainure
Glisser le châssis du rideau latéral dans les glissières supérieure
et inférieure du climatiseur.
Répéter les étapes1 et 2 pour l’autre côté.
2. Insérer le châssis de rideau dans
les glissières
Châssis de rideau
Préparer l’ouverture de la fenêtre
Mesurer la largeur d’ouverture de la fenêtre (A).
Marquer le centre (B) de la fenêtre sur l’intérieur de l’appui
de fenêtre.
A
B
1. Mesurer et marquer le centre
Fixer le joint en mousse au bas du châssis de la fenêtre à l’aide
de la bande adhésive.
2. Fixer le joint en mousse supérieur
Joint en mousse
Côté à onglet du rideau latéral
Ligne axiale (par rapport
aux glissières)
Largeur d’ouverture de la fenêtre

20
Installer le climatiseur dans la fenêtre
IMPORTANT :
■ S’assurer que le climatiseur ne tombe pas de l’ouverture lors
de l’installation ou de la dépose.
■ Le point d’où ressort le cordon d’alimentation du climatiseur
ne doit pas se trouver à plus de 6pi (183cm) d’une prise
reliée à la terre.
■ Pour maximiser l’efcacité de la climatisation et de la
circulation d’air, ne pas obstruer l’entrée d’air ou laisser les
évents se décharger dans le panneau avant.
■ Pour réduire le nombre de fois où le compresseur se met en
marche et s’arrête, et pour réduire les risques que l’appareil
gèle ou s’endommage, ne pas obstruer les évents situés à
l’extérieur du climatiseur.
Enlever les fenêtres anti-orage ou les
autres obstacles
Suivre les étapes dans “préparer l’ouverture de la fenêtre”.
Si possible, retirer le châssis de la fenêtre anti-orage ou d’autres
obstacles éventuels.
Si le cadre de la fenêtre anti-orage ou les autres obstacles
NEPEUVENT être enlevés, une cale d’espacement en bois devra
être ajoutée pour faire en sorte que le climatiseur soit incliné
vers l’extérieur. Cette procédure est requise pour permettre à la
condensation et à la pluie de s’écouler à l’extérieur.
À l’aide d’un niveau et d’un ruban à mesurer, évaluer l’épaisseur
de la cale d’espacement en bois nécessaire pour incliner
légèrement la partie extérieure du climatiseur vers le bas. La
cale devrait offrir un minimum de
1
⁄2po de hauteur au-dessus de
l’obstruction.
Placer la cale d’espacement en bois sur l’appui de fenêtre.
Lacale devrait être au moins aussi large que le climatiseur
lui-même.
1
/2"
Min.
1
/2"
Min.
1. Mesurer la taille de la cale
d’espacement nécessaire
A
B
C
1
/2"
Min.
1
/2"
Min.
E
D
2. Placer la cale sur l’appui de fenêtre
A. Pièce de bois
B. Appui de fenêtre
C Intérieur
D. Extérieur
E. Châssis de fenêtre
anti-orage et autre
obstruction
AVERTISSEMENT
Risque du poids excessif
Utiliser deux ou plus de personnes pour déplacer et
installer le climatiseur.
Le non-respect de cette instruction peut causer
une blessure au dos ou d'autre blessure.
A
B
C
D
1.
Positionner le climatiseur dans la fenêtre
À l’aide de 2 personnes ou plus, placer le climatiseur dans
l’ouverture de la fenêtre et le centrer en utilisant la marque tracée
précédemment. Vérier que la glissière inférieure du climatiseur
repose sur l’appui de fenêtre.
A. Filtre à air
B. Glissière inférieure
C Appui de fenêtre
D. Extérieur
C
B
A
2.
Abaisser le châssis mobile de la fenêtre
Abaisser le châssis mobile de la fenêtre derrière la glissière
supérieure pour maintenir le climatiseur en place.
REMARQUE : Votre modèle peut différer de celui qui est illustré.
A. Rideau latéral
contre la rainure
de la fenêtre
B. Châssis
mobile de la
fenêtre derrière
la glissière
supérieure
C. Glissière
inférieure,
derrière le rebord
de fenêtre
Cale d’espacement
Obstruction
La page est en cours de chargement...
La page est en cours de chargement...
La page est en cours de chargement...
La page est en cours de chargement...
La page est en cours de chargement...
La page est en cours de chargement...
La page est en cours de chargement...
La page est en cours de chargement...
La page est en cours de chargement...
La page est en cours de chargement...
La page est en cours de chargement...
La page est en cours de chargement...
La page est en cours de chargement...
La page est en cours de chargement...
La page est en cours de chargement...
La page est en cours de chargement...
La page est en cours de chargement...
La page est en cours de chargement...
La page est en cours de chargement...
La page est en cours de chargement...
-
 1
1
-
 2
2
-
 3
3
-
 4
4
-
 5
5
-
 6
6
-
 7
7
-
 8
8
-
 9
9
-
 10
10
-
 11
11
-
 12
12
-
 13
13
-
 14
14
-
 15
15
-
 16
16
-
 17
17
-
 18
18
-
 19
19
-
 20
20
-
 21
21
-
 22
22
-
 23
23
-
 24
24
-
 25
25
-
 26
26
-
 27
27
-
 28
28
-
 29
29
-
 30
30
-
 31
31
-
 32
32
-
 33
33
-
 34
34
-
 35
35
-
 36
36
-
 37
37
-
 38
38
-
 39
39
-
 40
40


dans d''autres langues
- English: Whirlpool WHAW050BW User manual
- español: Whirlpool WHAW050BW Manual de usuario