AEG S76090XNS1 Manuel utilisateur
- Catégorie
- Réfrigérateurs-congélateurs
- Taper
- Manuel utilisateur
Ce manuel convient également à

S76090XNS1
S96090XVM2
EN User manual
FR Manuel d’utilisation
DE Benutzerhandbuch
IT Manuale per l'utente
NL Gebruiksaanwijzing

2 www.aeg.com
2
CONTENTS
1. SAFETY INFORMATION . . . . . . . . . . . . . . . . . . . . . . . . . . . . . . . . . . . . . . . . . . . . . . . . . . . . 3
2. PRODUCT DESCRIPTION . . . . . . . . . . . . . . . . . . . . . . . . . . . . . . . . . . . . . . . . . . . . . . . . . . . 5
3. CONTROL PANEL . . . . . . . . . . . . . . . . . . . . . . . . . . . . . . . . . . . . . . . . . . . . . . . . . . . . . . . . . 8
4. BEFORE FIRST USE . . . . . . . . . . . . . . . . . . . . . . . . . . . . . . . . . . . . . . . . . . . . . . . . . . . . . . . 10
5. DAILY USE . . . . . . . . . . . . . . . . . . . . . . . . . . . . . . . . . . . . . . . . . . . . . . . . . . . . . . . . . . . . . . . 11
6. OPTIONS . . . . . . . . . . . . . . . . . . . . . . . . . . . . . . . . . . . . . . . . . . . . . . . . . . . . . . . . . . . . . . . . 13
7. HELPFUL HINTS AND TIPS . . . . . . . . . . . . . . . . . . . . . . . . . . . . . . . . . . . . . . . . . . . . . . . . . . 15
8. CARE AND CLEANING . . . . . . . . . . . . . . . . . . . . . . . . . . . . . . . . . . . . . . . . . . . . . . . . . . . . 16
9. WHAT TO DO IF… . . . . . . . . . . . . . . . . . . . . . . . . . . . . . . . . . . . . . . . . . . . . . . . . . . . . . . . . 18
FOR PERFECT RESULTS
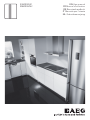
Thank you for choosing this AEG product. We have created it to give you impeccable
performance for many years, with innovative technologies that help make life simpler –
features you might not nd on ordinary appliances. Please spend a few minutes reading to get
the very best from it.
Visit our website for:
Get usage advice, brochures, trouble shooter, service information:
www.aeg.com
Register your product for better service:
www.aeg.com/productregistration
Buy Accessories, Consumables and Original spare parts for your appliance:
www.aeg.com/shop
CUSTOMER CARE AND SERVICE
We recommend the use of original spare parts.
When contacting Service, ensure that you have the following data available.
The information can be found on the rating plate. Model, PNC, Serial Number.
Warning / Caution-Safety information
General information and tips
Environmental information
Subject to change without notice.

ENGLISH 3
2
CONTENTS
1. SAFETY INFORMATION . . . . . . . . . . . . . . . . . . . . . . . . . . . . . . . . . . . . . . . . . . . . . . . . . . . . 3
2. PRODUCT DESCRIPTION . . . . . . . . . . . . . . . . . . . . . . . . . . . . . . . . . . . . . . . . . . . . . . . . . . . 5
3. CONTROL PANEL . . . . . . . . . . . . . . . . . . . . . . . . . . . . . . . . . . . . . . . . . . . . . . . . . . . . . . . . . 8
4. BEFORE FIRST USE . . . . . . . . . . . . . . . . . . . . . . . . . . . . . . . . . . . . . . . . . . . . . . . . . . . . . . . 10
5. DAILY USE . . . . . . . . . . . . . . . . . . . . . . . . . . . . . . . . . . . . . . . . . . . . . . . . . . . . . . . . . . . . . . . 11
6. OPTIONS . . . . . . . . . . . . . . . . . . . . . . . . . . . . . . . . . . . . . . . . . . . . . . . . . . . . . . . . . . . . . . . . 13
7. HELPFUL HINTS AND TIPS . . . . . . . . . . . . . . . . . . . . . . . . . . . . . . . . . . . . . . . . . . . . . . . . . . 15
8. CARE AND CLEANING . . . . . . . . . . . . . . . . . . . . . . . . . . . . . . . . . . . . . . . . . . . . . . . . . . . . 16
9. WHAT TO DO IF… . . . . . . . . . . . . . . . . . . . . . . . . . . . . . . . . . . . . . . . . . . . . . . . . . . . . . . . . 18
FOR PERFECT RESULTS
Thank you for choosing this AEG product. We have created it to give you impeccable
performance for many years, with innovative technologies that help make life simpler –
features you might not nd on ordinary appliances. Please spend a few minutes reading to get
the very best from it.
Visit our website for:
Get usage advice, brochures, trouble shooter, service information:
www.aeg.com
Register your product for better service:
www.aeg.com/productregistration
Buy Accessories, Consumables and Original spare parts for your appliance:
www.aeg.com/shop
CUSTOMER CARE AND SERVICE
We recommend the use of original spare parts.
When contacting Service, ensure that you have the following data available.
The information can be found on the rating plate. Model, PNC, Serial Number.
Warning / Caution-Safety information
General information and tips
Environmental information
Subject to change without notice.
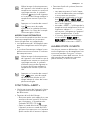
SAFETY INFORMATION
Before the installation and use of the ap-
pliance, carefully read the supplied in-
structions. The manufacturer is not re-
sponsible if an incorrect installation and
use causes injuries and damages. Always
keep the instructions with the appliance
for future reference.
CHILDREN AND VULNERABLE
PEOPLE SAFETY
WARNING!
Risk of suffocation, injury or per-
manent disability.
• Do not let persons, children included,
with reduced physical sensory, reduced
mental functions or lack of experience
and knowledge use the appliance. They
must have supervision or instruction for
the operation of the appliance by a per-
son who is responsible for their safety.
• Do not let children play with the appli-
ance.
• Keep all packaging away from children.
INSTALLATION
WARNING!
Only a qualified person must in-
stall this appliance.
• Remove all the packaging.
• Do not install or use a damaged appli-
ance.
• Obey the installation instruction sup-
plied with the appliance.
• Make sure that the floor where you in-
stall the appliance is not wet or damp.
• Do not move the appliance unless you
are minimum in 2 persons. Be careful
because the appliance is heavy. Always
wear safety gloves.
• When you move the appliance, lift up
the adjustable feet and attach tightly all
the movable parts in the appliance.
• Do not connect the appliance to the
power supply during the installation.
• When the installation is completed,
wait minimum 4 hours before you con-
nect the appliance to the power supply.
This is to let the oil to flow back in the
compressor.
• Make sure that there is access to the
mains plug after the installation.
• Make sure that there is sufficient air cir-
culation all around the appliance.
• Do not install the appliance near to ra-
diators, cookers, ovens or hobs.
• Only for appliances with water con-
nection: connect only to drinking water
supply.
• The rear of the appliance must stand
against the wall.
• Do not install the appliance where
there is direct sunlight.
Electrical connection
WARNING!
Risk of fire and electrical shock.
• The appliance must be earthed.
• Make sure that the electrical informa-
tion on the rating plate agrees with the
power supply. If not, contact an electri-
cian.
• Always use a correctly installed shock-
proof socket.
• Do not use multi-plug adapters and ex-
tension cables.
• Make sure not to cause damage to the
electrical components (e.g. mains plug,
mains cable, compressor). Contact the
Service or an electrician to change the
electrical components.
• The mains cable must stay below the
level of the mains plug.
• Do not pull the mains cable to discon-
nect the appliance. Always pull the
mains plug.
• Do not touch the mains cable or the
mains plug with wet hands.
USE
• Do not freeze again food that has been
thawed.
• Obey the storage instructions on the
packaging of frozen food.
(1*/,6+
3

4 www.aeg.com
WARNING!
Risk of fire, electrical shock or ex-
plosion.
• Use this appliance in a household envi-
ronment.
• Do not change the specification of this
appliance.
• Do not put electrical appliances (e.g.
ice cream makers) in the appliance un-
less they are stated applicable by the
manufacturer.
• Be careful not to cause damage to the
refrigerant circuit. It contains isobutane
(R600a), a natural gas with a high level
of environmental compatibility. This gas
is flammable.
• If damage occurs to the refrigerant cir-
cuit, prevent flames and sources of igni-
tions and fully ventilate the room.
• Do not let hot items to touch the plastic
parts of the appliance.
• Do not put fizzy drinks in the freezer
compartment. This will create pressure
on the drink container.
• Do not store flammable gas and liquid
in the appliance.
• Do not put flammable products or
items that are wet with flammable
products in, near or on the appliance.
WARNING!
Risk of injury or burns
• Do not touch the compressor or the
condenser. They are hot.
• Do not put your fingers or tools in the
dispenser outlet.
• Do not remove or touch items from the
freezer compartment if your hands are
wet or damp.
• When you remove an ice lolly from the
appliance, do not eat it immediately.
Wait a few minutes.
INTERNAL LIGHT
WARNING!
Risk of injury.
Visible LED radiation, do not look
directly into the beam.
• The LED light used for this appliance, is
only for household appliances. Do not
use it for house lighting.
• To replace the internal light, contact
Service.
CARE AND CLEANING
WARNING!
Before maintenance, disconnect
the mains plug from the mains.
• Do not clean the appliance with metal
objects.
• Do not use water spray and steam to
clean the appliance.
• Regularly examine the drain of the re-
frigerator and if necessary clean it. If the
drain is blocked, defrosted water col-
lects in the bottom of the appliance.
DISPOSAL
WARNING!
Risk of injury or suffocation.
• Disconnect the appliance from the
mains supply.
• Cut off the mains cable and discard it.
• Remove the door catch to prevent chil-
dren and pets to be closed in the appli-
ance.
• The refrigerant circuit and the insula-
tion materials of this appliance are
ozone-friendly.
• The insulation foam contains flammable
gas. Contact your municipal authority
for information on how to discard the
appliance correctly.
• Do not cause damage to the part of the
cooling unit that is near the heat ex-
changer.
RoHS (Directive 2002/95/EC)
Compliant
This environment-friendly product
does not contain the EU RoHS re-
stricted substances (Pb, Hg, Cd,
Cr6+, PBB, and PBDE).
SERVICE
• Contact the Service to repair or to re-
charge the appliance.
• We recommend only the use of original
spare parts.
4
www.aeg.com

ENGLISH 5
WARNING!
Risk of fire, electrical shock or ex-
plosion.
• Use this appliance in a household envi-
ronment.
• Do not change the specification of this
appliance.
• Do not put electrical appliances (e.g.
ice cream makers) in the appliance un-
less they are stated applicable by the
manufacturer.
• Be careful not to cause damage to the
refrigerant circuit. It contains isobutane
(R600a), a natural gas with a high level
of environmental compatibility. This gas
is flammable.
• If damage occurs to the refrigerant cir-
cuit, prevent flames and sources of igni-
tions and fully ventilate the room.
• Do not let hot items to touch the plastic
parts of the appliance.
• Do not put fizzy drinks in the freezer
compartment. This will create pressure
on the drink container.
• Do not store flammable gas and liquid
in the appliance.
• Do not put flammable products or
items that are wet with flammable
products in, near or on the appliance.
WARNING!
Risk of injury or burns
• Do not touch the compressor or the
condenser. They are hot.
• Do not put your fingers or tools in the
dispenser outlet.
• Do not remove or touch items from the
freezer compartment if your hands are
wet or damp.
• When you remove an ice lolly from the
appliance, do not eat it immediately.
Wait a few minutes.
INTERNAL LIGHT
WARNING!
Risk of injury.
Visible LED radiation, do not look
directly into the beam.
• The LED light used for this appliance, is
only for household appliances. Do not
use it for house lighting.
• To replace the internal light, contact
Service.
CARE AND CLEANING
WARNING!
Before maintenance, disconnect
the mains plug from the mains.
• Do not clean the appliance with metal
objects.
• Do not use water spray and steam to
clean the appliance.
• Regularly examine the drain of the re-
frigerator and if necessary clean it. If the
drain is blocked, defrosted water col-
lects in the bottom of the appliance.
DISPOSAL
WARNING!
Risk of injury or suffocation.
• Disconnect the appliance from the
mains supply.
• Cut off the mains cable and discard it.
• Remove the door catch to prevent chil-
dren and pets to be closed in the appli-
ance.
• The refrigerant circuit and the insula-
tion materials of this appliance are
ozone-friendly.
• The insulation foam contains flammable
gas. Contact your municipal authority
for information on how to discard the
appliance correctly.
• Do not cause damage to the part of the
cooling unit that is near the heat ex-
changer.
RoHS (Directive 2002/95/EC)
Compliant
This environment-friendly product
does not contain the EU RoHS re-
stricted substances (Pb, Hg, Cd,
Cr6+, PBB, and PBDE).
SERVICE
• Contact the Service to repair or to re-
charge the appliance.
• We recommend only the use of original
spare parts.
4
www.aeg.com
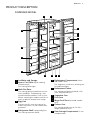
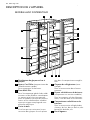
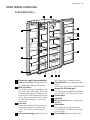
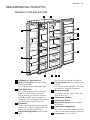
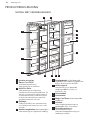
PRODUCT DESCRIPTION
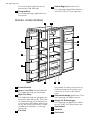
DISPENSER MODEL
1 2
891011
3
4
5
6
7
14
12
13
12
1
Ice Maker and Storage
2
Xpress Can Chiller (quick cooling
compartment)
For storing beverages.
3
Multi Plus Zone
For storing general medicines or cos-
metic products. Safekeeping is not
guaranteed for products such as aca-
demic sampling or medicine which re-
quire a specific temperature range.
4
Egg Case
Do not use this case for storing ice
cubes nor place it in the freezer com-
partment.
5
Refrigerator Shelf (tempered glass)
For storing common foods.
6
Refreshment Compartment (selec-
ted models only)
For frequently used cans, drinking wa-
ter and beverages.
7
Refreshment Pocket
For storing refrigerating foods, milk,
juice, beer bottles etc.
8
Vegetable Case
9
Fruit Case
10
Magic Cool Zone (selected models
only)
11
Freezer Case
For storing dried meat or fish for a
longer period of time.
12
Door Storage Compartment (2–star
compartment)
(1*/,6+

6 www.aeg.com
For short-term storage of food and
ice-cream.
13
Door Storage Compartment
For storing frozen food.
14
Freezer Shelf (tempered glass)
For storing frozen foods such as
meat, fish, ice-cream.
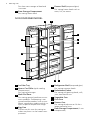
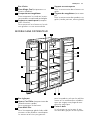
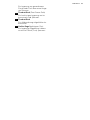
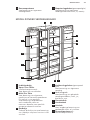
NON DISPENSER MODEL
1 2
789
3
4
5
6
12
10
11
11
1
Ice Cube Tray
2
Xpress Can Chiller (quick cooling
compartment)
For storing beverages.
3
Multi Plus Zone
For storing general medicines or cos-
metic products. Safekeeping is not
guaranteed for products such as aca-
demic sampling or medicine which re-
quire a specific temperature range.
4
Egg Case
Do not use this case for storing ice
cubes nor place it in the freezer com-
partment.
5
Refrigerator Shelf (tempered glass)
For storing common foods.
6
Refreshment Pocket
For storing refrigerating foods, milk,
juice, beer bottles etc.
7
Vegetable Case
8
Fruit Case
9
Freezer Case
For storing dried meat or fish for a
longer period of time.
10
Door Storage Compartment (2–star
compartment)
6
www.aeg.com

ENGLISH 7
For short-term storage of food and
ice-cream.
13
Door Storage Compartment
For storing frozen food.
14
Freezer Shelf (tempered glass)
For storing frozen foods such as
meat, fish, ice-cream.
NON DISPENSER MODEL
1 2
789
3
4
5
6
12
10
11
11
1
Ice Cube Tray
2
Xpress Can Chiller (quick cooling
compartment)
For storing beverages.
3
Multi Plus Zone
For storing general medicines or cos-
metic products. Safekeeping is not
guaranteed for products such as aca-
demic sampling or medicine which re-
quire a specific temperature range.
4
Egg Case
Do not use this case for storing ice
cubes nor place it in the freezer com-
partment.
5
Refrigerator Shelf (tempered glass)
For storing common foods.
6
Refreshment Pocket
For storing refrigerating foods, milk,
juice, beer bottles etc.
7
Vegetable Case
8
Fruit Case
9
Freezer Case
For storing dried meat or fish for a
longer period of time.
10
Door Storage Compartment (2–star
compartment)
6
www.aeg.com
For short-term storage of food and
ice-cream.
11
Door Storage Compartment
For storing frozen food.
12
Freezer Shelf (tempered glass)
For storing frozen foods such as
meat, fish, ice-cream.
(1*/,6+
7

8 www.aeg.com
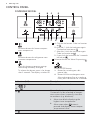
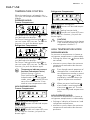
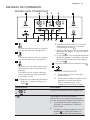
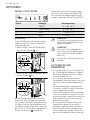
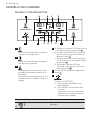
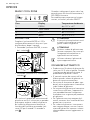
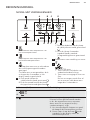
CONTROL PANEL
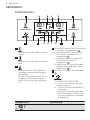
DISPENSER MODEL
$ '% &
()*+
1
Selection button for freezer compart-
ment temperature
2
Selection button for refrigerator com-
partment temperature.
3
Press this button to prevent settings
from being accidently changed.
To release the button, press it for longer
than 3 seconds. The display switches off.
4
A. Click the Ice button: Cube ice function
on
B. After No. 1 click the Ice button again:
Crushed ice function on
C. After No. 2 click the Ice button again:
Cube ice function on
D. If you click the Ice button for 3 seconds:
Ice lock on
5
Selection button for Water Dispensing
.
6
LIGHT/FILTER button:
1.
Button for switching on a dis-
penser light.
2.
Button for lter exchange or reset.
After exchanging lter or in order to
reset, press this button for 3 seconds.
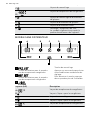
Indicators (A-H) Description
A.
Freezer temperature indicator
B.
Alarm display (no sound)
Customers can be informed of temper-
ature status when it normally rises due
to accidents (e.g. blackouts)
1.
Alarm icon blinks displaying the
highest inner temperature
2.
Alarm stops when button is
pressed and display shows temper-
ature control value
C.
Lock indicator
8
www.aeg.com

ENGLISH 9
CONTROL PANEL
DISPENSER MODEL
$ '% &
()*+
1
Selection button for freezer compart-
ment temperature
2
Selection button for refrigerator com-
partment temperature.
3
Press this button to prevent settings
from being accidently changed.
To release the button, press it for longer
than 3 seconds. The display switches off.
4
A. Click the Ice button: Cube ice function
on
B. After No. 1 click the Ice button again:
Crushed ice function on
C. After No. 2 click the Ice button again:
Cube ice function on
D. If you click the Ice button for 3 seconds:
Ice lock on
5
Selection button for Water Dispensing
.
6
LIGHT/FILTER button:
1.
Button for switching on a dis-
penser light.
2.
Button for lter exchange or reset.
After exchanging lter or in order to
reset, press this button for 3 seconds.
Indicators (A-H) Description
A.
Freezer temperature indicator
B.
Alarm display (no sound)
Customers can be informed of temper-
ature status when it normally rises due
to accidents (e.g. blackouts)
1.
Alarm icon blinks displaying the
highest inner temperature
2.
Alarm stops when button is
pressed and display shows temper-
ature control value
C.
Lock indicator
8
www.aeg.com
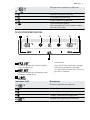
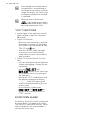
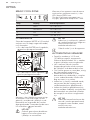
D.
Refrigerator temperature indicator
E.
Lock for Ice Maker indicator
F.
Ice Dispensing indicator
G.
Water Dispensing indicator
H.
Filter Exchange display
After 6 months of the first power input,
the icon will flicker.
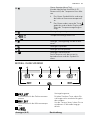
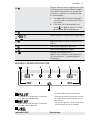
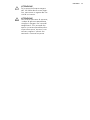
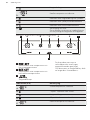
NON DISPENSER MODEL
1 2
A B D EC
3
1
Selection button for freezer compart-
ment temperature
2
Selection button for refrigerator com-
partment temperature
3
Lock button
Press this button to prevent settings
from being accidently changed.
To release the button, press it for lon-
ger than 3 seconds.
Indicators (A-E) Description
A
Freezer temperature indicator
B
“Super “indicator for freezer
C
Lock indicator
D
“Super” indicator for refrigerator
E
Refrigerator temperature indicator
(1*/,6+
9

10 www.aeg.com
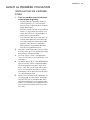
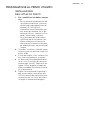
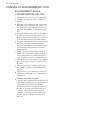
BEFORE FIRST USE
INSTALLING WATER LINE
1.
For models with Automatic Ice
Maker
– The water pressure should be
2.0~12.5 kgf/cm2 or more to run
the Automatic Ice Maker.
– Check your tap water pressure. If a
cup of 180 cc is full within 10 sec-
onds, the pressure is appropriate.
– If the water pressure is not high
enough to run the Automatic Ice
Maker, call the local plumber to get
an additional water pressure pump.
2.
When installing the water tubes, en-
sure they are not close to any hot sur-
faces.
3.
The water filter only “filters” water. It
does not eliminate any bacteria or mi-
crobes.
4.
The filter life depends on the amount
of use. We recommend you replace
the filter at least once every 6 months.
When attaching the filter, place it for
an easy access (to remove and re-
place) .
5.
After installing refrigerator and water
line system, select WATER on your
control panel and press it for 2–3 mi-
nutes to supply water into the water
tank and dispense water.
0
www.aeg.com

ENGLISH 11
BEFORE FIRST USE
INSTALLING WATER LINE
1.
For models with Automatic Ice
Maker
– The water pressure should be
2.0~12.5 kgf/cm2 or more to run
the Automatic Ice Maker.
– Check your tap water pressure. If a
cup of 180 cc is full within 10 sec-
onds, the pressure is appropriate.
– If the water pressure is not high
enough to run the Automatic Ice
Maker, call the local plumber to get
an additional water pressure pump.
2.
When installing the water tubes, en-
sure they are not close to any hot sur-
faces.
3.
The water filter only “filters” water. It
does not eliminate any bacteria or mi-
crobes.
4.
The filter life depends on the amount
of use. We recommend you replace
the filter at least once every 6 months.
When attaching the filter, place it for
an easy access (to remove and re-
place) .
5.
After installing refrigerator and water
line system, select WATER on your
control panel and press it for 2–3 mi-
nutes to supply water into the water
tank and dispense water.
0
www.aeg.com
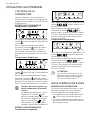
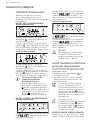
DAILY USE
TEMPERATURE CONTROL
When the appliance is plugged in for a
first time, the temperature mode is set to
Middle.
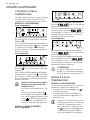
DISPENSER MODEL
Freezer Compartment
For temperature setting push button,
until desired value displays.
For Faster Freezing function hold
but-
ton until super LED turns on. To stop this
function, just push the button again.
Refrigerator Compartment
For temperature setting push button,
until desired value displays.
For Faster Cooling function hold
but-
ton until super LED turns on. To stop this
function, just push the button again.
Temperature indicator convert
function (Fahrenheit-Celsius)
Default setting is Celsius.
Press lock button
to enter
locked mode. Under the locked
mode , press
and WATER but-
ton at the same time for 10 sec-
onds to swap temperature scale.
NON DISPENSER MODEL
Freezer Compartment
For temperature setting push
button until desired temper-
ature displays.
For Faster Freezing function hold
button until super LED turns
on. To stop this function, just push the
button again.
Refrigerator Compartment
For temperature setting push
button until desired temper-
ature displays.
For Faster Cooling function hold
button until super LED turns
on. To stop this function, just push the
button again.
CAUTION!
Food in refrigerator can be frozen
if the ambient temperature of the
refrigerator is below 5° C.
HIGH TEMPERATURE MODE
DISPENSER MODEL
An increase in temperature in freezer or
refrigerator compartment is indicated by:
•
flashing the alarm icon
(buzzer does
not sound)
• electronic system shows the maximum
temperature reached inside the com-
partments
Even though normal operation of
the appliance is restored and in-
ner temperature reaches a normal
range, alarm icon
still blinks
and display indicator shows the
highest temperature reached .
When you press Lock button ,
alarm mode is terminated and
alarm icon
goes off. The dis-
play shows adjusted temperature
value.
NON DISPENSER MODEL
An increase in temperature in freezer or
refrigerator compartment is indicated by:
• flashing of a display of freezer or / and
refrigerator compartment
• electronic system shows the maximum
temperature reached inside the com-
partments
(1*/,6+
1

12 www.aeg.com
Even though normal operation of
the appliance is restored and in-
ner temperature reaches a normal
range, the display still flashes and
the highest temperature reached
is indicated.
When you press Lock button
, high temperature mode is
terminated and the display shows
adjusted temperature value.
"OFF" FUNCTIONS
• Interior lights of the appliance turn off
when the door is open for more than
10 minutes
• Display Off function:
– 5 minutes after no button is pressed
or no doors are open, all the display
LED lamps switch off except for WA-
TER, ICE and
icon
– After the LED off mode, the appli-
ance returns to a normal display
mode when you press any button or
open the door.
• System Off function (Power Off func-
tion ):
– you can stop operating the appliance
without unplugging it, especially dur-
ing holiday
–
pressing
and
button at the same time
for 5 seconds result in switching off
the appliance
– during the “OFF” mode freezer and
refrigerator temperature displays
“ — — “ . Other LED lights go off
and the whole operation of your ap-
pliance stops.
– on the contrary, hold button
and to-
gether for 5 seconds to clear the
“OFF” function
DOOR OPEN ALARM
An acoustic alarm will sound if refrigerator
or freezer door is left open for 1 minute.
The alarm will stop after 5 minutes. When
normal conditions are restored (door is
closed), the alarm stops.
2
www.aeg.com

ENGLISH 13
Even though normal operation of
the appliance is restored and in-
ner temperature reaches a normal
range, the display still flashes and
the highest temperature reached
is indicated.
When you press Lock button
, high temperature mode is
terminated and the display shows
adjusted temperature value.
"OFF" FUNCTIONS
• Interior lights of the appliance turn off
when the door is open for more than
10 minutes
• Display Off function:
– 5 minutes after no button is pressed
or no doors are open, all the display
LED lamps switch off except for WA-
TER, ICE and
icon
– After the LED off mode, the appli-
ance returns to a normal display
mode when you press any button or
open the door.
• System Off function (Power Off func-
tion ):
– you can stop operating the appliance
without unplugging it, especially dur-
ing holiday
–
pressing
and
button at the same time
for 5 seconds result in switching off
the appliance
– during the “OFF” mode freezer and
refrigerator temperature displays
“ — — “ . Other LED lights go off
and the whole operation of your ap-
pliance stops.
– on the contrary, hold button
and to-
gether for 5 seconds to clear the
“OFF” function
DOOR OPEN ALARM
An acoustic alarm will sound if refrigerator
or freezer door is left open for 1 minute.
The alarm will stop after 5 minutes. When
normal conditions are restored (door is
closed), the alarm stops.
2
www.aeg.com
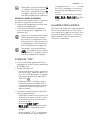
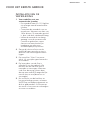
OPTIONS
MAGIC COOL ZONE
When you plug the appliance for a first
time FRESH LED is ON.
For changing settings step by step use
SELECT button.
Step Display Target Temperature
1. FRESH +5°C to +6°C.
2. VEGETABLE +3°C to +4°C.
3. FISH –1°C to +0°C.
4. MEAT –3°C to –2°C.
DISPENSER
Select WATER or ICE button and smooth-
ly push the lever with you cup, after 2 sec-
onds:
•
If you pressed WATER button,
icon
will light up
•
If you pressed ICE button,
icon will
light up.
When cleaning the ice cubes case assem-
bly or you do not use it for a longer time,
remove the ice cubes from the Ice Stor-
age Case and lock the Ice Maker by push-
ing ICE button for 3 seconds.
will light
up.
CAUTION!
Avoid using thin fragile cups or
crystal glasses while collecting ice
cubes.
CAUTION!
If the ice is discoloured, stop us-
ing the dispenser and call a serv-
ice agent.
Use only ice from this appliance.
AUTOMATIC ICE MAKER
• About 10 ice cubes are made at one
time, 14–15 times a day. If the Ice Stor-
age Case is full, ice making stops.
• It is normal for Ice Maker to make bang-
ing sounds when ice cubes are falling
into Ice Storage Case.
• To prevent a bad odour or smells, regu-
larly clean the Ice Cube Storage Case.
• If the amount of ice in the storage case
is not sufficient, the ice may not be dis-
pensed. Wait a day or so to make more
ice.
• If the ice does not dispense easily, en-
sure the dispenser outlet is not
blocked.
• If ice cubes get stuck and do not dis-
pense, pull out the Ice Storage Case
and separate the ice cubes which may
have stuck together.
CAUTION!
If the amount of water which is
supplied to Ice Maker needs ad-
justing, call for a service agent.
(1*/,6+
3

14 www.aeg.com
CAUTION!
In case of power failure ice cubes
may melt and flow down to the
floor. If you expect such situation
to last for long hours, pull out the
case and remove the ice cubes
from it, then replace it back.
4
www.aeg.com

ENGLISH 15
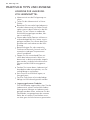
HELPFUL HINTS AND TIPS
HINTS FOR STORING FOOD
t Wash foods before storing.
t Divide and separate foods into smaller
pieces.
t Place watery foods or foods with much
moisture in front of shelves (close to the
door side). If they are placed close to
the cold air spout, they can be frozen.
t Warm or hot foods should be cooled
down enough before storing to reduce
power consumption and to enhance re-
frigeration performance.
t Be careful in storing tropical fruit such
as bananas, pineapples and tomatoes
as they can easily deteriorate in lower
temperature.
t Keep as much space between foods as
possible. If it is too tight or too close,
cold air circulation is hindered, resulting
in poor refrigeration.
t Never forget to cover or wrap foods to
prevent odour of foods.
t Do not store vegetables in the chilled
place as they can become frozen.
t Egg case can be placed on a refrigera-
tor shelf the way you prefer.
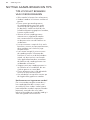
Storage of frozen food
The freezer baskets ensure that it is quick
and easy to nd the food package you want.
If large quantities of food are to be stored,
remove all drawers except for the bottom
basket which needs to be in place to provide
good air circulation.
15

16 www.aeg.com
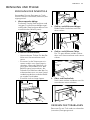
CARE AND CLEANING
CLEANING OF THE INTERIOR
PARTS
Use cloth with water and mild (neutral) de-
tergent to clean.
1.
Dispenser Water Shelf
Remove the spill grill and clean the
water shelf regularly (the spill shelf is
not self-draining).
2.
Ice Cube Storage Case
– Removing: pull up the case assem-
bly forward to remove.
– Replacing: fit to the side grooves
and insert to the end. If it is difficult
to fully insert the case, remove it,
rotate the swirl coil in the case or
drive mechanism a quarter turn and
insert again.
– Do not store ice cubes for too long.
3.
Freezer and Refrigerator Pockets
Hold both ends and pull up.
4.
Freezer and Refrigerator Shelves
Open the door completely, then pull
shelves forward to remove.
5.
Vegetable and Fruit Case
Pull forward and lift up a bit to re-
move.
CLEANING OF DOOR
PACKAGING
Use cloth with mild (neutral) detergent.
CLEANING OF THE BACK OF
THE APPLIANCE (MACHINE
ROOM)
Remove dust on a grill with a vacuum
cleaner at least once a year.
6
www.aeg.com

ENGLISH 17
CARE AND CLEANING
CLEANING OF THE INTERIOR
PARTS
Use cloth with water and mild (neutral) de-
tergent to clean.
1.
Dispenser Water Shelf
Remove the spill grill and clean the
water shelf regularly (the spill shelf is
not self-draining).
2.
Ice Cube Storage Case
– Removing: pull up the case assem-
bly forward to remove.
– Replacing: fit to the side grooves
and insert to the end. If it is difficult
to fully insert the case, remove it,
rotate the swirl coil in the case or
drive mechanism a quarter turn and
insert again.
– Do not store ice cubes for too long.
3.
Freezer and Refrigerator Pockets
Hold both ends and pull up.
4.
Freezer and Refrigerator Shelves
Open the door completely, then pull
shelves forward to remove.
5.
Vegetable and Fruit Case
Pull forward and lift up a bit to re-
move.
CLEANING OF DOOR
PACKAGING
Use cloth with mild (neutral) detergent.
CLEANING OF THE BACK OF
THE APPLIANCE (MACHINE
ROOM)
Remove dust on a grill with a vacuum
cleaner at least once a year.
6
www.aeg.com
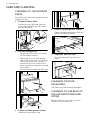
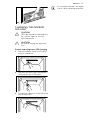
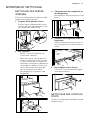
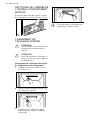
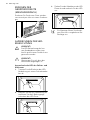
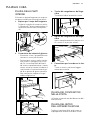
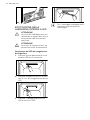
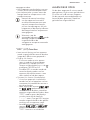
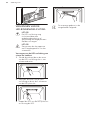
CHANGING THE INTERIOR
LED LIGHT
CAUTION!
LED light should be replaced only
by a service agent or similarly
qualified person.
CAUTION!
Be sure to unplug the appliance
first!
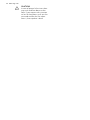
Freezer and refrigerator LED changing
1.
Separate a back side of a LED cover
using a screwdriver.
2.
Separate the LED cover and loosen 2
fixing screws for a LED plate.
x2
3.
Disconnect a harness of the LED plate
and change LED.
An assembly method is the oppo-
site of a disassembling sequence.
(1*/,6+
7

18 www.aeg.com
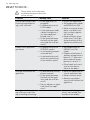
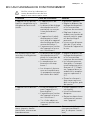
WHAT TO DO IF…
Please check up the following
troubleshooting tips before you
call for service!
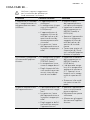
Problem Checkup Point Solution
It never gets cold inside.
Freezing and refrigerat-
ing is not sufficient.
• Is the appliance un-
plugged?
• Is temperature set to
LOW mode?
• Is the appliance under
a direct sunlight or is
any heat appliance
placed near it ?
• Is the space between
the back of the appli-
ance and the wall too
small?
• Plug in the appliance.
• Set temperature mode
to MIDDLE or HIGH .
• Move to a place where
there is no direct sun-
light, no heat applian-
ces around.
• Keep sufficient space
(more than 10 cm) be-
tween the back of the
appliance and the wall.
Foods in the appliance
get frozen.
• Is temperature set to
STRONG mode ?
• Is surrounding temper-
ature too low?
• Is the food with much
moisture stored close
to the cold air spout?
• Set temperature to
MIDDLE or LOW
mode.
• Foods can be frozen if
ambient temperature is
below 5 °C. Move to a
place where the tem-
perature is over 5 °C.
• Place foods with mois-
ture on the shelves
close to the doors.
Strange sound from the
appliance.
• Is floor beneath the ap-
pliance uneven?
• Is the space between
the back of the appli-
ance and the wall too
small?
• Do any objects or other
stuff touch the appli-
ance?
• Move the appliance to
a level and even floor.
• Keep sufficient space.
• Remove any object
away which touches the
appliance.
Strange sounds : crack-
ing, clicking, water flow-
ing, humming or buzzing.
It is normal (if the appli-
ance is not leveled, the
sound can be louder).
8
www.aeg.com

ENGLISH 19
WHAT TO DO IF…
Please check up the following
troubleshooting tips before you
call for service!
Problem Checkup Point Solution
It never gets cold inside.
Freezing and refrigerat-
ing is not sufficient.
• Is the appliance un-
plugged?
• Is temperature set to
LOW mode?
• Is the appliance under
a direct sunlight or is
any heat appliance
placed near it ?
• Is the space between
the back of the appli-
ance and the wall too
small?
• Plug in the appliance.
• Set temperature mode
to MIDDLE or HIGH .
• Move to a place where
there is no direct sun-
light, no heat applian-
ces around.
• Keep sufficient space
(more than 10 cm) be-
tween the back of the
appliance and the wall.
Foods in the appliance
get frozen.
• Is temperature set to
STRONG mode ?
• Is surrounding temper-
ature too low?
• Is the food with much
moisture stored close
to the cold air spout?
• Set temperature to
MIDDLE or LOW
mode.
• Foods can be frozen if
ambient temperature is
below 5 °C. Move to a
place where the tem-
perature is over 5 °C.
• Place foods with mois-
ture on the shelves
close to the doors.
Strange sound from the
appliance.
• Is floor beneath the ap-
pliance uneven?
• Is the space between
the back of the appli-
ance and the wall too
small?
• Do any objects or other
stuff touch the appli-
ance?
• Move the appliance to
a level and even floor.
• Keep sufficient space.
• Remove any object
away which touches the
appliance.
Strange sounds : crack-
ing, clicking, water flow-
ing, humming or buzzing.
It is normal (if the appli-
ance is not leveled, the
sound can be louder).
8
www.aeg.com
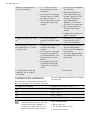
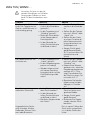
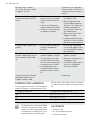
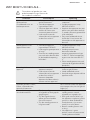
Odour or disgusting
smell from the inside .
• Is the food stored un-
covered or unwrap-
ped?
• Are the shelves and
pockets stained with
food stuff?
• Is the food stored for
too long?
• Be sure to cover and
wrap the foods.
• Clean the interior parts
of the appliance regu-
larly. Once smell gets
soaked to those parts,
it is not easy to re-
move.
• Do not store foods for
too long.
• The appliance is nei-
ther a perfect nor a
permanent food keep-
er.
Door do not open easily. • Was the door closed
and open again imme-
diately?
• In this case wait for a
minute, then it will
open easily.
Frost and dew inside the
appliance and on the
cabinet surface.
• Was the door open for
too long?
• Were the foods with
much moisture stored
uncovered or unwrap-
ped?
• Is temperature and/or
humidity around the
appliance high?
• Do not leave the door
open for a long time.
• Be sure to cover and
wrap the foods.
• Install the appliance in
a drier and cooler
place.
Front and side of the ap-
pliance feels warm or hot.
It is normal.
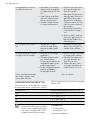
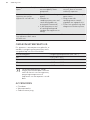
AMBIENT TEMPERATURE
This appliance is designed to operate in
ambient temperature specified by its cat-
egory marked on the rating plate.
Climate category Ambient temperature (from... to...)
SN +10°C to + 32°C
N +16°C to + 32°C
ST +16°C to + 38°C
T +16°C to + 43°C
Internal temperature may be af-
fected by factors such as location
of the appliance, ambient temper-
ature or frequency of door open-
ing.
ACCESSORIES
• Filter Box
• Water Supply Kit
• User Manual
(1*/,6+
9

20 www.aeg.com
20
www.aeg.com
SOMMAIRE
1. CONSIGNES DE SÉCURITÉ . . . . . . . . . . . . . . . . . . . . . . . . . . . . . . . . . . . . . . . . . . . . . . . . . . 21
2. DESCRIPTION DE L'APPAREIL . . . . . . . . . . . . . . . . . . . . . . . . . . . . . . . . . . . . . . . . . . . . . . . 2 4
3. BANDEAU DE COMMANDE . . . . . . . . . . . . . . . . . . . . . . . . . . . . . . . . . . . . . . . . . . . . . . . . . 27
4. AVANT LA PREMIÈRE UTILISATION . . . . . . . . . . . . . . . . . . . . . . . . . . . . . . . . . . . . . . . . . . . 29
5. UTILISATION QUOTIDIENNE . . . . . . . . . . . . . . . . . . . . . . . . . . . . . . . . . . . . . . . . . . . . . . . . 30
6. OPTIONS . . . . . . . . . . . . . . . . . . . . . . . . . . . . . . . . . . . . . . . . . . . . . . . . . . . . . . . . . . . . . . . . 32
7. CONSEILS UTILES . . . . . . . . . . . . . . . . . . . . . . . . . . . . . . . . . . . . . . . . . . . . . . . . . . . . . . . . . . 34
8. ENTRETIEN ET NETTOYAGE . . . . . . . . . . . . . . . . . . . . . . . . . . . . . . . . . . . . . . . . . . . . . . . . . 35
9. EN CAS D'ANOMALIE DE FONCTIONNEMENT . . . . . . . . . . . . . . . . . . . . . . . . . . . . . . . . 36
POUR DES RÉSULTATS PARFAITS
Merci d'avoir choisi ce produit AEG. Nous l'avons conçu pour qu'il vous offre des performances
irréprochables pour longtemps, en intégrant des technologies innovantes qui vous simplient
la vie grâce à des caractéristiques que vous ne trouverez pas forcément sur des appareils ordinaires.
Veuillez prendre quelques instants pour lire cette notice an d'utiliser au mieux votre appareil.
Visitez notre site Internet pour :
Obtenir des conseils d'utilisation, des brochures, de l'aide, des informations :
www.aeg.com
Enregistrer votre produit pour obtenir un meilleur service :
www.aeg.com/productregistration
Acheter des accessoires, consommables et pièces de rechange d'origine pour votre appareil :
www.aeg.com/shop
SERVICE APRÈS-VENTE
N'utilisez que des pièces de rechange d'origine.
Avant de contacter le service, assurez-vous de disposer des informations suivantes :
Vous trouverez ces informations sur la plaque signalétique. Modèle, PNC, numéro de série.
Avertissement – Informations importantes sur la sécurité.
Informations générales et conseils
Informations écologiques
Sous réserve de modications.
La page est en cours de chargement...
La page est en cours de chargement...
La page est en cours de chargement...
La page est en cours de chargement...
La page est en cours de chargement...
La page est en cours de chargement...
La page est en cours de chargement...
La page est en cours de chargement...
La page est en cours de chargement...
La page est en cours de chargement...
La page est en cours de chargement...
La page est en cours de chargement...
La page est en cours de chargement...
La page est en cours de chargement...
La page est en cours de chargement...
La page est en cours de chargement...
La page est en cours de chargement...
La page est en cours de chargement...
La page est en cours de chargement...
La page est en cours de chargement...
La page est en cours de chargement...
La page est en cours de chargement...
La page est en cours de chargement...
La page est en cours de chargement...
La page est en cours de chargement...
La page est en cours de chargement...
La page est en cours de chargement...
La page est en cours de chargement...
La page est en cours de chargement...
La page est en cours de chargement...
La page est en cours de chargement...
La page est en cours de chargement...
La page est en cours de chargement...
La page est en cours de chargement...
La page est en cours de chargement...
La page est en cours de chargement...
La page est en cours de chargement...
La page est en cours de chargement...
La page est en cours de chargement...
La page est en cours de chargement...
La page est en cours de chargement...
La page est en cours de chargement...
La page est en cours de chargement...
La page est en cours de chargement...
La page est en cours de chargement...
La page est en cours de chargement...
La page est en cours de chargement...
La page est en cours de chargement...
La page est en cours de chargement...
La page est en cours de chargement...
La page est en cours de chargement...
La page est en cours de chargement...
La page est en cours de chargement...
La page est en cours de chargement...
La page est en cours de chargement...
La page est en cours de chargement...
La page est en cours de chargement...
La page est en cours de chargement...
La page est en cours de chargement...
La page est en cours de chargement...
La page est en cours de chargement...
La page est en cours de chargement...
La page est en cours de chargement...
La page est en cours de chargement...
La page est en cours de chargement...
La page est en cours de chargement...
La page est en cours de chargement...
La page est en cours de chargement...
La page est en cours de chargement...
La page est en cours de chargement...
La page est en cours de chargement...
La page est en cours de chargement...
La page est en cours de chargement...
La page est en cours de chargement...
La page est en cours de chargement...
La page est en cours de chargement...
La page est en cours de chargement...
La page est en cours de chargement...
La page est en cours de chargement...
La page est en cours de chargement...
-
 1
1
-
 2
2
-
 3
3
-
 4
4
-
 5
5
-
 6
6
-
 7
7
-
 8
8
-
 9
9
-
 10
10
-
 11
11
-
 12
12
-
 13
13
-
 14
14
-
 15
15
-
 16
16
-
 17
17
-
 18
18
-
 19
19
-
 20
20
-
 21
21
-
 22
22
-
 23
23
-
 24
24
-
 25
25
-
 26
26
-
 27
27
-
 28
28
-
 29
29
-
 30
30
-
 31
31
-
 32
32
-
 33
33
-
 34
34
-
 35
35
-
 36
36
-
 37
37
-
 38
38
-
 39
39
-
 40
40
-
 41
41
-
 42
42
-
 43
43
-
 44
44
-
 45
45
-
 46
46
-
 47
47
-
 48
48
-
 49
49
-
 50
50
-
 51
51
-
 52
52
-
 53
53
-
 54
54
-
 55
55
-
 56
56
-
 57
57
-
 58
58
-
 59
59
-
 60
60
-
 61
61
-
 62
62
-
 63
63
-
 64
64
-
 65
65
-
 66
66
-
 67
67
-
 68
68
-
 69
69
-
 70
70
-
 71
71
-
 72
72
-
 73
73
-
 74
74
-
 75
75
-
 76
76
-
 77
77
-
 78
78
-
 79
79
-
 80
80
-
 81
81
-
 82
82
-
 83
83
-
 84
84
-
 85
85
-
 86
86
-
 87
87
-
 88
88
-
 89
89
-
 90
90
-
 91
91
-
 92
92
-
 93
93
-
 94
94
-
 95
95
-
 96
96
-
 97
97
-
 98
98
-
 99
99
-
 100
100


AEG S76090XNS1 Manuel utilisateur
- Catégorie
- Réfrigérateurs-congélateurs
- Taper
- Manuel utilisateur
- Ce manuel convient également à
dans d''autres langues
- italiano: AEG S76090XNS1 Manuale utente
- English: AEG S76090XNS1 User manual
- Deutsch: AEG S76090XNS1 Benutzerhandbuch
- Nederlands: AEG S76090XNS1 Handleiding