DELTA DORE TYXAL+ CLT 8000 Guide d'installation
- Catégorie
- Composants de dispositif de sécurité
- Taper
- Guide d'installation
Ce manuel convient également à

LS14500 x 3 - 3.6 V - 7,8 Ah - Lithium
Autonomie 10 ans - Autonomy 10 years
Consumption stand-by : < 10 μA
Consumption : 120 mA max.
868,30 MHz et 868,95 MHz (EN 300 220) - 100 m Ý 300m
-10°C / +70°C
-10°C / +55°C
IP
IP 31
IK 06
75%
89 x 168 x 24 mm
270 gr.
R&TTE 1999/5/CE
Important product information (Ë Ì)
Contenu / Contents / Inhalt / Contenuto / Contenido / :AWARTOÜĀ / Inhoud
www.deltadore.com
CLT 8000 TYXAL+
Mise en service / Activation / Inbetriebnahme / Attivazione / Activación / Uruchamianie /
Inbedrijfstelling
~1,50 m
abc def
jklghi mno
tuvpqrs wxyz
abc def
jklghi mno
tuvpqrs wxyz
Fixation / Mounting / Montage / Fissaggio / Fijación / Mocowanie / Bevestiging
!
UP
HAUT
!
C
1 2
V1
V2
V3
D3D2
D1
3
3
4
Lithium battery
3 x LS 14500 3,6 V
1
1
2
2
abc def
jklghi mno
tuvpqrs wxyz
abc def
jklghi mno
tuvpqrs wxyz
Bloc piles à l’intérieur /
Battery unit inside /
Mit Batterie-Block /
Blocco batterie all’interno /
Bloque de pilas en el interior /
Zestaw baterii wewn¹trz /
Batterijblok binnenin
Instructions
Important
Product
Informations
FR
Notice d’installation
EN
Installation guide
DE
Installationsanleitung
IT
Guida di installazione
ES
Manual de instalación
PL
Instrukcja instalacji
NL
Installatiehandleiding
FR
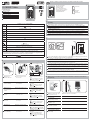
Ê Séparez les
2 parties du boîtier.
EN
Ê Separate the
2 parts of the unit.
DE
Ê Öffnen Sie das
Gehäuse, indem Sie die
zwei Gehäuseteile
trennen.
IT
Ê Separare le 2 parti del
prodotto.
ES
Ê Separe las 2 partes de
la carcasa.
PL
Ê Oddziel obie
CZĂÜCIÒOBUDOWY
NL
Ê Scheid de twee delen
van de behuizing.
Ë Tracez et percez les trous
D1, D2 et D3.
Ë Mark and drill holes
D1, D2 and D3.
Ë Bohrstellen markieren und
Löcher D1, D2 und D3 bohren.
Ë Tracciare dei segni e fare dei
fori D1,D2 e D3
Ë Señale y perfore los orificios
D1, D2 y D3.
Ë 7YZNACZÒIÒWYWIERĀÒOTWORY
D1, D2 i D3.
Ë Markeer en boor de gaten
D1, D2 en D3.
Ì Fixez le socle avec les vis V1, V2
et V3.
!
à ne pas détériorer ou perdre
la pièce en caoutchouc
C
(néces-
saire à l’autoprotection).
Ì Mount the base using screws V1,
V2 and V3.
!
Do not damage or lose the
rubber part
C
(required for the
tamper alarm).
Ì Sockel mit Schrauben V1, V2 und
V3 befestigen.
!
Gummiteil nicht beschädigen
oder verlieren
C
(für Sabotag-
eschutz).
Ì Fissare il supporto con le viti V1,V2
e V3.
!
Non danneggiare o perdere
la parte in gomma
C
(necessaria
all’autoprotezione).
Ì Fije la base con los tornillos V1, V2
y V3.
!
no deteriore o pierda la pieza
de caucho
C
(necesaria para la
autoprotección).
Ì :AMOCUJÒPODSTAWĂÒZAÒPOMOCæÒ
WKRĂTWÒ6Ò6ÒIÒ6
!
ÒBYÒNIEÒUSZKODZIĀÒANIÒNIEÒZGUBIĀÒ
ELEMENTUÒGUMOWEGO
C
ÒKONIECZNEGOÒ
DOÒAUTOMATYCZNEJÒOCHRONY
Ì Bevestig de basis met de vijzen V1,
V2 en V3.
!
Wees voorzichtig dat u het
rubberen deel niet beschadigt/
verliest
C
(nodig voor bescherming
tegen vandalisme).
FR
Ê Mettez en place le bloc piles
en respectant son sens.
EN
Ê Fit the battery unit, observing
the right polarity.
DE
Ê Batterie-Block unter Beach-
tung der Polung einsetzen.
IT
Ê Inserire il blocco batterie
rispettando i poli
ES
Ê Coloque todas las pilas
respetando la polaridad.
PL
Ê 7åêÒZESTAWÒBATERIIÒPRZESTRZE
GAJæCÒPRAWIDåOWEGOÒKIERUNKU
NL
Ê Plaats het batterijblok in de
juiste richting.
Ë Refermez le boîtier et verrouillez-le.
Ë Close and lock the unit.
Ë Gehäuse schließen und verriegeln.
Ë Richiudere il prodotto e bloccarlo.
Ë Cierre la carcasa.
Ë :AMKNIJÒOBUDOWĂÒIÒZABLOKUJÒJæ
Ë Sluit de behuizing en vergrendel deze.
FR
Avant d’utiliser le clavier, vous devez l’associer au système (voir notice installation système).
EN
Before using the keypad, you must associate it with the system (refer to system installation guide).
DE
Vor der Verwendung der Bedieneinheit müssen Sie diese dem System zuordnen (siehe
Installationsanleitung System).
IT
Prima di utilizzare la tastiera, associarla al sistema (Vedi istruzioni «Sistema»).
ES
Antes de utilizar el teclado, debe asociarlo con el sistema (ver manual de instalación del sistema).
PL
0RZEDÒUêYCIEMÒKLAWIATURYÒNALEêYÒJæÒPOWIæZAĀÒZÒSYSTEMEMÒPATRZÒINSTRUKCJAÒINSTALACJIÒSYSTEMU
NL
Voordat u het toetsenbord gebruikt, moet u het koppelen aan het systeem (zie handleiding).
Présentation / Presentation / Beschreibung / Presentazione / Presentación / Prezentacja /
Voorstelling
1
Emplacement / Location / Einbauort / Posizionamento / Ubicación / Lokalizacja / Locatie
2
FR
Il est conseillé d’installer le clavier près d’un des accès principaux, si possible protégé par un détecteur
d’intrusion, et à hauteur du regard pour faciliter les manipulations.
EN
It is advisable to install the keypad near one of the main entrances, if possible protected by an intrusion
detector mounted at eye level for easier use.
DE
Die Bedieneinheit sollte an einem der Hauptzugänge zur bequemeren Bedienung in Augenhöhe
installiert, und möglichst durch einen Einbruchmelder geschützt werden.
IT
E’consigliato installare la tastiera vicino ad un accesso principale, se possibile protetta da un sensore di
intrusione, e all’altezza uomo per facilitare l’utilizzo.
ES
Se recomienda instalar el teclado cerca de uno de los accesos principales, protegido con un detector
de intrusión si es posible, y a la altura de la vista para facilitar su manipulación.
PL
!BYÒUåATWIĀÒOBSåUGĂÒZALECAÒSIĂÒMONTOWANIEÒKLAWIATURYÒWÒPOBLIêUÒGåWNYCHÒWEJÜĀÒNAÒWYSOKOÜCIÒ
WZROKUÒWÒMIARĂÒMOêLIWOÜCIÒZABEZPIECZAJæCÒJæÒCZUJNIKIEMÒWåAMANIA
NL
Het wordt aanbevolen om het toetsenbord in de buurt van een van de hoofdingangten te installeren,
indien mogelijk beveiligd door een bewegingsmelder, en op ooghoogte.
Ø max = 3 mm
Environmental class II
Autoprotection à l’ouverture et à l’arrachement / Tamper alarm on opening or removal of unit /
Sabotagekontakt : Auslösung beim Öffnen und Abreißen / Autoprotezione all’apertura e alla rimozione
forzata / Autoprotección contra la apertura y el vandalismo / &UNKCJAÒANTYSABOTAêOWAÒWÒPRZYPADKUÒPRBYÒ
WYRWANIAÒLUBÒOTWARCIA / Automatische bescherming tegen opening en losrukken
EN 50131-3 / RTC 50131-3 / EN 50131-6 /
RTC 50131-6 / EN 50131-1 Grade 2

2
1
4
1
2
3
23/03/15 12:48
SOS
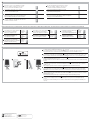
Réglages
OFF
Saisir votre code
Code d’accès / Access code / Zugangscode / Codice d’accesso / Código de acceso / +ODÒDOSTĂPU / Toegangscode
FR
A la mise en service, le code installateur est 123456.
Pour créer, modifier ou supprimer un code d’accès,
reportez-vous à la notice d’installation système.
EN
Upon activation, the installer code is 123456.
To create, modify or delete an access code,
refer to the system installation guide.
DE
Bei der ersten Inbetriebnahme ist der Installateurcode auf 123456 eingestellt.
Zum Erstellen, Ändern oder Löschen des Zugangscodes
bitte die Installationsanleitung des Systems beachten.
IT
All’avvio, il codice installatore è 123456.
Per creare, modificare o cancellare un codice d’accesso,
consultare le istruzioni «Sistema».
5
ES
El código de instalación para la activación es 123456.
Para crear, modificar o eliminar el código de acceso
compruebe el manual de instalación del sistema.
PL
0ODCZASÒURUCHAMIANIAÒKODÒINSTALATORAÒTOÒÒ
!BYÒUTWORZYĀÒZMIENIĀÒLUBÒUSUNæĀÒKODÒDOSTĂPU
PATRZÒINSTRUKCJAÒINSTALACJIÒSYSTEMU
NL
De standaard code is 123456.
Als u een toegangscode wilt aanmaken, wijzigen of verwijderen,
raadpleeg dan de installatiehandleiding.
Fonctionnement avec un système d’alarme / Operation with an alarm system / Betrieb mit einer Alarmanlage / Funzionamento con un sistema d’allarme / Funcionamiento con el sistema de
alarma / Działanie z systemem alarmowym / Werking met alarmsysteem
FR
• Association avec un système d’alarme
• Personnalisation de l’installation
• Retour à la configuration usine
IT
• Associazione con un sistema d’allarme
• Personalizzazione dell’installazione
• Ritorno alla configurazione di fabbrica
PL
jÒ0OWIæZANIEÒZÒSYSTEMEMÒALARMOWYM
jÒ0ERSONALIZACJAÒINSTALACJI
jÒ0RZYWRCENIEÒKONµGURACJIÒFABRYCZNEJ
EN
• Association with an alarm system
• Customising the installation
• Restoring factory settings
ES
• Asociación con el sistema de alarma
• Personalización de la instalación
• Volver a la configuración original
NL
• Koppeling aan alarmsysteem
• Aanpassen van installatie
• Fabrieksinstellingen herstellen
DE
• Verbindung mit einer Alarmanlage
• Individuelle Konfiguration der Installation
• Rückkehr zur Werkseinstellung
6
Voir notice
d’intallation
système
Vedi le
istruzioni
«Sistema»
Patrz
INSTRUKCJA
INSTALACJI
SYSTEMU
Refer to
system
installation
guide
Ver manual
de instalación
del sistema
Zie
installatie-
handleiding
systeem
Siehe
Installations-
anleitung
System
Changement de la pile / Changing the batteries / Batteriewechsel / Sostituzione delle batterie / Cambio de la pila / Wymiana baterii / Batterijblok vervangen
FR
Le clavier signale son défaut pile en affichant un «
!
» sur l’écran.
En consultant le défaut concerné, si le clavier affiche défaut pile sur ce produit, le bloc piles est usé (< 2,7V).
Avant d’ouvrir le boîtier, la centrale doit être en mode Maintenance (voir notice d’installation système).
EN
The keypad shows its battery fault by displaying a “
!
” on the screen.
By viewing the relevant fault, if the keypad displays a battery fault on this product, the battery unit is dead (< 2,7V).
Before opening the unit, the alarm control unit must be in Maintenance mode (refer to system installation guide).
DE
Die Bedieneinheit meldet Batteriefehler durch Anzeigen von “
!
”.
Wenn beim Überprüfen des entsprechenden Fehlers die Bedieneinheit für das betreffende Gerät “Batteriefehler”
anzeigt, ist der Batterie-Block leer (< 2,7V).
Die Alarmzentrale muss sich beim Öffnen des Gehäuses im Wartungsmodus befinden (siehe Installationsanleitung
System).
IT
La tastiera segnala l’esaurimento delle batterie attraverso il simbolo “
!
” sullo schermo.
Consultando l’errore in questione, se la tastiera visualizza Errore batterie su questo prodotto, il blocco batterie è
esaurito (< 2,7V).
Prima di aprire il prodotto, mettere la centrale in modalità Manutenzione (Vedi istruzioni Sistema)
ES
Cuando la pila del teclado se agota, aparece un «
!
» en la pantalla.
Si al consultar dicho error el teclado sugiere el cambio de pila del producto significa que las pilas se han agotado
(< 2,7V).
Antes de abrir la carcasa la central debe estar en modo de mantenimiento (ver manual de instalación del sistema).
PL
+LAWIATURAÒSYGNALIZUJEÒUSTERKĂÒSWOJEJÒBATERIIÒWYÜWIETLAJæCÒSYMBOLÒ`
!
iÒNAÒEKRANIE
*EÜLIÒPRZYÒSPRAWDZANIUÒDANEJÒUSTERKIÒKLAWIATURAÒWYÜWIETLAÒUSTERKĂÒBATERIIÒWÒTYMÒPRODUKCIEÒOZNACZAÒTOÒêEÒZESTAWÒ
BATERIIÒJESTÒZUêYTY (< 2,7V)
0RZEDÒOTWARCIEMÒCENTRALAÒPOWINNAÒBYĀÒWÒTRYBIEÒKONSERWACJIÒPATRZÒINSTRUKCJAÒINSTALACJIÒSYSTEMU
NL
Het toetsenbord vermeldt batterij deffect door
!
op het scherm te tonen.
Door het defect te raadplegen, als het toetsenbord batterij defect weergeeft, dan is de batterijblok bijna leeg
(< 2,7V).
Voor het openen van de behuizing moet de centrale in onderhoudmodus worden geplaatst (zie handleiding van
systeem).
7
Référentiel de certification NF324-H58 pour
la classification 2 boucliers.
Organismes certificateurs
AFNOR Certification : www.marque-nf.com
CNPP Cert. : www.cnpp.com
Certificazione IMQ :
IMQ Sistemi di sicurezza.
IMQ S.p.A : www.imq.it
-
 1
1
-
 2
2


DELTA DORE TYXAL+ CLT 8000 Guide d'installation
- Catégorie
- Composants de dispositif de sécurité
- Taper
- Guide d'installation
- Ce manuel convient également à
dans d''autres langues
Documents connexes
-
DELTA DORE TYXAL+ CLT 8000 Guide d'installation
-
-
-
-
-
-
-
DELTA DORE TYXAL+ DMB Guide d'installation
-