Fagor SFA8CEX Manuel utilisateur
- Catégorie
- Sèche-linge électriques
- Taper
- Manuel utilisateur

EN INSTALLATION & OPERATING INSTRUCTIONS
FR GUIDE D’INSTALLATION & D’UTILISATION
ES MANUAL DE INSTALACIÓN Y UTILIZACIÓN
Condenser tumble dryer
Sèche-linge à condenseur
Secadora de condensación

2
CONTENTS
EN
1 / FOR THE USER’S ATTENTION
• Important safety instructions ______________________________ 3
• Energy savings ________________________________________ 5
2 / DESCRIPTION OF YOUR APPLIANCE
• General presentation of the tumble dryer ____________________ 6
3 / INSTALLING YOUR TUMBLE DRYER
• The appliance’s surroundings ____________________________ 8
• Levelling ______________________________________________ 8
• Built-in installation ______________________________________ 9
• Combined washer/dryer installation ________________________ 9
• Modifying the door opening direction ______________________ 9
• Electrical connection ____________________________________ 10
• Replacing the electric power cable ________________________ 10
4 / PREPARING YOUR ITEMS
• Checking the condition of your textiles______________________ 11
• Inserting the items in the drum ____________________________ 11
5 / OPERATING INSTRUCTIONS AND PROGRAMMING
• Presentation of the control panel __________________________ 12
• Programming a drying cycle ______________________________ 12
• Your drier’s programs ____________________________________ 16
6 / USER-MAINTENANCE INSTRUCTIONS
• Cleaning the filter ______________________________________ 17
• Emptying the condensation container ______________________ 17
• Direct evacuation of water condenser ______________________ 18
• Cleaning the condenser __________________________________ 19
• Cleaning the appliance __________________________________ 19
7 / TROUBLESHOOTING ______________________________________ 20
8 / AFTER-SALES SERVICE ____________________________________ 21
• Changing the bulb ______________________________________ 21
Warning :
Please read the user guide carefully before turning on your appliance so that you can
learn how to use it as quickly as possible.

3
1 / FOR THE USER’S ATTENTION
EN
WARNING :
To reduce the risk of fire, electric shock, or injury to persons when using your appliance,
follow basic precautions, including the following:
— Read all instructions before using the appliance.
— Do not dry articles that have been previously cleaned in, washed in, soaked in, or spotted with
gasoline, dry-cleaning solvents, or other flammable or explosive substances, as they give off
vapours that could ignite or explode.
— Do not allow children to play on or in the appliance. Close supervision of children is necessary
when the appliance is used near children.
— Before the appliance is removed from service or discarded, remove the door to the drying com-
partment.
— Do not reach into the appliance if the drum is moving.
— Do not install or store this appliance where it will be exposed to the weather.
— Do not tamper with controls.
— Do not repair or replace any part of the appliance or attempt any servicing unless specifically
recommended in the user-maintenance instructions or in published user-repair instructions that
you understand and have the skills to carry out.
— Do not use fabric softeners or products to eliminate static unless recommended by the manufac-
turer of the fabric softener or product.
— Do not use heat to dry articles containing foam rubber or similarly textured rubber-like materials.
— Clean lint screen before or after each load.
— Keep area around the exhaust opening and adjacent surrounding areas free from the accumula-
tion of lint, dust, and dirt.
— The interior of the appliance should be cleaned periodically by qualified service personnel.
— Do not place items exposed to cooking oils in your dryer. Items contaminated with cooking oils
may contribute to a chemical reaction that could cause a load to catch fire.
•
Grounding instructions
— This appliance must be grounded. In the event of malfunction or breakdown, grounding will
reduce the risk of electric shock by providing a path of least resistance for electric current.
— This appliance is equipped with a cord having an equipment-grounding conductor and a groun-
ding plug. The plug must be plugged into an appropriate outlet that is properly installed and groun-
ded in accordance with all local codes and ordinances.
WARNING :
Improper connection of the equipment-grounding conductor can result in a risk of electric
shock. Check with a qualified electrician or service representative or personnel if you are in
doubt as to whether the appliance is properly grounded.
Do not modify the plug provided with the appliance: if it will not fit the outlet, have a proper out-
let installed by a qualified electrician.
SAVE THESE INSTRUCTIONS
• IMPORTANT SAFETY INSTRUCTIONS

4
EN
1 / FOR THE USER’S ATTENTION
Important :
Keep these operating instructions with
your appliance. If you should sell your
machine or give it to someone else, ensure
that the operating instructions are provided.
Please take note of these safety instructions
before installing and using your appliance.
They have been written for your safety and
that of others.
•
SAFETY INSTRUCTIONS
•
Installation
— When you receive the appliance, unpack it or
have it unpacked immediately. Check that it
has not suffered any damage during trans-
port. Express any reservations in writing on
the delivery slip and keep a copy.
Never connect a damaged appliance.
If your appliance is damaged, please contact
your dealer.
— Before connecting your appliance, please
refer to the installation instructions.
— Your tumble dryer must be kept disconnec-
ted from the mains supply throughout the
whole installation process.
— The electrical connection details shown on
your appliance’s information plate must match
those of the local mains supply.
— Once your appliance has been installed, the
electrical plug must remain accessible.
— Do not alter or try to alter the appliance’s
characteristics. This could be dangerous.
— If your installation requires alteration, only
entrust the electrical and plumbing work to
qualified electricians and plumbers.
— The appliance must not be installed behind a
locking door, a sliding door or a door with hin-
ges on the opposite side to those on the dryer.
— Your appliance is designed for normal
domestic use. Do not use it for commercial or
industrial purposes or for any purpose other
than the one for which it has been designed
•
Children’s safety
— This appliance must only be used by adults.
Do not let children play with the appliance and
keep pets away from it.
— Keep young children away from the
appliance when it is operating.
— Keep the packaging materials out of chil-
dren’s reach (e.g.: plastic bags, polystyrene,
etc.) because they can be dangerous for chil-
dren : risk of suffocation.
— This appliance is not intended for use by per-
sons (including children) with reduced physi-
cal, sensory or mental capabilities, or lack of
experience and knowledge, unless they are
supervised or instructed concerning use of
the appliance by the person responsible for
their safety.
•
Use
Important :
Your tumble dryer is designed for
domestic use only, for drying textiles suitable
for tumble drying.
Important :
You must observe the following instruc-
tions. We decline any responsibility and res-
cind the guarantee if these recommendations
are ignored : failure to observe them can
result in material damage and physical injury.
— Use your appliance in accordance with its
method of use, thereby avoiding injury to your-
self and damage to your items. Do not use sol-
vents in the appliance (risk of fire and explo-
sion).
— Strictly comply with the care instructions on
your laundry.
— If you have to open the door of the drum
during the drying cycle, ensure that you do not
touch the drum immediately, as it is very hot.

5
EN
1 / FOR THE USER’S ATTENTION
— Substances contained in soiling such as oil, acetone, alcohol, petrol, kerosene, stain removers,
turpentine or wax must be removed before drying in your machine (by using an adapted warm water
washing programme with additional detergent for example).
— Precautions for using stain-removing products : any preliminary treatment by solvent, stain-remo-
ver, aerosol, such as acetone, alcohol, gasoline, kerosene, turpentine is prohibited because these
products are very inflammable. If your laundry requires this type of treatment, this must be done
before washing. Similarly, we recommend that you do not use these products near to the dryer or,
in general, near any electrical appliance in a poorly ventilated room in order to avoid any risk of an
explosion.
— If any incidents occur, which you cannot resolve using the troubleshooting advice we provide (see
“TROUBLESHOOTING”), contact our Technical Service Center.
— Before disposing of your worn-out appliance, make it unusable. Unplug and cut off the power
cable flush with the appliance and make the door lock inoperable.
— For your safety’s sake, if you wish to change your appliance’s power cable, contact a qualified
electrician.
— If any operating anomalies occur, disconnect your appliance and call our Technical Service
Center.
•ENERGY SAVINGS
— Spin your textiles at high speeds ; the residual dampness will be low, as will your energy
consumption. Even synthetic textiles must be spun before drying.
— Place the maximum load in your machine ; this will optimize the energy used. When doing so,
comply with the indications on volume provided in this instruction manual.
— The drying time and the energy consumption are both increased by a high ambient temperature
and too small a room.
— Clean the filter after each drying cycle.
— Clean the condenser twice a month.

6
EN
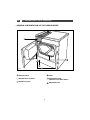
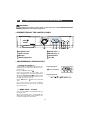
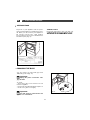
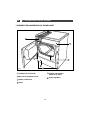
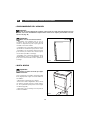
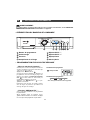
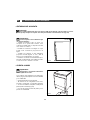
2 / DESCRIPTION OF YOUR APPLIANCE
• GENERAL PRESENTATION OF THE TUMBLE DRYER
Fig. 01
BB
DD
FF
CC
EE
Control panel
Condensate container
Condenser grill
Filter
Information plate
(Reference for After-Sales)
Adjustable feet
FF
EE
DD
CC
BB
AA

7
EN
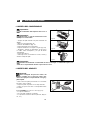
3 / INSTALLING YOUR TUMBLE DRYER
WARNING :
WARNING - Risk of fire
— Clothes dryer installation must be performed by a qualified installer.
— Install the clothes dryer according to the manufacturer’s instructions and local codes.
— Do not install a clothes dryer with flexible plastic venting materials. If flexible metal (foil type) duct
is installed, it must be of a specific type identified by the appliance manufacturer as suitable for use
with clothes dryers. Flexible venting materials are known to collapse, be easily crushed, and trap
lint. These conditions will obstruct clothes dryer airflow and increase the risk of fire.
— To reduce the risk of severe injury or death, follow all installation instructions.
SAVE THESE INSTRUCTIONS
• IMPORTANT SAFETY INSTRUCTIONS
•
Grounding instructions
— This appliance must be grounded. In the event of malfunction or breakdown, grounding will
reduce the risk of electric shock by providing a path of least resistance for electric current.
— This appliance is equipped with a cord having an equipment-grounding conductor and a groun-
ding plug. The plug must be plugged into an appropriate outlet that is properly installed and groun-
ded in accordance with all local codes and ordinances.
WARNING :
Improper connection of the equipment-grounding conductor can result in a risk of electric
shock. Check with a qualified electrician or service representative or personnel if you are in
doubt as to whether the appliance is properly grounded.
Do not modify the plug provided with the appliance: if it will not fit the outlet, have a proper out-
let installed by a qualified electrician.
SAVE THESE INSTRUCTIONS

8
3 / INSTALLING YOUR TUMBLE DRYER
EN
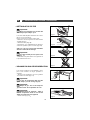
Fig. 03
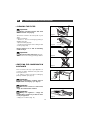
Fig. 02
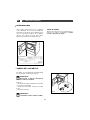
• THE APPLIANCE’S SURROUNDINGS
Important :
We strongly advise against :
— Installing your appliance on a carpeted floor.
If you cannot avoid this, take all possible mea-
sures not to obstruct the circulation of air at
its base.
— Installing your dryer in a location where it
can be subject to being splashed with water.
— Installing your dryer in a small closed room
(if this is the case, open the door or the win-
dow during drying)
— Installing your dryer in a poorly ventilated
room. The temperature in the room must
remain below 30°C during drying.
1 cm mini
Advice :
Your tumble dryer releases heat. If you place it next to another appliance or a unit, we
advise you always to leave a space in-between to assist in air circulation (Fig. 02).
Important :
Use a level to check that the appliance
is horizontal :
Your dryer is fitted with 4 adjustable feet
(Fig.03).
To adjust the stability and levelness :
— Tip it slightly backwards
— Screw one or more of the feet in or out using
a spanner or a screwdriver to adjust their
height to suit the shape of the floor
(Fig.03)
— Set your dryer back on its feet and check
that it is stable.
• LEVELLING
0.4 inches minimum

9
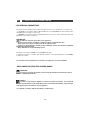
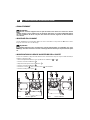
EN
3 / INSTALLING YOUR TUMBLE DRYER
E
F
B
C
A
A
B
E
F
C
Fig. 04
Fig. 05
Left-hand Door
Right-hand door
• BUILT-IN INSTALLATION
An adaptation kit is available from your dealer. This is used to mount your tumble dryer above your
washing machine.
• MODIFYING THE DOOR OPENING DIRECTION
Important :
Check with your dealer that the kit is compatible with your washing machine. For safety rea-
sons, fitting must be performed by a qualified professional.
Important :
If you are fitting the appliance underneath a worktop, you must either keep the original
laminated top, or replace it with a slimmer version using a kit available for this purpose from your
dealer. For safety reasons, the appliance must never be operated without a top.
• COMBINED WASHER/DRYER INSTALLATION
If you wish, you can alter the direction the door opens as follows
(Fig. 04 or 05).
— Remove the 4 screws in the front panel holding the hinges and
.
— Reverse the hinge and fasten it back on.
— Refit the door on the hinge .
— Reverse the hinge and fasten it back on.
— Reverse the positions of the lock and the cover on the machine’s front face.
— Reverse the positions of the bolt .
CC
EEFF
BB
AA
AA
BBAA

10
EN
3 / INSTALLING YOUR TUMBLE DRYER
• ELECTRICAL CONNECTION
Danger :
To make the electrical connection to your appliance :
— Do not use an extension, an adapter, a multiple socket or a programmable timer.
— The plug must be easily accessible but be out of children’s reach.
— If there's any doubt about the condition of your installation, contact your installer or a qualified
Brandt-approved professional.
— Never eliminate the electrical Earthing system.
The Dryer comes with a 16AWG Cord and NEMA 6-15P plug
It should be connected to a 240V, 15A, 60Hz AC 2 Phases + wire grounding power outlet (NEMA
6-15R) is necessary.
We cannot be held responsible for any incident caused by poor electrical installation.
Advice :
In order to easily find your appliance’s reference numbers in the future, we recommend
that you note them down on the “After-Sales Service and Consumer Relations” page (this page
also explains where to find these on your appliance).
Your appliance complies with UL 2158 (Electric clothes Dryer).
• REPLACING THE ELECTRIC POWER CABLE
Important :
To ensure your safety, this must be carried out by the manufacturer's after-sales service
team or a qualified professional.
The dryer must be installed in accordance with all local codes or, in the absence of a local code :
— in the U.S.A., in accordance with the National Electric Code, ANSI/NFPA 70 - latest edition/State
and Municipal codes and/or local codes.
— in Canada, in accordance with the Canadianl Electric Code, C22.1 - latest edition/Provincial and
Municipal codes and/or local codes.

11
EN
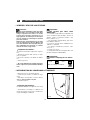
4 / PREPARING YOUR ITEMS
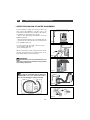
• CHECKING THE CONDITION OF YOUR TEXTILES
— Open the door by pushing (press where the
label is)
(Fig. 06)
.
— Check that the filter is in its housing .
— Insert washed and spun clothes loosely in
the drum
wwiitthhoouutt ffoollddiinngg iitt oorr ppiilliinngg iitt uupp..
— Take care not to let any fabrics get caught in
the door.
— Close the door.
••
Recommended volumes :
The maximum capacity of the dryer is 8 kg.
— To reduce creasing and optimize drying
times, we recommend you do not overload
the machine.
• INSERTING YOUR ITEMS IN THE DRUM
Fig. 06
Advice :
If, before you insert your clothes in the
tumble dryer, you notice any stains, even
after washing, do not dry the items concer-
ned. As a general rule, stains that have been
ironed or tumble-dried can no longer be
removed.
Please refer to the instructions for treating
stubborn stains provided in most washing
machine instruction manuals and, in particu-
lar, wash the stained items again.
••
Preparing your items :
— Close all zippers and snap buttons.
— Remove any loose buttons, pins or hook
fasteners.
— Knot any belts, apron strings, etc...
— Empty pockets.
— Always adhere to the manufacturer's ins-
tructions when using softening products.
Important :
Do not tumble-dry the following
articles :
— Clothing including rubber like materials (for
example: shower caps, waterproof clothing
and textiles, linings, pillows etc.)
— Chlorofibres (Thermolactyl* for example)
*Registered trademark
— Items containing underwiring that could
become detached
— Bulky items (duvets, eiderdowns, etc...)
— Laundry that has not been spun
— Laundry cleaned with inflammable chemi-
cals.
Important :
Check the labels on your textiles
Normal
drying
Gentle
drying
Do not tumble dry

12
EN
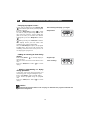
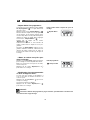
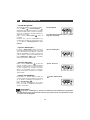
5 / OPERATING INSTRUCTIONS AND PROGRAMMING
• PRESENTATION OF THE CONTROL PANEL
• PROGRAMMING A DRYING CYCLE
• Starting the appliance :
Check that the power cable is plugged in.
The
appliance will not start unless the door is pro-
perly closed.
Press the “On/Off” button .
Select your program (see the table “Your
dryer’s programs” on the following pages) by
turning the programs dial (it turns in both
directions). The indicator light shows you the
program you have selected.
Press “Start/Pause” and the program will
start.
The screen tells you the time remaining,
which becomes more precise as the drying
cycle progresses.
• “ MEMO ACTIV’ ” function :
Your dryer remembers the programs that you
use most often.
After a few drying cycles, the program dis-
played when you switch on your machine is the
one that you have used most often.
GG
AA
HH
Program progress
Time remaining
Anti-creasing
Anti-creasing
Beeper
Beeper
Delay Timer
Delay Timer
Extra Drying
Extra Drying
Time
Time
Anti-creasing Beeper
Delay Timer
Extra Drying
Time
Anti-creasing Beeper
Delay Timer
Extra Drying
Time
Anti-creasing Beeper
Delay Timer
Extra Drying
Time
Anti-creasing Beeper
Delay Timer
Extra Drying
Time
Anti-creasing Beeper
Delay Timer
Extra Drying
Time
Anti-creasing Beeper
Delay Timer
Extra Drying
Time
Anti-creasing Beeper
Delay Timer
Extra Drying
Time
Anti-creasing Beeper
Delay Timer
Extra Drying
Time
Anti-creasing Beeper
Delay Timer
Extra Drying
Time
Anti-creasing Beeper
Delay Timer
Extra Drying
Time
Anti-creasing Beeper
Delay Timer
Extra Drying
Time
Pause Stop
Pause Stop
Pause Stop
Pause Stop
Pause Stop
Pause Stop
Pause Stop
Pause Stop
Pause Stop
Pause Stop
+
-
Pause
Pause
Stop
Stop
Pause Stop
Pause Stop
Pause Stop
Programs dial
Anti-creasing
Beeper
Extra drying time
Delay timer “-”
Delay timer “+”
Start/Pause
On/Off
HH
GG
FF
EE
DD
CC
BB
AA
WARNING :
To reduce the risk of fire, electric shock, or injury to persons, read the IMPORTANT SAFETY
INSTRUCTIONS before operating this appliance.
Pause
Stop
Pause - Drying - Cooling down - End of program
Program progress :
+
-
Pause Stop
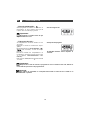
Air Dry - Wool
Air Dry - Wool
Air Dry
Air Dry
Ultra - Delicates
Ultra - Delicates
Delicates
Delicates
Anti-creasing
Anti-creasing
Beeper
Beeper
Delay Timer
Delay Timer
Start/Pause
Start/Pause
On/Off
On/Off
Extra Drying
Extra Drying
Time
Time
REGULAR
REGULAR
SFA-8CE
Dry
Dry
Heavy Duty
Heavy Duty
Dry
Dry
Extra Dry
Extra Dry
COTTON
COTTON
Perm. Press
Perm. Press
Damp Dry
Damp Dry
Damp Dry
Damp Dry
AA BB CC DD
EE
GG HHFF

13
EN
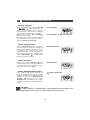
5 / OPERATING INSTRUCTIONS AND PROGRAMMING
Program stop
Time remaining
Time remaining until drying cycle begins
Delayed start
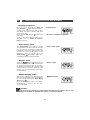
• Delaying a program’s start :
Select your program using the program dial
. The indicator light shows you the program
you have selected.
Press the ”Delay timer +” button to delay
the start of your program thirty minutes at a
time until you reach the desired delay time
(max 23 ½ hours). To decrease the differed
starting time, press the “Delay timer -” button
.
Confirm by pressing the “Start/Pause” button
.
The display shows you how much time
remains before your program starts.
Once the time delay has expired, the program
actually starts. The screen tells you the time
remaining, which becomes more precise as
the drying cycle progresses.
• Adding or removing an item during
drying :
Press “Start/Pause” to interrupt drying or
open the door.
Insert or remove the item or items and close the
door.
Press the “Start/Pause” button to resume
drying.
• Altering programming or drying
during operation :
If you have entered the wrong program, you
can change your selection during the cycle.
Press “Start/Pause” to interrupt drying.
Select another program using the program
dial.
Press the “Start/Pause” button to resume
drying.
GG
GG
GG
GG
GG
EE
FF
AA
Advice :
Consult the Programs table on the next page to determine the program needed for the
type of items being dried.
Anti-creasing Beeper
Delay Timer
Extra Drying
Time
Anti-creasing Beeper
Delay Timer
Extra Drying
Time
Anti-creasing
Anti-creasing
Beeper
Beeper
Delay Timer
Delay Timer
Extra Drying
Extra Drying
Time
Time
Anti-creasing Beeper
Delay Timer
Extra Drying
Time
Anti-creasing Beeper
Delay Timer
Extra Drying
Time
Anti-creasing Beeper
Delay Timer
Extra Drying
Time
Anti-creasing Beeper
Delay Timer
Extra Drying
Time
Anti-creasing Beeper
Delay Timer
Extra Drying
Time
Anti-creasing Beeper
Delay Timer
Extra Drying
Time
Anti-creasing Beeper
Delay Timer
Extra Drying
Time
Anti-creasing Beeper
Delay Timer
Extra Drying
Time
Anti-creasing Beeper
Delay Timer
Extra Drying
Time
Pause Stop
Pause Stop
+
-
Pause
Pause
Stop
Stop
Pause Stop
Pause Stop
Pause Stop
Pause Stop
Pause Stop
Pause Stop
Pause Stop
Pause Stop
Pause Stop
Pause Stop
Pause Stop
Anti-creasing Beeper
Delay Timer
Extra Drying
Time
Anti-creasing
Anti-creasing
Beeper
Beeper
Delay Timer
Delay Timer
Extra Drying
Extra Drying
Time
Time
Anti-creasing Beeper
Delay Timer
Extra Drying
Time
Anti-creasing Beeper
Delay Timer
Extra Drying
Time
Anti-creasing Beeper
Delay Timer
Extra Drying
Time
Anti-creasing Beeper
Delay Timer
Extra Drying
Time
Anti-creasing Beeper
Delay Timer
Extra Drying
Time
Anti-creasing Beeper
Delay Timer
Extra Drying
Time
Anti-creasing Beeper
Delay Timer
Extra Drying
Time
Anti-creasing Beeper
Delay Timer
Extra Drying
Time
Anti-creasing Beeper
Delay Timer
Extra Drying
Time
Anti-creasing Beeper
Delay Timer
Extra Drying
Time
Pause Stop
+
-
Pause
Pause
Stop
Stop
Pause Stop
Pause Stop
Pause Stop
Pause Stop
Pause Stop
Pause Stop
Pause Stop
Pause Stop
Pause Stop
Pause Stop
Pause Stop
Pause Stop

14
EN
5 / OPERATING INSTRUCTIONS AND PROGRAMMING
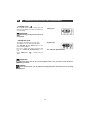
Additional time
Remarks :
The “Anti-creasing” and "Beeper" options remains selected from one program to the next. You
can simply press the button to deactivate these options, even during a program.
• Stopping the appliance :
At the end of the program, the “Filter”
and “Tank Full” lights flash alternately
to remind you that you must clean the filter
and empty the water collection tank after
every drying cycle :
Press the “On/Off” button and empty
your dryer.
Clean the filter and empty the water collec-
tion tank (see the “REGULAR MAINTE-
NANCE” section).
• “Anti-creasing” option :
The “Anti-creasing” option fluffs the textiles
every 10 minutes for up to 24 hours, until the
door is opened or the machine is turned off.
It begins as soon as the drying finishes and
prevents the clothes from settling in the
machine. To select this function, press the
“Anti-creasing” . An indicator lights up to
show that this option has been activated.
• “Beeper” option :
Press the
““BBuuzzzzeerr””
button . At the end of
drying, three beeps will sound every 10 minu-
tes for one hour until the door is opened or
the appliance is stopped. The indicator light
corresponding to this option lights up at the
bottom of the screen, indicating that the buz-
zer is activated.
• “Additional Drying” option :
This function enables you to add drying time
at the end of a program in units of 10 minutes
by successively pressing the “Extra Drying
Time” button .
Press the “Start/Pause” button. The additio-
nal drying time is added at the end of the
selected program.
DD
CC
BB
HH
Pause Stop
Pause Stop
Pause Stop
Pause Stop
Pause Stop
Pause Stop
Pause Stop
Pause Stop
Pause Stop Pause Stop
Pause Stop
Pause Stop
Pause Stop
Pause Stop
Pause Stop
Pause Stop
Pause Stop
Pause Stop
Pause Stop
Pause Stop
Pause Stop
Pause Stop
Pause Stop Pause Stop
Pause Stop
Pause Stop
Pause Stop
Pause Stop
End of program
The “Filter” and “Tank Full” lights flash
“Anti-creasing” option
“Beeper” option
Anti-creasing Beeper
Delay Timer
Extra Drying
Time
Anti-creasing Beeper
Delay Timer
Extra Drying
Time
Anti-creasing Beeper
Delay Timer
Extra Drying
Time
Anti-creasing Beeper
Delay Timer
Extra Drying
Time
Anti-creasing Beeper
Delay Timer
Extra Drying
Time
Anti-creasing Beeper
Delay Timer
Extra Drying
Time
Anti-creasing Beeper
Delay Timer
Extra Drying
Time
Anti-creasing Beeper
Delay Timer
Extra Drying
Time
Anti-creasing Beeper
Delay Timer
Extra Drying
Time
Anti-creasingAnti-creasing BeeperBeeper
Delay TimerDelay Timer
Extra DryingExtra Drying
TimeTime
Anti-creasing Beeper
Delay Timer
Extra Drying
Time
Anti-creasing Beeper
Delay Timer
Extra Drying
Time
Pause Stop
Pause Stop
Pause Stop
Pause Stop
Pause Stop
Pause Stop
Pause Stop
Pause Stop
+
-
PausePause StopStop
Pause Stop
Pause Stop
Pause Stop
Pause Stop
Pause Stop
Anti-creasing Beeper
Delay Timer
Extra Drying
Time
Anti-creasing Beeper
Delay Timer
Extra Drying
Time
Anti-creasing Beeper
Delay Timer
Extra Drying
Time
Anti-creasing Beeper
Delay Timer
Extra Drying
Time
Anti-creasing Beeper
Delay Timer
Extra Drying
Time
Anti-creasing Beeper
Delay Timer
Extra Drying
Time
Anti-creasingAnti-creasing BeeperBeeper
Delay TimerDelay Timer
Extra DryingExtra Drying
TimeTime
Anti-creasing Beeper
Delay Timer
Extra Drying
Time
Anti-creasing Beeper
Delay Timer
Extra Drying
Time
Anti-creasing Beeper
Delay Timer
Extra Drying
Time
Anti-creasing Beeper
Delay Timer
Extra Drying
Time
Anti-creasing Beeper
Delay Timer
Extra Drying
Time
Pause Stop
Pause Stop
Pause Stop
Pause Stop
+
-
PausePause StopStop
Pause Stop
Pause Stop
Pause Stop
Pause Stop
Pause Stop
Pause Stop
Pause Stop
Pause Stop
Pause Stop
Anti-creasing Beeper
Delay Timer
Extra Drying
Time
Anti-creasing Beeper
Delay Timer
Extra Drying
Time
Anti-creasing Beeper
Delay Timer
Extra Drying
Time
Anti-creasing Beeper
Delay Timer
Extra Drying
Time
Anti-creasing Beeper
Delay Timer
Extra Drying
Time
Anti-creasing Beeper
Delay Timer
Extra Drying
Time
Anti-creasing Beeper
Delay Timer
Extra Drying
Time
Anti-creasing Beeper
Delay Timer
Extra Drying
Time
Anti-creasing Beeper
Delay Timer
Extra Drying
Time
Anti-creasing Beeper
Delay Timer
Extra Drying
Time
Anti-creasing Beeper
Delay Timer
Extra Drying
Time
Anti-creasingAnti-creasing BeeperBeeper
Delay TimerDelay Timer
Extra DryingExtra Drying
TimeTime
Pause Stop
Pause Stop
Pause Stop
Pause Stop
+
Pause Stop
Pause Stop
Pause Stop
Pause Stop
Pause Stop
Pause Stop
Pause Stop
Pause Stop
-
PausePause StopStop
Pause Stop
Anti-creasing Beeper
Delay Timer
Extra Drying
Time
Anti-creasing Beeper
Delay Timer
Extra Drying
Time
Anti-creasing Beeper
Delay Timer
Extra Drying
Time
Anti-creasing Beeper
Delay Timer
Extra Drying
Time
Anti-creasing Beeper
Delay Timer
Extra Drying
Time
Anti-creasing Beeper
Delay Timer
Extra Drying
Time
Anti-creasing Beeper
Delay Timer
Extra Drying
Time
Anti-creasing Beeper
Delay Timer
Extra Drying
Time
Anti-creasingAnti-creasing BeeperBeeper
Delay TimerDelay Timer
Extra DryingExtra Drying
TimeTime
Anti-creasing Beeper
Delay Timer
Extra Drying
Time
Anti-creasing Beeper
Delay Timer
Extra Drying
Time
Anti-creasing Beeper
Delay Timer
Extra Drying
Time
Pause Stop
Pause Stop
Pause Stop
+
-
PausePause StopStop
Pause Stop
Pause Stop
Pause Stop
Pause Stop
Pause Stop
Pause Stop
Pause Stop
Pause Stop
Pause Stop
Pause Stop

15
EN
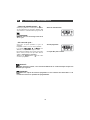
Program stop
The ”Tank Full” light illuminates.
5 / OPERATING INSTRUCTIONS AND PROGRAMMING
• Cooling cycle :
All programs finish with a cooling cycle that
lasts for a few minutes to allow the washing to
cool gradually.
Important :
Do not stop your dryer before this cycle
has finished.
• During the cycle :
Your tank is full during the drying cycle.
The appliance stops during the program.
The “Tank Full” and “Pause” turns on, the
time remaining flashes.
Proceed to empty your water collection tank
(see the “REGULAR MAINTENANCE” sec-
tion).
Press “Start/Pause” to restart your pro-
gram.
GG
Pause Stop
Pause Stop
Pause Stop
Pause Stop
Pause Stop
Pause Stop
Pause Stop
Pause Stop
Pause Stop Pause Stop
Pause Stop
Pause Stop
Pause Stop
Pause Stop
Anti-creasing Beeper
Delay Timer
Extra Drying
Time
Anti-creasing Beeper
Delay Timer
Extra Drying
Time
Anti-creasing Beeper
Delay Timer
Extra Drying
Time
Anti-creasing Beeper
Delay Timer
Extra Drying
Time
Anti-creasing Beeper
Delay Timer
Extra Drying
Time
Anti-creasing Beeper
Delay Timer
Extra Drying
Time
Anti-creasing Beeper
Delay Timer
Extra Drying
Time
Anti-creasing Beeper
Delay Timer
Extra Drying
Time
Anti-creasing Beeper
Delay Timer
Extra Drying
Time
Anti-creasing Beeper
Delay Timer
Extra Drying
Time
Anti-creasing Beeper
Delay Timer
Extra Drying
Time
Anti-creasing Beeper
Delay Timer
Extra Drying
Time
Pause Stop
Pause Stop
Pause Stop
Pause Stop
Pause Stop
Pause Stop
Pause Stop
Pause Stop
Pause Stop
Pause Stop
Pause Stop
Pause Stop
Pause Stop
Pause Stop
Cooling cycle
Important :
A power failure cancels the current program. In this case, you have to reset all the pro-
gramming operations.
Advice :
As a safety measure, you are advised to unplug the power cable when you are not using
the appliance.
Anti-creasing Beeper
Delay Timer
Extra Drying
Time
Anti-creasing Beeper
Delay Timer
Extra Drying
Time
Anti-creasing Beeper
Delay Timer
Extra Drying
Time
Anti-creasing Beeper
Delay Timer
Extra Drying
Time
Anti-creasing Beeper
Delay Timer
Extra Drying
Time
Anti-creasing Beeper
Delay Timer
Extra Drying
Time
Anti-creasing Beeper
Delay Timer
Extra Drying
Time
Anti-creasing Beeper
Delay Timer
Extra Drying
Time
Anti-creasing Beeper
Delay Timer
Extra Drying
Time
Anti-creasing Beeper
Delay Timer
Extra Drying
Time
Anti-creasing Beeper
Delay Timer
Extra Drying
Time
Anti-creasing Beeper
Delay Timer
Extra Drying
Time
Pause Stop
Pause Stop
Pause Stop
Pause Stop
Pause Stop
Pause Stop
Pause Stop
Pause Stop
Pause Stop
Pause Stop
Pause Stop
Pause Stop
Pause Stop
+
-
Pause
Pause
Stop
Stop
Anti-creasing Beeper
Delay Timer
Extra Drying
Time
Anti-creasing Beeper
Delay Timer
Extra Drying
Time
Anti-creasing Beeper
Delay Timer
Extra Drying
Time
Anti-creasing Beeper
Delay Timer
Extra Drying
Time
Anti-creasing Beeper
Delay Timer
Extra Drying
Time
Anti-creasing
Anti-creasing
Beeper
Beeper
Delay Timer
Delay Timer
Extra Drying
Extra Drying
Time
Time
Anti-creasing Beeper
Delay Timer
Extra Drying
Time
Anti-creasing Beeper
Delay Timer
Extra Drying
Time
Anti-creasing Beeper
Delay Timer
Extra Drying
Time
Anti-creasing Beeper
Delay Timer
Extra Drying
Time
Anti-creasing Beeper
Delay Timer
Extra Drying
Time
Anti-creasing Beeper
Delay Timer
Extra Drying
Time
Pause Stop
Pause Stop
Pause Stop
Pause Stop
Pause Stop
Pause Stop
Pause Stop
+
-
Pause
Pause
Stop
Stop
Pause Stop
Pause Stop
Pause Stop
Pause Stop
Pause Stop
Pause Stop

16
EN
5 / OPERATING INSTRUCTIONS AND PROGRAMMING
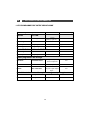
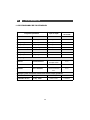
• YOUR DRYER’S PROGRAMS
Regular programs Type of textile Drying results
COTTON
Extra Dry
Cotton Dry
Dry
Cotton Dry
Damp Dry
Cotton Slightly damp
Heavy Duty
Cotton Damp
REGULAR TEXTILES
Dry
Regular textiles Dry
Damp Dry
Regular textiles Slightly damp
Other drying programs
Permanent Press
Synthetic,
easy iron
Dry
Delicates
Delicate, synthetic Dry
Ultra Delicates
Very delicate: silk, light
synthetic lingerie ...
Dry
Refreshing and airing your textiles after prolonged storage
Air Dry
Other textiles 15 minutes
Air Dry - Wool
Woollens already dry 6 minutes

17
EN
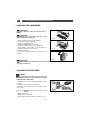
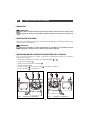
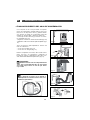
6 / USER-MAINTENANCE INSTRUCTIONS
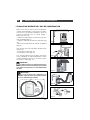
Important :
Please remember that the filter must
be cleaned after every drying.
The filter is located in the lower part of your
dryer.
Clean it as follows:
— Remove it from its housing by pulling it
upwards
(Fig. 07)
— Open the filter
(Fig. 08)
— Clean it by removing the thin coating of fluff
covering it
(Fig. 09)
Ensure that there is no fluff accumulating
round the dryer.
Important :
Do not wash filter with water (Fig. 10)
..
— Re-insert it in its housing, pushing it well in.
• CLEANING THE FILTER
Fig. 07
Fig. 08
Fig. 09
Fig. 10
• EMPTYING THE CONDENSATION
CONTAINER
Fig. 11
Fig. 12
This is located at the top of your appliance. It
collects the water extracted from your items
as they are dried.
— To empty it, release it from its housing by
pulling it towards you
(Fig. 11).
Important :
The condensation container must be
emptied after each drying cycle (Fig.12).
Important :
Risk of frost : if there is a risk of frost,
empty the condensation container.
Important :
Moving the appliance : empty the
condensation container if you wish to move
or tilt your appliance.
— Empty the container
(Fig. 12).

18
EN
6 / USER-MAINTENANCE INSTRUCTIONS
• DIRECT EVACUATION OF WATER CONDENSER
90 cm maxi
Fig. 15
Fig. 13
Fig. 14
Fig. 17
Fig. 16
To avoid having to empty the collection tank every
time you use the appliance, you have a kit (*) for
removing the water from the condenser directly into
the drain (hose and deflector). To fit this :
— Take off the existing pipe and push it inside the
appliance
(Fig. 13).
— Clip the deflector with the top of the pump
(Fig. 14).
— Connect the hose from the kit to the end connector
on the appliance
(Fig. 15)
You can connect the other end of the hose either :
- To a ventilated trap
(Fig. 16
).
- Or a sink trap
(Fig. 17)
.
When connecting to a trap, you must remove the fil-
ler plug. Then press home the rubber tip. If neces-
sary, add a clamp connection
(Fig. 17
).
Important :
The deflector must be positioned before the
drain hose connection to avoid any water splashes
when taking off the hose.
Déflecteur
Encart
Tuyau
Remarks :
(*) This kit is provided with the appliance
or is available near your After-sales service
under the ref. 57X3184 (according to model).
Deflector
Hose
Insert

19
EN
Important :
When refitting the condenser, ensure that it is pushed in firmly right to the back of its hou-
sing when locking it in
6 / USER-MAINTENANCE INSTRUCTIONS
Fig. 21
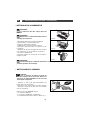
• CLEANING THE CONDENSER
Fig. 18
Fig. 19
Fig. 20
Important :
The condenser must be cleaned twice a
month.
Important :
Unplug the power cable from the socket
before cleaning the condenser.
— Open the grill at the front of the appliance.
— Release the condenser
(Fig.18)
.
— Remove it carefully
(Fig.19).
— Remove any fluff from the condenser.
— Clean it with water only under the tap
(Fig.20)
.
— After cleaning, ensure that none of the tubes are
“blocked” and that the fins are clean.
— Rub it superficially.
— Re-insert the condenser and lock it in place. Close
the grill.
Advice :
To clean the control panel, the access to the
drum and the casing, use only a sponge or a damp
cloth and some soapy water.
— Ensure that there is no fluff accumulating round
the dryer.
— Clean the door seal with a damp cloth.
— Clean the filter housing with your vacuum cleaner
once a year.
You should
nnoott uussee,,
under any circumstances
(Fig
21)
:
— Abrasive powders
— Metal or plastic sponges
— Alcohol-based products (alcohol, thinners, etc.)
• CLEANING THE APPLIANCE

20
EN
7 / TROUBLESHOOTING
Advice :
Some incidents may arise when you are using your dryer. Here are the points you should
check.
Fault : Check whether :
The dryer does not start :
- The plug is in the socket
- The On/Off button is pressed in
- The door is properly closed
- The condenser is correctly locked in place.
The drying times are too long :
- The filter in the drum is clogged with fluff
- The laundry has been spun enough beforehand
(500rpm minimum, but spinning at 850rpm provides
better drying times)
- The condenser is not clogged.
- The air inlets and outlets are unobstructed enough to
ensure correct air circulation.
- The drying program selected matches the type of
items in the drum.
The laundry is too damp :
- The filter in the drum is clogged with fluff
- The type of drying has been selected correctly (too
low) : switch to the next programme up or increase
the drying time.
- The condenser is not blocked by fluff.
The laundry is too dry, too creased :
- The drying time selected is too long : the drying time
is better to be too short than too long: this avoids the
laundry becoming too dry and difficult to iron.
The items are unevenly dried :
- The types of textiles in the load are too different (e.g.
sheets together with jeans)
- The laundry has been laid correctly ‘unfolded’ in the
dryer
- The drum is not overloaded.
The synthetic items are loaded with
static electricity :
- The laundry has been dried too much
- You have used softener during washing. By using this
product, you can reduce most of the problems with
static electricity.
The “Tank Full” indicator light is lit :
- The condensate container is full : once you have emp-
tied it, re-insert it correctly, pushing it completely into
its housing
The “Tank Full” indicator light illumi-
nates although the tank is empty :
- The container has been properly inserted: push it in
completely.
- The condenser is tightly locked on the two sides.
La page est en cours de chargement...
La page est en cours de chargement...
La page est en cours de chargement...
La page est en cours de chargement...
La page est en cours de chargement...
La page est en cours de chargement...
La page est en cours de chargement...
La page est en cours de chargement...
La page est en cours de chargement...
La page est en cours de chargement...
La page est en cours de chargement...
La page est en cours de chargement...
La page est en cours de chargement...
La page est en cours de chargement...
La page est en cours de chargement...
La page est en cours de chargement...
La page est en cours de chargement...
La page est en cours de chargement...
La page est en cours de chargement...
La page est en cours de chargement...
La page est en cours de chargement...
La page est en cours de chargement...
La page est en cours de chargement...
La page est en cours de chargement...
La page est en cours de chargement...
La page est en cours de chargement...
La page est en cours de chargement...
La page est en cours de chargement...
La page est en cours de chargement...
La page est en cours de chargement...
La page est en cours de chargement...
La page est en cours de chargement...
La page est en cours de chargement...
La page est en cours de chargement...
La page est en cours de chargement...
La page est en cours de chargement...
La page est en cours de chargement...
La page est en cours de chargement...
La page est en cours de chargement...
La page est en cours de chargement...
La page est en cours de chargement...
La page est en cours de chargement...
La page est en cours de chargement...
La page est en cours de chargement...
-
 1
1
-
 2
2
-
 3
3
-
 4
4
-
 5
5
-
 6
6
-
 7
7
-
 8
8
-
 9
9
-
 10
10
-
 11
11
-
 12
12
-
 13
13
-
 14
14
-
 15
15
-
 16
16
-
 17
17
-
 18
18
-
 19
19
-
 20
20
-
 21
21
-
 22
22
-
 23
23
-
 24
24
-
 25
25
-
 26
26
-
 27
27
-
 28
28
-
 29
29
-
 30
30
-
 31
31
-
 32
32
-
 33
33
-
 34
34
-
 35
35
-
 36
36
-
 37
37
-
 38
38
-
 39
39
-
 40
40
-
 41
41
-
 42
42
-
 43
43
-
 44
44
-
 45
45
-
 46
46
-
 47
47
-
 48
48
-
 49
49
-
 50
50
-
 51
51
-
 52
52
-
 53
53
-
 54
54
-
 55
55
-
 56
56
-
 57
57
-
 58
58
-
 59
59
-
 60
60
-
 61
61
-
 62
62
-
 63
63
-
 64
64


Fagor SFA8CEX Manuel utilisateur
- Catégorie
- Sèche-linge électriques
- Taper
- Manuel utilisateur
dans d''autres langues
- English: Fagor SFA8CEX User manual
- español: Fagor SFA8CEX Manual de usuario
Autres documents
-
Brandt TST130ES Le manuel du propriétaire
-
Whirlpool HDLX 80311 Mode d'emploi
-
Whirlpool DELX70112 Mode d'emploi
-
-
-
FORS TK6500 Manuel utilisateur
-
Candy GO W475-47 Manuel utilisateur
-
Beko DCU7230X Manuel utilisateur
-
Beko DC 7230DC7230SDC7230S Le manuel du propriétaire