Legrand WIO-24 Wireless Input/Output Control Node Guide d'installation
- Taper
- Guide d'installation

Wattstopper
®
Wireless Input/Output Control Node
Installation Instructions • Instructions d’Installation • Instrucciones de Instalación
No: 25198 – 10/16 rev. 1
Catalog Number • Numéro de Catalogue • Número de Catálogo: WIO-24
Country of Origin: Made in China • Pays d’origine: Fabriqué en Chine • País de origen: Hecho en China
BEFORE INSTALLATION
1. Unpack the WIO-24.
2. Inspect the device for missing/broken pieces/components.
3. Read all instructions prior to use.
Included in this package
• WIO-24 Wireless Input/Output Control Node
• 3 – 8 Position Connectors
• 2 – 12 Position Connectors
• 1 – 2 Position 7.5mm Power Connector
• 1 – 2dBi Antenna, RPSMA
• 12 – 500Ω Resistors
Safety Instructions
The following instructions are general guidelines for proper installation of the device. Any question should be directed to Wattstopper
prior to installation. It is the responsibility of the installer to ensure local, state, and federal codes are followed.
1. Disconnect all power prior to installation.
2. Make all connections in accordance with local and national electrical codes.
3. This device is used for monitoring and control, not intended for life and safety applications.
4. Discharge any static electricity prior to handling the device.
Static discharge produces voltages high enough to damage electronic components.
Do not handle the bare printed circuit board without proper protection against static discharge.
MOUNTING
The devices can be mounted in any orientation, as long as vertical polarity is maintained with the antenna. Fixed antenna devices must
be mounted with the antenna vertically positioned.
Mounting on a 1.4” (35mm) wide DIN Rail is recommended. If DIN Rail mounting is impractical or not possible, screws in the mounting
tabs may be used. Remove all connectors on the bottom side of the controller prior to mounting via DIN Rail. Use a small flat-tip
screwdriver to pull down on the plastic locking clip, and push the controller base onto the DIN rail and release. Ensure the controller is
mounted securely.
WIRING
1. Prepare power wiring with the included 7.5mm pitch power connector.
Please ensure proper polarity with 24VAC/DC.
2. Connect I/O wiring accordingly, following the directions on the I/O
labels.
3. Connect 24VAC/DC power only after all I/O terminations are completed
WARNING: If 24VAC power is used, a separate isolated transformer is required.
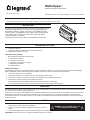
DESCRIPTION
The WIO-24 is a configurable wireless control node, using wireless 2.4GHz
technology by NXP. The WIO-24 has eight universal inputs (supporting
temperature, resistance, voltage, and current), four Digital/Binary inputs
(contact closure), six Digital/Binary Relay outputs, and six Analog Outputs.
The controller features a Real Time Clock (RTC) and backup battery
(optional: CR2032, not included).
This document covers mounting, wiring , and initial startup of the WIO-24.
WARNING: TURN THE POWER OFF AT THE
CIRCUIT BREAKER BEFORE WIRING.
WIO-24
D1 D2 D3 D4 D5 D6
PWR

800.879.8585
www.legrand.us/wattstopper
No. 25198 – 10/16 rev. 1
© Copyright 2016 Legrand All Rights Reserved.
© Copyright 2016 Tous droits réservés Legrand.
© Copyright 2016 Legrand Todos los derechos reservados.
Wattstopper warranties its products to be free
of defects in materials and workmanship for a
period of five (5) years. There are no obligations
or liabilities on the part of Wattstopper for
consequential damages arising out of, or in
connection with, the use or performance of this
product or other indirect damages with respect
to loss of property, revenue or profit, or cost of
removal, installation or reinstallation.
Wattstopper garantit que ses produits sont
exempts de défauts de matériaux et de fabrication
pour une période de cinq (5) ans. Wattstopper
ne peut être tenu responsable de tout dommage
consécutif causé par ou lié à l’utilisation ou
à la performance de ce produit ou tout autre
dommage indirect lié à la perte de propriété, de
revenus, ou de profits, ou aux coûts d’enlèvement,
d’installation ou de réinstallation.
Wattstopper garantiza que sus productos
están libres de defectos en materiales y mano
de obra por un período de cinco (5) años. No
existen obligaciones ni responsabilidades por
parte de Wattstopper por daños consecuentes
que se deriven o estén relacionados con el
uso o el rendimiento de este producto u otros
daños indirectos con respecto a la pérdida
de propiedad, renta o ganancias, o al costo
de extracción, instalación o reinstalación.
WARRANTY INFORMATION INFORMATIONS RELATIVES À LA GARANTIE INFORMACIÓN DE LA GARANTÍA
INPUTS/OUTPUTS
Universal Inputs can support any of the following:
• Type 2 Thermistor (xxx_Ai2T)
• Type 3 Thermistor (xxx_Ai3T)
• Digital Input (xxx_AiDi)
• Resistance Input (xxx_AiOhm)
• Milliamp Input (xxx_AimAmp)
• Voltage Input (xxx_AiVolt)
These different input types are packaged in their own kit to improve memory management. For Ai2T, Ai3T, AiDi, and AiOhm, the DIP
Switch for each input must be in Resistance position. For AimAmp and AiVolt, the DIP Switch for each input must be in V/mA position
Digital/Binary Inputs support dry contact closure.
• xxx_Di
The digital input is packaged in its own kit to improve memory management.
Analog Outputs support both milliamp and voltage outputs,
• xxx_AomAmp (0-20 mA + 0-10%)
• xxx_AoVolt (0-10 vDC + 0-10% via a 500Ω shunt resistor placed across the output)
These different output types are packaged in their own kit to improve memory management.
Digital/Binary Outputs command a normally open 5A relay.
• xx_Do
• 277VAC resistive @ 5A
• 30VDC resistive @ 5A
• 277VAC inductive @ 1A
The digital output is packaged in its own kit to improve memory management.
REPLACEMENT PARTS
For replacement parts or RMA, please contact Wattstopper Support for information: 800-879-8585.
FCC STATEMENT
This device complies with Part 15 of the FCC Rules. Operation is subject to the following two conditions: (1) this device may not cause
harmful interference, and (2) this device must accept any interference received, including interference that may cause undesired
operation.
-
 1
1
-
 2
2


Legrand WIO-24 Wireless Input/Output Control Node Guide d'installation
- Taper
- Guide d'installation
dans d''autres langues
Documents connexes
-
Legrand WIO-4 Wireless Input/Output Control Node Guide d'installation
-
-
-
-
-
wattstopper NWTL-111-1P/2P version 2 BUILT Wireless Control Node Guide d'installation
-
-
-