Kichler Lighting 15390AZT Manuel utilisateur
- Taper
- Manuel utilisateur

FOR USE WITH LANDSCAPE LIGHTING SYSTEMS ONLY.
1) The device is accepted as a component of a landscape lighting system
where the suitability of the CSA or UL labeled combination shall be deter
mined by CSA, UL respectively or the local inspection authorities having
jurisdiction.
2) Fixture shall be connected to an extra low voltage transformer approved for
use with landscape lighting systems.
3) Thisxtureistobeconnectedtoasecondarywiringofthefollowingtype:
12 GA 60°C minimum type;
SPT-3 suitable for outdoor use; or
approved landscape lighting cable.
INSTRUCTIONS PERTAINING TO A RISK OF FIRE,OR INJURY TO
PERSONS
IMPORTANT SAFETY INSTRUCTIONS
Lighted lamp is HOT!
WARNING — To reduce the risk of FIRE OR INJURY TO PERSONS.
1) Turn off / unplug and allow to cool before replacing lamp.
2) Lamp gets HOT quickly! Contact only switch / plug when turning on.
3) Do not touch hot lens or cowl.
4) Do not remain in light if skin feels warm. (Light is intense, it may cause
“sunburn”.)
5) Do not look directly at lighted lamp.
6) Keep lamp away from materials that may burn.
7) Useonlywithwattageandlampmarkedonxture.
8) Do not touch the inner glass envelope of the lamp at any time. Use a soft
cloth. Oil from skin may damage lamp.
9) Donotoperatethexturewithadamagedormissinglens.
CAUTION
WHEN INSTALLING KICHLER LANDSCAPE LIGHTING (LINE VOLTAGE OR LOW VOLTAGE),
CARE SHOULD BE TAKEN TO KEEP CLEAR OF POTENTIALLY COMBUSTIBLE MATERIALS.
WHEN MAINTAINING THE FIXTURES, BE SURE TO REMOVE LEAVES, PINE NEEDLES,
GRASS CLIPPINGS, MULCH, OR ANY DEBRIS THAT HAS ACCUMULATED ON THE LIGHT
BULB, LENS, OR BODY OF THE FIXTURE.
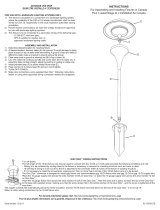
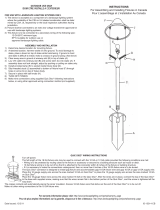
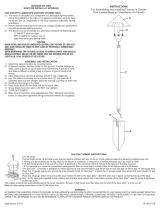
ASSEMBLY AND INSTALLATION
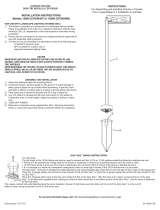
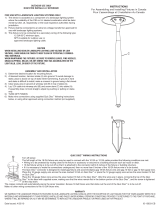
1) Determinedesiredlocationformountingxture.
2) At desired location, hammer stake (A) into ground. To avoid damage to
stake, place a board on top of stake while hammering. If ground is hard
andstakeisdifculttoinstall,makeacrosscutingroundusingaat
shovel.
3) Clear away area in ground at wireway slot (B) in top of stake (A).
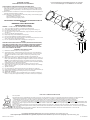
4) Make lamp connections. Slide spade lugs (C) beneath head of screws on
back of par 36 lamp (not supplied) and tighten screws to secure connection.
NOTE: To ease replacement of lamp and prevent corrosion of connection,
apply 15670, Corrosion Preventative Compound (sold separately) liberally
over spade lugs, par 36 screws and tabs.
5) Carefully place lamp inside cowl (E) and place o-ring (F) on lamp.
6) Align notch (G) in retaining ring with rib (H) inside cowl (E). This will align
screws (J) with holes.
7) Tighten screws (J).
8) Lay12Vcableintowirewayslot(B)andscrewxtureintostake(A).
9) Once desired direction is achieved run locknut (K) down against stake (A).
10)Adjustangleofxturebylooseningscrew(L)inswivel(M).
11) TURN OFF POWER.
12) Make wire connections using supplied Quic Disc
™
following instructions
below, or using other approved wiring connection method (not supplied.)
Date Issued: 1/27/12 IS-15390-CB
OUTDOOR USE ONLY
DOM ETRE INSTALLE A L’EXTERIEUR
INSTRUCTIONS
For Assembling and Installing Fixtures in Canada
Pour L’assemblage et L’installation Au Canada
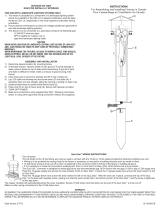
QUIC DISC
™
WIRING INSTRUCTIONS
Turn off power.
Thefulllengthofthe18GAxturewiremaybeusedtoconnectwiththe10GAor12GAcableprovidedthefollowingconditionsaremet:
•Wiringistobeprotectedbyroutingclosetothextureoraccessoryorsecuredtoabuildingstructuresuchashouseordeck.
• 18GAxturewiringistobecutoffsothatitisattachedtotheconnectorwithin6inchesofthextureorbuildingstructure.
• Ifitisnecessarytomaketheconnectionsunderground,thennomorethan6inchesofthe18GAxturewireistobeburied.
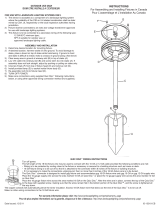
The Quic Disc
™
connector is designed to install onextureandaccommodatesone18GAxturewireandone 10 GA or one 12 GA supply wire.
Place the 10 gauge supply wire across the area marked 10 GA on Quic Disc
™
or place the 12 gauge supply wire across the area marked 12 GA
on Quic Disc
™
.
Placethe18gaugexturewireacrosstheareamarked18GAontheQuicDisc
™
. After the wires are in place, connecta the top of the Quic
Disc
™
tothebasewithsuppliedscrew,makingsurethatthewiresremainatinthebottomportionoftheQuicDisc
™
, and the screw is tightened
all the way down.
Thecoppercontactswillautomaticallypiercethewires’insulation.Excess18GAxturewirethatsticksouttheendoftheQuicDisc
™
is to be cut off.
Makenootherwiringconnectionstothe18GAxturewire.
D
E
H
B
A
G
F
L
K
M
C
For warranty information please visit: http://www.landscapelighting.com/portal/warranty_page
Pour de plus amples informations sur la garantie, cliquez sur le lien ci-dessous : http://www.landscapelighting.com/portal/warranty_page

A UTILISER UNIQUEMENT POUR LES SYSTÈMES D’ÉCLAIRAG PAYSAGER
1) Le dispositif est accepté en tant que composant d’un système d’é
clairage paysager lorsque la compatibilité de la combinaison étiquetée
UL ou CSA (ACNOR) doit être déterminée par CSA, UL respectivement
ou les autorités d’inspection locales ayant compétence.
2) L’appareil doit étre connecté à un transformateur supplémentaire à
basse tension approuvé pour une utilisation avec les systémes
d’éclairage paysager.
3) Cetapareildoitétreconnectéàuncâblagesecondairedutypesuivant:
12GA 60°C type minimum;
SPT-3 combatible pour utilisation extreme;
ou câble d’éclairage paysager agréé.
INSTRUCTIONS POUR EVITER TOUT RISQUE D’INCENDIE
OU DE BLESSURE
INSTRUCTIONS DE SECURITE IMPORTANTES
Une lampe allumée est BRULANTE!
AVERTISSEMENT — Pour éviter tout risque d’INCENDIE OU DE BLESSURE
1) Éteindre ou débrancher l’appareil et attendre que la lampe refroidisse
avant de la remplacer.
2) La lampe chauffe rapidement! Ne toucher que l’interrupteur / la prise
lorsque vous l’allumez.
3) Ne pas toucher la lentille ou le capot lorsqu’ils sont chauds.
4) Ne pas rester près de la lampe si vous ressentez la chaleur dégagée (La
lumière est intense et risque de brûler comme un “coup de soleil”.)
5) Ne pas regarder directement l’ampoule lorsqu’elle est allumée.
6) Garder la lampe à distance de matériaux qui risquent de prendre feu.
7) N’utiliser la puissance et la lampe que selon les valeurs indiquées sur
l’appareil.
8) Ne jamais toucher l’enveloppe en verre à l’intérieur de la lampe. Utiliser un
chiffon doux. L’huile de la peau risque d’endommager la lampe.
9) Ne pas utiliser l’appareil sans lentille ou si cette dernière est endommagée.
ATTENTION
LORS DE L’INSTALLATION D’ECLAIRAGE DE JARDIN KICHLER 9TNESION DU SECTEUR OU
BASSE TENSION), PRENEZ SOIN DE LE MAINTENIR DEGAGE DE TOUT MATERIAU
COMBUSTIBLE.
LORS DE L’ENTRETIEN DE LA LAMPE, ASSUREZ - VOUS DE RETIRER LES FEULLES, LES
AIGUILLES DE PIN, LES BRINS D’HERBE, L’HUMUS, ET TOUT DEBRIS QUI S’EST ACCUMULE
SUR L’AMPOULE DE LA LAMPE, LE DIFFUSEUR OU LE CORP DE LA LAMPE.
MONTAGE ET INSTALLATION
1) Déterminer L’emplacement où installer le luminaire.
2) Planter le poteau (A) dans le sol. Pour éviter d’endommager le poteau avec
le marteau, poser dessus un morceau de bois. Si le sol est très dur, faire
deux entailles en croix dans le sol avec une pelle plate.
3) Dégagerlesolauniveaudelafenteguide-ls(B)situéesurlapartie
supérieure du poteau (A).
4) Faire les branchements de la lampe. Passer les languettes de contact (C)
souslatêtedesvis(D)situéesderrièrelalampePAR(àréecteur
parabolique) 36 (non fournie) et bien serrer les vis-.
REMARQUE : Pour faciliter le remplacement de la lampe et éviter la
corrosion des branchements, appliquer une bonne quantité d’enduit
anticorrosion 15670 (vendu séparément) sur les languettes de contact, les
vis 36 et les languettes.
5) Installer avec précaution la lampe dans le chapeau (E) et poser un joint
torique (F) sur la lampe.
6) Faire correspondre l’encoche (G située sur la bague de retenue avec la
saillie (H) située dans le chapeau (E). Ceci permettra de placer les vis (J)
en face des - trous.
7) Serrer les vis (J).
8) Poseràplatlelde12Vdanslafenteguid-ls(B)etvisserlaxturesur
le poteau (A).
9) Une fois la direction adéquate obtenue, visser le poteau (A).
10) Régler l’angle du luminaire en desserrant la vis (L) du pivot (M).
11) COUPER LE COURANT ÉLECTRIQUE.
12)ConnecterleslsenutilisantleconnecteurQuicDisc
™
fourni en suivant
les indications ci-dessous, ou en suivant toute autre méthode de connexion
approuvée (non fournie).
Date Issued: 1/27/12 IS-15390-CB
OUTDOOR USE ONLY
DOM ETRE INSTALLE A L’EXTERIEUR
INSTRUCTIONS
For Assembling and Installing Fixtures in Canada
Pour L’assemblage et L’installation Au Canada
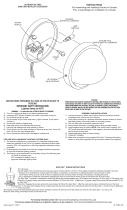
INSTRUCTIONS DE CBLAGE ÉLECTRIQUE AVEC UN QUIC DISC
™
Couper le courant d’alimentation.
Toutelalongueurdulélectriquedecalibre18peutêtreutiliséepourlebranchementaveclelélectriquedecalibre10ou12silesconditions
suivantessontremplies:
•Lecâblagedoitêtreprotégésoitparlecheminementdeslsàproximitédel’appareil,parunaccessoireoubienildoitêtrexéàlastructure
d’une construction telle qu’une maison ou une terrasse.
•Leslsdecalibre18doiventêtrecoupésdemanièreàpouvoirêtrereliésauconnecteuràunedistancemaximumde6poucesduluminaireou
de la construction.
•Silesbranchementsdoiventêtrefaitssousterre,pasplusde6poucesdelsdecalibre18doiventêtreenterrés.
LeconnecteurQuicDisc™estconçuand’installerunluminaireetconvientàunldeluminaire18GAetun10GA,ouunlderéserve12
GA.
Poserlelélectriquedecalibre10surleQuicDisc™entraversdel’endroitmarquécalibre10ouceluidecalibre12entraversdel’endroit
marqué calibre 12.
Poserleld’alimentationduluminaireentraversdel’endroitmarquécalibre18.Lorsqueleslssontenplace,connecterlapartiesupérieureduQuicDisc
™
à la
baseaveclavifournie.S’assurerqueleslssontbienàplatdanslapartieinférieureduQuicDisc™etquelavisestserréeàfond.
Les contacts en cuivre perceront automatiquement l’isolement des fils. Couper le fil d’alimentation de calibre 18 qui dépasse du Quic Disc
™
.
Ne faire aucune autre connexion de fils aux fils du luminaire 18 GA.
D
E
H
B
A
G
F
L
K
M
C
For warranty information please visit: http://www.landscapelighting.com/portal/warranty_page
Pour de plus amples informations sur la garantie, cliquez sur le lien ci-dessous : http://www.landscapelighting.com/portal/warranty_page
-
 1
1
-
 2
2


Kichler Lighting 15390AZT Manuel utilisateur
- Taper
- Manuel utilisateur
dans d''autres langues
Documents connexes
-
 Kichler Lighting 15805BKT27R Manuel utilisateur
-
 Kichler Lighting 15833AZT27R Manuel utilisateur
-
 Kichler Lighting 15374AZT Manuel utilisateur
-
Kichler Lighting 16154AZT27 Manuel utilisateur
-
 Kichler Lighting 15318AZT Manuel utilisateur
-
 Kichler Lighting 15336BKT Manuel utilisateur
-
 Kichler Lighting 15314MST Manuel utilisateur
-
 Kichler Lighting 15458OZ Manuel utilisateur
-
 Kichler Lighting 15064AZT Manuel utilisateur
-
 Kichler Lighting 15437TZT Manuel utilisateur


