Kichler Lighting 15313TZG Manuel utilisateur
- Taper
- Manuel utilisateur

FOR USE WITH LANDSCAPE LIGHTING SYSTEMS ONLY.
1) The device is accepted as a component of a landscape lighting system
where the suitability of the CSA or UL labeled combination shall be deter
mined by CSA, UL respectively or the local inspection authorities having
jurisdiction.
2) Fixture shall be connected to an extra low voltage transformer approved
for use with landscape lighting systems.
3) Thisxtureistobeconnectedtoasecondarywiringofthefollowingtype:
12 GA 60°C minimum type;
SPT-3 suitable for outdoor use; or
approved landscape lighting cable.
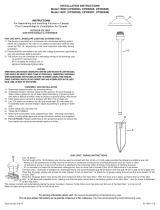
ASSEMBLY AND INSTALLATION
1) Determinedesiredlocationformountingxture.
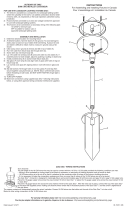
2) At desired location, hammer stake (A) into ground. To avoid damage to
stake, place a board on top of stake while hammering. If ground is hard
andstakeisdifculttoinstall,makeacrosscutingroundusingaat
shovel.
3) Clear away area in ground at wireway slot (B) in top of stake (A).
4) Lay 12V cable into wireway slot (B) and screw stem (D) into stake (A).
If assembly does not look straight, adjust by pushing or pulling on stake
only.
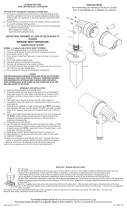
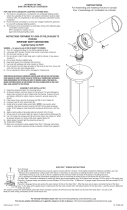
5) Loosen thumbscrews (C) and remove shade (G).
6) Installprovidedlamp(F)tosocketinsidexturehead(E).
7) Re-assembleshade(G)toxturehead(E)andtightenthumbscrews(C).
8) TURNOFFPOWER.
9) Make wire connections using supplied Quic Disc
™
following instructions
below, or using other approved wiring connection method (not supplied.)
Date Issued: 12/2/11 IS-15313-CB
OUTDOOR USE ONLY
DOM ETRE INSTALLE A L’EXTERIEUR
INSTRUCTIONS
For Assembling and Installing Fixtures in Canada
Pour L’assemblage et L’installation Au Canada
For warranty information please visit: http://www.landscapelighting.com/portal/warranty_page
Pour de plus amples informations sur la garantie, cliquez sur le lien ci-dessous : http://www.landscapelighting.com/portal/warranty_page
A
B
F
C
FIXTURE HEADS MAY VARY DUE TO INDIVIDUAL DESIGNS.
E
G
D
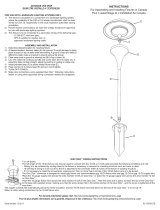
QUIC DISC
™
WIRING INSTRUCTIONS
Turn off power.
Thefulllengthofthe18GAxturewiremaybeusedtoconnectwiththe10GAor12GAcableprovidedthefollowingconditionsaremet:
•Wiringistobeprotectedbyroutingclosetothextureoraccessoryorsecuredtoabuildingstructuresuchashouseordeck.
• 18GAxturewiringistobecutoffsothatitisattachedtotheconnectorwithin6inchesofthextureorbuildingstructure.
• Ifitisnecessarytomaketheconnectionsunderground,thennomorethan6inchesofthe18GAxturewireistobeburied.
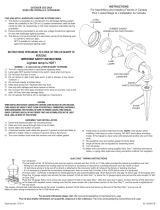
The Quic Disc
™
connector is designed to install onextureandaccommodatesone18GAxturewireandone 10 GA or one 12 GA supply wire.
Place the 10 gauge supply wire across the area marked 10 GA on Quic Disc
™
or place the 12 gauge supply wire across the area marked 12 GA
on Quic Disc
™
.
Placethe18gaugexturewireacrosstheareamarked18GAontheQuicDisc
™
. After the wires are in place, connect the top of the Quic Disc
™
tothebasewithsuppliedscrew,makingsurethatthewiresremainatinthebottomportionoftheQuicDisc™,andthescrewistightenedall
the way down.
Thecoppercontactswillautomaticallypiercethewires’insulation.Excess18GAxturewirethatsticksouttheendoftheQuicDisc
™
is to be cut off.
Makenootherwiringconnectionstothe18GAxturewire.

A UTILISER UNIQUEMENT POUR LES SYSTÈMES D’ÉCLAIRAG PAYSAGER
1) Le dispositif est accepté en tant que composant d’un système d’é
clairage paysager lorsque la compatibilité de la combinaison étiquetée
UL ou CSA (ACNOR) doit être déterminée par CSA, UL respectivement
ou les autorités d’inspection locales ayant compétence.
2) L’appareil doit étre connecté à un transformateur supplémentaire à
basse tension approuvé pour une utilisation avec les systémes
d’éclairage paysager.
3) Cetapareildoitétreconnectéàuncâblagesecondairedutypesuivant:
12GA 60°C type minimum;
SPT-3 combatible pour utilisation extreme;
ou câble d’éclairage paysager agréé.
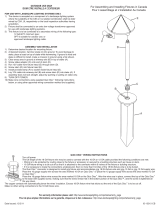
MONTAGE ET INSTALLATION
1) Déterminer l’emplacement pour l’installation du luminaire.
2) A l’endroit choisi, enfoncer le piquet (A) dans le sol avec un marteau.
Pour ne pas endommager le piquet, placer une plaque en haut du piquet
ettaperdessus.Silesolestduretquelepiquetestdifcileàinstaller,
enfoncer une pelle plate en croisé dans le sol.
3) Nettoyerlesolautourdelafentedupasse-l(B)danslasectionsupérieure
du piquet (A).
4) Achemineruncâblede12Vdanslafentedupasse-l(B)etvisserla
tige (D) dans le piquet (A). Si le montage ne paraît pas droit, ajuster en
enfonçant ou en ressortant le piquet (n’ajuster que le piquet).
5) Desserrer les vis moletées (C) et enlever l’abat-jour (G).
6) Installerl’ampoulefournie(F)àladouilleàl’intérieurdelatêteduluminaire(E).
7) Ré-assemblerl’abat-jour(G)surlatêteduluminaire(E)ettournerlesvisà
tête moletée (C).
8) COUPERLECOURANT.
9) ConnecterleslsenutilisantleconnecteurQuicDisc
™
fourni en suivant
les indications ci-dessous, ou en suivant toute autre méthode de connexion
approuvée (non fournie).
Date Issued: 12/2/11 IS-15313-CB
OUTDOOR USE ONLY
DOM ETRE INSTALLE A L’EXTERIEUR
INSTRUCTIONS
For Assembling and Installing Fixtures in Canada
Pour L’assemblage et L’installation Au Canada
LES TÉTES DES APPAREILS PEUVENT ETRE DIFFÉRENTES
SELON LE MODÉLES.
For warranty information please visit: http://www.landscapelighting.com/portal/warranty_page
Pour de plus amples informations sur la garantie, cliquez sur le lien ci-dessous : http://www.landscapelighting.com/portal/warranty_page
A
B
F
C
E
G
D
INSTRUCTIONS DE CBLAGE ÉLECTRIQUE AVEC UN QUIC DISC
™
Couper le courant d’alimentation.
Toutelalongueurdulélectriquedecalibre18peutêtreutiliséepourlebranchementaveclelélectriquedecalibre10ou12silesconditions
suivantessontremplies:
•Lecâblagedoitêtreprotégésoitparlecheminementdeslsàproximitédel’appareil,parunaccessoireoubienildoitêtrexéàlastructure
d’une construction telle qu’une maison ou une terrasse.
•Leslsdecalibre18doiventêtrecoupésdemanièreàpouvoirêtrereliésauconnecteuràunedistancemaximumde6poucesduluminaireou
de la construction.
•Silesbranchementsdoiventêtrefaitssousterre,pasplusde6poucesdelsdecalibre18doiventêtreenterrés.
LeconnecteurQuicDisc™estconçuand’installerunluminaireetconvientàunldeluminaire18GAetun10GA,ouunlderéserve12
GA.
Poserlelélectriquedecalibre10surleQuicDisc™entraversdel’endroitmarquécalibre10ouceluidecalibre12entraversdel’endroit
marqué calibre 12.
Poserleld’alimentationduluminaireentraversdel’endroitmarquécalibre18.Lorsqueleslssontenplace,connecterlapartiesupérieureduQuicDisc
™
à la
baseaveclavifournie.S’assurerqueleslssontbienàplatdanslapartieinférieureduQuicDisc™etquelavisestserréeàfond.
Les contacts en cuivre perceront automatiquement l’isolement des fils. Couper le fil d’alimentation de calibre 18 qui dépasse du Quic Disc
™
.
Ne faire aucune autre connexion de fils aux fils du luminaire 18 GA.
-
 1
1
-
 2
2


Kichler Lighting 15313TZG Manuel utilisateur
- Taper
- Manuel utilisateur
dans d''autres langues
Documents connexes
-
Kichler Lighting 15361AZT Manuel utilisateur
-
 Kichler Lighting 15397AZT Manuel utilisateur
-
 Kichler Lighting 15309AZT Manuel utilisateur
-
 Kichler Lighting 15317AZT Manuel utilisateur
-
 Kichler Lighting 15326AZT Manuel utilisateur
-
 Kichler Lighting 15398AZT Manuel utilisateur
-
 Kichler Lighting 15821AZT27 Manuel utilisateur
-
 Kichler Lighting 15336BKT Manuel utilisateur
-
 Kichler Lighting 15350CO Manuel utilisateur
-
 Kichler Lighting 15315AZT Manuel utilisateur


