ZyXEL G-360
802.11g Wireless PCI Adapter
Quick Start Guide
Version 2.10
12/2005
Procedure to View a Product's Certification(s)
1 Go to www.zyxel.com
2 Select your product from the drop-down list box on
the ZyXEL home page to go to that product's page.
3 Select the certification you wish to view from this
page.
Installation Requirements
Before installation, make sure you have a computer with
the following:
• Pentium II 300MHz or above
• A minimum of 6 MB available hard disk space
• A minimum of 32 MB RAM
• A CD-ROM drive
• A 32-bit (v2.2) PCI slot
• Windows 98 Second Edition (SE), Windows ME, Win-
dows 2000 or Windows XP
• Windows 98 SE users may need the Windows 98 SE
CD
Hardware Installation
Follow the steps below to install the ZyXEL G-360 in
your computer.
1 Save your work and close all applications.
2 Turn off the computer and peripheral device(s), such
as the printer. Then disconnect the computer power
cord from the power source.
3 Ground yourself by wearing an anti-static wrist strap
or touching a metal object. Remove the computer
cover and the ZyXEL G-360 from its packaging.
4 Insert the ZyXEL G-360 into an available PCI slot.
Make sure the ZyXEL G-360's contacts are fully
seated in the PCI slot.
5 Secure the ZyXEL G-360 to the computer with a
bracket screw.
6 Attach the included antenna to the ZyXEL G-360.
The antenna should be perpendicular to the ground.
7 Replace the computer cover and power on your
computer.
Driver Installation
Follow the steps for the appropriate version of Windows
to install the ZyXEL driver.
Windows 98 SE
1 When Windows automatically detects the ZyXEL G-
360, click Next.
2 Select Search for the best driver for your device.
(Recommended). and click Next.
3 Insert the Installation CD into your CD-ROM drive.
Select Specify a location and click Browse to find
the Driver folder in the CD. Click Next.
4 When prompted, insert the Windows 98 SE CD and
click OK. Or specify the location of the Windows 98
SE installation files and click OK.
5 When Add New Hardware Wizard finds the driver
file, click Next.
6 Click Finish and restart the computer when
prompted.
Windows Me
1 Windows automatically detects the ZyXEL G-360.
Select Specify the location of the driver
(Advanced), then click Next.
2 Insert the Installation CD into your CD-ROM drive.
Select Search for the best drive for your device
then select only Removable Media (Floppy, CD-
ROM …) and click Next.
3 When the Add New Hardware Wizard finds the
driver, click Next.
4 Click Finish and restart the computer when
prompted.
Windows 2000
1 When Windows automatically detects the ZyXEL G-
360, click Next.
2 Insert the Installation CD into your CD-ROM drive.
Select Search for a suitable driver for my device
(recommended) and click Next.
3Select CD-ROM drive and click Next.
4 When the Found New Hardware Wizard finds the
driver, click Next.
5If a Digital Signature Not Found window displays,
click Yes to continue.
6 Click Finish to complete the driver installation.
Windows XP
1 Windows automatically detects the ZyXEL G-360.
Select Install from a list or specific location
(Advanced), then click Next.
2 Insert the Installation CD into your CD-ROM drive.
Select Search for the best drive in these
locations then select only Search removable
media. (Floppy, CD-ROM …) and click Next.
3 If a warning window displays, click Continue
Anyway.
4 Click Finish to complete the driver installation.
ZyXEL Wireless LAN Utility Installation
The installation procedures are similar for all supported
Windows versions.
1 After you have successfully installed the driver, re-
insert the support CD into the CD-ROM drive on
your computer. The CD automatically runs.
Otherwise, locate and double-click setup.exe.
2 Select your language and click OK.
3 Click Install Utility to start installation.
4 A Welcome screen displays. Click Next.
5 Click Next to accept the default file location or click
Browse to select an alternate folder.
6 Click Finish to restart the computer.
After you insert the ZyXEL G-360 and install
the driver and ZyXEL Utility, an icon appears
in the system tray.
Introduction to OTIST
In a wireless network, the wireless clients must have the
same SSID and security settings as the access point
(AP) or wireless router (we will refer to both as "AP"
here) in order to associate with it. Traditionally this meant
that you had to configure the settings on the AP and then
manually configure the exact same settings on each
wireless client.
OTIST (One-Touch Intelligent Security Technology)
allows you to transfer your AP's SSID and WEP or WPA-
PSK security settings to wireless clients that support
OTIST and are within transmission range. You can also
choose to have OTIST generate a WPA-PSK key for you
if you didn't configure one manually.
Enabling OTIST
You must enable OTIST on both the AP and wireless
client before you start transferring settings.
We use the Prestige 334WT and the G-360 screens in
this guide as an example. Screens may vary slightly for
your ZyXEL devices.
AP
You can enable OTIST using the Reset button or the
web configurator. If you use the Reset button, the default
(01234567) or previous saved (through the web
configurator) Setup key is used to encrypt the settings
that you want to transfer.
Hold in the Reset button for one or two seconds.
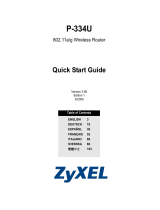
In the web configurator, go to the Wireless LAN main
screen and then select OTIST. To change the Setup key,
enter zero to eight printable characters. To have OTIST
automatically generate a WPA-PSK key, select the Yes
check box. If you manually configured a WEP key or a
WPA-PSK key and you also selected this check box,
then the key you manually configured is used.
Wireless Client
Start the ZyXEL Utility and click the Adapter tab. Select
the OTIST check box, enter the same Setup Key as your
AP's and click Save.
Starting OTIST
1 In the AP, a web configurator screen pops up
showing you the security settings to transfer. After
reviewing the settings, click OK.
2 This screen appears while OTIST settings are being
transferred. It closes when the transfer is complete.
• In the wireless client,
you see this screen if it
can't find an OTIST-
enabled AP (with the
same Setup key).
Click OK to go back to the ZyXEL Utility main screen.
• If there is more than one OTIST-enabled AP within
range, you see a screen asking you to select one AP
to get settings from.
Notes on OTIST
1 If you enabled OTIST
in the wireless client,
you see this screen
each time you start the
ZyXEL Utility. Click
Yes for it to search for
an OTIST-enabled AP.
2 If an OTIST-enabled wireless client loses its
wireless connection for more than ten seconds, it
will search for an OTIST-enabled AP for up to one
minute. (If you manually have the wireless client
search for an OTIST-enabled AP, there is no
timeout; click Cancel in the OTIST progress screen
to stop the search.)
3 When the wireless client finds an OTIST-enabled
AP, you must still click Start in the AP OTIST web
configurator screen or hold in the Reset button (for
one or two seconds) for the AP to transfer settings.
4 If you change the SSID or the keys on the AP after
using OTIST, you need to run OTIST again or enter
them manually in the wireless client(s).
5 If you configure OTIST to generate a WPA-PSK key,
this key changes each time you run OTIST.
Therefore, if a new wireless client joins your
wireless network, you need to run OTIST on the AP
and ALL the wireless clients again.
Troubleshooting
If Windows does not auto-detect the ZyXEL G-360, do
the following:
• Make sure the ZyXEL G-360 is inserted into the com-
puter PCI slot properly and then restart your com-
puter. Check the LEDs on the ZyXEL G-360.
• Perform a hardware scan by clicking Start, Settings,
Control Panel and double-clicking Add/Remove
Hardware. (Steps may vary depending on the version
of Windows). Follow the on-screen instructions to
search for the ZyXEL G-360 and install the driver.
• Check for possible hardware conflicts. In Windows,
click Start, Settings, Control Panel, System, Hard-
ware and then click Device Manager. Verify the sta-
tus of the ZyXEL G-360 under Network Adapter.
(Steps may vary depending on the version of Win-
dows).
• Install the ZyXEL G-360 in another computer. If the
error persists, you may have a hardware problem. In
this case, you should contact your local vendor.
Procèdure permettant de consulter une(les)
Certification(s) du Produit
1 Go to Allez sur www.zyxel.com.
2 Sèlectionnez votre produit dans la liste dèroulante
se trouvant sur la page d'accueil ZyXEL pour
accèder à la page du produit concernè.
3 Sèlectionnez sur cette page la certification que vous
voulez consulter.
Configuration requise
Avant l'installation, assurez-vous que vous avez un
ordinateur avec la configuration suivante:
• Pentium II 300MHz ou plus
• Au minimum 6 Mo d'espace disponible sur le disque
dur
• An minimum 32 Mo de RAM
• Un lecteur de CD-ROM
• Un emplacement PCI
• Windows 98 Second Edition, Windows ME, Windows
2000 ou Windows XP
• Il se peut que les utilisateurs de Windows 98 SE aient
besoin du CD Windows 98 SE
Installation de l'équipement
Veuillez suivre la procédure ci-dessous pour installer la
ZyXEL G-360 dans votre ordinateur.
1 Enregistrez votre travail et fermez toutes vos
applications.
2 Eteignez votre ordinateur et vos appareils
périphériques, tels que l'imprimante. Puis
débranchez l'alimentation de votre ordinateur.
3 Reliez vous à la terre en portant un poignet anti-
statique, ou en touchant un objet métallique.
Démontez le capot de l'ordinateur et sortez la
ZyXEL G-360 de son paquet.
4 Insérez le ZyXEL G-360 dans un slot PCI
disponible. Assurez vous que les contacts de le
ZyXEL G-360 soient entièrement posés dans le slot.
5 Fixez le ZyXEL G-360 avec un tourne-vis.
6 Fixez l'antenne incluse sur le ZyXEL G-360.
L'antenne doit être perpendiculaire au sol.
7 Reposez le couvercle de l'ordinateur, branchez et
allumez votre ordinateur.
Installation du pilote
Suivez la procédure correspondant à la version de
Windows qui vous concerne pour installer le pilote
ZyXEL.
Windows 98 SE
1 Lorsque Windows détecte automatiquement la
ZyXEL G-360, cliquez sur Suivant.
2 Sélectionner Rechercher le meilleur pilote pour
votre périphérique. (Recommandé) cliquez sur
Suivant.
3 Insérez le CD d'installation dans votre lecteur de
CD-ROM. Sélectionnez Spécifier un emplacement
et cliquez sur Parcourir pour trouver le dossier
Pilote sur le CD. Cliquez sur Suivant.
4 Lorsque vous y êtes invité, insérez le CD Windows
98 SE et cliquez sur OK. Ou bien spécifiez
l'emplacement des fichiers d'installation de
Windows 98 SE et cliquez sur OK.
5 Lorsque l'Assistant Ajout de nouveau matériel
trouve le fichier pilote, cliquez sur Suivant.
6 Cliquez sur Terminer et redémarrez l'ordinateur
lorsque vous y êtes invité.
Windows Me
1 Windows détecte automatiquement la ZyXEL G-
360. Sélectionnez Spécifier l'emplacement du
pilote (Avancé), puis cliquez sur Suivant.
2 Insérez le CD d'installation dans votre lecteur de
CD-ROM. Sélectionnez Rechercher le meilleur
pilote pour votre périphérique puis sélectionnez
uniquement Support amovible (Lecteur de
disquettes, CD-ROM …) et cliquez sur Suivant.
3 Lorsque l'Assistant Ajout de nouveau matériel
trouve le pilote, cliquez sur Suivant.
4 Cliquez sur Terminer et redémarrez l'ordinateur
lorsque vous y êtes invite.
Windows 2000
1 Lorsque Windows détecte automatiquement la
ZyXEL G-360, cliquez sur Suivant.
2 Insérez le CD d'installation dans votre lecteur de
CD-ROM. Sélectionnez Rechercher le meilleur
pilote pour votre périphérique (Recommandé) et
cliquez sur Suivant.
3 Sélectionnez Unité CD-ROM et cliquez sur
Suivant.
4 Si un fenêtre Signature numérique introuvable
s'affiche, cliquez sur Oui pour continuer.
5 Cliquez sur Terminer pour terminer l'installation du
pilote.
Windows XP
1 Windows détecte automatiquement la ZyXEL G-
360. Sélectionnez Installer à partir d'une liste
d'emplacements spécifiques (Avancé), puis
cliquez sur Suivant.
2 Insérez le CD d'installation dans votre lecteur de
CD-ROM. Sélectionnez Rechercher la meilleure
unité dans ces emplacements puis sélectionnez
uniquement Rechercher les médias amovibles.
(Lecteur de disquette, CD-ROM …) et cliquez sur
Suivant.
3 Si une fenêtre d'avertissement s'affiche, cliquez sur
Continuer quand même.
4 Cliquez sur Terminer pour terminer l'installation du
pilote.
Installation de l'Utilitaire LAN sans fil ZyXEL
Les procédures d'installation sont similaires pour toutes
les versions de Windows prises en charge.
1 Après avoir installé le pilote avec succès, re-placez
le CD de soutien dans le lecteur de CD-ROM de
votre ordinateur. Le CD s'exécute automatiquement.
Sinon, recherchez et double-cliquez sur setup.exe.
2 Sèlectionnez votre langue et cliquez sur OK.
3 Cliquez sur Installer l'utilitatire pour lancer
l'installation.
4 Un écran de bienvenue s'affiche. Cliquez sur
Suivant.
5 Cliquez sur Suivant pour accepter l'emplacement
des fichiers par dèfaut, sinon cliquez sur Parcourir
pour sèlectionner un autre dossier.
6 Cliquez sur Terminer pour redémarrer votre
ordinateur.
Après que vous avez inséré la ZyXEL G-360 et
installé le pilote et l'Utilitaire ZyXEL, une icône
s'affiche dans le casier système.
Présentation d'OTIST
Dans un réseau sans fil, les clients sans fil doivent avoir
les mêmes paramètres SSID et de sécurité que le point
d'accès (AP) ou le routeur sans fil (nous les nommerons
tous deux "AP" ici) afin de s'associer à celui-ci.
Traditionnellement, cela signifie que vous devez
configurer les paramètres sur l'AP et configurer
manuellement exactement les mêmes paramètres sur
chaque client sans fil.
OTIST (One-Touch Intelligent Security Technology) vous
permet de transférer les paramètres de sécurité SSID,
WEP et WPA-PSK de votre AP vers des clients sans fil
prenant en charge OTIST et se trouvant dans les limites
de la plage de transmission. Vous pouvez aussi choisir
de faire générer une clé WPA-PSK par OTIST pour vous
si vous ne voulez pas la configurer manuellement.
Activer OTIST
Vous devez activer OTIST à la fois sur l'AP et le client
avant de commencer à transférer les paramètres.
Nous utilisons les écrans du Prestige 334WT et du
ZyXEL G-360 comme exemple dans ce guide. Les
écrans peuvent légèrement varier selon vos matériels
ZyXEL.
AP
Vous pouvez activer OTIST à l'aide du bouton Reset
(Réinitialiser) ou du configurateur web. Si vous utilisez
le bouton Reset (Réinitialiser), la Setup key (Clé de
configuration) par défaut (01234567) ou celle
précédemment enregistrée (à l'aide du configurateur
web) est utilisée pour coder les paramètres que vous
voulez transférer.
Appuyez sur le bouton Reset (Réinitialiser) pendant
une à deux secondes.
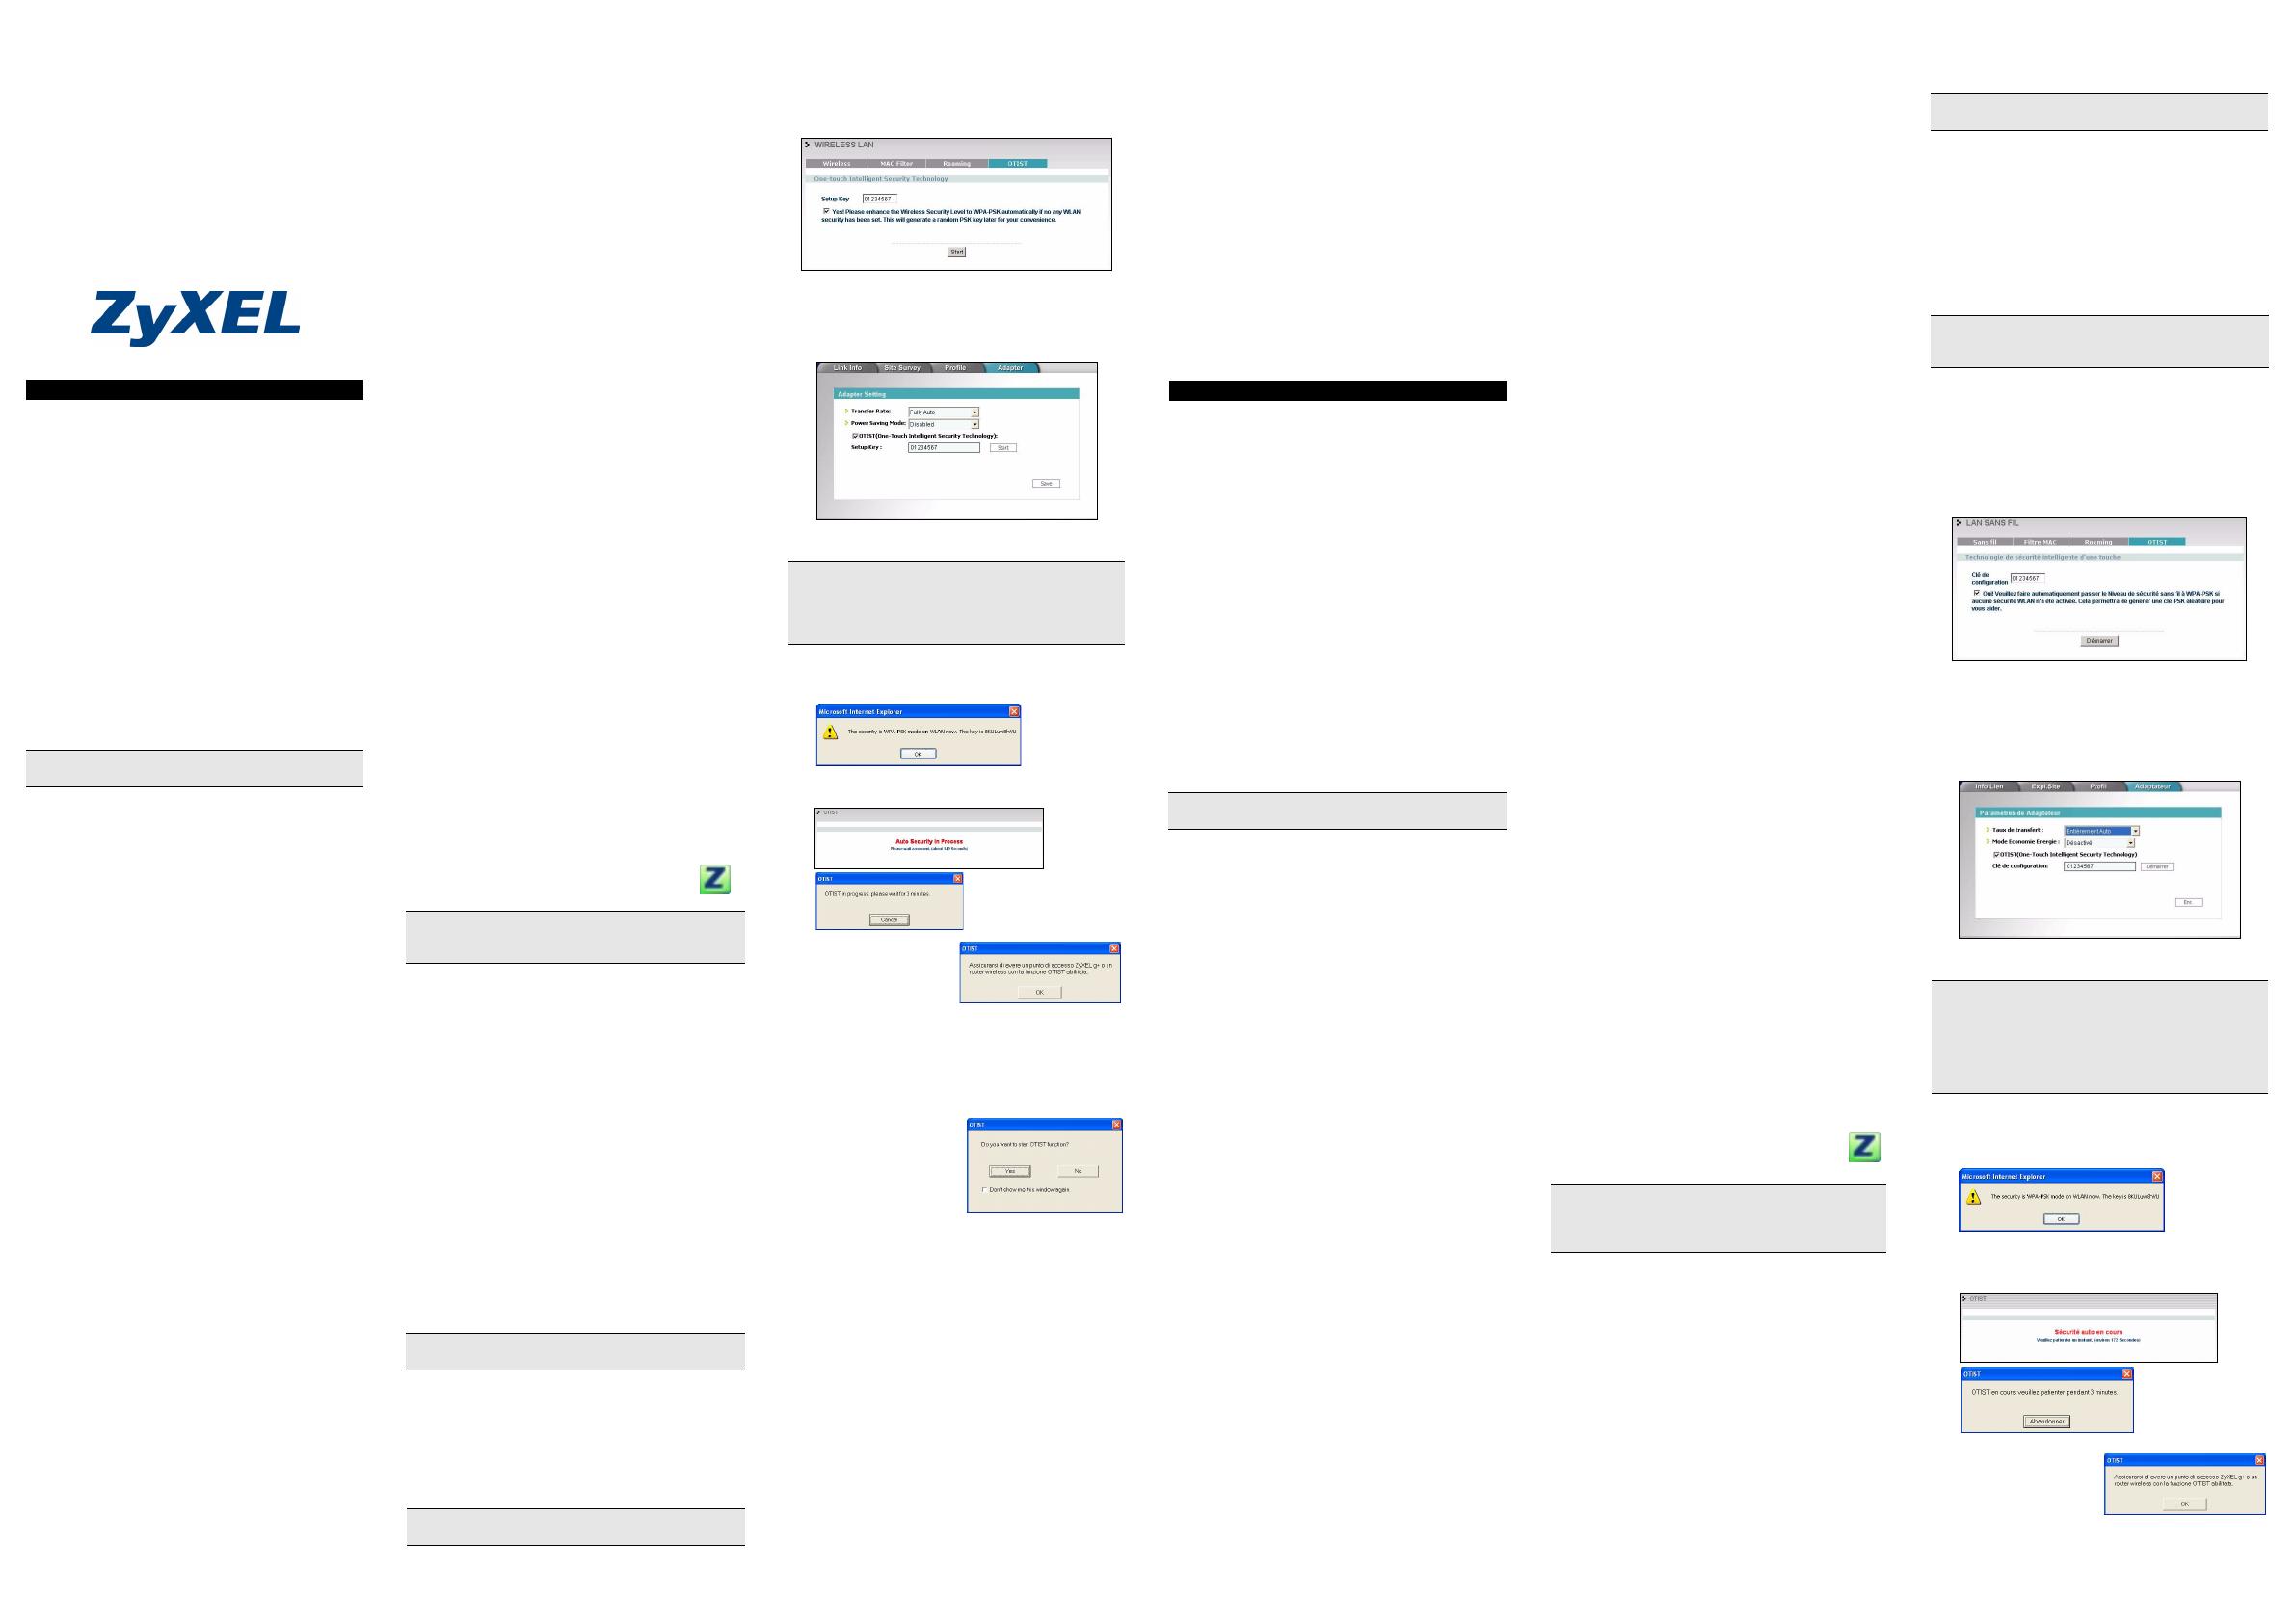
Dans le configurateur web, allez à l'écran principal du
Wireless LAN (LAN sans fil) et sélectionnez OTIST.
Pour changer la Setup key (Clé de configuration),
entrez zéro à huit caractères imprimables. Pour
qu'OTIST génère automatiquement une clé WPA-PSK,
cochez la case Yes (Oui). Si vous avez configuré
manuellement une clé WEP ou une clé WPA-PSK et que
vous avez aussi cochez la case, alors la clé que vous
avez configuré manuellement est utilisée.
Client sans fil
Démarrez l'utilitaire de ZyXEL et cliquez sur l'onglet
Adapter (Adaptateur). Sélectionnez la case à cocher
OTIST, entrez la même Setup Key (Clé de
configuration) que pour votre AP et cliquez sur Save
(Enregistrer).
Démarrer OTIST
1 Dans l'AP, un écran de configurateur web apparaît
vous indiquant les paramètres de sécurité à
transférer. Après avoir vérifié les paramètres,
cliquez sur OK.
2 Cet écran apparaît quand les paramètres OTIST
sont en cours de transfert. Il se ferme quand le
transfert est terminé.
• Dans le client sans fil,
cet écran apparaît s'il
ne trouve pas d'APavec
la fonction OTIST
activée (avec la même
Setup key (Clé de configuration)). Cliquez sur OK
pour retourner à l'écran principal de l'utilitaire du
ZyXEL.
English
If you install the Funk Odyssey Client software on the
computer, uninstall (remove) it.
If the ZyXEL Utility icon displays, the ZyXEL G-360 is
installed properly. Refer to the User's Guide to configure
the ZyXEL G-360.
The AP and wireless client(s) MUST use the same Setup
key.
If you hold in the Reset button too long, the device will
reset to the factory defaults!
You must click Start in the AP OTIST web configurator
screen and in the wireless client(s) Adapter screen all
within three minutes (at the time of writing). You can start
OTIST in the wireless clients and AP in any order but
they must all be within range and have OTIST enabled.
Français
Si vous avez installè le logiciel Funk Odyssey Client sur
l'ordinateur, dèsinstallez-le (supprimez-le).
Si l'icône de l'utilitaire ZyXEL s'affiche, cela signifie que
la ZyXEL G-360 a été installée correctement. Veuillez
vous reporter au Guide de l'utilisateur pour configurer la
ZyXEL G-360.
L'AP et le(s) client(s) sans fil DOIVENT utiliser la même
Setup key (Clé de configuration).
Si vous appuyez trop longtemps sur le bouton Reset
(Réinitialiser), le périphérique sera réinitialisé aux
paramètres d'usine!
Vous devez cliquer sur Start (Démarrer) dans l'écran du
configurateur web OTIST de l'AP et dans l'écran
Adapter (Adaptateur) du (des) client(s) sans fil le tout
en l'espace de trois minutes (au moment de la
rédaction). Vous pouvez démarrer OTIST dans les
clients sans fil et l'AP dans n'importe quel ordre mais ils
doivent tous se trouver à portée et avoir OTIST activé.