
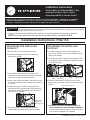
PROCEDURE FOR INSTALLING
FILTER KIT
1. Ensure power is not connected to Zoneline.
2. Insert filter housing into the far side slot of the
make-up air module.
3. Compress the filter housing by pressing on its
opposite end causing the filter housing to bend (be
careful not to apply too much pressure).
4. While in the compressed state, insert the other end
of the filter housing into the opening of the make-up
air module.
5. Release the grip on the filter housing and let it
expand back to its original shape while guiding the
other end of the housing into the near side slot of
the make-up air module.
6. Both ends of the filter housing should now be
located within both slots of the make-up module.
31-5000405 Rev. 0 05-19 GEA
WARNING
For your safety, the information in these instructions must be followed to minimize the risk of electric
shock, property damage, personal injury, or loss of life.
• Unplug or disconnect the Zoneline at the fuse box or circuit breaker prior to working on product.
NOTE: We strongly recommend that any servicing be performed by a qualified individual.
Installation Instructions
Zoneline Make-Up Air Module MERV 13 filter
housing kit (includes 1 filter): : RAK13
Replacement MERV 13 Filter Kit: RAA13
Before you begin - Read these instructions completely and carefully. IMPORTANT – OBSERVE ALL GOVERNING
CODES AND ORDINANCES. Note to Installer – Be sure to leave these instructions with the Consumer. Note to
Consumer – Keep these instructions with your Owner’s Manual for future reference.
Installation Instructions: Filter Kit
PROCEDURE FOR INSTALLING
FILTER KIT
7. Looking at the tag on the air filter, orientate the
filter so the airflow is in the correct direction into the
make-up air module.
8. Insert the filter into the filter housing, adjust the filter
as needed to ensure it is taking up the entire cavity
of the filter housing.
9. Place the “airflow label”, as seen on the second
page, on the fan shroud across from the make-up air
module.
10.
REPLACE THE AIR FILTER WITHIN EVERY 90
DAYS IN ORDER TO AVOID VOIDING WARRANTY.
In areas where outside air quality is lower, the air filter
may need to be changed more frequently.
Far Side Slot
Filter housing
Inserted into
Near Side Slot
3ODFH$LUÀRZ/DEHO+HUH
Filter Filter housing
Filter Filter housing

2
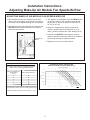
Installation Instructions:
Adjusting Make-Up Air Module Fan Speeds/Airflow
ADJUSTING MAKE-UP AIR MODULE FAN SPEEDS/AIRFLOW
1. After installing the filter, the Zoneline into the wall
sleeve, and re-energizing, the airflow of the make-up
air module can be adjusted through the Aux settings.
2. With the front panel of the Zoneline off, press the red
AUX SET button located behind the room cabinet,
below the user interface.
3. “AU” appears on the display. Press the MODE button
on the user interface until a double numerical digit
starting with “0” shows up (should be either 00, 01,
02, 03, 04, 05, 06).
4. Using the “Supplementary Airflow” graph below,
choose a speed setting by pressing the up (+) or
down (-) buttons to select one of the settings; 00-06.
5. Press the red AUX SET button again to save the
selection, which will cause the make-up air module to
reset and go through its startup procedure.
6. Replace the front cover of the Zoneline.
Red AUX Set
Button
-0.1
-0.08
-0.06
-0.04
-0.02
0
0 5 10 15 20 25 30 35 40 45 50
ѐP (inH
2
O)
Volumetric Flow Rate (CFM)
Supplementary AirŇow - RAA13 Air Filter
Make-up Air Module Fan Speed Seƫng (Aux 0_)
1 2 3 4 5 6
Make-up Air Module Filter Airflow Information
Data below is when module is equipped with the RAA13
1” MERV13 filter at 0.0 in. H
2
O static pressure
6
4
3
1
2
5
28
21
18
12
15
25
Make-up Air Module Fan
Speed Setting
(Aux 0_)
Design Airflow Rate (cfm)
See supplementary airflow graph on increasing airflow rates
Air Filter Max Allowable Clean Filter Pressure Drop: 0.1 in. H
2
0

Instructions d’installation
Module d’air d’appoint Zoneline MERV 13, kit filtre
(comprend 1 filtre):
RAK13
Kit de filtre de rechange MERV 13: RAA13
Avant de commencer – Lisez ces instructions attentivement et en totalité.
IMPORTANT – OBSERVEZ TOUS LES CODES ET RÈGLEMENTS EN VIGUEUR.
Remarque à l’installateur – Assurez-vous de remettre ces instructions au consommateur.
Remarque au consommateur – Conservez ces instructions avec le manuel d’utilisation pour consultation ultérieure.
AVERTISSEMENT
Pour votre sécurité, vous devez suivre ces instructions afin de minimiser le risque
de décharge électrique, de dommage à la propriété, de blessure ou de perte en vie humaine.
• Débranchez ou déconnectez le Zoneline à la boîte de fusibles ou au disjoncteur avant de
travailler avec ce produit.
Instructions d’installation: Trousse de filtre à air
31-5000405 Rev. 0 05-19 GEA
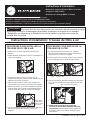
PROCÉDURE POUR INSTALLER LA
TROUSSE DE FILTRE À AIR
1. Assurez-vous de couper l’alimentation électrique au
Zoneline.
2. Insérez le boîtier du filtre dans la fente du côté éloigné du
module d’air d’appoint
3. Comprimez le boîtier du filtre en pressant sur son
extrémité opposée pour courber le boîtier (veillez à ne pas
appliquer une pression excessive).
4. Dans son état comprimé, insérez l’autre extrémité du
boîtier du filtre dans l’ouverture du module d’air d’appoint.
5. Relâchez la pression sur le boîtier et laissez-le reprendre
sa forme initiale tout en guidant l’autre extrémité dans la
fente du côté le plus proche du module d’air d’appoint.
6. Les deux extrémités du boîtier du filtre doivent maintenant
être situées dans les deux fentes du module d’air
d’appoint.
Fente du côté éloigné
%RvWLHUGX¿OWUH
inséré dans la
fente du côté le
plus proche
PROCÉDURE POUR INSTALLER LA
TROUSSE DE FILTRE
7. En regardant l’étiquette sur le filtre à air, orientez le
filtre de façon que le débit d’air se dirige dans la bonne
direction dans le module d’air d’appoint.
8. Insérez le filtre dans son boîtier, ajustez le filtre au besoin
afin qu’il remplisse toute la cavité du boîtier de filtre.
9. Placez« l’étiquette du débit d’air »(illustrée sur cette page)
sur le capot de ventilateur de l’autre côté du module d’air
d’appoint.
10. REMPLACEZ LE FILTRE À AIR TOUS LES
90JOURS OU MOINS POUR ÉVITER D’ANNULER
LA GARANTIE.Dans les régions où l’air extérieur est
de moindre qualité, il faut changer le filtre à air plus
fréquemment.
Placer l’étiquette du débit d’air ici
¿OWUH %RvWLHUGX¿OWUH
¿OWUH %RvWLHUGX¿OWUH

2
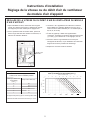
Instructions d’installation
Réglage de la vitesse ou du débit d’air du ventilateur
du module d’air d’appoint
RÉGLAGE DE LA VITESSE OU DU DÉBIT D’AIR DU VENTILATEUR DU MODULE
D’AIR D’APPOINT
1. Après l’installation du filtre, du Zoneline dans sa gaine
murale, et la remise sous tension, le débit d’air du module
d’air d’appoint peut être modifié par les réglages Aux.
2. Avec le panneau frontal du Zoneline éteint, pressez le
bouton rouge AUX SET situé derrière la carrosserie, en
dessous de l’interface utilisateur.
3. Les lettres « AU »apparaissent sur l’afficheur. Pressez le
bouton MODE sur l’interface utilisateur jusqu’à ce qu’un
nombre de deux chiffres débutant par « 0 »s’affiche (00, 01,
02, 03, 04, 05 ou 06).
4. À l’aide du graphique « Débit d’air supplémentaire
»ci-dessous, choisissez une vitesse à l’aide des boutons haut
(+) ou bas (-) pour sélectionner un des réglages; 00 à 06.
5. Pressez le bouton rouge AUX SET de nouveau pour
sauvegarder la sélection, ce qui réinitialisera le module d’air
d’appoint et lancera la procédure de démarrage.
6. Replacez le couvercle frontal du Zoneline.
Bouton rouge
AUX SET
-0.1
-0.08
-0.06
-0.04
-0.02
0
0 5 10 15 20 25 30 35 40 45 50
ѐP (inH
2
O)
Volumetric Flow Rate (CFM)
Supplementary AirŇow - RAA13 Air Filter
Make-up Air Module Fan Speed Seƫng (Aux 0_)
1 2 3 4 5 6
Make-up Air Module Filter Airflow Information
Data below is when module is equipped with the RAA13
1” MERV13 filter at 0.0 in. H
2
O static pressure
6
4
3
1
2
5
28
21
18
12
15
25
Make-up Air Module Fan
Speed Setting
(Aux 0_)
Design Airflow Rate (cfm)
See supplementary airflow graph on increasing airflow rates
Air Filter Max Allowable Clean Filter Pressure Drop: 0.1 in. H
2
0
-
 1
1
-
 2
2
-
 3
3
-
 4
4


GE RAA13 Guide d'installation
- Taper
- Guide d'installation
- Ce manuel convient également à
dans d''autres langues
- English: GE RAA13 Installation guide