ProScan PS27500 Mode d'emploi
- Catégorie
- Téléviseurs CRT
- Taper
- Mode d'emploi

1
Setup
& Features
TOCOM# 15358390

2
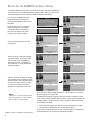
SETTING UP THE GUIDE PLUS+ GOLD* SYSTEM
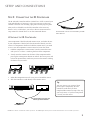
To complete GUIDE Plus+ Gold setup, you must have already connected the GUIDE Plus+
Gold controllers to your cable box and VCR if you have a VCR or Cable box. Refer to the
Setup and Connections
section of the
User’s Guide
for additional information.
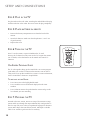
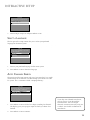
SETUP
This TV has Guide Plus+, the
new on-screen program guide
with one-button VCR recording.
1 Set up Guide
2 Skip this step
The next series of screens asks you about
your cable TV setup. If you have a cable
box, you need to set the GUIDE Plus+
Gold system to control it. Otherwise, it
may not be able to locate and download
program information.
NOTE
Channels 0 or 2-4 can be used for the cable
box’s output channel. “0” is used for VIDEO
INPUT 1 (INPUT 2 cannot be used).
Select
YES
if the cable box changed to channel 9, or
NO
if it did not. If you select
NO
, the system will try another code.
If GUIDE Plus+ Gold cannot recognize either your cable box or VCR after several
tries, a screen stating “Cable Box (VCR) test failed...Please consult your manual and
try again” appears. You have a choice to either Try Again or Skip Cable Box Setup.
If this happens, you should:
• Double check the brand of your cable box or VCR, and try entering it again.
• Check to make sure the IR controllers are positioned correctly.
If you choose to skip the cable box (or VCR) setup some features of the guide may
not be available until you successfully complete this procedure.
Tune your cable box to Channel 2 and then
select the brand of your cable box from the
choices available. The system then searches
for the correct code to control your cable
box. When your cable box switches to
channel 9 it has located the correct code.
You can set up the GUIDE Plus+ Gold
system during Interactive Setup or by
selecting the
GUIDE Plus+ Menu
from the
Main Menu.
During the Setup you will program the
system to display your local program
listings and control your cable box or
VCR. After you complete each screen,
press OK on the remote to advance.
Select your Country and enter your ZIP
or Postal code.
*GUIDE Plus+ Gold is a trademark of Index Systems Inc.

3
Once the correct model of cable box has
been identified, you need to set the cable
box’s output channel.
Enter the channel you normally use to view
channels through your cable box—usually 3
or 4. Consult your cable box’s instruction
book or your cable company if you are not
sure. Choose
0
to use VIDEO INPUT 1.
When the GUIDE Plus+ Gold system correctly identifies the correct code for your VCR,
the VCR’s tuner changes to channel 9.
Select
YES
if the VCR automatically changed to channel 9, or
NO
if it did not.
If you select
NO
, the system will try another code.
Select
YES
if you have a VCR, or
NO
if you do
not.
(Answering
NO
automatically skips forward to
the end of GUIDE Plus+ Gold setup.)
Tune your VCR to channel 2 and turn it off.
Enter the brand of your VCR.
NOTE
Since the program information
provided by GUIDE Plus+ Gold is
based on your locale, you will need
to run setup again if you move.
The last screen comes up when you’ve successfully finished the GUIDE Plus+ Gold setup.
Remember:
• Leave your cable box turned ON to download program information.
• Leave your VCR turned OFF to record programs.
Press OK to leave the GUIDE Plus+ Gold system setup and either return to the TV’s
Interactive Setup or the Main Menu.
GUIDE PLUS+ GOLD DATA
The GUIDE Plus+ Gold system is not available until it completes its first download of
program information.
When the power is turned off, the TV locates a “host channel” that carries GUIDE
Plus+ Gold data containing program schedule and channel mapping information. A
channel map is the list of stations and their respective channels.
To ensure that your first download of data is complete, you should leave your TV off
overnight. Downloads occur several times a day.
The TV must be turned off for GUIDE
Plus+ Gold data to download.
If the TV loses power or is unplugged, GUIDE Plus+ Gold program information may
be lost. When power is restored, make sure to review that the setup information is still
correct. The GUIDE Plus+ Gold program will complete a download at the next
available time.

4
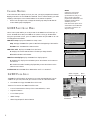
GUIDE PLUS+ GOLD
The GUIDE Plus+ Gold system is an interactive on-screen program guide that lists TV
schedules for your area, and allows your TV direct control of a cable box and VCR.
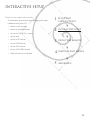
1. Press GUIDE to bring up the GUIDE Plus+ Gold screen.
There are five sections to a GUIDE Plus+ Gold screen:
•A row of Action buttons at the top of the screen numbered 1, 2 and 3
• Program information
•A row of Menu options
• Channel listings
• Advertising and special show information
NOTE
GUIDE Plus+ Gold screens
illustrated in this book are
representations of what you are
likely to see. Not all channels,
programs, and GUIDE Plus+ Gold
information depicted will be
available in your area.
New features and options can be
downloaded to the GUIDE Plus+
Gold system, so these too are
subject to change.
CHANNEL MAPPING
If more than one cable company services your area, you may be prompted with a Channel
Mapping screen after the first GUIDE Plus+ download. You will need to identify your cable
company by selecting the correct channel numbers for the stations in question.
• Use the left and right arrows
to change the channel group and press OK when the
correct channel group is highlighted.
GUIDE PLUS+ GOLD MENU
The TV’s menu system enables you to adjust some of the GUIDE Plus+ Gold settings. To
access the GUIDE Plus+ Menu press MENU on the remote to bring up the Main Menu.
Using the up and down arrows, point to GUIDE Plus+ Menu and press MENU or OK. The
following options are available:
GUIDE Plus+ Setup Displays the GUIDE Plus+ setup screen.
Setup Setting up the GUIDE Plus+ system is detailed in the beginning of this booklet
.
View Demo Runs the GUIDE Plus+ demonstration.
GUIDE Plus+ Label Displays the GUIDE Plus+ Label menu.
On Displays the station name and shows title when you change channels.
Off Disables the Label & Title feature.
GUIDE Plus+ Auto Display Displays the GUIDE Plus+ display options.
On Automatically displays the Guide when you use the TV button on the remote to
turn on the TV.
Off Disables the Guide from being displayed when you use the TV button on the
remote to turn on the TV.
Continuous Demo Runs the GUIDE Plus+ demonstration until it is turned off.
TV MAIN MENU
1 Audio
2 Picture Quality
3 Screen
4 Channel
5 Time
6 Parental Controls
7 GUIDE Plus+ Menu
8 Setup
0 Exit
GUIDE PLUS+ MENU
1 GUIDE Plus+ Setup
2 GUIDE Plus+ Label
3 GUIDE Plus+ Display
4 Continuous Demo
0 Exit
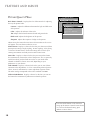
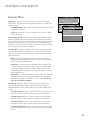
Action
Buttons
Program
Information
Menu
Options
Channel Listings
Ad/Show
Information

5
GUIDE PLUS+ GOLD MENUS
The GUIDE Plus+ Gold system offers six different options on the MENU bar: GRID, SORT,
SCHEDULE, MESSAGES, EDITOR and SETUP.
To access the Menu bar:
• Press GUIDE to bring up the GUIDE Plus+ Gold screen.
• Press MENU or use the up and down arrows to highlight the Menu bar. The Grid Guide
comes up by default.
• Use the left and right arrows to access other menus.
• Press OK, MENU or use the down arrow to access the menu options.
GRID GUIDE
The Grid Guide appears each time you enter the guide and displays the current programming
for each channel. The live program is displayed in the video window.
• Use the up and down arrows to browse channel listings. Use the right and left arrows to
browse future program listings.
• To select another menu, press MENU to highlight the Menu bar and then use the left and
right arrows.
• To tune to a channel, highlight the program you want to view in the channel listing and
press OK. Press CLEAR to exit the Guide and return to the original channel. Press
GUIDE to exit the Guide and tune to the channel in the view window.
EXPANDED INFORMATION
To view more information about a program, advertisement or special, highlight the channel
listing or ad and press the INFO button. Requesting more information about a particular
show will also display the PlusCode and the Shows on Next for that channel.
Pressing INFO while highlighting an ad panel will fill the screen with any additional and/or
promotional information regarding that particular program.
Press the INFO button again to exit the expanded information screen
G ETTING IN AND OUT OF THE GUIDE
To enter the Guide:
• Press GUIDE on the remote.
There are three ways to exit the Guide:
• Press OK to exit the GUIDE Plus+ Gold system and tune to the channel highlighted in
the Channel listing.
• Press GUIDE to exit the GUIDE Plus+ Gold system and tune to the channel displayed in
the View window
• Press CLEAR to exit the GUIDE Plus+ Gold system and return to the original channel.
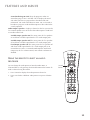
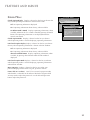
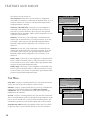
STOP PAUSE
TV
ON OFF
AUX
DVD
SAT
CABLE
PIP
SWAP
RECORD
RESETCH CTRL
PLAY FORWARDREVERSE
SOUND
GO BACK
C
H
+
C
H
-
V
O
L
V
O
L
SKIPMUTE
INFO
MENU
OK
CLEAR
GUIDE
ANTENNA
1
2
3
4
5
6
7
8
9
0
WHO INPUT
VCR1
VCR2
GUIDE
OK
CLEAR

6
GRID GUIDE ACTION BUTTONS
Action buttons will change according to where you are in the guide. Be sure to look at the
action bar before pressing the command numbers.
When browsing the Channel listings, the following Action buttons are available on the bar:
• Watch Press 1 on the remote to place a timer in the Schedule for the TV to turn on
and tune to the program highlighted in the Channel listing. When the TV turns on the
Guide will automatically appear with the scheduled program highlighted and tuned in
the View window.
• GoTo Press 2 on the remote to bring up the direct dial box and enter the number of
the channel to which you want to tune. This will highlight the channel and current
program in the Channel listing of the Grid Guide. Press OK to tune to the highlighted
channel. If the view window is unlocked, you can press GUIDE to tune to the channel
as well.
• Record Press 3 on the remote to place a timer in the Schedule for the VCR to record
the program highlighted in the Channel listing. If you have a cable box, changing
channels on the TV will not cause the cable box channel to change while recording.
The Program information window will display a confirmation when you have successfully
created a timer to watch or record. If you have selected two programs to watch or record
which begin at the same time or overlap, you will receive a timer conflict message. The
Guide will not schedule a conflicting timer, therefore you must choose between the two
programs.
When browsing the Channel logos (the left column on the Channel listing), the following
Action buttons are available on the bar:
• Lock/Unlock Press 1 to lock or unlock the view window to either stay at one
channel as you browse the Guide (lock) or change as you browse through different
channels (unlock).
• GoTo Press 2 on the remote to bring up the direct dial box and enter the number of
the channel to which you want to tune. This will highlight the channel and current
program in the Channel listing of the Grid Guide. Press OK to tune to the highlighted
channel. If the view window is unlocked, you can press GUIDE to tune to the channel
as well.
SORT MENU
The Sort Menu lets you browse programs by category. The channel to which you are
currently tuned is displayed in the video window.
1. Use the left and right arrows to select a category. When the Sort menu is highlighted for
the first time, the
Movies
category is displayed, thereafter the last category used
becomes the default. A listing of subcategories is displayed.
2. Use the up and down arrows to highlight a subcategory. For example, highlight
All
and
press OK.
3. When the listing comes up,
All Movies
are displayed. Use the up and down arrows to
browse the list of sorted programs one at a time. Use CH^ and CHv to page through the
result list. Seven days of programming are listed in the Sort Menu.
4. Select MENU to return to the menu bar, or press GUIDE or CLEAR to exit the GUIDE
Plus+ Gold system.
STOP PAUSE
TV
ON OFF
AUX
DVD
SAT
CABLE
PIP
SWAP
RECORD
RESETCH CTRL
PLAY FORWARDREVERSE
SOUND
GO BACK
C
H
+
C
H
-
V
O
L
V
O
L
SKIPMUTE
INFO
MENU
OK
CLEAR
GUIDE
ANTENNA
1
2
3
4
5
6
7
8
9
0
WHO INPUT
VCR1
VCR2
Action
Button
command
numbers

7
SORT MENU ACTION BUTTONS
When viewing the results of a Sort the following Action buttons will appear on the bar:
• Watch Press 1 on the remote to place a timer in the Schedule for the TV to turn on
and tune to the program highlighted in the Channel listing. When the TV turns on the
Guide will automatically appear with the scheduled program highlighted and tuned in
the View window.
• Record Press 3 on the remote to place a timer in the Schedule for the VCR to record
the program highlighted in the Channel listing. If you have a cable box, changing
channels on the TV will not cause the cable box channel to change while recording.
The Program information window will display a confirmation when you have successfully
created a timer to watch or record. If you have selected two programs to watch or record
which begin at the same time or overlap, you will receive a timer conflict message. The
Guide will not schedule a conflicting timer, therefore you must choose between the two
programs.
S CHEDULE
The Schedule Menu lets you create timers for either viewing or recording programs. The
GUIDE Plus+ Gold system allows one-button recording if you have connected the IR
controller to your VCR. See the Setup and Connections section of your TV’s Instruction
Manual
for more details on connecting the IR controller.
To schedule a program to watch or record:
• Press GUIDE to bring up the GUIDE Plus+ Gold system.
• Highlight a program within the Channel listing.
• Select Watch or Record from the Action buttons bar. The timer is then automatically
logged into the Schedule menu. The program information window will show
confirmation of your selection.
• If you select Record, make sure to place a blank tape in the VCR.
The Program information window will display a confirmation when you have successfully
created a timer to watch or record. If you have selected two programs to watch or record
which begin at the same time or overlap, you will receive a timer conflict message. The
Guide will not schedule a conflicting timer, therefore you must choose between the two
programs.
To remove or change the frequency of a scheduled event, access the Schedule Menu from the
Menu bar.
• Press GUIDE to bring up the GUIDE Plus+ Gold system.
• Press MENU to highlight the Menu bar.
• Use the right and left arrows to highlight Schedule.
• Use the up and down arrows to highlight the program you want to edit.
SCHEDULE MENU ACTION BUTTONS
When viewing the Schedule menu the following Action buttons will appear on the bar:
• Remove Highlight the Watch or Record timer you wish to remove from the schedule
and press 1 on the remote.
• Change Highlight the Watch or Record timer you wish to change and press 3 on the
remote to toggle the frequency between the following choices:
DAILY
records the same program each day Monday through Friday.
ONCE
records only on that day.
WEEKLY
records the program each week at the same time.

8
EDITOR
You may customize the channel listing by enabling or disabling the display of certain
channels. For instance, you may disable channels that you never watch. You can restore
disabled channels at a later point in time.
• Press GUIDE to bring up the GUIDE Plus+ Gold system.
• Press MENU to highlight the Menu bar.
• Use the right and left arrows to highlight Editor.
• Use the up and down arrows to select a channel.
EDITOR MENU ACTION BUTTONS
While browsing the Editor menu the following Action buttons are available on the bar:
• Cancel Press 1 on the remote to cancel any changes made since entering the
Editor Menu.
• Change Press 2 on the remote to change the channel number for the highlighted
channel line.
• On/Off Press 3 on the remote to toggle the state of the channel between On and Off.
T ROUBLESHOOTING
Troubles sometimes are caused by simple “faults” that you can correct without the help of a
service technician. If you experience any difficulty with your TV or Guide system, check a
few basic remedies before calling your service technician.
Program information does not download
• Review your setup information and make sure it is correct.
• The TV must be off in order to download information. Leave your TV off overnight, for
at least 10 hours, to receive a download for your area.
• If you are using a cable box, make sure the cable box is on in order to receive program
information.
Scheduled Watch or Record does not occur
• Check Schedule for timer conflicts.
• Check that IR controllers are attached securely and directly over the remote sensor.
For more Troubleshooting information, see your TV
User’s Manual
.
M ESSAGES
Occasionally you will receive messages regarding your GUIDE Plus+ Gold system as well as
special programming information. You can access these messages from the Message Menu
on the Menu bar.
To read messages:
• Highlight the message you wish to read by using the up and down arrows.
• Press INFO to display the full text of the message. If the text continues beyond the
screen, press INFO to view the next page of text. Once you have reached the end of the
message, pressing INFO closes the expanded information and returns you to the
Messages screen.
M ESSAGES MENU ACTION BUTTONS
When viewing the Messages menu the following Action buttons will appear on the bar:
• Remove Highlight the message you wish to delete and press 1 on the remote.
10330 North Meridian Street
Indianapolis, IN 46290
©1998 Thomson Consumer
Electronics, Inc.
Trademark(s)® Registered
Marca(s) Registrada(s)
Printed in USA

1
Configuration
et fonctions
TOCOM# 15358390

2
CONFIGURATION DU SYSTÈME GUIDE PLUS+ GOLD*
Pour réaliser la configuration du GUIDE Plus+ Gold, les contrôleurs GUIDE Plus+ Gold doivent
déjà être connectés sur le câblo-sélecteur et magnétoscope, si vous disposez de l’un des deux.
Pour plus de détails, consultez le section
Installation et connexions
dans le
Guide de l’utilisateur
.
Une série d’écrans vous interrogent ensuite
sur la configuration de votre câblodiffusion.
Si vous avez un câblo-sélecteur, il doit être
commandé à partir du système GUIDE Plus+
Gold, au risque de ne pas pouvoir localiser et
télécharger les informations sur les émissions.
REMARQUE
Les canaux 0 ou 2-4 peuvent être utilisés
comme canal de sortie du câblo-sélecteur. “0”
est utilisé pour VIDEO INPUT1 (INPUT 2 ne
peut être utilisé).
Sélectionnez
YES
si le câblo-sélecteur est passé au canal 9, et
NO
dans le cas contraire. Si
vous sélectionnez
NO
, le système essaiera un autre code.
Si GUIDE Plus+ Gold ne reconnaît ni votre câblo-sélecteur ni votre magnétoscope après
plusieurs tentatives, le message “Cable Box (VCR) test failed... Please consult your manual
and try again” (Echec de test du cablô-sélecteur (VCR)... Veullez consulter votre manuel et
essayer de nouveau) s’affiche. Vous pouvez soit essayer de nouveau, soit sauter la
configuration du câblo-sélecteur. Si cette situation se présente, vous devez :
• Vérifier de nouveau la marque de votre câblo-sélecteur ou de votre magnétoscope et le
sélectionner de nouveau ;
• Vérifier que les contrôleurs IR sont placés correctement.
Si vous choisissez de sauter l’étape de configuration du câblo-sélecteur (ou du
magnétoscope), vous pourriez ne pas avoir accès à certaines fonctions décrites dans ce guide.
Réglez votre câblo-sélecteur sur le canal 2, puis
sélectionnez la marque de votre câblo-sélecteur
à partir de la liste fournie. Le système recherche
ensuite le bon code qui lui permettra de
commander le câblo-sélecteur. Lorsque le
câblo-sélecteur passe au canal 9, cela signifie
qu’il a trouvé le bon code.
Vous pouvez configurer le système
GUIDE Plus+ Gold via la configuration
interactive ou en sélectionnant
GUIDE
Plus+ Menu
depuis le menu principal.
C’est au cours de la configuration que vous
programmez l’affichage de la liste des
émissions locales et le fonctionnement du
câblo-sélecteur ou du magnétoscope. Après
avoir terminé avec chaque écran, appuyez
sur OK sur la télécommande pour passer à
l’écran suivant.
Sélectionnez votre pays et entrez votre
code postal.
R ÉGLAGE
Ce TV a GUIDE Plus+ le nouv.
guide horaire sur l'écran
avec programm. VCR à 1 bouton.
1 Activ. GUIDE Plus+
2 Passer cette étape
*GUIDE Plus+ Gold est une marques déposée de Index Systems Inc.

3
Après avoir correctement identifié le modèle du
câblo-sélecteur, vous devez programmer le canal
de sortie du câblo-sélecteur.
Entrez le canal utilisé pour syntoniser les canaux
via votre câblo-sélecteur, généralement 3 ou 4.
Consultez le manuel du câblo-sélecteur ou le
câblo-distributeur si vous n’êtes pas certain.
Sélectionnez
0
pour utiliser VIDEO INPUT 1.
Lorsque le système GUIDE Plus+ Gold identifie correctement le code de votre magnétoscope, le
syntoniseur du magnétoscope passe au canal 9.
Sélectionnez
YES
si le magnétoscope est syntonisé sur le canal 9,
NO
s’il ne l’est pas.
Si vous sélectionnez
NO
, le système essaiera un autre code.
Sélectionnez
YES
si vous avez un magnétoscope,
NO
si vous n’en avez pas.
(En répondant
NO,
vous passez directement à la
fin de la configuration
GUIDE Plus+ Gold.)
Réglez votre magnétoscope sur le canal 2 et
éteignez-le.
Entrez la marque de votre magnétoscope.
REMARQUE
L’information sur les émissions fournie
par GUIDE Plus+ Gold est propre à
votre région ; il faudra donc exécuter
de nouveau le programme de
configuration si vous déménagez.
Cet écran s’affiche à la fin d’une configuration réussie du système GUIDE Plus+ Gold.
N’oubliez-pas de :
• Laisser le câblo-sélecteur allumé pour télécharger les informations sur les émissions.
• Laisser le magnétoscope éteint pour enregistrer des émissions.
Appuyez sur OK pour quitter la configuration du système GUIDE Plus+ Gold et revenir à la
configuration interactive ou au menu principal.
DONNÉES GUIDE PLUS+ GOLD
Le système GUIDE Plus+ Gold est opérationnel seulement après son premier
téléchargement des informations sur les émissions.
Lorsque l’alimentation est coupée, le téléviseur cherche le “canal hôte” affichant les
données GUIDE Plus+ Gold qui contiennent l’horaire des émissions et les informations sur
le mappage des canaux. La liste des canaux énumère les stations et leurs canaux respectifs.
Pour vérifier que votre premier téléchargement de données est terminé, laissez le téléviseur
éteint pour la nuit. En cas de coupure de courant ou de débranchement du téléviseur, il se
peut que les données du programme GUIDE Plus+ soient perdues. Une fois l’alimentation
rétablie, vérifiez que les données de configuration sont toujours correctes. Le programme
GUIDE Plus+ Gold exécutera un téléchargement à la prochaine heure disponible.
Les téléchargements se font plusieurs fois par jour.
Le téléviseur doit être éteint pour
télécharger les données GUIDE Plus+ Gold.

4
GUIDE PLUS+ GOLD
Le système GUIDE Plus+ Gold est un guide d’émissions interactif à l’écran qui liste l’horaire des
émissions dans votre région et permet à votre téléviseur de commander directement un câblo-
sélecteur et un magnétoscope.
1. Appuyez sur GUIDE pour afficher l’écran GUIDE Plus+ Gold.
L’écran GUIDE Plus+ Gold se compose de cinq sections :
• Une rangée de boutons Action au sommet de l’écran numérotés 1, 2 et 3
• Informations sur les émissions
• Une rangée d’options de menu
• Listes des canaux
• Publicité et informations sur les émissions spéciales
REMARQUE
Les écrans TV GUIDE Plus+ illustrés
dans ce livret sont représentatifs des
écrans que vous êtes susceptible de
voir. Par contre, les canaux, les
émissions et les informations TV
GUIDE Plus+ figurant ici ne sont pas
toutes disponibles dans votre région.
Des nouvelles fonctions et options
peuvent être téléchargées dans le
système TV GUIDE Plus+, et sont
aussi sujettes à des modifications.
MAPPAGE DES CANAUX
Si votre région est desservie par plusieurs câblo-distributeurs, il se peut qu’un écran de mappage
des canaux s’affiche après le premier téléchargement GUIDE Plus+ Gold. Vous aurez besoin
d’identifier votre câblo-distributeur en sélectionnant les numéros de canaux correspondant aux
stations.
• Utilisez les flèches gauche et droite pour modifier le groupe de canaux et appuyez sur OK
ou MENU lorsque le groupe de canaux approprié est mis en surbrillance.
Boutons
Action
Informations
sur émissions
Options
de menu
Listes des canaux
pub/Information
sur émission
MENU GUIDE PLUS+
Vous pouvez ajuster les réglages de GUIDE Plus+ Gold. Pour accéder au Menu GUIDE
Plus+ appuyer sur MENU sur la télécommande pour afficher la Menu Principal.
Désignez Menu GUIDE Plus+ et appuyez sur MENU ou OK.
Réglage du GUIDE Plus+ Affiche l’écran de configuration du système GUIDE Plus+.
Réglage La configuration du système GUIDE Plus+ est expliquée en détails dans la
brochure GUIDE Plus+.
Démonstration illustrée Exécute une démonstration de GUIDE Plus+.
Étiquette GUIDE Plus+ Affiche le menu Étiquette GUIDE Plus+.
ON (Activé) Affiche le nom de la station de l’émission quand vous changez de
canaux.
OFF (Désactivé) Désactive la fonction Étiquette.
Affichage automatique GUIDE Plus+ Démontre les options d’affichage GUIDE Plus+.
ON (Activé) Affiche automatiquement le Guide quand vous utilisez le bouton TV
sur la télécommande pour allumer le téléviseur.
OFF (Désactivé) Empêche le Guide d’être affiché quand vous utilisez le bouton TV
sur la télécommande pour allumer le téléviseur.
Démonstration continue Exécute une démonstration du système GUIDE Plus+ jusqu’à
ce que l’on arrête la démonstration.
MENU PRINCIPAL TELEVISION
1 Audio
2 Qualité de l'image
3 Écran
4 Canal
5 Horloge
6 Contrôles des parents
7 Menu GUIDE Plus+
8 Réglage
0 Sortie
MENU DU GUIDE PLUS+
1 Réglage du GUIDE Plus+
2 Étiq. du GUIDE Plus+
3 Affichage Auto GUIDE Plus+
4 Démonstration Continue
0 Sortie

5
INFORMATIONS DÉVELOPPÉES
Pour afficher d’autres informations au sujet d’une émission, d’une publicité ou d’un programme
spécial, mettez en surbrillance la liste des canaux ou la publicité et appuyez sur le bouton INFO.
Toute demande d’informations additionnelles affichera aussi PlusCode et Shows on Next pour ce
canal.
Le fait d’appuyer sur INFO pendant la mise en surbrillance d’un panneau publicitaire provoquera
l’affichage à l’écran d’informations additionnelles ou promotionnelles qui existent à propos de cette
émission particulière.
Appuyez de nouveau sur le bouton INFO pour quitter l’écran d’informations développées.
MENUS GUIDE PLUS+ GOLD
Le système GUIDE Plus+ Gold offre six différentes options sur la barre de menus : GRID (GRILLE),
SORT (TRI), SCHEDULE (HORAIRE), MESSAGES, EDITOR (ÉDITEUR) et SETUP
CONFIGURATION).
Pour accéder à la barre de menus :
• Appuyez sur GUIDE pour afficher l’écran GUIDE Plus+ Gold.
• Appuyez sur MENU ou utilisez les flèches haut ou bas pour mettre en surbrillance la barre
de menus. Grid Guide s’affiche par défaut.
• Utilisez les flèches gauche et droite pour accéder à d’autres menus.
• Appuyez sur OK, MENU ou utilisez la flèche bas pour accéder à d’autres options.
GRID GUIDE
Le Grid Guide s’affiche chaque fois que vous entrez dans le guide et affiche la programmation
courante pour chaque canal. L’émission en direct s’affiche dans la fenêtre vidéo.
• Utilisez les flèches haut ou bas pour explorer les listes de canaux. Utilisez les flèches droite
et gauche pour explorer la programmation future.
• Pour sélectionner un autre menu, appuyez sur MENU pour mettre en surbrillance la barre de
menus, puis utilisez les flèches gauche et droite.
• Pour syntonisez un canal, mettez en surbrillance l’émission que vous désirez visualiser dans
la liste des canaux et appuyez sur OK. Appuyez sur CLEAR pour quitter le Guide et revenir
au canal d’origine. Appuyez sur GUIDE et syntonisez le canal dans la fenêtre de
visualisation.
P OUR ENTRER ET SORTIR DU GUIDE
Pour accéder au Guide:
• Appuyez sur GUIDE sur la télécommande.
Vous pouvez quitter le Guide de trois manières :
• Appuyez sur OK pour quitter le système GUIDE Plus+ Gold et syntonisez le canal mis en
surbrillance dans la liste des canaux.
• Appuyez sur GUIDE pour quitter le système GUIDE Plus+ Gold et syntonisez le canal affiché
dans la fenêtre View.
• Appuyez sur CLEAR pour quitter le système GUIDE Plus+ Gold et revenir au canal d’origine.
STOP PAUSE
TV
ON OFF
AUX
DVD
SAT
CABLE
PIP
SWAP
RECORD
RESETCH CTRL
PLAY FORWARDREVERSE
SOUND
GO BACK
C
H
+
C
H
-
V
O
L
V
O
L
SKIPMUTE
INFO
MENU
OK
CLEAR
GUIDE
ANTENNA
1
2
3
4
5
6
7
8
9
0
WHO INPUT
VCR1
VCR2
GUIDE
OK
CLEAR

6
BOUTONS ACTION DU GRID GUIDE
Les boutons Action changent selon l’endroit où vous êtes dans le guide. N’oubliez pas de
regarder la barre Action avant d’appuyer sur les numéros de commande.
Lorsque vous explorez les listes des canaux, les boutons Action suivants sont disponibles sur la
barre
:
• Watch Appuyez sur 1 sur la télécommande pour placer une minuterie dans l’horaire des
émissions pour que le téléviseur s’allume et syntonise l’émission mise en surbrillance dans
la liste des canaux. Lorsque le téléviseur s’allume, le Guide s’affichera automatiquement
avec l’émission programmée mise en subrilliance et syntonisée dans la fenétre de
visualisation.
• GoTo Appuyez sur 2 sur la télécommande pour afficher la boîte d’accès direct et entrez le
numéro de canal que vous aimeriez syntoniser. Ceci mettra en surbrillance le canal et
l’émission courante dans la liste des canaux du Grid Guide. Appuyez sur OK pour mettre en
surbrillance le canal. Si la fenêtre de visualisation est verrouillée, vous pouvez appuyer
aussi sur GUIDE pour syntoniser le canal.
• Record Appuyez sur 3 sur la télécommande pour placer une minuterie dans l’horaire des
émissions pour que le magnétoscope enregistre l’émission mise en surbrillance dans la liste
des canaux. Lorsque vous enregistrez à l’aide d’un câblo-sélecteur, le changement de
canaux sur le téléviseur ne provoque pas le changement des canaux sur le câblo-sélecteur.
La fenêtre d’informations sur les émissions affichera une confirmation après la création réussie
d’une minuterie à des fins de visualisation ou d’enregistrement. Si vous avez sélectionné deux
émissions à visionner ou à enregistrer que débutent à la même heure ou qui se chevauchent, un
message de conflit horaire s’affichera. En cas de conflit horaire, la programmation du Guide est
impossible. Vous devez donc choisir l’une ou l’autre de ces deux émissions.
Après exploration des logos de canaux (colonne de gauche dans la liste des canaux), les boutons
suivants sont disponibles sur la barre :
• Lock/Unlock Appuyez sur 1 pour verrouiller ou déverrouiller la fenêtre de visualisation
pour que celle-ci reste sur un canal lorsque vous explorez le guide (verrouillée) ou change
lorsque vous faites défiler les canaux (déverrouillée).
• GoTo Appuyez sur 2 sur la télécommande pour afficher la boîte d’accès direct et entrez le
numéro de canal que vous souhaitez syntoniser. Ceci mettra en surbrillance le canal et
l’émission courante dans la liste des canaux du Grid Guide. Appuyez sur OK pour
syntoniser le canal mis en surbrillance. Si la fenêtre de visualisation est verrouillée, vous
pouvez également syntoniser le canal en appuyant sur GUIDE.
MENU SORT
Le menu Sort vous permet d’explorer les émission par rubriques. Le canal en cours est affiché
dans la fenêtre de visualisation.
1. Utilisez les flèches gauche et droite pour sélectionner une rubrique. Lorsque le menu Sort
est mis en surbrillance pour la première fois, la rubrique
Movies
est affichée, après quoi la
dernière catégorie utilisée devient la sélection par défaut. Une liste des sous-rubriques est
affichée.
2. Utilisez les flèches haut et bas pour mettre en surbrillance une sous-rubrique. Par exemple,
mettez en surbrillance
All
et appuyez sur OK.
3. Lorsque la liste s’affiche,
All Movies
est affiché. Utilisez les flèches haut et bas pour
explorer la liste des programmes triés un à la fois. Utilisez CH+ et CH- pour passer d’une
page à l’autre de la liste. Sept jours de programmation figurent dans le menu Sort.
4. Selectionnez MENU pour revenir à la barre de menus, ou appuyez sur GUIDE ou CLEAR
pour quitter le système GUIDE Plus+ Gold.
STOP PAUSE
TV
ON OFF
AUX
DVD
SAT
CABLE
PIP
SWAP
RECORD
RESETCH CTRL
PLAY FORWARDREVERSE
SOUND
GO BACK
C
H
+
C
H
-
V
O
L
V
O
L
SKIPMUTE
INFO
MENU
OK
CLEAR
GUIDE
ANTENNA
1
2
3
4
5
6
7
8
9
0
WHO INPUT
VCR1
VCR2
Les numéros
de commande
des boutons
Action

7
BOUTONS ACTION DU MENU SORT
Lorsque vous consultez les résultats d’un tri, les boutons Action suivants s’affichent sur la barre:
• Watch Appuyez sur 1 sur la télécommande pour placer une minuterie dans l’horaire des
émissions pour que le téléviseur s’allume et syntonise l’émission mise en surbrillance dans la
liste des canaux. Lorsque le téléviseur s’allume, le Guide s’affichera automatiquement avec
l’émission programmée mise en subrilliance et syntonisée dans la fenétre de visualisation.
• Record Appuyez sur 3 sur la télécommande pour placer une minuterie dans l’horaire des
émissions pour que le magnétoscope enregistre l’émission mise en surbrillance dans la liste
des canaux. Lorsque vous enregistrez à l’aide d’un câblo-sélecteur, le changement de canaux
sur le téléviseur ne provoque pas le changement des canaux sur le câblo-sélecteur.
La fenêtre d’informations sur les émissions affichera une confirmation après la création réussie
d’une minuterie à des fins de visualisation ou d’enregistrement. Si vous avez sélectionné deux
émissions à visionner ou à enregistrer que débutent à la même heure ou qui se chevauchent, un
message de conflit horaire s’affichera. En cas de conflit horaire, la programmation du Guide est
impossible. Vous devez donc choisir l’une ou l’autre de ces deux émissions.
SCHEDULE (HORAIRE)
Le menu Schedule vous permet de créer des minuteries pour la visualisation ou l’enregistrement
d’émissions. Le système GUIDE Plus+ Gold autorise l’enregistrement une touche si vous avez
connecté le contrôleur IR à votre magnétoscope. Consultez le manuel d’instructions de votre
téléviseur pour plus de détails sur la connexion du contrôleur IR.
Pour programmer une émission pour la visualisation ou l’enregistrement:
• Appuyez sur GUIDE pour afficher le menu GUIDE Plus+ Gold.
• Mettez en surbrillance une émission dans la liste des canaux.
• Selectionnez Watch ou Record depuis la barre des boutons Action. La minuterie est ensuite
automatiquement enregistrée dans le menu Schedule. La fenêtre d’information sur les
émissions affichera la confirmation de votre sélection.
• Si vous avez sélectionné Record, n’oubliez pas d’insérer une vidéocassette vierge dans le
magnétoscope.
La fenêtre d’informations sur les émissions affichera une confirmation après la création réussie
d’une minuterie à des fins de visualisation ou d’enregistrement. Si vous avez sélectionné deux
émissions à visionner ou à enregistrer que débutent à la même heure ou qui se chevauchent, un
message de conflit horaire s’affichera. En cas de conflit horaire, la programmation du Guide est
impossible. Vous devez donc choisir l’une ou l’autre de ces deux émissions.
Pour supprimer ou modifier la fréquence d’une émission régulière, accédez au menu Schedule
dans la barre de menus.
• Appuyez sur GUIDE pour afficher le menu GUIDE Plus+ Gold.
• Appuyez sur MENU pour mettre en surbrillance la barre de menus.
• Utilisez les flèches droite et gauche pour mettre en surbrillance Schedule.
• Utilisez les flèches haut et bas pour mettre en surbrillance l’émission que vous désirez
modifier.
BOUTONS ACTION DU MENU SORT
Lorsque vous consultez le menu Schedule, les boutons Action suivants s’affichent sur la barre:
• Remove Mettez en surbrillance la minuterie Watch ou Record que vous désirez supprimer
de l’horaire et appuyez sur 1 sur la télécommande.
• Change Mettez en surbrillance la minuterie Watch ou Record que vous désirez modifier et
appuyez sur 3 sur la télécommande pour basculer entre les choix suivants :
DAILY
enregistre la même émission du lundi au vendredi.
ONCE
enregistre seulement au cours du jour spécifié.
WEEKLY
enregistre l’émission chaque semaine à la même heure.

8
EDITOR (ÉDITEUR)
Vous pouvez personnaliser la liste des canaux en activant ou en désactivant l’affichage de certains
canaux. Par exemple, vous pouvez désactiver des canaux que vous ne regardez jamais. Vous
pouvez restaurer les canaux désactivés ultérieurement.
• Appuyez sur GUIDE pour afficher le menu GUIDE Plus+ Gold.
• Appuyez sur MENU pour mettre en surbrillance la barre de menus.
• Utilisez les flèches droite et gauche pour mettre en surbrillance Editor.
• Utilisez les flèches haut et bas pour sélectionner un canal.
BOUTONS ACTION DU MENU EDITOR
Lorsque vous consultez le menu Editor, les boutons Action s’affichent sur la barre:
• Cancel Appuyez sur 1 sur la télécommande pour annuler les modifications apportées
depuis que vous êtes entré dans le menu Editor.
• Change Appuyez sur 2 sur la télécommande pour modifier le numéro de canal pour le
canal mis en surbrillance.
• On/Off Appuyez sur 3 sur la télécommande pour faire basculer le canal entre marche et
arrêt.
D ÉPANNAGE
Des problèmes surviennent parfois à la suite d’erreurs simples que vous pouvez corriger sans
l’assistance d’un technicien réparateur. Si vous rencontrez des difficultés avec votre téléviseur,
faites quelques vérifications de base avant d’appeler un technicien.
Les informations sur les émissions ne se téléchargent pas
• Passez en revue votre configuration et corrigez-la au besoin.
• Pour télécharger des informations, le téléviseurdoit être éteint. Laissez le téléviseur éteint
pour la nuit, pendant au moins 10 heures pour télécharger les informations pour votre région.
• Si vous utilisez un câblo-sélecteur, assurez-vous qu’il est allumé afin de recevoir les
informations sur les émissions.
La visualisation ou l’enregistrement programmé ne s’est pas déclenché
• Vérifiez l’horaire pour voir s’il y a des conflits horaires.
• Vérifiez que les contrôleurs IR sont bien fixés et directement par-dessusle télécapteur.
Pour plus d’informations sur le dépannage, consultez le Manuel de l’utilisateur du téléviseur.
MESSAGES
Vous recevrez à l’occasion des messages concernant votre système GUIDE Plus+ Gold ainsi que
des informations sur les émissions spéciales. Vous pouvez accéder à ces messages depuis le
menu Message ou la barre de menus.
Pour lire les messages:
• Mettez en surbrillance le message que vous désirez lire en utilisant les flèches haut ou bas.
• Appuyez sur INFO pour afficher le texte complet du message. Si le texte se prolonge à
l’extérieur de l’afficheur, appuyez sur INFO pour lire la page de texte suivante. Une fois
arrivé à la fin du message, le fait d’appuyer sur INFO ferme la fenêtre étendue et vous
ramène à l’écran Messages.
B OUTONS ACTION DU MENU MESSAGES
Lorsque vous consultez le menu Messages, les boutons Action s’affichent sur la barre :
• Remove Mettez en surbrillance le message que vous désirez supprimer et appuyez sur 1 sur
la télécommande.
10330 North Meridian Street
Indianapolis, IN 46290
©1998 Thomson Consumer
Electronics, Inc.
Trademark(s)® Registered
Marca(s) Registrada(s)
Printed in USA

TV
User’s Manual

Important Information
WARNING
To reduce the risk of fire or shock
hazard, do not expose this TV to
rain or moisture.
To reduce the risk of electric shock, do not remove
cover (or back). No user serviceable parts inside. Refer
servicing to qualified service personnel.
This symbol indicates
"dangerous voltage" inside the
product that presents a risk of
electric shock or personal injury.
This symbol indicates
important instructions
accompanying the product.
WARNING
RISK OF ELECTRIC
SHOCK DO NOT OPEN
Caution: To reduce the risk of electric shock, match wide
blade of plug to wide slot, fully insert.
Attention: Pour éviter les chocs électriques, introduire la lame
la plus large de la fiche dans la borne correspondante de la
prise et pousser jusqú au fond.
Refer to the identification/rating label located on the back
panel of your product for its proper operating voltage.
FCC Regulations state that unauthorized changes or modifications to this
equipment may void the user’s authority to operate it.
If fixed (non-moving) images are left on the screen for long periods, they may
be permanently imprinted on the screen. Such images include network logos,
phone numbers, and video games. This damage is not covered by your
warranty. Extended viewing of channels displaying these images should be
avoided.
Cable TV Installer: This reminder is provided to call your attention to Article
820-40 of the National Electrical Code (Section 54 of the Canadian Electrical
Code, Part 1) which provides guidelines for proper grounding and, in particular,
specifies that the cable ground shall be connected to the grounding system of the
building as close to the point of cable entry as practical.
The GUIDE Plus+ Gold system is manufactured under license from Index
Systems Inc.

1
Table of Contents
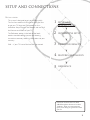
Setup and connections ............................................ 3
Step 1: Unpack the TV ..................................................... 4
Step 2: Connecting your TV ............................................. 4
TV Only (PIP Not Available) ....................................... 4
The Basic connection (pip not available) .................... 5
Advanced Connections .............................................. 6
Step 3:Connecting the IR Controller ................................. 9
Attaching the IR Controllers........................................ 9
Step 4: Plug in the TV .................................................... 10
Step 5: Place batteries in remote .................................... 10
Step 6: Turn on the TV ................................................... 10
On-Screen Program Guide ....................................... 10
Step 7: Program the TV .................................................. 10
Interactive Setup .......................................................... 11
Using Point and Select ................................................... 12
Entering Setup................................................................ 12
Select a Language .......................................................... 13
Auto Channel Search ..................................................... 13
GUIDE Plus+ System ..................................................... 14
Set the Time ................................................................... 14
Set the VCR1 Channel (auto tuning) ............................... 15
Set the VCR2 Channel (auto tuning) ............................... 15
Set the DVD Channel (auto tuning) ................................ 16
Set the SAT/CABLE Channel (auto tuning) ...................... 17
Label the Channels ........................................................ 18
What Now? ................................................................... 18
Program the Remote ................................................. 18
Using the Remote .......................................................... 19
Remote Buttons ........................................................ 20
Using the WHO•INPUT button ............................... 21
Programming the Remote .............................................. 22
Testing the remote .................................................... 22
Programming the remote .......................................... 22
Using the remote to control a device ........................ 23
Modes of Operation ................................................. 23
Front Panel .................................................................... 23

2
Table of Contents
Features and Menus ....................................................25
Menus and Control Panels ............................................. 26
Menus ...................................................................... 26
Control Panels .......................................................... 27
Audio Menu .................................................................. 28
Using the remote to select an audio processor ............... 29
Picture Quality Menu .................................................... 30
Screen Menu ................................................................. 31
Using Closed Captioning .......................................... 32
Channel Menu ............................................................... 33
Time Menu .................................................................... 34
Parental Controls Menu ................................................. 35
GUIDE Plus+ Menu ....................................................... 36
Setup Menu ................................................................... 36
PIP (Picture-in-Picture) Operation .................................. 37
Channel Marker ............................................................. 38
Troubleshooting ........................................................ 39
Care and Cleaning ..................................................... 40
PROSCAN TV LIMITED WARRANTY ........................... 41
Accessory Information ......................................... 42
INDEX ....................................................................................... 45
La page charge ...
La page charge ...
La page charge ...
La page charge ...
La page charge ...
La page charge ...
La page charge ...
La page charge ...
La page charge ...
La page charge ...
La page charge ...
La page charge ...
La page charge ...
La page charge ...
La page charge ...
La page charge ...
La page charge ...
La page charge ...
La page charge ...
La page charge ...
La page charge ...
La page charge ...
La page charge ...
La page charge ...
La page charge ...
La page charge ...
La page charge ...
La page charge ...
La page charge ...
La page charge ...
La page charge ...
La page charge ...
La page charge ...
La page charge ...
La page charge ...
La page charge ...
La page charge ...
La page charge ...
La page charge ...
La page charge ...
La page charge ...
La page charge ...
La page charge ...
La page charge ...
-
 1
1
-
 2
2
-
 3
3
-
 4
4
-
 5
5
-
 6
6
-
 7
7
-
 8
8
-
 9
9
-
 10
10
-
 11
11
-
 12
12
-
 13
13
-
 14
14
-
 15
15
-
 16
16
-
 17
17
-
 18
18
-
 19
19
-
 20
20
-
 21
21
-
 22
22
-
 23
23
-
 24
24
-
 25
25
-
 26
26
-
 27
27
-
 28
28
-
 29
29
-
 30
30
-
 31
31
-
 32
32
-
 33
33
-
 34
34
-
 35
35
-
 36
36
-
 37
37
-
 38
38
-
 39
39
-
 40
40
-
 41
41
-
 42
42
-
 43
43
-
 44
44
-
 45
45
-
 46
46
-
 47
47
-
 48
48
-
 49
49
-
 50
50
-
 51
51
-
 52
52
-
 53
53
-
 54
54
-
 55
55
-
 56
56
-
 57
57
-
 58
58
-
 59
59
-
 60
60
-
 61
61
-
 62
62
-
 63
63
-
 64
64


ProScan PS27500 Mode d'emploi
- Catégorie
- Téléviseurs CRT
- Taper
- Mode d'emploi
dans d''autres langues
- English: ProScan PS27500 User guide
Autres documents
-
KTM 61712994100 Le manuel du propriétaire
-
RCA 24V510T Manuel utilisateur
-
-
-
Panasonic CT 27SX32 Manuel utilisateur
-
-
-
Jensen JE1507 Le manuel du propriétaire
-
RCA F27450 Manuel utilisateur
-