Zanussi ZBT23420SR Manuel utilisateur
- Catégorie
- Congélateurs
- Taper
- Manuel utilisateur

EN
User manual 2
FR
Notice d'utilisation 15
DE
Benutzerinformation 30
IT
Istruzioni per l’uso 45
ES
Manual de instrucciones 58
Fridge-Freezer
Réfrigérateur/congélateur
Kühl-Gefrierschrank
Frigorifero-Congelatore
Frigorífico-congelador
ZBT23420SR

Contents
Safety instructions _ _ _ _ _ _ _ _ _ _ _ _ _ _ 2
Operation _ _ _ _ _ _ _ _ _ _ _ _ _ _ _ _ _ _ _ 4
First use _ _ _ _ _ _ _ _ _ _ _ _ _ _ _ _ _ _ _ _ 4
Daily use _ _ _ _ _ _ _ _ _ _ _ _ _ _ _ _ _ _ _ _ 5
Helpful hints and tips _ _ _ _ _ _ _ _ _ _ _ _ _ 6
Care and cleaning _ _ _ _ _ _ _ _ _ _ _ _ _ _ _ 7
What to do if… _ _ _ _ _ _ _ _ _ _ _ _ _ _ _ _ 8
Technical data _ _ _ _ _ _ _ _ _ _ _ _ _ _ _ _ 10
Installation _ _ _ _ _ _ _ _ _ _ _ _ _ _ _ _ _ _ 10
Environmental concerns _ _ _ _ _ _ _ _ _ _ _ 14
Subject to change without notice.
Safety instructions
In the interest of your safety and to ensure the
correct use, before installing and first using the
appliance, read this user manual carefully, in-
cluding its hints and warnings. To avoid unnec-
essary mistakes and accidents, it is important to
ensure that all people using the appliance are
thoroughly familiar with its operation and safety
features. Save these instructions and make sure
that they remain with the appliance if it is moved
or sold, so that everyone using it through its life
will be properly informed on appliance use and
safety.
For the safety of life and property keep the pre-
cautions of these user's instructions as the man-
ufacturer is not responsible for damages caused
by omission.
Children and vulnerable people safety
• This appliance is not intended for use by per-
sons (including children) with reduced physi-
cal, sensory or mental capabilities, or lack of
experience and knowledge, unless they have
been given supervision or instruction con-
cerning use of the appliance by a person re-
sponsible for their safety.
Children should be supervised to ensure that
they do not play with the appliance.
• Keep all packaging well away from children.
There is risk of suffocation.
• If you are discarding the appliance pull the
plug out of the socket, cut the connection ca-
ble (as close to the appliance as you can)
and remove the door to prevent playing chil-
dren to suffer electric shock or to close them-
selves into it.
• If this appliance featuring magnetic door
seals is to replace an older appliance having
a spring lock (latch) on the door or lid, be
sure to make that spring lock unusable before
you discard the old appliance. This will pre-
vent it from becoming a death trap for a child.
General safety
Warning!
Keep ventilation openings, in the appliance en-
closure or in the built-in structure, clear of ob-
struction.
• The appliance is intended for keeping food-
stuff and/or beverages in a normal household
and similar applications such as:
– staff kitchen areas in shops, offices and
other working environments;
– farm houses and by clients in hotels, mo-
tels and other residential type environ-
ments;
– bed and breakfast type environments;
– catering and similar non-retail applications.
• Do not use a mechanical device or any artifi-
cial means to speed up the thawing process.
• Do not use other electrical appliances (such
as ice cream makers) inside of refrigerating
appliances, unless they are approved for this
purpose by the manufacturer.
• Do not damage the refrigerant circuit.
• The refrigerant isobutane (R600a) is con-
tained within the refrigerant circuit of the ap-
pliance, a natural gas with a high level of envi-
ronmental compatibility, which is nevertheless
flammable.
During transportation and installation of the
appliance, be certain that none of the compo-
nents of the refrigerant circuit become dam-
aged.
2
www.zanussi.com

If the refrigerant circuit should become dam-
aged:
– avoid open flames and sources of ignition
– thoroughly ventilate the room in which the
appliance is situated
• It is dangerous to alter the specifications or
modify this product in any way. Any damage
to the cord may cause a short-circuit, fire
and/or electric shock.
Warning! Any electrical component (pow-
er cord, plug, compressor) must be re-
placed by a certified service agent or qualified
service personnel to avoid hazard.
1. Power cord must not be lengthened.
2. Make sure that the power plug is not
squashed or damaged by the back of the
appliance. A squashed or damaged pow-
er plug may overheat and cause a fire.
3. Make sure that you can come to the
mains plug of the appliance.
4. Do not pull the mains cable.
5. If the power plug socket is loose, do not
insert the power plug. There is a risk of
electric shock or fire.
6. You must not operate the appliance with-
out the lamp cover (if foreseen) of interior
lighting.
• This appliance is heavy. Care should be taken
when moving it.
• Do not remove nor touch items from the
freezer compartment if your hands are damp/
wet, as this could cause skin abrasions or
frost/freezer burns.
• Avoid prolonged exposure of the appliance to
direct sunlight.
• Bulb lamps (if foreseen) used in this appli-
ance are special purpose lamps selected for
household appliances use only. They are not
suitable for household room illumination.
Daily Use
• Do not put hot pot on the plastic parts in the
appliance.
• Do not store flammable gas and liquid in the
appliance, because they may explode.
• Do not place food products directly against
the air outlet on the rear wall. (If the appliance
is Frost Free)
• Frozen food must not be re-frozen once it has
been thawed out.
• Store pre-packed frozen food in accordance
with the frozen food manufacturer's instruc-
tions.
• Appliance's manufacturers storage recom-
mendations should be strictly adhered to. Re-
fer to relevant instructions.
• Do not place carbonated or fizzy drinks in the
freezer compartment as it creates pressure
on the container, which may cause it to ex-
plode, resulting in damage to the appliance.
• Ice lollies can cause frost burns if consumed
straight from the appliance.
Care and cleaning
• Before maintenance, switch off the appliance
and disconnect the mains plug from the
mains socket.
• Do not clean the appliance with metal ob-
jects.
• Do not use sharp objects to remove frost
from the appliance. Use a plastic scraper.
• Regularly examine the drain in the refrigerator
for defrosted water. If necessary, clean the
drain. If the drain is blocked, water will collect
in the bottom of the appliance.
Installation
Important! For electrical connection carefully
follow the instructions given in specific
paragraphs.
• Unpack the appliance and check if there are
damages on it. Do not connect the appliance
if it is damaged. Report possible damages
immediately to the place you bought it. In that
case retain packing.
• It is advisable to wait at least four hours be-
fore connecting the appliance to allow the oil
to flow back in the compressor.
• Adequate air circulation should be around the
appliance, lacking this leads to overheating.
To achieve sufficient ventilation follow the in-
structions relevant to installation.
3
www.zanussi.com

• Wherever possible the back of the product
should be against a wall to avoid touching or
catching warm parts (compressor, condens-
er) to prevent possible burn.
• The appliance must not be located close to
radiators or cookers.
• Make sure that the mains plug is accessible
after the installation of the appliance.
• Connect to potable water supply only (If a
water connection is foreseen).
Service
• Any electrical work required to do the servic-
ing of the appliance should be carried out by
a qualified electrician or competent person.
• This product must be serviced by an author-
ized Service Centre, and only genuine spare
parts must be used.
Environment Protection
This appliance does not contain gasses
which could damage the ozone layer, in ei-
ther its refrigerant circuit or insulation materials.
The appliance shall not be discarded together
with the urban refuse and rubbish. The insula-
tion foam contains flammable gases: the appli-
ance shall be disposed according to the appli-
cable regulations to obtain from your local au-
thorities. Avoid damaging the cooling unit, espe-
cially at the rear near the heat exchanger. The
materials used on this appliance marked by the
symbol
are recyclable.
Operation
Switching on
Insert the plug into the wall socket.
Turn the Temperature regulator clockwise to a
medium setting.
Switching off
To turn off the appliance, turn the Temperature
regulator to the "O" position.
Temperature regulation
The temperature is automatically regulated.
To operate the appliance, proceed as follows:
• turn the Temperature regulator toward lower
settings to obtain the minimum coldness.
• turn the Temperature regulator toward higher
settings to obtain the maximum coldness.
A medium setting is generally the most
suitable.
However, the exact setting should be chosen
keeping in mind that the temperature inside the
appliance depends on:
• room temperature
• how often the door is opened
• the quantity of food stored
• the location of the appliance.
Important! If the ambient temperature is high
or the appliance is fully loaded, and the
appliance is set to the lowest temperatures, it
may run continuously causing frost to form on
the rear wall. In this case the dial must be set to
a higher temperature to allow automatic
defrosting and therefore reduced energy
consumption.
First use
Cleaning the interior
Before using the appliance for the first time,
wash the interior and all internal accessories
with lukewarm water and some neutral soap so
as to remove the typical smell of a brand-new
product, then dry thoroughly.
Important! Do not use detergents or abrasive
powders, as these will damage the finish.
4
www.zanussi.com

Daily use
Freezing fresh food
The freezer compartment is suitable for freezing
fresh food and storing frozen and deep-frozen
food for a long time.
To freeze fresh foods it is not necessary to
change the medium setting.
However, for a faster freezing operation, turn the
temperature regulator toward higher settings to
obtain the maximum coldness.
Important! In this condition, the refrigerator
compartment temperature might drop below
0°C. If this occurs reset the temperature
regulator to a warmer setting.
Storage of frozen food
When first starting-up or after a period out of
use, before putting the products in the compart-
ment let the appliance run at least 2 hours on
the higher settings.
Important! In the event of accidental
defrosting, for example due to a power failure, if
the power has been off for longer than the value
shown in the technical characteristics chart
under "rising time", the defrosted food must be
consumed quickly or cooked immediately and
then re-frozen (after cooling).
Thawing
Deep-frozen or frozen food, prior to being used,
can be thawed in the refrigerator compartment
or at room temperature, depending on the time
available for this operation.
Small pieces may even be cooked still frozen,
directly from the freezer: in this case, cooking
will take longer.
Ice-cube production
This appliance is equipped with one or more
trays for the production of ice-cubes. Fill these
trays with water, then put them in the freezer
compartment.
Important! Do not use metallic instruments to
remove the trays from the freezer.
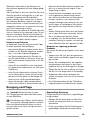
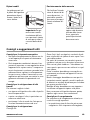
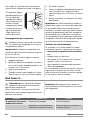
Temperature Indicator
Important! This appliance is sold in France.
In accordance with regulations valid in this
country it must be provided with a special de-
vice (see figure) placed in the lower compart-
ment of the fridge to indicate the coldest zone
of it.
5
www.zanussi.com

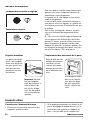
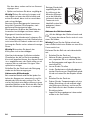
Movable shelves
The walls of the re-
frigerator are equip-
ped with a series of
runners so that the
shelves can be posi-
tioned as desired.
Important! Do not
move the glass shelf
above the vegetable
drawer to ensure cor-
rect air circulation.
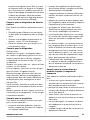
Positioning the door shelves
To permit storage of
food packages of var-
ious sizes, the door
shelves can be
placed at different
heights.
Gradually pull the
shelf in the direction
of the arrows until it
comes free, then re-
position as required.
Helpful hints and tips
Hints for energy saving
• Do not open the door frequently or leave it
open longer than absolutely necessary.
• If the ambient temperature is high and the
Temperature Regulator is set to low tempera-
ture and the appliance is fully loaded, the
compressor may run continuously, causing
frost or ice on the evaporator. If this happens,
set the Temperature Regulator toward warm-
er settings to allow automatic defrosting and
so a saving in electricity consumption.
Hints for fresh food refrigeration
To obtain the best performance:
• do not store warm food or evaporating liquids
in the refrigerator
• do cover or wrap the food, particularly if it has
a strong flavour
• position food so that air can circulate freely
around it
Hints for refrigeration
Useful hints:
Meat (all types) : wrap in polythene bags and
place on the glass shelf above the vegetable
drawer.
For safety, store in this way only one or two
days at the most.
Cooked foods, cold dishes, etc..: these should
be covered and may be placed on any shelf.
Fruit and vegetables: these should be thorough-
ly cleaned and placed in the special drawer(s)
provided.
Butter and cheese: these should be placed in
special airtight containers or wrapped in alumi-
nium foil or polythene bags to exclude as much
air as possible.
Milk bottles: these should have a cap and
should be stored in the bottle rack on the door.
Bananas, potatoes, onions and garlic, if not
packed, must not be kept in the refrigerator.
Hints for freezing
To help you make the most of the freezing proc-
ess, here are some important hints:
• the maximum quantity of food which can be
frozen in 24 hrs. is shown on the rating plate;
• the freezing process takes 24 hours. No fur-
ther food to be frozen should be added dur-
ing this period;
• only freeze top quality, fresh and thoroughly
cleaned, foodstuffs;
• prepare food in small portions to enable it to
be rapidly and completely frozen and to make
it possible subsequently to thaw only the
quantity required;
6
www.zanussi.com

• wrap up the food in aluminium foil or poly-
thene and make sure that the packages are
airtight;
• do not allow fresh, unfrozen food to touch
food which is already frozen, thus avoiding a
rise in temperature of the latter;
• lean foods store better and longer than fatty
ones; salt reduces the storage life of food;
• water ices, if consumed immediately after re-
moval from the freezer compartment, can
possibly cause the skin to be freeze burnt;
• it is advisable to show the freezing in date on
each individual pack to enable you to keep
tab of the storage time.
Hints for storage of frozen food
To obtain the best performance from this appli-
ance, you should:
• make sure that the commercially frozen food-
stuffs were adequately stored by the retailer;
• be sure that frozen foodstuffs are transferred
from the foodstore to the freezer in the short-
est possible time;
• not open the door frequently or leave it open
longer than absolutely necessary;
• once defrosted, food deteriorates rapidly and
cannot be refrozen;
• do not exceed the storage period indicated
by the food manufacturer.
Care and cleaning
Caution! Unplug the appliance before
carrying out any maintenance operation.
This appliance contains hydrocarbons in its
cooling unit; maintenance and recharging
must therefore only be carried out by authorized
technicians.
Periodic cleaning
The equipment has to be cleaned regularly:
• clean the inside and accessories with luke-
warm water and some neutral soap.
• regularly check the door seals and wipe clean
to ensure they are clean and free from debris.
• rinse and dry thoroughly.
Important! Do not pull, move or damage any
pipes and/or cables inside the cabinet.
Never use detergents, abrasive powders, highly
perfumed cleaning products or wax polishes to
clean the interior as this will damage the surface
and leave a strong odour.
Clean the condenser (black grill) and the com-
pressor at the back of the appliance with a
brush. This operation will improve the perform-
ance of the appliance and save electricity con-
sumption.
Important! Take care of not to damage the
cooling system.
Many proprietary kitchen surface cleaners con-
tain chemicals that can attack/damage the plas-
tics used in this appliance. For this reason it is
recommended that the outer casing of this ap-
pliance is only cleaned with warm water with a
little washing-up liquid added.
After cleaning, reconnect the equipment to the
mains supply.
Defrosting the refrigerator
Frost is automatically eliminated from the evapo-
rator of the refrigerator compartment every time
the motor compressor stops, during normal use.
The defrost water drains out through a drain
hole into a special container at the back of the
appliance, over the motor compressor, where it
evaporates.
7
www.zanussi.com

It is important to peri-
odically clean the de-
frost water drain hole
in the middle of the
refrigerator compart-
ment channel to pre-
vent the water over-
flowing and dripping
onto the food inside.
Defrosting the freezer
A certain amount of frost will always form
on the freezer shelves and around the top
compartment.
Important! Defrost the freezer when the frost
layer reaches a thickness of about 3-5 mm.
To remove the frost, do these steps:
1. Switch off the appliance.
2. Remove any stored food, wrap it in several
layers of newspaper and put it in a cool
place.
3. Leave the door open.
4. When defrosting is completed, dry the inte-
rior thoroughly and refit the plug.
5. Switch on the appliance.
6. Set the temperature regulator to obtain the
maximum coldness and run the appliance
for two or three hours using this setting.
7. Reload the previously removed food into
the compartment.
Important! Never use sharp metal tools to
scrape off frost from the evaporator as you
could damage it. Do not use a mechanical
device or any artificial means to speed up the
thawing process other than those
recommended by the manufacturer. A
temperature rise of the frozen food packs,
during defrosting, may shorten their safe
storage life.
Periods of non-operation
When the appliance is not in use for long peri-
ods, take the following precautions:
• disconnect the appliance from electrici-
ty supply
• remove all food
• defrost (if foreseen) and clean the appliance
and all accessories
• leave the door/doors ajar to prevent unpleas-
ant smells.
If the cabinet will be kept on, ask somebody to
check it once in a while to prevent the food in-
side from spoiling in case of a power failure.
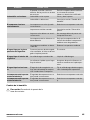
What to do if…
Warning! Before troubleshooting,
disconnect the mains plug from the mains
socket.
Only a qualified electrician or competent person
must do the troubleshooting that is not in this
manual.
Important! There are some sounds during
normal use (compressor, refrigerant circulation).
Problem Possible cause Solution
The appliance does not op-
erate. The lamp does not
operate.
The appliance is switched off. Switch on the appliance.
The mains plug is not connected to
the mains socket correctly.
Connect the mains plug to the mains
socket correctly.
8
www.zanussi.com

Problem Possible cause Solution
The appliance has no power. There
is no voltage in the mains socket.
Connect a different electrical appli-
ance to the mains socket.
Contact a qualified electrician.
The lamp does not work. The lamp is in stand-by. Close and open the door.
The lamp is defective. Refer to "Replacing the lamp".
The compressor operates
continually.
The temperature is not set correctly. Set a higher temperature.
The door is not closed correctly. Refer to "Closing the door".
The door has been opened too fre-
quently.
Do not keep the door open longer
than necessary.
The product temperature is too
high.
Let the product temperature de-
crease to room temperature before
storage.
The room temperature is too high. Decrease the room temperature.
Water flows on the rear
plate of the refrigerator.
During the automatic defrosting
process, frost defrosts on the rear
plate.
This is correct.
Water flows into the refrig-
erator.
The water outlet is clogged. Clean the water outlet.
Products prevent that water flows
into the water collector.
Make sure that products do not touch
the rear plate.
Water flows on the ground. The melting water outlet does not
flow in the evaporative tray above
the compressor.
Attach the melting water outlet to the
evaporative tray.
The temperature in the ap-
pliance is too low.
The temperature regulator is not set
correctly.
Set a higher temperature.
The temperature in the ap-
pliance is too high.
The temperature regulator is not set
correctly.
Set a lower temperature.
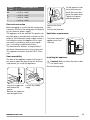
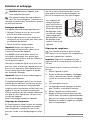
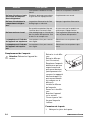
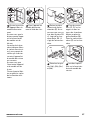
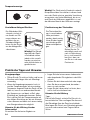
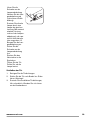
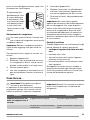
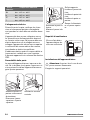
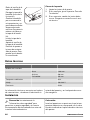
Replacing the lamp
Caution! Disconnect the plug from the
mains socket.
9
www.zanussi.com

Remove the screw
from the lamp cover.
Remove the lamp
cover (refer to the il-
lustration).
Replace the used
lamp with a new lamp
of the same power
and specifically de-
signed for household
appliances (the maxi-
mum power is shown
on the lamp cover).
Install the lamp cover.
Tighten the screw to
the lamp cover.
Connect the plug to
the mains socket.
Open the door. Make
sure that the light
comes on.
Closing the door
1. Clean the door gaskets.
2. If necessary, adjust the door. Refer to "In-
stallation".
3. If necessary, replace the defective door
gaskets. Contact the Service Center.
Technical data
Dimension of the recess
Height 1446 mm
Width 560 mm
Depth 550 mm
Rising Time 20 h
Voltage 230-240 V
Frequency 50 Hz
The technical information are situated in the rat-
ing plate on the internal left side of the appli-
ance and in the energy label.
Installation
Caution! Read the "Safety Information"
carefully for your safety and correct
operation of the appliance before installing the
appliance.
Positioning
Install this appliance at a location where the am-
bient temperature corresponds to the climate
class indicated on the rating plate of the appli-
ance:
10
www.zanussi.com

Climate
class
Ambient temperature
SN +10°C to + 32°C
N +16°C to + 32°C
ST +16°C to + 38°C
T +16°C to + 43°C
Electrical connection
Before plugging in, ensure that the voltage and
frequency shown on the rating plate correspond
to your domestic power supply.
The appliance must be earthed. The power sup-
ply cable plug is provided with a contact for this
purpose. If the domestic power supply socket is
not earthed, connect the appliance to a sepa-
rate earth in compliance with current regula-
tions, consulting a qualified electrician.
The manufacturer declines all responsibility if
the above safety precautions are not observed.
This appliance complies with the E.E.C. Direc-
tives.
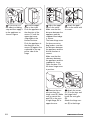
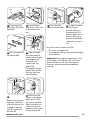
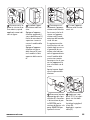
Door reversibility
The door of the appliance opens to the right. If
you want to open the door to the left, do these
steps before you install the appliance:
Loosen the upper pin
and remove the
spacer.
Remove the upper pin
and the upper door.
Loosen the middle
hinge.
Remove the lower
door.
Loosen the lower pin.
On the opposite side:
Install the lower pin.
Install the lower door.
Install the upper door.
Tighten the spacer
and the upper pin.
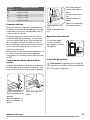
Ventilation requirements
The airflow behind the
appliance must be
sufficient.
5 cm
min. 200cm
2
min.
200cm
2
Installing the appliance
Caution! Make sure that the mains cable
can move freely.
Do the following steps:
11
www.zanussi.com

x
x
1
If necessary cut
the adhesive sealing
strip and then apply it
to the appliance as
shown in figure.
1
2
2
Install the appli-
ance in the niche.
Push the appliance in
the direction of the
arrows (1) until the
upper gap cover
stops against the
kitchen furniture.
Push the appliance in
the direction of the
arrows (2) against the
cupboard on the op-
posite side of the
hinge.
44mm
4mm
3
Adjust the appli-
ance in the niche.
Make sure that the
distance between the
appliance and the
cupboard front-edge
is 44 mm.
The lower hinge cover
(in the accessories
bag) makes sure that
the distance between
the appliance and the
kitchen furniture is
correct.
Make sure that the
clearance between
the appliance and the
cupboard is 4 mm.
Open the door. Put
the lower hinge cover
in position.
I
I
4
Attach the appli-
ance to the niche with
4 screws.
5
Remove the cor-
rect part from the
hinge cover (E). Make
sure to remove the
part DX, in the case
of right hinge, SX in
opposite case.
E
E
D
C
B
6
Attach the covers
(C, D) to the lugs and
the hinge holes.
Install the vent grille
(B).
Attach the hinge cov-
ers (E) to the hinge.
12
www.zanussi.com

Ha Hb
HdHc
7
Disconnect the
parts (Ha), (Hb), (Hc)
and (Hd).
21 mm
21 mm
~50 mm
~50 mm
90
o
90
o
8
Install the part
(Ha) on the inner side
of the kitchen furni-
ture.
Ha
Hc
9
Push the part (Hc)
on the part (Ha).
Hb
Ha
8 mm
10
Open the appli-
ance door and the
kitchen furniture door
at an angle of 90°.
Insert the small
square (Hb) into
guide (Ha).
Put together the ap-
pliance door and the
furniture door and
mark the holes.
Ha
8 mm
K
11
Remove the brackets
and mark a distance
of 8 mm from the out-
er edge of the door
where the nail must
be fitted (K).
Hb
12
Place the small
square on the guide
again and fix it with
the screws supplied.
Align the kitchen fur-
niture door and the
appliance door by ad-
justing the part Hb.
Hb
Hd
13
Press the part
(Hd) on the part (Hb).
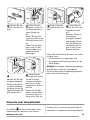
14
To open the doors
do these steps.
Use the sliding sys-
tem previously illus-
trated or open one of
the two doors by fit-
ting the small handle
supplied as an acces-
sory.
Do a final check to make sure that:
• All screws are tightened.
• The magnetic sealing strip is attached tightly
to the cabinet.
Important! If the ambient temperature is low
(for example, in the Winter), the size of the
gasket decreases. The size of the gasket
increases when the ambient temperature
increases.
13
www.zanussi.com

Environmental concerns
The symbol on the product or on its
packaging indicates that this product may not
be treated as household waste. Instead it
should be taken to the appropriate collection
point for the recycling of electrical and
electronic equipment. By ensuring this product
is disposed of correctly, you will help prevent
potential negative consequences for the
environment and human health, which could
otherwise be caused by inappropriate waste
handling of this product. For more detailed
information about recycling of this product,
please contact your local council, your
household waste disposal service or the shop
where you purchased the product.
14
www.zanussi.com

Sommaire
Instructions de sécurité _ _ _ _ _ _ _ _ _ _ _ 15
Fonctionnement _ _ _ _ _ _ _ _ _ _ _ _ _ _ _ 18
Première utilisation _ _ _ _ _ _ _ _ _ _ _ _ _ 18
Utilisation quotidienne _ _ _ _ _ _ _ _ _ _ _ _ 19
Conseils utiles _ _ _ _ _ _ _ _ _ _ _ _ _ _ _ _ 20
Entretien et nettoyage _ _ _ _ _ _ _ _ _ _ _ _ 22
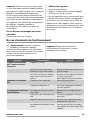
En cas d'anomalie de fonctionnement _ _ _ 23
Caractéristiques techniques _ _ _ _ _ _ _ _ 25
Installation _ _ _ _ _ _ _ _ _ _ _ _ _ _ _ _ _ _ 25
En matière de sauvegarde de l'environnement
_ _ _ _ _ _ _ _ _ _ _ _ _ _ _ _ _ _ _ _ _ _ _ _ 28
Sous réserve de modifications.
Instructions de sécurité
Pour votre sécurité et garantir une utilisation
correcte de l'appareil, lisez attentivement cette
notice, y compris les conseils et avertissements,
avant d'installer et d'utiliser l'appareil pour la
première fois. Pour éviter toute erreur ou acci-
dent, veillez à ce que toute personne qui utilise
l'appareil connaisse bien son fonctionnement et
ses fonctions de sécurité. Conservez cette noti-
ce avec l'appareil. Si l'appareil doit être vendu
ou cédé à une autre personne, veillez à remettre
cette notice au nouveau propriétaire, afin qu'il
puisse se familiariser avec son fonctionnement
et sa sécurité.
Pour la sécurité des personnes et des biens,
conservez et respectez les consignes de sécu-
rité figurant dans cette notice. Le fabricant dé-
cline toute responsabilité en cas de dommages
dus au non-respect de ces instructions.
Lors de sa fabrication, cet appareil a été cons-
truit selon des normes, directives et/ou décrets
pour une utilisation sur le territoire français.
Pour la sécurité des biens et des person-
nes ainsi que pour le respect de l'environ-
nement, vous devez d'abord lire attentive-
ment les préconisations suivantes avant
toute utilisation de votre appareil.
Attention Pour éviter tout risque de
détérioration de l'appareil, transportez-le
dans sa position d'utilisation muni de ses cales
de transport (selon le modèle). Au déballage de
celui-ci, et pour empêcher des risques
d'asphyxie et corporel, tenez les matériaux
d'emballage hors de portée des enfants.
Attention Pour éviter tout risque (mobilier,
immobilier, corporel,...), l'installation, les
raccordements (eau, gaz, électricité, évacuation
selon modèle), la mise en service et la
maintenance de votre appareil doivent être
effectuées par un professionnel qualifié.
Attention Votre appareil a été conçu pour
être utilisé par des adultes. Il est destiné à
un usage domestique normal. Ne l'utilisez pas à
des fins commerciales ou industrielles ou pour
d'autres buts que ceux pour lesquels il a été
conçu. Vous éviterez ainsi des risques matériel
et corporel.
Attention Débranchez l'appareil avant
toute opération de nettoyage manuel.
N'utilisez que des produits du commerce non
corrosifs ou non inflammables. Toute projection
d'eau ou de vapeur est proscrite pour écarter le
risque d'électrocution.
Attention Si votre appareil est équipé
d'un éclairage, débranchez l'appareil avant
de procéder au changement de l'ampoule (ou
du néon, etc.) pour éviter de s'électrocuter.
Attention Afin d'empêcher des risques
d'explosion ou d'incendie, ne placez pas de
produits inflammables ou d'éléments imbibés de
produits inflammables à l'intérieur, à proximité
ou sur l'appareil.
Attention Lors de la mise au rebut de
votre appareil, et pour écarter tout risque
corporel, mettez hors d'usage ce qui pourrait
présenter un danger : coupez le câble
d'alimentation au ras de l'appareil. Informez-vous
auprès des services de votre commune des
endroits autorisés pour la mise au rebut de
l'appareil.
15
www.zanussi.com

Attention Respectez la chaîne de froid
dès l'acquisition d'un aliment jusqu'à sa
consommation pour exclure le risque
d'intoxication alimentaire.
Veuillez maintenant lire attentivement
cette notice pour une utilisation optimale
de votre appareil.
Sécurité des enfants et des personnes
vulnérables
• Cet appareil n'est pas destiné à être utilisé
par des enfants ou des personnes dont les
capacités physiques, sensorielles ou menta-
les, ou le manque d'expérience et de connais-
sance les empêchent d'utiliser l'appareil sans
risque lorsqu'ils sont sans surveillance ou en
l'absence d'instruction d'une personne res-
ponsable qui puisse leur assurer une utilisa-
tion de l'appareil sans danger.
Empêchez les enfants de jouer avec l'appa-
reil.
• Ne laissez pas les différents emballages à
portée des enfants. Ils pourraient s'asphyxier.
• Si l'appareil doit être mis au rebut, veillez à
couper le câble d'alimentation électrique au
ras de l'appareil pour éviter les risques d'élec-
trocution. Démontez la porte pour éviter que
des enfants ne restent enfermés à l'intérieur.
• Cet appareil est muni de fermetures magnéti-
ques. S'il remplace un appareil équipé d'une
fermeture à ressort, nous vous conseillons de
rendre celle-ci inutilisable avant de vous en
débarrasser. Ceci afin d'éviter aux enfants de
s'enfermer dans l'appareil et de mettre ainsi
leur vie en danger.
Consignes générales de sécurité
Avertissement
Veillez à ce que les orifices de ventilation, situés
dans l'enceinte de l'appareil ou la structure inté-
grée, ne soient pas obstrués.
• Les appareils sont destinés uniquement à la
conservation des aliments et/ou des boissons
dans le cadre d’un usage domestique normal,
tel que celui décrit dans la présente notice.
– dans des cuisines réservées aux employés
dans des magasins, bureaux et autres lieux
de travail ;
– dans les fermes et par les clients dans des
hôtels, motels et autres lieux de séjour ;
– dans des hébergements de type chambre
d'hôte ;
– pour la restauration et autres utilisations
non commerciales.
• N'utilisez pas d'appareils électriques,
d'agents chimiques ou tout autre système ar-
tificiel pour accélérer le processus de dégi-
vrage.
• Ne faites pas fonctionner d'appareils électri-
ques (comme des sorbetières électriques, ...)
à l'intérieur des appareils de réfrigération à
moins que cette utilisation n'ait reçu l'agré-
ment du fabricant.
• N'endommagez pas le circuit frigorifique.
• Le circuit frigorifique de l’appareil contient de
l’isobutane (R600a), un gaz naturel offrant un
haut niveau de compatibilité avec l’environne-
ment mais qui est néanmoins inflammable.
Pendant le transport et l'installation de votre
appareil, assurez-vous qu'aucune partie du
circuit frigorifique n'est endommagée.
Si le circuit frigorifique est endommagé :
– évitez les flammes vives et toute autre
source d'allumage
– aérez soigneusement la pièce où se trouve
l'appareil
• Ne modifiez pas les spécifications de l'appa-
reil. Si le câble d'alimentation est endomma-
gé, il peut causer un court circuit, un incendie
et/ou une électrocution.
Avertissement Les éventuelles répara-
tions ou interventions sur votre appareil,
ainsi que le remplacement du câble d'alimenta-
tion, ne doivent être effectuées que par un pro-
fessionnel qualifié.
1. Ne branchez pas le cordon d'alimenta-
tion à une rallonge.
2. Assurez-vous que la prise n'est pas écra-
sée ou endommagée par l'arrière de l'ap-
pareil. Une prise de courant écrasée ou
endommagée peut s'échauffer et causer
un incendie.
3. Vérifiez que la prise murale de l'appareil
est accessible.
16
www.zanussi.com

4. Ne débranchez pas l'appareil en tirant
sur le câble.
5. Si la prise murale n'est pas bien fixée,
n'introduisez pas de prise dedans. Ris-
que d'électrocution ou d'incendie.
6. N'utilisez pas l'appareil sans le diffuseur
de l'ampoule (si présent) de l'éclairage
intérieur.
• Cet appareil est lourd. Faite attention lors de
son déplacement.
• Ne touchez pas avec les mains humides les
surfaces givrées et les produits congelés (ris-
que de brûlure et d'arrachement de la peau).
• Évitez une exposition prolongée de l'appareil
aux rayons solaires.
• Les ampoules (si présentes) utilisées dans
cet appareil sont des ampoules spécifiques
uniquement destinées à être utilisées sur des
appareils ménagers. Elles ne sont pas du tout
adaptées à un éclairage quelconque d'une
habitation.
Utilisation quotidienne
• Ne posez pas d'éléments chauds sur les par-
ties en plastique de l'appareil.
• Ne stockez pas de gaz ou de liquides inflam-
mables dans l'appareil (risque d'explosion).
• Ne placez pas d'aliments directement contre
la sortie d'air sur la paroi arrière de l'appareil.
(Si l'appareil est sans givre.)
• Un produit décongelé ne doit jamais être re-
congelé.
• Conservez les aliments emballés conformé-
ment aux instructions de leur fabricant.
• Respectez scrupuleusement les conseils de
conservation donnés par le fabricant de l'ap-
pareil. Consultez les instructions respectives.
• Ne mettez pas de bouteilles ni de boîtes de
boissons gazeuses dans le compartiment
congélateur, car la pression se formant à l'in-
térieur du contenant pourrait le faire éclater et
endommager ainsi l'appareil.
• Ne consommez pas certains produits tels que
les bâtonnets glacés dès leur sortie de l'ap-
pareil, car ils peuvent provoquer des brûlures.
Entretien et nettoyage
• Avant toute opération d'entretien, mettez l'ap-
pareil hors tension et débranchez-le de la pri-
se de courant.
• N'utilisez pas d'objets métalliques pour net-
toyer l'appareil.
• N'utilisez pas d'objet tranchant pour gratter la
couche de givre. Utilisez une spatule en plas-
tique.
• Contrôlez régulièrement l'orifice d'évacuation
de l'eau de dégivrage dans le compartiment
réfrigérateur. Nettoyez-le, si besoin. Si l'orifice
est bouché, l'eau s'écoulera en bas de l'appa-
reil.
Installation
Important Avant de procéder au branchement
électrique, respectez scrupuleusement les
instructions fournies dans cette notice.
• Déballez l'appareil et vérifiez qu'il n'est pas
endommagé. Ne branchez pas l'appareil s'il
est endommagé. Signalez immédiatement au
revendeur de l'appareil les dommages cons-
tatés. Dans ce cas, gardez l'emballage.
• Il est conseillé d'attendre au moins quatre
heures avant de brancher l'appareil pour que
le circuit frigorifique soit stabilisé.
• Veillez à ce que l'air circule librement autour
de l'appareil pour éviter qu'il ne surchauffe.
Pour assurer une ventilation suffisante, res-
pectez les instructions de la notice (chapitre
Installation).
• Placez l'appareil dos au mur pour éviter tout
contact avec le compresseur et le conden-
seur (risque de brûlure).
• Placez de préférence votre appareil loin d'une
source de chaleur (chauffage, cuisson ou ray-
ons solaires trop intenses).
• Assurez-vous que la prise murale reste ac-
cessible après l'installation de l'appareil.
• Branchez à l'alimentation en eau potable uni-
quement. (Si un branchement sur le réseau
d'eau est prévu.)
Maintenance
• Les branchements électriques nécessaires à
l'entretien de l'appareil doivent être réalisés
17
www.zanussi.com

par un électricien qualifié ou une personne
compétente.
• Cet appareil ne doit être entretenu et réparé
que par un Service après-vente autorisé, ex-
clusivement avec des pièces d'origine.
Protection de l'environnement
Le système frigorifique et l'isolation de vo-
tre appareil ne contiennent pas de C.F.C.
contribuant ainsi à préserver l'environnement.
L'appareil ne doit pas être mis au rebut avec les
ordures ménagères et les déchets urbains. La
mousse d'isolation contient des gaz inflamma-
bles : l'appareil sera mis au rebut conformément
aux règlements applicables disponibles auprès
des autorités locales. Veillez à ne pas détériorer
les circuits frigorifiques, notamment au niveau
du condenseur. Les matériaux utilisés dans cet
appareil identifiés par le symbole
sont recy-
clables.
Fonctionnement
Mise en fonctionnement
Branchez l'appareil sur une prise murale.
Tournez le bouton du thermostat dans le sens
des aiguilles d'une montre sur une position
moyenne.
Mise à l'arrêt
Pour mettre à l'arrêt l'appareil, tournez le bouton
du thermostat sur la position "O".
Réglage de la température
La température est réglée automatiquement.
Pour faire fonctionner l'appareil, procédez com-
me suit :
• tournez le bouton du thermostat vers le bas
pour obtenir un réglage de froid minimum.
• tournez le bouton du thermostat vers le haut
pour obtenir un réglage de froid maximum.
Une position moyenne est la plus indiquée.
Toutefois, le réglage doit être choisi en tenant
compte du fait que la température à l'intérieur
de l'appareil dépend de plusieurs facteurs :
• la température ambiante
• la fréquence d'ouverture de la porte
• la quantité de denrées stockées
• l'emplacement de l'appareil.
Important Si le thermostat est réglé sur la
position de froid maximum, lorsque la
température ambiante est élevée et que
l'appareil est plein, il est possible que le
compresseur fonctionne en régime continu.
Dans ce cas, il y a un risque de formation
excessive de givre sur la paroi postérieure à
l'intérieur de l'appareil. Pour éviter cet
inconvénient, placez le thermostat sur une
température plus élevée de façon à permettre
un dégivrage automatique et, par conséquent,
des économies de courant.
Première utilisation
Nettoyage intérieur
Avant d'utiliser l'appareil pour la première fois,
nettoyez l'intérieur et tous les accessoires inter-
nes avec de l'eau tiède savonneuse pour sup-
primer l'odeur caractéristique du "neuf" puis sé-
chez soigneusement.
Important N'utilisez pas de produits abrasifs,
poudre à récurer, éponge métallique pour ne
pas abîmer la finition.
18
www.zanussi.com

Utilisation quotidienne
Congélation d'aliments frais
Le compartiment congélateur est idéal pour
congeler des denrées fraîches et conserver les
aliments surgelés ou congelés pendant long-
temps.
Pour congeler des aliments frais, il n'est pas né-
cessaire de modifier le réglage moyen.
Toutefois, pour une congélation plus rapide,
tournez le thermostat vers le haut pour obtenir
plus de froid.
Important Dans ce cas, la température du
compartiment réfrigérateur peut chuter au-
dessous de 0°C. Si cela se produit,
repositionnez le thermostat sur un réglage plus
chaud.
Conservation d'aliments surgelés
À la mise en service ou après un arrêt prolongé,
placez le thermostat sur la position maximale
pendant 2 heures environ avant d'introduire les
produits dans le compartiment.
Important En cas de décongélation
accidentelle, due par exemple à une coupure de
courant, si la coupure a duré plus de temps
qu'indiqué au paragraphe « Autonomie de
fonctionnement » du chapitre « Caractéristiques
techniques », consommez rapidement les
aliments décongelés ou cuisez-les
immédiatement avant de les recongeler (une
fois refroidis).
Décongélation
Avant utilisation, les aliments surgelés ou con-
gelés peuvent être décongelés dans le compar-
timent du réfrigérateur ou à température am-
biante en fonction du temps disponible pour
cette opération.
Les petites portions peuvent même être cuites
sans décongélation préalable (la cuisson sera
cependant un peu plus longue).
Fabrication de glaçons
Cet appareil est équipé d'un ou de plusieurs
bacs à glaçons. Remplissez d'eau ces bacs et
mettez-les dans le compartiment congélateur.
Important N'utilisez pas d'instruments
métalliques pour décoller les bacs du
congélateur.
19
www.zanussi.com

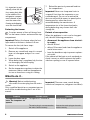
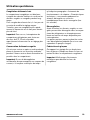
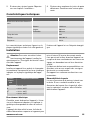
Indicateur de température
Le thermostat nécessite un réglage
Température correcte
OK
Pour vous aider à contrôler correctement votre
appareil, nous avons intégré un indicateur de
température à votre réfrigérateur
Le symbole sur le côté indique la zone la plus
froide du réfrigérateur.
La zone la plus froide s'étend de la clayette en
verre du bac à fruits et légumes au symbole ou
à la clayette positionnée à la même hauteur que
le symbole.
Pour un bon stockage des aliments, assurez-
vous que l'indicateur de température affiche
« OK ».
Si « OK » n'est pas affiché, réglez le thermostat
sur une position afin d'obtenir plus de froid et
attentez 12 heures avant de vérifier à nouveau.
Après chargement de denrées fraîches dans
l'appareil ou après des ouvertures répétées (ou
une ouverture prolongée) de la porte, il est nor-
mal que l'inscription « OK » disparaisse.
Clayettes amovibles
Les parois du réfrigé-
rateur sont équipées
d'une série de glissiè-
res pour que les clay-
ettes puissent être
placées en fonction
des besoins.
Important Ne modi-
fiez pas l'emplace-
ment de la clayette si-
tuée au-dessus du
bac à fruits et légu-
mes, afin de garantir
une circulation d'air
optimale.
Emplacement des balconnets de la porte
Selon la taille des em-
ballages des aliments
conservés, les bal-
connets de la porte
peuvent être position-
nés à différentes hau-
teurs.
Tirez progressivement
dans le sens des flè-
ches pour les déga-
ger, puis reposition-
nez-les selon les be-
soins.
Conseils utiles
Conseils pour l'économie d'énergie
• N'ouvrez pas la porte trop souvent ou plus
longtemps que nécessaire.
• Si la température ambiante est élevée, le dis-
positif de réglage de température est sur la
position de froid maximum et l'appareil est
plein : il est possible que le compresseur
20
www.zanussi.com
La page est en cours de chargement...
La page est en cours de chargement...
La page est en cours de chargement...
La page est en cours de chargement...
La page est en cours de chargement...
La page est en cours de chargement...
La page est en cours de chargement...
La page est en cours de chargement...
La page est en cours de chargement...
La page est en cours de chargement...
La page est en cours de chargement...
La page est en cours de chargement...
La page est en cours de chargement...
La page est en cours de chargement...
La page est en cours de chargement...
La page est en cours de chargement...
La page est en cours de chargement...
La page est en cours de chargement...
La page est en cours de chargement...
La page est en cours de chargement...
La page est en cours de chargement...
La page est en cours de chargement...
La page est en cours de chargement...
La page est en cours de chargement...
La page est en cours de chargement...
La page est en cours de chargement...
La page est en cours de chargement...
La page est en cours de chargement...
La page est en cours de chargement...
La page est en cours de chargement...
La page est en cours de chargement...
La page est en cours de chargement...
La page est en cours de chargement...
La page est en cours de chargement...
La page est en cours de chargement...
La page est en cours de chargement...
La page est en cours de chargement...
La page est en cours de chargement...
La page est en cours de chargement...
La page est en cours de chargement...
La page est en cours de chargement...
La page est en cours de chargement...
La page est en cours de chargement...
La page est en cours de chargement...
La page est en cours de chargement...
La page est en cours de chargement...
La page est en cours de chargement...
La page est en cours de chargement...
La page est en cours de chargement...
La page est en cours de chargement...
La page est en cours de chargement...
La page est en cours de chargement...
-
 1
1
-
 2
2
-
 3
3
-
 4
4
-
 5
5
-
 6
6
-
 7
7
-
 8
8
-
 9
9
-
 10
10
-
 11
11
-
 12
12
-
 13
13
-
 14
14
-
 15
15
-
 16
16
-
 17
17
-
 18
18
-
 19
19
-
 20
20
-
 21
21
-
 22
22
-
 23
23
-
 24
24
-
 25
25
-
 26
26
-
 27
27
-
 28
28
-
 29
29
-
 30
30
-
 31
31
-
 32
32
-
 33
33
-
 34
34
-
 35
35
-
 36
36
-
 37
37
-
 38
38
-
 39
39
-
 40
40
-
 41
41
-
 42
42
-
 43
43
-
 44
44
-
 45
45
-
 46
46
-
 47
47
-
 48
48
-
 49
49
-
 50
50
-
 51
51
-
 52
52
-
 53
53
-
 54
54
-
 55
55
-
 56
56
-
 57
57
-
 58
58
-
 59
59
-
 60
60
-
 61
61
-
 62
62
-
 63
63
-
 64
64
-
 65
65
-
 66
66
-
 67
67
-
 68
68
-
 69
69
-
 70
70
-
 71
71
-
 72
72


Zanussi ZBT23420SR Manuel utilisateur
- Catégorie
- Congélateurs
- Taper
- Manuel utilisateur
dans d''autres langues
- italiano: Zanussi ZBT23420SR Manuale utente
- English: Zanussi ZBT23420SR User manual
- español: Zanussi ZBT23420SR Manual de usuario
- Deutsch: Zanussi ZBT23420SR Benutzerhandbuch
Documents connexes
-
Zanussi ZBB28430SL Manuel utilisateur
-
Zanussi ZRB34103XA Manuel utilisateur
-
-
Zanussi ZRB934PX2 Manuel utilisateur
-
Zanussi ZRG15801WA Manuel utilisateur
-
-
-
-