
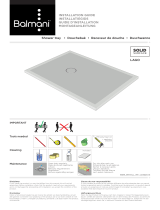
INSTALLATION GUIDE - MONTAGEANLEITUNG - INSTALLATIEGIDS - GUIDE D’INSTALLATION
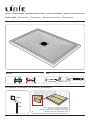
PLAYA - LIDO Shower tray • Douchebak • Receveur de douche • Duschwanne
58483_INSTALL_INT_ver2022.1.1
ToolsImportant
MS-polymeer kit
+ sanitairy silicone
DRAIN
Ø 40
Ø 50 Ø 40 Ø 40
Ø 40 Ø 50
Ø 50
DRAIN DRAIN
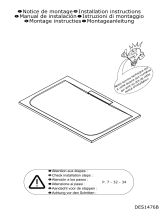
Place in nal room 24 hours before installation.
Vooraf 24u in denitieve ruimte leggen.
Placer 24h à l’avance dans la pièce ou il sera installé.
24 Stunden vorher in den letzten Raum stellen.
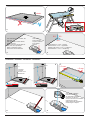
Pré-installation - Pré-installatie - Pré-installation - pré-installation
1

check !
90°90°
90°
Level dierence > 3 mm -> leveling
Niveauverschil > 3 mm -> egaliseren
Diérence de niveau > 3 mm -> nivellement
Niveaudierenz > 3 mm -> Nivellierung
Floor and walls must be stable, at,
dust-free!
Vloer en wanden moeten stabiel,
vlak, stofvrij zijn!
Le sol et les murs doivent être sta-
bles, plats, sans poussière!
Boden und Wände müssen
stabil, ach und staubfrei sein!
Clean inside.
Zuiver binnenin.
Propre à l’intérieur.
Innen sauber
machen.
After the test - Na de test
Après le test - Nach dem Test
floor
tub
A
floor tub
B
Floorlevel
Vloerpas
Niveau du sol
Bodenhöhe
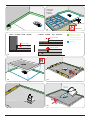
Installation - Installatie - Installation - Installation
+ 3 mm + 3 mm
See specic installation
instructions of siphon.
Zie specieke installatie-
instructies van de sifon.
Voir les instructions d’installation
spéciques du siphon.
Siehe spezische Installations-
anweisungen zu Siphon.
45
6
23
7
8 9

WALL - WAND - MUR - WAND
min 3 mm
Expansion tape
Uitzetvoegband
Bande d’expansion
Expansionsband
Silicone
min 3 mm
FLOOR - VLOER - SOL - BODEN
A
min 3 mm
B
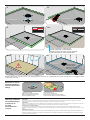
PROTECT
Bottom side
Onderzijde
Dessous
Unterseite
MS-polymeer kit
TEST
10 11
12
13 14
15 16

Warranty conditions
Garantiebepalingen
Conditions de
garantie
Garantiebestim-
mungen
Maintenance advice
Onderhoudsadvies
Conseils d’entretien
Piege
Disclaimer
If you install the product in a way that diers from this manual, this will void all guarantees. Before installation check that the product meets all your
requirements and is not damaged. By proceeding with installation, you accept the condition of the product.
Disclaimer
Indien u het product plaatst op een manier die afwijkt van deze handleiding, vervalt alle garantie. Controleer voor plaatsing of het product aan al uw eisen
voldoet en niet beschadigd is. Indien u overgaat tot plaatsing, aanvaardt u de staat waarin het product zich bevindt.
Clause de non-responsabilité
Si vous installez le produit d’une manière diérente de celle présentée dans ce manuel, toutes les garanties seront invalidées. Contrôlez avant le
placement si le produit répond à toutes vos exigences et n’est pas endommagé. En procédant au placement, vous acceptez l’état dans lequel se trouve le
produit.
Haftungsausschluss
Wenn Sie das Produkt nicht genau nach den Angaben in dieser Montageanleitung einbauen, verfällt die Garantie. Überprüfen Sie vor dem Einbau des
Produkts, ob sämtliche Voraussetzungen erfüllt sind und das Produkt nicht beschädigt ist. Sobald Sie mit der Montage beginnen, sehen Sie, in welchem
Zustand sich das Produkt bendet.
Clean drain regularly.
Maak de afvoer regelmatig schoon.
Nettoyez régulièrement l’évacuation.
Abuss regelmäßig reinigen.
Dry tub after each use.
Droog de bak na elk gebruik.
Sécher le receveur après chaque utilisation.
Trocknen Sie die Wanne nach jedem Gebrauch.
PROTECT
floor tub
A
floor tub
B
floor
tub
A
floor tub
B
Second screed layer, under tile oor.
Tweede chape laag, onder tegelvloer.
Deuxième couche de chape, sous le carrelage.
Zweite Estrichschicht, unter Fliesenboden.
Sanitary silicone
Sanitaire silicone
Silicone sanitaire
Bad-Silicon
17 18
19 19b
20 21
Mounting glass panels only after 48 hours - Montage glaspanelen pas na 48 uur - Montage des panneaux de verre après 48 h - Montage der Glass-
cheiben erst nach 48 St.
-
 1
1
-
 2
2
-
 3
3
-
 4
4


dans d''autres langues
- Deutsch: Linie 71037 Installationsanleitung
- Nederlands: Linie 71037 Installatie gids
Documents connexes

Autres documents
-
 Balmani 75107 Guide d'installation
-
 Balmani 94432 Guide d'installation
-
 Balmani 27641 Guide d'installation
-
 Balmani 66296 Guide d'installation
-
 Balmani 201088 Guide d'installation
-
 Balmani 76540 Guide d'installation
-
 Balmani 201093 Guide d'installation
-
 Balmani 76552 Guide d'installation
-
 Kinedo Kineline Guide d'installation
-
Artweger ARTLIFT-Tub Assembly Instructions


