Kohler K-1337-HN-96 Guide d'installation
- Taper
- Guide d'installation

1011090-2-B
Installation Guide
Español, Página 14
Français, Page 26
K-1106-CN/HN, K-1126-CN/HN, K-1131-CE/HE, , K-1139-CN/HN,
K-1144-CD/HD, K-1146-CN/HN, K-1146-CK/HK, K-1148-CE/HE,
K-1148-CH/HH, K-1157-CN/HN, K-1192-CB/HB, K-1194-CB/HB,
K-1196-CB/HB, K-1198-CB/HB, K-1201-CB/HB, K-1209-CB/HB,
K-1221-CB/HB, K-1224-CB/HB, K-1226-CD/HD, K-1231-CD/HD,
K-1239-CB/HB, K-1244-HM/CM, K-1246-CD/HD, K-1246-CF/HF,
K-1248-CG/HG, K-1248-CJ/HJ, K-1257-CB/HB, K-1263-CJ/HJ,
K-1263-CG/HG, K-1266-CN/HN, K-1337-HN, K-1458-CN/HN

1011090-2-B
2
Kohler Co.
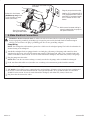
Important Information
Electrical Requirements
Factory-Assembled Features
Product Notices
Connections and Service Access

1011090-2-B
3
Kohler Co.
Table of Contents
Thank You 3. . . . . . . . . . . . . . . . . . . . . . . . . . . . . . . . . . . .
Before You Begin 3. . . . . . . . . . . . . . . . . . . . . . . . . . . . . .
Recommended Tools and Materials 3. . . . . . . . . . . . . . .
Prepare the Site 4. . . . . . . . . . . . . . . . . . . . . . . . . . . . . . .
Prepare the Whirlpool 4. . . . . . . . . . . . . . . . . . . . . . . . . . .
Disconnect the Pump 4. . . . . . . . . . . . . . . . . . . . . . . . . . .
Secure the Whirlpool to the Subfloor-Models
With Support Blocks 5. . . . . . . . . . . . . . . . . . . . . . . . . .
Secure the Whirlpool to the Subfloor-Models
With Whirlpool Base 6. . . . . . . . . . . . . . . . . . . . . . . . . .
Relocate and Mount the Pump 7. . . . . . . . . . . . . . . . . . .
Install the Plumbing 8. . . . . . . . . . . . . . . . . . . . . . . . . . . . .
Install a Rim-Mounted Faucet 8. . . . . . . . . . . . . . . . . . . .
Make Electrical Connections 9. . . . . . . . . . . . . . . . . . . . .
Test Run the Whirlpool 10. . . . . . . . . . . . . . . . . . . . . . . . . .
Complete the Finished Wall 10. . . . . . . . . . . . . . . . . . . . . .
Clean-Up After Installation 10. . . . . . . . . . . . . . . . . . . . . . .
Confirm Proper Operation 11. . . . . . . . . . . . . . . . . . . . . . .
Troubleshooting 12. . . . . . . . . . . . . . . . . . . . . . . . . . . . . . . .
Thank You For Choosing Kohler Company
Before You Begin
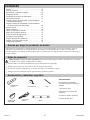
Recommended Tools and Materials
Silicone Sealant Measuring Tape Pencil
Safety Glasses Pipe Wrench
Level
Plus:
Conventional Woodworking tools
and materials
Drop cloth
Construction adhesive (optional)
Cement or mortar (optional)
2x4’s or 2x6’s

1011090-2-B
4
Kohler Co.
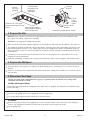
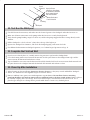
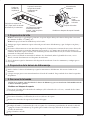
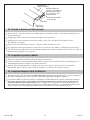
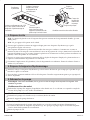
Verify that the subfloor
offers adequate support,
and is flat and level
Frame the floor
according to the
roughing-in
information
Position
the rough
plumbing
Provide a 1/16” (2mm) gap
between the whirlpool rim and
framing.
Pump
Pump Support
Bracket
Cut the
pump
banding
straps
Shipping
Bracket
Model With Support Blocks Shown
1. Prepare the Site
2. Prepare the Whirlpool
3. Disconnect the Pump
Models with Support Blocks
Models with Support Pan
All Models

1011090-2-B
5
Kohler Co.
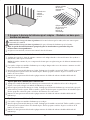
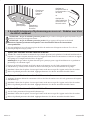
Clear spaces
for support
blocks
Clear space
for pump
Spread a 2”
(5cm) layer of
cement or
mortar bed
material
Apply a bead of
silicone sealant
around the entire
rim
or
Apply construction
adhesive to the
support blocks
4. Secure the Whirlpool to the Subfloor–Models With Support Blocks Only
Option for Using a Cement or Mortar Bed
Option for Using Construction Adhesive
Option for Using Silicone Sealant

1011090-2-B
6
Kohler Co.
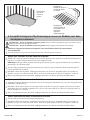
Apply a bead of
silicone sealant
around the entire
rim
or
Apply construction
adhesive to the
whirlpool base
Spread a 2”
(5cm) layer
of cement or
mortar bed
material
5. Secure the Whirlpool to the Subfloor–Models with Whirlpool Base Only
Option for Using a Cement or Mortar Bed
Option for Using Construction Adhesive
Option for Using Silicone Sealant

1011090-2-B
7
Kohler Co.
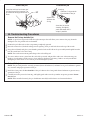
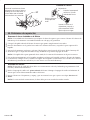
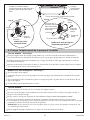
Make sure the water
intake pipe is pitched
down and away from
the pump
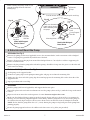
When installing the pump, make sure to
remove the plugs from the inlet and
outlet piping
Relocate
Pump
Pitch
Spring
Clip
Model with Whirlpool
Base Shown
Pump Support
Bracket
Provide access to the installed pump for servicing
Fig. #1
Fig. #2
Mounting Holes
Pump Mounting
Plate
Pump
Pump
Support
Bracket
Gasket
Model with Support
Blocks Shown
Screw or
Lag Bolt
6. Relocate and Mount the Pump
All Models-See Fig. 1
Models with Whirlpool Base-See Fig. 2
All Models

1011090-2-B
8
Kohler Co.
Whirlpool Rim
Install the faucet to the rim
and plywood according to
the faucet manufacturer’s
instructions
Measure, cut, and drill a piece of
1/2” exterior grade plywood 4”
(10.2cm) x 11-1/2” (29.2cm) for
the K-1226, or 4” (10.2cm) x
15-1/2” (39.4cm) for the K-1331
4” 4”
7. Install the Plumbing
8. Install a Rim-Mounted Faucet – K-1226 and K-1231 Only

1011090-2-B
9
Kohler Co.
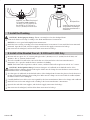
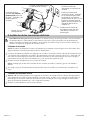
Bond in accordance
with applicable codes
Plug the pump into this outlet
Install a GFCI-protected 120 V,
15 A grounded outlet. Install a
second GFCI-protected outlet
for “H” models for the in-line
heater.
Make sure air actuator tubing is
securely attached to the pump or
the optional time box
Plug the in-line heater into
this outlet
Optional In-line Heater
(models may vary) either
T-style (shown) or water
intake (not shown)
9. Make Electrical Connections
Pump Wiring
In-line Heater Wiring

1011090-2-B
10
Kohler Co.
Apply silicone
sealant to the edges
of the water-resistant
deck material and
the finished wall
Whirlpool
Framing
Water-Resistant
Deck Material
Finished
Deck
Material
10. Test Run the Whirlpool
11. Complete the Finished Wall
12. Clean-Up After Installation

1011090-2-B
11
Kohler Co.
Press the air actuator to turn on and
off the whirlpool
Turn the jet trim
ring clockwise to
decrease the flow
Turn the jet trim ring
counterclockwise to
increase the flow
Fill with water 2” (5cm)
above the highest jet
Position the jet
nozzles to direct
the water flow as
desired
13. Confirm Proper Operation
Fill the Whirlpool
Operating Sequence

1011090-2-B
12
Kohler Co.
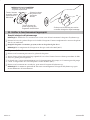
Housing
Inspect and
lubricate the
O-ring
Insert the jet into the
housing, and lightly
push and rotate until it
snaps in position
Slide the O-ring onto the
first shoulder of the jet
Insert the tool hook as shown and
pull the jet out of the housing. The
jet should be facing up when this is
done.
Remove the Jets
Re-install the Jets
14. Troubleshooting Procedures
Remove the Factory Installed Jet
Re-install the Jets

1011090-2-B
13
Kohler Co.
Troubleshooting Table
Symptoms Probable Causes Recommended Action

1011090-2-B
14
Kohler Co.
Guía de Instalación
Información importante
Requisitos eléctricos
Componentes montados en la fábrica
Advertencias
Conexiones y acceso para
mantenimiento

1011090-2-B
15
Kohler Co.
Contenido
Gracias 15. . . . . . . . . . . . . . . . . . . . . . . . . . . . . . . . . . . . . .
Antes de comenzar 15. . . . . . . . . . . . . . . . . . . . . . . . . . . . .
Herramientas y materiales sugeridos 15. . . . . . . . . . . . . .
Preparación del sitio 16. . . . . . . . . . . . . . . . . . . . . . . . . . . .
Preparación de la bañera de hidromasaje 16. . . . . . . . . .
Desconecte la bomba 16. . . . . . . . . . . . . . . . . . . . . . . . . . .
Asegure la bañera de hidromasaje al subpiso-Modelos
con bloques de soporte 17. . . . . . . . . . . . . . . . . . . . . . . .
Asegure la bañera de hidromasaje al subpiso-Modelos
con base de bañera de hidromasaje 18. . . . . . . . . . . . .
Monte la bomba 19. . . . . . . . . . . . . . . . . . . . . . . . . . . . . . .
Instale la plomería 20. . . . . . . . . . . . . . . . . . . . . . . . . . . . . .
Instale un grifo sobre el reborde 20. . . . . . . . . . . . . . . . . .
Realice las conexiones eléctricas 21. . . . . . . . . . . . . . . . .
Pruebe la bañera de hidromasaje 22. . . . . . . . . . . . . . . . .
Complete la pared acabada 22. . . . . . . . . . . . . . . . . . . . . .
Limpieza después de la instalación 22. . . . . . . . . . . . . . . .
Verifique el funcionamiento correcto 23. . . . . . . . . . . . . . .
Problemas de reparación 24. . . . . . . . . . . . . . . . . . . . . . . .
Gracias por elegir los productos de Kohler
Antes de comenzar
Herramientas y materiales sugeridos
Sellador de
silicona
Cinta métrica Lápiz
Anteojos de
seguridad
Llave para
tubería
Nivel
Adicionalmente:
Herramientas y materiales
convencionales para trabajar la
madera
Trapo para el piso
Adhesivo para construcción
(optativo)
Cemento o mortero (optativo)
Listones de 2x4 / 2x6

1011090-2-B
16
Kohler Co.
Verifique que el subpiso
suministre suficiente
soporte, y que sea plano
y esté nivelado
Prepare la estructura
del piso de acuerdo
al diagrama de
instalación
Realice el
tendido de
la plomería
Suministre un espacio de
1/16” (2mm) entre el reborde
de la bañera y la estructura.
Bomba
Soporte de bomba
Corte las
cintas
metálicas de
la bomba
Abrazadera de
embarque
Modelo con bloques de soporte ilustrado
1. Preparación del sitio
2. Preparación de la bañera de hidromasaje
3. Desconecte la bomba
Modelos con bloques de soporte
Modelos con área de soporte
Todos los modelos

1011090-2-B
17
Kohler Co.
Suministre espacio
para los bloques
de soporte
Suministre espacio
para la bomba
Extienda una
capa de
cemento o
mortero
Aplique sellador
de silicona
alrededor del
reborde
o
Aplique adhesivo
de construcción a
los bloques de
soporte
4. Asegure la bañera de hidromasaje al subpiso – Modelos con bloques de
soporte únicamente
Opción para usar una lechada de cemento o de mortero
Opción para usar cemento para construcción:
Opción para usar sellador de silicona

1011090-2-B
18
Kohler Co.
Aplique sellador
de silicona
alrededor del
reborde
o
Aplique adhesivo
de construcción a
la base de la
bañera de
hidromasaje
Extienda una
capa de
cemento o
mortero
5. Asegure la bañera de hidromasaje al subpiso – Modelos con base para
bañera únicamente
Opción para usar una lechada de cemento o de mortero
Opción para usar cemento para construcción:
Opción para usar sellador de silicona

1011090-2-B
19
Kohler Co.
Al instalar la bomba, asegúrese de
remover los obturadores de las
tuberías de entrada y salida
Reubique la
bomba
Inclinación
Presilla
Modelo con base de
bañera ilustrado
Soporte de
bomba
Suministre acceso a la bomba para futuro mantenimiento
Fig. #1
Fig. #2
Orificios de fijación
Placa de
montaje de la
bomba
Bomba
Soporte
de bomba
Empaque
Modelo con bloques
de soporte ilustrado
Tornillo o perno
de fijación
Verifique que la tubería de
entrada esté inclinada hacia
abajo y que se encuentre
lejos de la bomba
6. Reubique y monte la bomba
Todos los modelos - Consulte la Fig. 1
Modelos con base para bañera - Consulte la Fig. 2
Todos los modelos

1011090-2-B
20
Kohler Co.
Borde de la bañera
de hidromasaje
Instale el grifo sobre el
reborde según las
instrucciones del fabricante
Mida y corte una pieza de madera laminada
de grado exterior de 1/2”, de 4” (10,2cm) x
11-1/2” (29,2cm) para el modelo K-1226, o
de 4” (10,2cm) x 15-1/2” (39,4cm) para el
modelo K-1331
4” (10,2cm)
4” (10,2cm)
7. Instale la plomería
8. Instale un grifo sobre el reborde – K-1226/K-1231
La page est en cours de chargement...
La page est en cours de chargement...
La page est en cours de chargement...
La page est en cours de chargement...
La page est en cours de chargement...
La page est en cours de chargement...
La page est en cours de chargement...
La page est en cours de chargement...
La page est en cours de chargement...
La page est en cours de chargement...
La page est en cours de chargement...
La page est en cours de chargement...
La page est en cours de chargement...
La page est en cours de chargement...
La page est en cours de chargement...
La page est en cours de chargement...
La page est en cours de chargement...
La page est en cours de chargement...
La page est en cours de chargement...
La page est en cours de chargement...
-
 1
1
-
 2
2
-
 3
3
-
 4
4
-
 5
5
-
 6
6
-
 7
7
-
 8
8
-
 9
9
-
 10
10
-
 11
11
-
 12
12
-
 13
13
-
 14
14
-
 15
15
-
 16
16
-
 17
17
-
 18
18
-
 19
19
-
 20
20
-
 21
21
-
 22
22
-
 23
23
-
 24
24
-
 25
25
-
 26
26
-
 27
27
-
 28
28
-
 29
29
-
 30
30
-
 31
31
-
 32
32
-
 33
33
-
 34
34
-
 35
35
-
 36
36
-
 37
37
-
 38
38
-
 39
39
-
 40
40


Kohler K-1337-HN-96 Guide d'installation
- Taper
- Guide d'installation
Documents connexes
-
Kohler K-1337-H-0 Guide d'installation
-
Kohler K-1114-95 Guide d'installation
-
Kohler K-1224-LA-0 Guide d'installation
-
Kohler K-1112-RA-0 Guide d'installation
-
-
Kohler K-1124-RA-0 Guide d'installation
-
Kohler K-1360-H2-0 Guide d'installation
-
-
Kohler 1170-HC-0 Guide d'installation
-
Kohler 1394-H2-96 Guide d'installation