Nikon 1922 Manuel utilisateur
- Catégorie
- Lentilles de caméra
- Taper
- Manuel utilisateur
Ce manuel convient également à
La page est en cours de chargement...

Schermi di messa a fuoco raccomandati
Per le fotocamere Nikon F6, F5 e quelle delle serie F4 ed
F3 sono disponibili vari schermi di messa a fuoco
intercambiabili per qualsiasi tipo di obiettivo e situazione
di ripresa. Quelli raccomandati per questo obiettivo sono
elencati nella lista. Per maggiori dettagli, consultate il
manuale della fotocamere.
74° [53° con fotocamera digitale Nikon, (Formato
Nikon DX); 63° con fotocamere sistema IX240]
Italiano
Profundidad de campo
SchärfentiefentabelleDepth of field
Profondità di campo
Profondeur de champ
Depth of field
Photographic Range With Close-Up Attachments Fotografische Bereiche mit dem Nahaufnahme-Zubehör
Rapports obtenus en proxiphotographie et photomacrographie Rangos fotográficos con accesorios de aceramiento
Fotografia con dispositivi per riprese Close-Up
Photographic Range With Close-Up Attachments
* The first values are for the PK-11A ring used alone and the other ones for the PK-11A—PK-13, PK-11—PK-13, or PK-1—PK-
3 rings used together. However, the PK-11 and PK-1 rings can not be attached directly to the lens.
** The Macro Adapter Ring BR-3 or BR-6 is used to connect the reverse lens to the copying adapter.
*** The figures shown here represent the ranges obtained with the subject on the baseplate, using the lens without any close-up
attachment.
* Die ersten Werte gelten für den Zwischenring PK-11A, wenn dieser allein benutzt wird. Die anderen Werte gelten für die
Kombinationen PK-11A—PK-13, PK-11—PK-13 oder PK-1—PK-3. Die Zwischenringe PK-11 und PK-1 lassen sich nicht
direkt am Objektiv anbringen!
** Der Umkehrring BR-3 oder BR-6 ist zum Anschluß des Objektives in Reprostellung an den Kopieransatz.
*** Die Angaben beziehen sich auf die Abstände, die entstehen, wenn das Objekt auf der Grundplatte liegt und das Objektiv nicht
mit Nahaufnahmezubehör versehen ist.
* Les premières valeurs sont pour la bague PK-11A utilisée seulement et les autres pour les bagues PK-11A—PK13, PK-11—
PK-13 ou PK-1—PK-3 utilsees ensemble. Toutefois, les bagues PK-11 et PK-1 ne peuvent être directement fixées à l’objectif.
** La bague d’adaptateur macro BR-3 ou BR-6 sert à relier l’objectif monté à retourné l’adaptateur de reproduction.
*** Les chiffres indiqués représentent les rapports obtenus avec le sujet sur le plateau. l’objectif étant utilisé san asccessoire
macro.
* Los primeros valores son para el caso en que se utilice el anillo PK-11A solo y los otros valores para el caso en que se utilicen
los anillos PK-11A—PK-13, PK-11—PK-13, o PK-1—PK-3 juntos. Sin embargo, no es posible montar los anillos PK-11 y
PK-1 en el objetivo en forma directa.
** El anillo macro adaptador BR-3 o BR-6 sirve para acoplar el objetivo invertivo al adaptador de reproducción.
*** Las cifras indicadas representan los intervalos obtenidos con los sujetos en la pletina de base, sin emplear ningún accesorio de
aproximación en el objetivo.
*I primi valori sono per l’anello PK-11A usato da solo mentre i seguenti sono per gli anelli PK-11A—PK-13, PK-11—PK-13, o
PK-1—PK-3 usati assieme. Si tenga comunque presente che gli anelli PK-11 e PK-1 non possono essere agganciati
direttamente all’obiettivo.
** L’anello adattatore macro BR-3 o BR-6 viene usatao per collegare l’obiettivo montato in modo inverso all’adattatore di
duplicazione.
*** I dati indicati in alto rappresentano i valori ottenuti con il soggetto posto sulla base usando l’obiettivo senza l’ausilo di
dispositivi close-up.
*
**
***
*
**
***
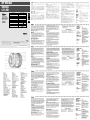
Fig. A Minimum aperture lock lever
Abb. A Verriegelung für kleinsten Blende
Fig. A Levier de verrouillage d'ouverture minimale
Fig. A Palanca de bloqueo de apertura mínima
Fig. A Leva di blocco al diaframma minimo
F6
F5 + DP-30
F5 + DA-30
F4 + DP-20
F4 + DA-20
F3
EC-B
EC-E
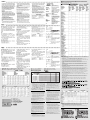
A/L B C D E G1 G2 G3 G4 H1 H2 H3 H4 J K/P M R T U F
Screen Pantalla
Einstellscheibe Verre Schermo
Camera Appareil
Kamera Cámara Fotocamere
Table of Recommended Focusing Screens
Tabelle der empfohlenen Einstellscheiben
Tableau des verres de visée recommandés
Tabla de pantallas de enfoque recomendadas
Tabella schermi di messa a fuoco raccomandati
Excellent focusing
Acceptable focusing
Slight vignetting or moiré patterns appear in the viewfinder, but not on the film.
Indicates degree of exposure compensation needed (Center-Weighted metering
only). For F6 cameras, compensate by selecting "Other screen” in Custom
Setting “b6: Screen comp.” and setting the EV level to -2.0 to +2.0 in 0.5 EV
steps. When using screens other than type B or E, “Other screen” must be
selected even when the required compensation value is “0” (no compensation
required). For F5 cameras, compensate using Custom Setting #18 on the
camera body. For F4-Series cameras, compensate using the Exposure
Compensation Dial for the focusing screen.
See instruction manual of the camera body for more details.
Blank box means not applicable. Since type M screen can be used for both
macrophotography at a 1:1 magnification ratio and for photomicrography, it has
different applications than other screens.
• When using the B/B2/B3, E/E2/E3 and K/K2/K3 focusing screens in cameras other
than those listed above, refer to the columns for the B, E and K screens.
Hervorragende Scharfeinstellung
Akzeptable Scharfeinstellung
Das Sucherbild vignettiert leicht. Die Aufnahme selbst bleibt hiervon unberührt.
Zeigt den Betrag zusätzlich erforderlicher Belichtungskorrektur (Nur
mittenbetonte Belichtungsmessung). Bei F6-Kameras korrigieren Sie durch
Wahl von “Andere” in der Individualfunktion “b6: Einstellscheibe” und
Einstellen des LW-Werts im Bereich zwischen –2,0 und +2,0 in 0,5-LW-
Schritten. Bei Gebrauch von anderen Scheiben als B oder E, ist “Andere” auch
dann zu wählen, wenn der erforderliche Korrekturwert “0” beträgt (keine
Korrektur nötig). Zur Einstellung des Korrekturwerts am F5 Kameragehäuse
dient die Individualfunktion Nr. 18. Mit den F4-Serien-Geräten durch den
Belichtung-Kompensationsanzeiger für Visiermattscheiben kompensieren.
Näheres hierzu finden Sie in der Bedienungsanleitung des Kameragehäuses.
Ein Leerfeld bedeutert: unbrauchbar. Da die Einstellscheibe M sowohl für
Maktrofotografie bis zum Abbildungsmaßstab 1:1 als auch Mikrofotografie eingesetzt
werden kann, unterscheidet sich ihr Anwendungsbereich von dem anderer
Einstellscheiben.
• Bei Verwendung der Scheiben B/B2/B3, E/E2/E3 und K/K2/K3 in anderen als den
obengenannten Kameras gelten die Spalten für die Scheiben B, E und K.
Mise au point excellente
Mise au point passable
Un vignetage affecte l’image du verre. L’image sur la pellicule ne porte
cependant aucune trace de ceci.
( ) Indique la compensation de l’exposition additionnelle requise (Mesure pondérée
centrale uniquement). Pour les appareils F6, corrigez en sélectionnant “Activ.:
autre“ dans le réglage personnalisé "b6: Plage visée” et en réglant le niveau IL de
-2,0 à +2,0 par pas de 0,5 IL. Lorsque vous utilisez des verres autres que ceux
de type B ou E, il faut sélectionner “Activ.: autre” même lorsque la valeur de
correction est de “0“ (pas de correction nécessaire). Pour les appareils F5,
compenser en utilisant le réglage personnalisé n° 18 sur l’appareil. Pour les
appareils de la série F4, compenser en utilisant le cadran de compensation de
l’exposition prévu pour les filtres de mise au point.
Voyez le manuel d’instructions de l’appareil photo pour plus de détails.
Un blanc indique aucune application. Du fait que le verre M peut être utilisé pour la
macrophotographie à un rapport d’agradissement 1:1 et pour la photomicrographie, il a
des applications diffèrentes de celles des autres verres.
• Lors de l’utilisation de verres B/B2/B3, E/E2/E3 et K/K2/K3 dans des appareils
autres que ceux indiqués ci-dessus, se reporter aux colonnes sur verres B, E et K.
Enfoque excelente
Enfoque aceptable
Ligero viñeteo afecta la imagen de la pantalla, pero la imagen de la película no
es afectada por esto.
( ) Indica la cantidad de compensación adicional necesaria (Solamente medición
ponderada central). Para cámaras F6, compense seleccionando "Otra pantalla”
en el ajuste personal del usuario “b6: Compens pantalla” y ajustando el nivel
EV a -2,0 a +2,0 en pasos de 0,5 EV. Cuando se utilice una pantalla que no sea
de tipo B o E, debe seleccionarse “Otra pantalla” incluso cuando el valor de
compensación requerido sea “0” (no se requiere compensación). Para la
cámara F5 compense usando el ajuste personal del usuario No. 18 en el cuerpo
de la cámara. Para las cámaras de la serie F4, compense usando el dial de
compensación de exposición para las pantallas de enfoque.
Para más detalles, consulte el manual de instrucciones de la cámara.
Los blancos significan inaplicable. Como la pantalla de tipo M se usa para
macrofotografía a una razón de aumento de 1:1 asi como para microfotografía, su
aplicación es distinta a la de las demás pantallas.
• Cuando se utilicen las pantallas de enfoque B/B2/B3, E/E2/E3 y K/K2/K3 en
cámaras distintas de las relacionadas arriba, ver las columnas correspondientes a
las pantallas B, E y K.
Messa a fuoco eccellente
Messa a fuoco accettabile
L’immagine sullo schermo presenta una riduzione di luminosità o tracce di
fenomeno del moiré. Questo però non lascia tracce sulla pellicola.
( ) Indica il valore della compensazione di esposizione aggiuntiva richiesto
(Solamente misurazione a preferenza centrale). Con le fotocamere F6,
compensare selezionando “Otra pantalla” nell’impostazione personalizzata “b6:
Compens pantalla”, quindi impostando il livello EV tra -2.0 e +2.0 ad intervalli
di 0,5 EV. Quando si utilizzano schermate diverse da B o E, è necessario
selezionare “Otra pantalla” anche quando il valore di compensazione richiesto
è pari a “0” (nessuna compensazione necessaria). Per la fotocamera F5,
compensare utilizzando l’impostazione personalizzata 18 sul corpo della
fotocamera. Per gli apparecchi della serie F4, compensare utilizzando il
quadrante di compensazione dell’esposizione previsto per i filtri di messa a
fuoco.
Per ulteriori dettagli, fare riferimento al manuale d’istruzioni della fotocamera.
Il quadrato vuoto non è applicabile. Come lo schermo del tipo M può essere utilizzato
per macrofotografia con rapporto di ingrandimento 1:1 e fotomicrografia, esso
presenta differenti applicazioni che agli altri schermi.
• Impiegando gli schermi B/B2/B3, E/E2/E3 e K/K2/K3 con fotocamere diverse da
quelle elencate sopra, fate riferimento alle rispettive colonne delle versioni B, E e K.
* The first values are for the PK-11A ring used alone and the other ones for the PK-11A—PK-13, PK-11—PK-13, or PK-1—PK-
3 rings used together. However, the PK-11 and PK-1 rings can not be attached directly to the lens.
** The Macro Adapter Ring BR-3 or BR-6 is used to connect the reverse lens to the copying adapter.
*** The figures shown here represent the ranges obtained with the subject on the baseplate, using the lens without any close-up
attachment.
*
**
***
*
**
***
Angolo di campo :
74° [53° con fotocamera digitale Nikon, (Formato
Nikon DX); 63° con fotocamere sistema IX240]
); ]
-
 1
1
-
 2
2


Nikon 1922 Manuel utilisateur
- Catégorie
- Lentilles de caméra
- Taper
- Manuel utilisateur
- Ce manuel convient également à
dans d''autres langues
- italiano: Nikon 1922 Manuale utente
- English: Nikon 1922 User manual
- español: Nikon 1922 Manual de usuario
- Deutsch: Nikon 1922 Benutzerhandbuch
- 日本語: Nikon 1922 ユーザーマニュアル
Documents connexes
-
Nikon AF 50mm f/1.8D Nikkor Le manuel du propriétaire
-
-
-
Amazon Renewed 50mm f/1.8D AF Manuel utilisateur
-
-
-
-