Whirlpool AKR 420 IX Le manuel du propriétaire
- Taper
- Le manuel du propriétaire

5019 318 33000
AKR419-420-424-425-426-427-428-429-430-601-619-620-624-625-626-627-628-629-720
INSTALLATIONSANGABEN
Mindestabstand zur Kochfläche: 60 cm (Elektroplatten), 70 cm (Gas-, Öl- oder
Kohleflammen). Folgen Sie bei der Installation der Nummerierung
(1
Ö
2
Ö
3
Ö
.....). Schließen Sie das Gerät erst nach erfolgter Installation an die
Stromversorgung an. Befindet sich die Steckdose an einer nicht zugänglichen
Stelle, müssen Sie einen normgerechten und leicht zugänglichen Zweipolschalter
mit einer Kontaktöffnungsweite von mindestens 3 mm vorsehen.
INSTALLATION SHEET
Minimum height above cooker: 60 cm (electric cookers), 70 cm (gas, gas oil or
coal cookers). To install, follow points (1
Ö
2
Ö
3
Ö
.....). Do not connect the
appliance to the electrical power supply until installation is completed. If the
plug is not easily accessible once inserted into the socket, a two-pole switch
with minimum break distance between contacts of 3 mm must be fitted at an
easily accessible point.
FICHE D'INSTALLATION
Distance minimale par rapport à la cuisinière : 60 cm (cuisinière électrique),
70 cm (cuisinière à gaz, mazout ou charbon). Pour le montage, suivez la
numérotation (1
Ö
2
Ö
3
Ö
.....). Ne branchez pas l'appareil tant que l'installation
n'est pas terminée. S'il s'avère difficile d'accéder à la prise de courant une fois
qu'elle a été insérée dans la fiche, installez un interrupteur bipolaire conforme
facilement accessible ayant une ouverture minimale de 3 mm entre les contacts.
INSTALLATIEKAART
Minimumafstand tot het kooktoestel: 60 cm (elektrische kooktoestellen), 70 cm
(kooktoestellen op gas, olie of kolen). Volg voor de montage de nummering
(1
Ö
2
Ö
3
Ö
.....). Geef het apparaat geen stroom totdat de installatie geheel
voltooid is. Als de stekker na plaatsing in het stopcontact niet goed toegankelijk
is, moet een genormaliseerde tweepolige schakelaar met een afstand tussen de
contacten van minstens 3 mm worden gemonteerd, op een duidelijke
toegankelijke plaats.
D
GB
F
NL
31833000.fm5 Page 1 Tuesday, March 20, 2001 3:29 PM

5019 318 33000
AKR419-420-424-425-426-427-428-429-430-601-619-620-624-625-626-627-628-629-720
FICHA DE INSTALACIÓN
Distancia mínima desde los fuegos: 60 cm (fuegos eléctricos), 70 cm (fuegos de
gas, gasóleo o carbón). Para el montaje, siga la numeración(1
Ö
2
Ö
3
Ö
.....). No
conecte el aparato a la corriente eléctrica hasta que la instalación esté
completamente finalizada. Si la clavija no se encuentra en un punto accesible
una vez enchufada, se deberá aplicar un interruptor bipolar según las normas con
una distancia de abertura entre los contactos no inferior a 3 mm, que
naturalmente deberá ser accesible.
FICHA DE INSTALAÇÃO
Distância mínima dos fogões: 60 cm (fogões eléctricos), 70 cm (fogões a gás,
óleo ou carbono). Para a montagem siga a numeração (1
Ö
2
Ö
3
Ö
.....). Não ligue
o aparelho à corrente eléctrica até a instalação estar concluída. Se a ficha, após
ter sido introduzida na tomada, não se encontrar num ponto acessível, deve-se
sempre aplicar um interruptor bipolar segundo as normas e com uma distância
dos contactos na abertura não inferior a 3 mm, facilmente acessível.
SCHEDA INSTALLAZIONE
Distanza minima dai fuochi: 60 cm (fuochi elettrici), 70 cm (fuochi a gas,
gasolio o carbone). Per il montaggio seguire la numerazione (1
Ö
2
Ö
3
Ö
.....). Non
dare corrente all’apparecchio finché l’installazione non è totalmente completata.
Se la spina, una volta inserita nella presa, non si trova in un punto accessibile,
si dovrà comunque applicare un interruttore bipolare a norme con una distanza
dei contatti in apertura non inferiore a 3 mm, chiaramente accessibile.
ùüùü+ùùùþ
ü$12.)12.1. )2"0120" FP02!"0120" FP
0120".0! #02!0. #0! # +.22 21
. #1202.!1
Ö
Ö
Ö
2! 3 / 20200
02!)!0*.21#10#!2 !&12" 0.212.1"
ù2 3"0221*/0112!./0!102.1010 0
0* !)1.1!0 .2 020/ )"/.)2"10
2&. 1+00$12.)12.1. .2 "02.*2&0.3+
PP100* .! 1011
E
P
I
*5
31833000.fm5 Page 2 Tuesday, March 20, 2001 3:29 PM

5019 318 33000
AKR419-420-424-425-426-427-428-429-430-601-619-620-624-625-626-627-628-629-720
31833000.fm5 Page 3 Tuesday, March 20, 2001 3:29 PM

5019 318 33000
AKR419-420-424-425-426-427-428-429-430-601-619-620-624-625-626-627-628-629-720
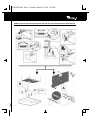
1.
Control panel
2.
Grease filters (behind the extractor grille)
3.
Lighting unit (not present in AKR 427-627-720)
4.
Pull-out steam deflector
5.
Halogen bulbs (AKR 427-627-720 only)
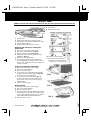
Removing and renewing or cleaning the
grease filter:
1.
Disconnect the electrical power supply.
2.
Pull out the steam deflector
(Fig.1,a)
.
3.
Open the extractor grille
(Fig.1,b-c-d)
.
4.
Remove the device securing the grease filter
(
Fig. 2,e
or
Fig. 3,e
).
5.
Remove the dirty grease filter.
6.
After the grease filter has been replaced or
cleaned (depending on model), refit the parts in
reverse order, making sure the entire extraction
surface is covered.
Fitting or renewing the carbon filter:
1.
Disconnect the electrical power supply.
2.
Pull out the steam deflector.
3.
Open the extractor grille.
4.
If the carbon filter is already fitted and needs
renewing, press the release buttons
(Fig. 4,h)
and pull the filter out downwards.
5.
If the filters are nor already fitted
(Fig. 4)
.
f.
Locate the carbon filter on the back rings.
g.
Secure the filter in front with the clips (h)
supplied with it.
6.
Refit the extractor grille.
Replacing bulbs
1.
Disconnect the electrical power supply.
2.
Pull out the steam deflector.
3.
Open the extractor grille.
4.
Remove the burnt-out bulb. Replace using 40 W
max E14 bulbs or 20 W max GU5.3 halogen bulbs
only (models AKR 427-627-720 only) or 9 W PL
bulbs (models AKR 419-426-619-626 only).
5.
Refit the extractor grille.
CONTROL PANEL
A.
Light switch
B.
Speed selector switch
small amount of steam and fumes
medium amount of steam and fumes
large amount of steam and fumes
large amount of steam and fumes
FIG. 1
FIG. 2
FIG. 3
FIG. 4
F NL E PD GRI
GB
PRODUCT SHEET
31833000.fm5 Page 6 Tuesday, March 20, 2001 3:29 PM
-
 1
1
-
 2
2
-
 3
3
-
 4
4


Whirlpool AKR 420 IX Le manuel du propriétaire
- Taper
- Le manuel du propriétaire
dans d''autres langues
- italiano: Whirlpool AKR 420 IX Manuale del proprietario
- English: Whirlpool AKR 420 IX Owner's manual
- português: Whirlpool AKR 420 IX Manual do proprietário
Documents connexes
-
Whirlpool AKR 428 NB Program Chart
-
-
-
Whirlpool AKR 620 ME Program Chart
-
Whirlpool AKR 429 AV Program Chart
-
Whirlpool AKR 429 AV Program Chart
-
-
Whirlpool AKR 627 NB Le manuel du propriétaire
-
-
Whirlpool AKR 439 WH Program Chart