
DW80R2031
Series
DD81-02158B-00


eries
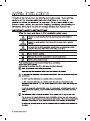
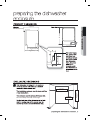
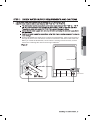
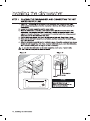
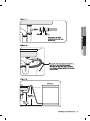
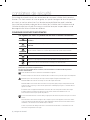
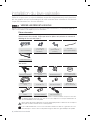
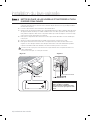
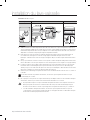
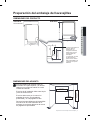
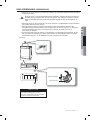
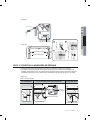
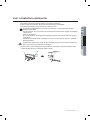
26 "(683mm)
24 "(625mm)
20 "(520.7mm)
23 "(604mm)
33 "(858mm)
2 "(58.5mm)
6 "(154mm)
24"(610mm)
minimum
34 "(867mm)
minimum
24 inches deep and 34 inches high.
24"(610mm)
minimum
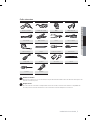
7
8
1
2
5
8
3
4
3
4
5
16
1
16
1
8
1
8
S
DW80R2031

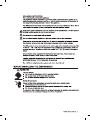
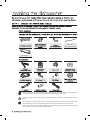
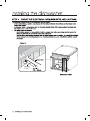
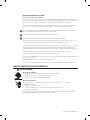
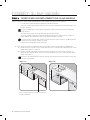
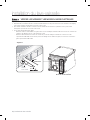
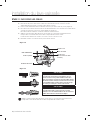
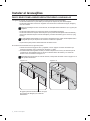
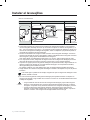
Kick Plate
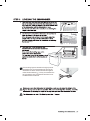
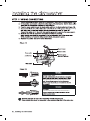
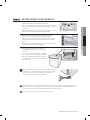
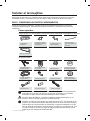
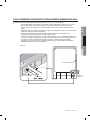
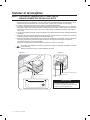
For the hot water supply line – We strongly recommend using ⅜" minimum O.D. copper tubing with
a compression fitting or a flexible stainless steel braided hot water supply line.
Do not use plastic tubing. Plastic tubing can deteriorate over time and cause a leak inside the tube
fitting.
You also need a 90° Fitting with ¾" N.P.T. external pipe threads on one end and a fitting sized to fit
your hot water supply line (copper tubing/compression fitting or braided hose) on the other.
For the power cable, we recommend a jacketed 12-2 cable with ground. Note that some local codes
may require the cable to have a BX style metal jacket.
⅜"
Cable Tie
(for the Drain hose1)

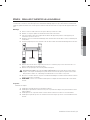
15
existing

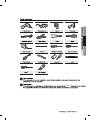
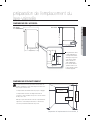
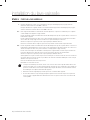
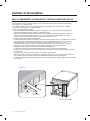
The location must have sufficient space for the dishwasher door to open easily and provide
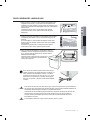
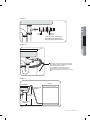
Using a 2 inch hole saw, cut a hole into the side of the cabinet that hold the sink as
1
2
s

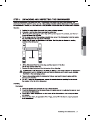
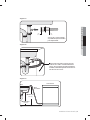
Drain hose1
Drain hose2
Connect drain
through the hole on the side wall so it can be connected to the drain outlet at the sink.
When you install the dishwasher, ensure there is nothing in the drain hose, and be
careful not to damage the drain hose during installation.
hose
2 to drain hose 1 using the provided clamp. Then run drain hose 2


rear

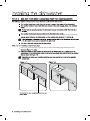
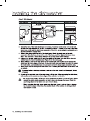
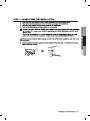
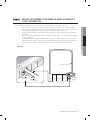
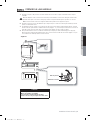
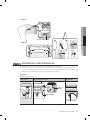
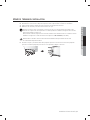
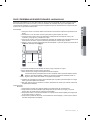
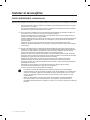
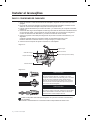
STEP 6 PREPARING THE DISHWASHER
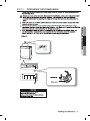
1.

Drain Hose2
Drain Hose1
4

If the leveling legs are rotated to the right (counter
clockwise),they are lo sened and the front of the
dishwasher is raised. And the maximum height be
raised is about 38mm(1 ").If they are rotated to the
left (clockwise),they are tightened and the front of
the dishwasher is lowered.
1
2
legs.
o


Drain hose2
1
2
3
4

Drain hose2

Drain hose2

Only qualified electricians should perform electrical
To avoid a fire hazard,make sure electrical work is
inserting
La page est en cours de chargement...
La page est en cours de chargement...
La page est en cours de chargement...
La page est en cours de chargement...
La page est en cours de chargement...
La page est en cours de chargement...
La page est en cours de chargement...
La page est en cours de chargement...
La page est en cours de chargement...
La page est en cours de chargement...
La page est en cours de chargement...
La page est en cours de chargement...
La page est en cours de chargement...
La page est en cours de chargement...
La page est en cours de chargement...
La page est en cours de chargement...
La page est en cours de chargement...
La page est en cours de chargement...
La page est en cours de chargement...
La page est en cours de chargement...
La page est en cours de chargement...
La page est en cours de chargement...
La page est en cours de chargement...
La page est en cours de chargement...
La page est en cours de chargement...
La page est en cours de chargement...
La page est en cours de chargement...
La page est en cours de chargement...
La page est en cours de chargement...
La page est en cours de chargement...
La page est en cours de chargement...
La page est en cours de chargement...
La page est en cours de chargement...
La page est en cours de chargement...
La page est en cours de chargement...
La page est en cours de chargement...
La page est en cours de chargement...
La page est en cours de chargement...
La page est en cours de chargement...
La page est en cours de chargement...
La page est en cours de chargement...
La page est en cours de chargement...
La page est en cours de chargement...
La page est en cours de chargement...
La page est en cours de chargement...
La page est en cours de chargement...
La page est en cours de chargement...
La page est en cours de chargement...
La page est en cours de chargement...
La page est en cours de chargement...
La page est en cours de chargement...
La page est en cours de chargement...
-
 1
1
-
 2
2
-
 3
3
-
 4
4
-
 5
5
-
 6
6
-
 7
7
-
 8
8
-
 9
9
-
 10
10
-
 11
11
-
 12
12
-
 13
13
-
 14
14
-
 15
15
-
 16
16
-
 17
17
-
 18
18
-
 19
19
-
 20
20
-
 21
21
-
 22
22
-
 23
23
-
 24
24
-
 25
25
-
 26
26
-
 27
27
-
 28
28
-
 29
29
-
 30
30
-
 31
31
-
 32
32
-
 33
33
-
 34
34
-
 35
35
-
 36
36
-
 37
37
-
 38
38
-
 39
39
-
 40
40
-
 41
41
-
 42
42
-
 43
43
-
 44
44
-
 45
45
-
 46
46
-
 47
47
-
 48
48
-
 49
49
-
 50
50
-
 51
51
-
 52
52
-
 53
53
-
 54
54
-
 55
55
-
 56
56
-
 57
57
-
 58
58
-
 59
59
-
 60
60
-
 61
61
-
 62
62
-
 63
63
-
 64
64
-
 65
65
-
 66
66
-
 67
67
-
 68
68
-
 69
69
-
 70
70
-
 71
71
-
 72
72


Samsung DW80R2031US Guide d'installation
- Taper
- Guide d'installation
- Ce manuel convient également à
dans d''autres langues
Documents connexes
-
Samsung DW80R2031US Guide d'installation
-
-
-
-
-
-
Samsung DW80R5060UG/AA Guide d'installation
-
Samsung DW80F600UTB Guide d'installation
-
-