Nextbook Flexx 10 NXW101QC232 Mode d'emploi
- Catégorie
- Comprimés
- Taper
- Mode d'emploi
Ce manuel convient également à

1
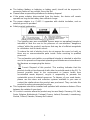
Safety Precautions
Do not subject the device to severe impact or drop it from heights.
Do not use the device in extreme hot or cold, dusty or damp conditions. Do not
expose it to direct sunlight.
Avoid using the device near strong magnetic fields.
Normal functioning of the product may be disturbed by ESD. If so, simply reset
and restart the device following the instruction manual. During file transmission,
please handle with care and operate in a static-free environment.
Keep the device away from water and other liquids. In the event that water or
other liquids enter the device, power off the product immediately and clean the
device.
Do not use chemicals to clean the device in order to avoid corrosion. Clean it
with a dry cloth.
Do not install this equipment in a confined space such as a book case or similar
unit. The ventilation should not be impeded by covering the ventilation openings
with items such as newspaper, table-cloths, curtains etc.
No naked flame sources, such as lighted candles, should be placed on the
apparatus.
Attention should be drawn to environmental aspects of battery disposal.
Use the apparatus in moderate climates.
We are not responsible for damage or lost data caused by malfunction, misuse,
modification of the device or battery replacement.
Do not attempt to disassemble, repair or modify the product. This will invalidate
the warranty.
If the device will not be used for an extended period of time, please charge the
battery at least once per month to maintain battery life.
Charge the battery if:
a) The battery level icon displays (An empty battery)
b) The device powers off automatically when restarted.
c) There is no response when pressing keys with keys unlocked and battery full.
Do not interrupt the connection when the device is being formatted or
transferring files. Otherwise, data may be corrupted or lost.
When the device is used as a portable HD, please use only per the instructions.
Otherwise, permanent data loss could occur.
Please use and install data using the attachments/accessories provided and only
according to the manufacturer’s instruction.
Please refer to the information on the bottom of the device for electrical and
safety information before installing data or operating the device.
To reduce the risk of fire or electric shock, do not expose this device to rain or
moisture. The device should not be exposed to dripping or splashing. Never
place objects filled with liquids, such as vases, on the device.
There is danger of explosion if the battery is replaced incorrectly. Replace only
with the same or equivalent type.

2
The battery (battery or batteries or battery pack) should not be exposed to
excessive heat such as sunlight, fire or the like.
Please follow responsible procedures for battery disposal.
If the power adaptor disconnected from the device, the device will remain
operable as long as the battery has sufficient charge.
The power adaptor is a CLASS II apparatus with double insulation, and no
external ground is provided.
Safety symbol explanation:
- The lightning flash with arrowhead symbol within an equilateral triangle is
intended to alert the user to the presence of non-insulated “dangerous
voltage” within the product’s enclosure that may be of sufficient magnitude
to constitute a risk of electric shock.
- To reduce the risk of electric shock, do not remove the cover (or back) as
there are no user-serviceable parts inside. Refer servicing to qualified
personnel.
- The exclamation point within an equilateral triangle is intended to alert the
user to the presence of important operating and maintenance instructions in
the literature accompanying the device.
- Correct Disposal of this product. This marking indicates that this
product should not be disposed of with other household waste in the EU. To
prevent possible harm to the environment or human health from
uncontrolled waste disposal, recycle it responsibly to promote the
sustainable reuse of material resources. To dispose of your used device,
please use the return and collection systems available in your area or
contact the retailer where the product was purchased. They can take this
product for safe environmental recycling.
This equipment should be installed and operated with minimum distance 20cm
between the radiator & your body.
CE in which countries where the product may be used freely: Germany, UK, Italy,
Spain, Belgium, Netherlands, Portugal, Greece, Ireland, Denmark, Luxembourg,
Austria, Finland, Sweden, Norway and Iceland.

3
Listening Cautions
This product respects the current regulations for limiting the output volume of
consumer audio devices to a safe level. By listening to your device with
headphones or earbuds at high volumes, you run the risk of permanent damage
to your ears. Even if you get used to listening at high volumes and it seems
normal to you, you still risk the possibility of damaging your hearing. Reduce the
volume of your device to a reasonable level to avoid permanent hearing damage.
If you hear ringing in your ears, reduce the volume or shut off your device. This
device has been tested with the supplied earphones. In order to preserve your
hearing, it is advised that you use only the following headphone models: the
earphones supplied with your device, or any other headphones that respect the
current regulations. Other types of headphones may produce higher volume
levels.(At full power ,the prolonged listening of the walkman can damage the ear
of the use)
Do not use while operating a motorized vehicle. It may create a traffic hazard
and is illegal in many areas.
You should use extreme caution or temporarily discontinue use in potentially
hazardous situations created by obstructed hearing.
Even if your headphones or earphones are the open-air type designed to let you
hear outside sounds, don’t turn up the volume so high that you can’t hear what’s
around you.
Sound can be deceiving. Over time your hearing “comfort level” adapts to higher
volumes of sound. What sounds “normal” can actually be loud and harmful to
your hearing. Guard against this by setting the volume of your device at a safe
level BEFORE your hearing adapts.
To establish a safe volume level:
a. Start your volume control at a low setting.
b. Slowly increase the sound until you can hear it comfortably and clearly,
and without distortion. Once you have established a comfortable sound
level, leave it there.
This manual may not reflect your actual device’s operation. All information is subject to change
without prior notification. Please follow your actual device’s operational procedures.

4
Table of Content
Safety Precautions ......................................................................... 1
Listening Cautions ......................................................................... 3
Packing Contents .......................................................................... 5
Features & Functionality ................................................................... 5
Basic Connections ......................................................................... 6
Basic Operation ............................................................................ 9
Maintenance ............................................................................... 13
Major Specifications ...................................................................... 15
FCC Statement ............................................................................ 15

5
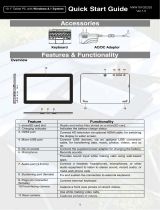
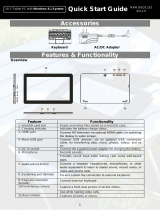
Packing Contents
When you get your Nextbook device, be sure to check the following items are
included in the package:
Main Unit ● Power Adaptor ● Keyboard
User’s Manual ● Warranty Card ● FAQ
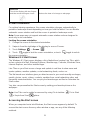
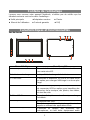
Features & Functionality
Overview
Feature
Functionality
1. microSD card slot
Reads and writes files stored on a microSD card.
2. Charging indicator
Indicates the battery-charge status.
3. HDMI port
Connect HD television via optional HDMI cable, for switching
the display to wider screen.
4. Micro-USB port
Connect USB devices, via an optional USB conversion
cable, for transferring data, music, photos, videos, and so
on.
5. DC-In socket
Connect the supplied power adapter for charging the battery.
6. Microphone Records sounds.
Provides sound input while making calls using web-based
apps.
7. Audio port (3.5 mm)
Connect a headset, headphones, microphones, or other
audio equipment to listen to stereo sound, record audio, or
make web phone calls.
8. Sustaining port (female)
Fix and sustain the connection to external keyboard.
9. Pogo pin connector
(female)
Connect external keyboard
10.Front-facing camera
Capture a front view picture or record videos.
Use while making video calls.

6
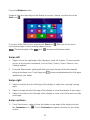
11.Rear camera
Captures pictures or videos.
12.Windows button
Press to open the Windows Start screen.
Press for quick access to the most recently used app or
most recently viewed screen.
13.Volume+/- buttons
Press to increase/decrease volume
14.Power button
Press and hold to turn the tablet on or off.
Press to turn the display on or off.
15. Speaker
Provides audio output.
Note:
1. Both cameras do not support zoom, face tracking.
2. User can connect a keyboard and USB mouse to this tablet if necessary.
Basic Connections
Charging the tablet
Note: If using the tablet for the first time, or after a long period of idle time, charge the
battery for more than half an hour before turning it on, to ensure system stability.
The tablet has a built-in rechargeable battery. Charge the device when the battery
level is low.
1. Plug the power adapter into the DC-In socket.
2. Connect the power adapter to an electrical outlet and charge the tablet until the
battery is fully charged.
Caution:
1. Charge the battery in an ambient temperature of 0 °C to 35 °C.
2. Use only the supplied power adapter to charge your tablet. Using unauthorized
power adapters may severely damage your tablet.
Note:
1. The battery is not fully charged when you unpack your tablet.
2. A fully discharged battery takes about 5 hours to fully charge.
3. When the battery is being charged, the LED indicator lights red, and when the
battery has been fully charged, the LED indicator lights orange.
Turning On the Tablet
Note: This Nextbook device has been equipped with Windows 8.1 system at the
factory, so user need not perform Windows setup again before using for the first time.
1. Press and hold the Power button for 2 seconds to turn on your tablet. The lock
screen appears.
2. Swipe-up your finger from the bottom of the display to switch to the login screen,

7
and then enter password to log in to Windows.
Now the tablet is ready for use when the Windows Start screen is displayed.
Note: If the login screen is not enabled in Windows 8.1, you will be taken directly from
the lock screen to the Start screen.
Turning Off the Tablet
You can turn off the tablet in two ways:
Using the Power button:
1. Press and hold the Power button for at least 4 seconds.
2. Swipe-down the shutdown confirmation screen to the bottom edge of the display
to turn off the tablet.
Using Charms:
1. Swipe-in from the right edge of the display to access Charms.
2. Touch Settings → Power → Shut down to turn off the tablet.
Turning On/Off screen
Usually, user can press once the power button to turn on/ off the screen display.
Optionally, user can also use the Charms:
1. Swipe-in from the right edge of the display to access Charms.
2. Touch Settings → Power → Sleep to turn off the screen.
Inserting a microSD card
1. Pick up a microSD card.
2. Align the microSD card so that the pins are pointed toward the card slot.
3. Push the microSD card into the card slot until it locks into place.
Removing a microSD card
Caution: Removing the microSD card while it is in use may cause data loss or result
in application errors. Make sure all save operations to the microSD card are complete

8
before removing the microSD card.
1. Touch the Desktop tile to enter Desktop mode.
2. Touch Safely Remove Hardware in the notification area at the bottom-right
corner of the screen.
Note: If you do not see Safely Remove Hardware , touch Show Hidden Icons
to display all icons in the notification area.
3. Touch Eject SD Memory Card. A message appears confirming that the microSD
card can be safely removed. If a warning message appears stating the microSD
card cannot be removed, ensure all data transfers involving the microSD card are
complete.
4. Press on the microSD card to release it.
5. Slide the card out after it pops out from the microSD card slot.
Using Headphones
You can connect a headset or headphones to the audio port of your tablet.
Warning: Listening to loud music for an extended period of time can lead to
hearing loss.
1. Connect headphones to the audio port (3.5 mm) on the tablet.
2. Insert the earphones in your ears and adjust the volume level to a comfortable
level.
Note: When you connect an audio device to the 3.5 mm audio jack, the integrated
speakers on your tablet are muted automatically
.
Caution: To prevent damage to the headphones when disconnecting it from the
tablet, pull the connector instead of the cable.
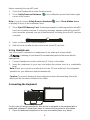
Connecting the Keyboard
For the sake of using convenience, this device is designed to be equipped with a
dedicated keyboard. Follow these steps to connect the keyboard to your tablet:
1. Place the dedicated keyboard on an even and stable plane (e.g. desk);

9
2. Hold your tablet with two hands, align the connector and the two magnetic
contacts on the keyboard to the jack and positioning slots at the bottom of the
tablet.
3. As soon as the keyboard is connected to the tablet, it is ready for use.
4. You can rotate the tablet to overlap the keyboard as you do with a laptop.
Note:
1.This keyboard is a plug-and-play device; you can connect/disconnect it anytime.
2. There is no notification or indication for the keyboard connection, except for
appearance of the mouse icon (arrow) as you put your hand onto the touch area.
3. When the tablet overlaps on the keyboard, the display will be turned off; as soon as
it is erect, the display will be turned on again.
4. Since the keyboard is powered by the tablet, it has no built-in battery inside.
Warning:
The maximum angle between the tablet and the keyboard is 120 degrees, so DO NOT
rotate the tablet greater than that angle; otherwise, it may cause damage to the tablet
and the keyboard.
Instructions for using the cool function keys:
FN+ F1
Switch off the screen display
FN+F5
Decrease the volume
FN+F2
Bring up Settings menu
FN+F6
Increase the volume
FN+F3
Decrease the display brightness
FN+F7
Mute the tablet.
FN+F4
Increase the display brightness
FN+F8
switch display on tablet/HD TV.
FN+F9
Lock or unlock the touch area on the keyboard
FN+Nu
mLk
Lock or unlock numeric keys on the keyboard.
Note: The numeric keys are those with blue printings on the top-right corner.
To remove the keyboard from tablet, you need to push down the button at the top
center of the keyboard with one hand, then lift it up with the other hand gently.
Basic Operation
Wi-Fi Setting
Turning On/Off Wi-Fi:
1. Swipe-in from the right edge of the display to access Charms.
2. Touch Settings → Network icon .
3. Swipe Wi-Fi icon left or right to turn Wi-Fi on or off.
Connecting to a network:
1. Swipe-in from the right edge of the display to access Charms.
2. Touch Settings → Available .
3. Select an available network from the list and touch Connect.

10
Gestures
Your tablet has a multi-touch display. You can touch the screen to operate the tablet.
Finger Gesture
You can do
Touch
Tap gently on the display with your
fingertip.
Select items on the screen, including options, entries,
images, and icons.
Start apps.
Touch buttons on the screen.
Input text using the on-screen keyboard.
Touch and Hold
Touch and hold your finger on the
display.
Display detailed information about an item.
Open the context menu of an item to perform further
actions.
Drag
1. Touch and hold your finger on
an item on the screen.
2. Keeping your finger in contact
with the display, move your fingertip
to the desired location.
3. Take your finger off the display to
drop the item in the desired
location.
Move items such as images and icons on the screen.
Swipe or Slide
Move your finger in a vertical or
horizontal direction on the display.
Scroll through the Start screen, web pages, lists,
entries, photos, contacts, and so on.
Close an app. (Swipe the app to the bottom of the
display.)
Zoom in
Touch the display with two fingers
and then move the fingers apart.
Enlarge the view of an image or web page.

11
Zoom out
Touch the display with two fingers
and then move the fingers closer.
Reduce the view of an image or web page.
Screen Orientation
For optimal viewing experience, the screen orientation changes automatically to
portrait or landscape format depending on how you hold the tablet. You can disable
automatic screen rotation and lock the screen in portrait or landscape mode.
Note: Some apps may not support automatic screen rotation and are designed to
work only in one orientation.
Locking the screen orientation
1. Change the screen to the desired orientation.
2. Swipe-in from the right edge of the display to access Charms.
3. Touch Settings → Screen .
4. Touch toggle to lock the screen orientation, or touch toggle to unlock
the screen orientation.
Windows 8.1 Start Screen
The Windows 8.1 Start screen displays a list of default and custom Live Tiles, which
act as a shortcut to Mail, Windows Explorer, Weather app, Calendar, Windows Store,
Internet Explorer, and other installed apps.
Live Tiles on your Start screen change and update in real time to show news and
sports updates, weather updates, social-networking feeds, and so on.
The tile-based user interface gives you direct access to your most recently used apps,
emails, photos, music, videos, contacts, updates from social-networking sites, and
frequently viewed websites. You can pin your favorite apps as tiles to customize the
Start screen.
You also can personalize the Start screen by setting your favorite picture as the
wallpaper.
Note: Live Tiles can be added or removed by using Pin to taskbar , Pin to Start
or Unpin from Start options.
Accessing the Start screen
When you computer boots into Windows, the Start screen appears by default. To
access the start screen from any other window or app, use any of the following
methods.

12
Press the Windows button.
Swipe-in from the right edge of the display to access Charms, and then touch the
Start icon .
If you are at the Start screen, pressing the Start icon takes you to the most
recently used app or most recently viewed screen.
Note: The functionality of the Start icon is same as Windows button
.
Swipe left
1. Swipe-in from the right edge of the display to show the charms. Charms provide
access to the system commands, such as Start, Search, Share, Devices, and
Settings options.
2. From the Start screen, swiping left until you reach the end of the tile view will
bring up the Apps icon. Touch Apps icon to show an alphabetical list of all apps
installed on your tablet.
Swipe right
1. Swipe-in quickly from the left edge of the display to switch the currently running
apps.
2. Swipe-in slowly from the left edge of the display to show thumbnails of open apps.
3. Swipe-in and out on the left edge of the display to show a list of the most recently
used apps.
Swipe up/down
1. From Start screen, swipe-in from the bottom or top edge of the display to show
the Customize icon . Touch Customize to organize the tiles on your Start
screen.

13
2. Swipe-in from the top to the bottom of an app to dock or close the app.
Synchronizing Your Tablet
Using a Microsoft account
If your computer has Microsoft Windows 8 installed, you can synchronize user
settings of your tablet with your computer using a Microsoft account. When you sign in
with your Microsoft account on your tablet, your settings, including internet browser
history, app settings, and personal files etc., are synchronized with other Windows 8
PCs and tablets computers.
1. On the tablet, access Charms and click Settings → Change PC Settings →
Accounts → Your account → Connect to a Microsoft Account to switch your
computer local account to your Microsoft account.
2. Click Settings → Change PC Settings → OneDrive → Sync settings to
see the options for synchronizing your data and settings.
Copy music, photos, and videos
1. Connect your tablet to a USB storage device with a Micro-USB to standard USB
conversion cable, then transfer files to or from the USB storage device.
2. After transferring files, use the Safely Remove Hardware wizard to remove the
USB storage device.
Note: The Micro-USB to standard USB conversion cable is sold separately and is
not shipped with the tablet. See the picture below for reference.
Maintenance
Cleaning Your Tablet
Caution:
Before you clean your tablet, disconnect all the cables and turn off the tablet. Clean
your tablet with a soft cloth dampened with water. Do not use liquid or aerosol
cleaners, which may contain flammable substances.
1. Turn off your tablet. For more information on turning off your tablet,
2. Disconnect any attached devices, headphones, and speakers from the tablet and
from their electrical outlets.
3. Moisten a soft, lint-free cloth with either water or a display cleaner, and wipe the
surface of the tablet until it is clean. Do not allow water from the cloth to seep
down to the tablet ports or buttons.

14
Caution:
1. To avoid damaging the tablet or display, do not spray cleaning solution directly
onto the display. Only use products specifically designed for cleaning displays
and follow the instructions included with the product.
2. Do not clean the keyboard with a moist cloth.
Refreshing your tablet
Refreshing your tablet will restore Windows to original factory settings without deleting
any of your personal files, installed apps from Windows Store, or personalization
settings.
To restore your tablet:
1. Swipe-in from the right edge of the display to access Charms.
2. Touch Settings → Change PC settings→ Update and recovery→
Recovery.
3. Touch Get started under Refresh your PC without affecting your files.
4. Read the warning and touch Next after you read the warning.
Note:
Apps installed from the Windows Store are automatically reinstalled after the refresh
is complete. Apps installed from sources other than the Windows Store are removed
and have to be manually installed. A list of apps removed during this process is
created on the desktop after the process is complete.
Resetting your tablet
Resetting your tablet will return the system to original factory settings.
1. Swipe-in from the right edge of the display to access Charms.
2. Touch Settings → Change PC settings→ Update and recovery→
Recovery.
3. Touch Get started under Remove everything and reinstall Windows.
4. Read the warning and touch Next after you read the warning.
In shutdown status, user can press and hold Power & Vol- keys at the same time to
boot the device and enter Recovery mode, for the purpose of repairing or resetting
the system.
Caution:
Resetting your tablet erases all data from your tablet, including your account

15
configuration, apps, music, pictures, files, and so on. Make sure that you back up all
the required data before you proceed.
Major Specifications
Item
Descriptions
CPU
Intel BayTrail-T CR, Quad core/1.8GHz (Z3735F)
Operation system Windows 8.1 with Bing
DDR
2GB
Internal Memory EMMC: 32 GB
Expandable Memory
Micro SD card: up to 64 GB
Interfaces
USB 2.0 high speed /Micro SD (compatible SDHC, up to 64GB) card
3.5mm Earphone
Connection Agreement WiFi (802.11 b/g/n); BT4.0
Front Webcam
Front camera, 2.0 Mega Pixels; rear camera, 2.0 Mega Pixels
Bluetooth Support
Display
Resolution,1280*800 Pixels, 10.1 inch LCD IPS
Power Supply
Rechargeable lithium battery, 7000mAh;
AC Adapter: DC-Out 5V/2.5 A
Storage Temp.
-20℃ ~ +65℃
Ambient Temp.
0℃ ~ +40℃
Operation RH
20% ~ 90% (40℃)
Storage RH
20% ~ 93% (40℃)
FCC Statement
IC Caution.
RSS-Gen Issue 3 December 2010"&"CNR-Gen 3e éditionDécembre 2010:
- English:
This device complies with Industry Canada licence-exempt RSS standard(s).
Operation is subject to the following two conditions: (1) This device may not cause
interference, and (2) This device must accept any interference, including interference
that may cause undesired operation of the device.
- French:
Le présentappareilestconforme aux CNR d'Industrie Canada applicables aux
appareils radio exempts de licence. L'exploitationestautorisée aux deux conditions
suivantes:
(1) l'appareil ne doit pas produire de brouillage, et
(2) l'utilisateur de l'appareildoit accepter tout brouillageradioélectriquesubi, mêmesi le
brouillageest susceptible d'encompromettre le fonctionnement.
FCC Caution.
This device complies with part 15 of the FCC Rules. Operation is subject to the
following two conditions: (1) This device may not cause harmful interference, and (2)
this device must accept any interference received, including interference that may

16
cause undesired operation.
Any Changes or modifications not expressly approved by the party responsible for
compliance could void the user's authority to operate the equipment.
Note: This equipment has been tested and found to comply with the limits for a Class
B digital device, pursuant to part 15 of the FCC Rules. These limits are designed to
provide reasonable protection against harmful interference in a residential installation.
This equipment generates uses and can radiate radio frequency energy and, if not
installed and used in accordance with the instructions, may cause harmful
interference to radio communications. However, there is no guarantee that
interference will not occur in a particular installation. If this equipment does cause
harmful interference to radio or television reception, which can be determined by
turning the equipment off and on, the user is encouraged to try to correct the
interference by one or more of the following measures:
-Reorient or relocate the receiving antenna.
-Increase the separation between theequipment and receiver.
-Connect the equipment into an outlet on a circuit different from that to which the
receiver is connected.
-Consult the dealer or an experienced radio/TV technician for help.
The device has been evaluated to meet general RF exposure requirement. The devic
e can be used in portable exposure condition without restriction.
This manual was correct and complete at the time of printing. However, new
specifications and updates can occur at any time without prior notice. No part of this
manual may be copied, republished, reproduced, transmitted or distributed in any way
without prior written consent of E Fun. Any unauthorized distribution of this manual is
expressly forbidden.
E Fun may find it necessary to modify, amend or otherwise change or update this
manual. We reserve the right to do this at any time, without any prior notice. All
specifications and features are subject to change without notice. All screen shots
shown are simulated and may not represent the actual screen on production units
sold to consumers.
For instruction manuals, updated drivers or other information, be sure to visit our
website at:
www.nextbookusa.com
Or write to us at:
E Fun
West Covina, CA 91791
USA
Copyright © 2015

1
Mesures de sécurité
Ne pas soumettre l'appareil à des impacts sévères et ne pas le laisser tomber.
Ne pas utiliser l’appareil dans des conditions de chaleur ou de froid extrêmes,
un environnement poussiéreux ou par temps humide. Ne pas exposer à la
lumière directe du soleil.
Éviter d’utiliser l’appareil à proximité de champs magnétiques puissants.
Le fonctionnement normal du produit peut être perturbé par les DES.Si c’est le
cas, réinitialisez et redémarrez simplement l’appareil en suivant les instructions
du manuel d’utilisation. Lors de la transmission de fichiers, veuillez manipuler
l'appareil avec soin et l'utiliser dans un environnement sans parasites
atmosphériques.
Conserver l'appareil à l’écart de l’eau et d’autres liquides. Si de l’eau ou
d’autres liquides venaient à s’infiltrer dans l’appareil, mettre immédiatement le
produit hors tension et le nettoyer.
Ne pas utiliser de produits chimiques pour nettoyer l’appareil afin d’éviter la
corrosion. Nettoyez à l'aide d'un chiffon sec.
Ne pas laisser l’appareil dans un espace confiné comme une bibliothèque ou un
endroit semblable. La ventilation ne doit pas être obstruée en couvrant les
orifices de ventilation avec des articles tels que des journaux, des nappes, des
rideaux, etc.
Aucune flamme nue, comme une chandelle allumée, ne doit être placée sur
l’appareil.
Une attention particulière devra être portée aux aspects environnementaux de
l’élimination de la pile.
N'utilisez cet appareil que dans des climats tempérés.
Nous ne sommes pas tenus responsables des dommages ou des pertes de
données causés par la défaillance, le mauvais usage ou la modification de
l’appareil ou le remplacement de la batterie.
Ne pas tenter de démonter, de réparer ou de modifier le produit. Cela aura pour
effet d’annuler la garantie.
Si l’appareil n’est pas utilisé pendant une période de temps prolongée, veuillez
charger la batterie au moins une fois par mois pour prolonger la vie utile de la
batterie.
Chargez la batterie si :
a) L’icône de l’indicateur de charge de la batterie affiche (une batterie à plat)
b) L’appareil se met automatiquement hors tension lorsqu’il est redémarré.
c) Si le fait d’appuyer sur les touches alors qu’elles sont déverrouillées ne donne
aucun résultat et que la batterie est complètement chargée.
Lorsque l'appareil est en cours de formatage ou que le transfert de fichiers est
en cours, ne pas interrompre la connexion. Sinon, les données pourront être
corrompues ou perdues.
Lorsque l’appareil est utilisé comme un HD portable, veuillez l'utiliser
uniquement conformément aux instructions. Dans le cas contraire, une perte
permanente des données pourrait s’ensuivre.
Veuillez utiliser et installer les données en utilisant l'équipement / les
accessoires fournis et uniquement conformément aux directives du fabricant.
Veuillez vous référer aux informations se trouvant sous l'appareil pour trouver
les instructions concernant les connexions électriques et la sécurité avant
d'installer les données ou d'utiliser l'appareil.
Afin de réduire les risques d’incendie ou de chocs électriques, ne pas exposer

2
cet appareil à la pluie ou à l’humidité. Cet appareil ne doit pas être exposé aux
écoulements ou aux éclaboussures. Ne jamais placer des objets remplis de
liquides, comme des vases, sur l’appareil.
Il existe un risque d’explosion si la batterie est incorrectement remplacée.
Remplacer uniquement avec la même batterie ou une batterie du même type.
La batterie (batterie ou batteries ou bloc de piles) ne doit pas être exposée à la
chaleur excessive comme la lumière du soleil, aux flammes ou à toute source
de chaleur similaire.
Veuillez adopter des procédures responsables pour l’élimination de la batterie.
Si l’adaptateur d’alimentation est débranché de l’appareil, l’appareil demeurera
opérationnel tant que la charge de la batterie sera suffisante.
L’adaptateur d’alimentation est un appareil de CLASSE II à double isolation et
aucune mise à la terre n’est nécessaire.
Explication des symboles de sécurité :
- Le symbole de l’éclair avec la pointe de flèche à l’intérieur d’un triangle
équilatéral a pour but d’alerter l’utilisateur de la présence d'une « tension
dangereuse », non isolée, à l’intérieur du boîtier du produit et dont la
magnitude est suffisante pour constituer un risque de choc électrique.
- Afin de réduire le risque de choc électrique, ne pas enlever le couvercle
(ou l’arrière) du fait de l’absence de pièces réparables par l’utilisateur à
l’intérieur. Confier l’entretien à un technicien qualifié.
- Le point d’exclamation dans un triangle équilatéral a pour but d’avertir
l’utilisateur de la présence d’instructions importantes sur le fonctionnement
et l'entretien dans la documentation accompagnant l'appareil.
- Élimination appropriée de ce produit. Cette inscription indique que ce
produit ne doit pas être éliminé avec les autres déchets domestiques dans
l’UE. Afin d’éviter toute atteinte possible à l’environnement ou à la santé
humaine provenant de l’élimination non contrôlée des déchets, recyclez
l’appareil de manière responsable afin de promouvoir la réutilisation
rationnelle des ressources matérielles. Pour éliminer votre appareil usagé,
veuillez utiliser les systèmes de retour et de recyclage, disponibles dans
votre région ou contacter le détaillant chez qui vous avez acheté le produit.
Il pourra reprendre ce produit pour le recycler de façon sûre et
respectueuse de l’environnement.
Cet équipement devra être installé et utilisé à une distance minimum de 20 cm
entre le radiateur et votre corps.
CE dans quels pays ou le produit peut être librement utilisé : Allemagne,
Royaume Uni Italie, Espagne, Belgique, Pays-Bas, Grèce, Irlande, Danemark,
Luxembourg, Autriche, Finlande, Suède, Norvège and Islande. En France, mis
a part les canaux de 10 a 13, la loi interdit l’utilisation d’autre canaux.

3
Mesures de précaution à adopter lors de l’écoute
Ce produit est conforme aux normes actuelles limitant à un niveau sécuritaire le
volume d’émission audio d’appareils destinés à la consommation. En vous
servant d’écouteurs ou d’oreillettes pour écouter votre appareil, vous courez le
risque d’endommager votre ouïe. Même si vous devenez habitué à écouter à un
volume élevé et que ceci vous parait normal, vous courez quand même le
risque d’endommager votre ouïe. Réduisez le volume de votre appareil à un
niveau raisonnable afin d’éviter des dommages permanents à l’ouïe. Si vous
entendez un grondement dans vos oreilles, réduisez le volume ou fermez votre
appareil. Cet appareil a été testé avec les écouteurs fournis. Afin de préserver
votre ouïe, nous vous suggérons de n’utiliser que les modèles d’écouteurs
suivants: ceux fournis avec votre appareil ou encore tout autre
écouteurconforme aux normes actuelles en vigueur. Les autres types
d’écouteurs peuvent produire des niveaux de son plus élevés. (L’écoute
prolongée du baladeur à pleine puissance peut endommager l’ouïe de
l’utilisateur)
Ne pas utiliser pendant la conduite d’un véhicule motorisé. Cela pourrait créer
un risque d’accident et cela est illégal dans plusieurs régions.
Vous devrez faire preuve d’une grande prudence ou cesser temporairement
l’utilisation dans des situations potentiellement dangereuses pouvant être
créées lorsque les oreilles sont obstruées.
Même si vos écouteurs ou votre casque d’écoute est (sont) de type ouvert et
conçu(s) pour vous laisser entendre les bruits extérieurs, n’augmentez pas le
volume à un point tel que vous ne puissiez plus entendre ce qui vous entoure.
Les bruits peuvent être trompeurs. Avec le temps, votre « niveau de confort »
de l’ouïe s’adapte à des volumes plus élevés. Ce qui semble « normal » peut
actuellement être bruyant et dangereux pour vos oreilles. Prémunissez-vous
contre de tels risques en réglant le volume de votre appareil à un niveau sûr,
AVANT que vos oreilles ne s’adaptent.
Pour établir un volume sûr :
a. Commencez en choisissant un réglage bas du volume.
b. Augmentez lentement le son jusqu'à ce que vous puissiez l’entendre
confortablement et clairement sans aucune distorsion. Une fois que
vous avez établi un niveau sonore confortable, gardez ce réglage.
Il se peut que ce manuel ne reflète pas le fonctionnement de votre appareil
actuel. Toutes les informations sont sujettes à changement sans préavis.
Veuillez suivre les procédures opérationnelles de votre appareil actuel.

4
Table des matières
Contenu de l'emballage ............................................................................................ 5
Caractéristiques et fonctionnalités ............................................................................ 5
Connexions de base ................................................................................................ 6
Fonctionnement de base ........................................................................................ 10
Entretien ................................................................................................................ 14
Caractéristiques principales ................................................................................... 16
Déclaration de la FCC ............................................................................................ 16
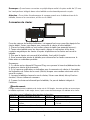
La page charge ...
La page charge ...
La page charge ...
La page charge ...
La page charge ...
La page charge ...
La page charge ...
La page charge ...
La page charge ...
La page charge ...
La page charge ...
La page charge ...
La page charge ...
-
 1
1
-
 2
2
-
 3
3
-
 4
4
-
 5
5
-
 6
6
-
 7
7
-
 8
8
-
 9
9
-
 10
10
-
 11
11
-
 12
12
-
 13
13
-
 14
14
-
 15
15
-
 16
16
-
 17
17
-
 18
18
-
 19
19
-
 20
20
-
 21
21
-
 22
22
-
 23
23
-
 24
24
-
 25
25
-
 26
26
-
 27
27
-
 28
28
-
 29
29
-
 30
30
-
 31
31
-
 32
32
-
 33
33


Nextbook Flexx 10 NXW101QC232 Mode d'emploi
- Catégorie
- Comprimés
- Taper
- Mode d'emploi
- Ce manuel convient également à
dans d''autres langues
Documents connexes
-
Nextbook Flexx NXW116QC264 Manuel utilisateur
-
-
Nextbook NXW8QC132 Manuel utilisateur
-
-
-
-
 Mode Ares 10A Manuel utilisateur
-
 Mode Flexx 10 Guide de démarrage rapide
-
-


