Siemens LC95KA670/01 Manuel utilisateur
- Catégorie
- Hottes
- Taper
- Manuel utilisateur


en Safety
2
Table of contents
INFORMATION FOR USE
1 Safety...................................................................2
2 Avoiding material damage..................................4
3 Environmental protection and saving en-
ergy ......................................................................4
4 Operating modes ................................................5
5 Familiarising yourself with your appliance .......5
6 Accessories.........................................................5
7 Basic operation...................................................6
8 Cleaning and servicing.......................................6
9 Troubleshooting..................................................8
10 Disposal...............................................................9
11 Customer Service................................................9
12 INSTALLATION INSTRUCTIONS ........................9
12.4 Secure installation ............................................10
1 Safety
Observe the following safety instructions.
1.1 General information
¡Read this instruction manual carefully.
¡Keep the instruction manual and the
product information safe for future refer-
ence or for the next owner.
¡Do not connect the appliance if it has been
damaged in transit.
1.2 Intended use
This appliance is designed only to be built
into kitchen units. Read the special installation
instructions.
The appliance can only be used safely if it is
correctly installed according to the safety in-
structions. The installer is responsible for en-
suring that the appliance works perfectly at its
installation location.
Only use this appliance:
¡For extracting cooking vapour.
¡in private households and in enclosed
spaces in a domestic environment.
¡up to an altitude of max. 2000m above
sea level.
Do not use the appliance:
¡With an external timer.
1.3 Restriction on user group
This appliance may be used by children aged
8 or over and by people who have reduced
physical, sensory or mental abilities or inad-
equate experience and/or knowledge,
provided that they are supervised or have
been instructed on how to use the appliance
safely and have understood the resulting
dangers.
Do not let children play with the appliance.
Children must not perform cleaning or user
maintenance unless they are at least 15 years
old and are being supervised.
Keep children under the age of 8 years away
from the appliance and power cable.
1.4 Safe use
WARNING‒Risk of suffocation!
Children may put packaging material over
their heads or wrap themselves up in it and
suffocate.
▶Keep packaging material away from chil-
dren.
▶Do not let children play with packaging ma-
terial.
Children may breathe in or swallow small
parts, causing them to suffocate.
▶Keep small parts away from children.
▶Do not let children play with small parts.

Safety en
3
WARNING‒Risk of poisoning!
Risk of poisoning from flue gases being
drawn back in. Room-air-dependent heat-pro-
ducing appliances (e.g. gas, oil, wood or coal-
operated heaters, continuous flow heaters or
water heaters) obtain combustion air from the
room in which they are installed and dis-
charge the exhaust gases into the open
through an exhaust gas system (e.g. a chim-
ney). With the extractor hood switched on, air
is extracted from the kitchen and the adjacent
rooms. Without an adequate supply of air, the
air pressure falls below atmospheric pressure.
Toxic gases from the flue or the extraction
shaft are sucked back into the living space.
▶Always ensure adequate fresh air in the
room if the appliance is being operated in
exhaust air mode at the same time as a
room-air-dependent heat-producing appli-
ance is being operated.
▶It is only possible to safely operate the ap-
pliance if the pressure in the room in which
the heating appliance is installed does not
drop more than 4Pa(0.04mbar) below at-
mospheric pressure. This can be achieved
whenever the air needed for combustion is
able to enter through openings that cannot
be sealed, for example in doors, windows,
incoming/exhaust air wall boxes or by
other technical means. An incoming/ex-
haust air wall box alone does not ensure
compliance with the limit.
▶In any case, consult your responsible chim-
ney sweep. They are able to assess the
house's entire ventilation setup and will
suggest the suitable ventilation measures
to you.
▶Unrestricted operation is possible if the ap-
pliance is operated exclusively in circulat-
ing-air mode.
WARNING‒Risk of fire!
Fatty deposits in the grease filters may catch
fire.
▶Never operate the appliance without a
grease filter.
▶Clean the grease filters regularly.
▶Never work with naked flames close to the
appliance (e.g. flambéing).
▶Do not install the appliance near a solid
fuel heating appliance (e.g. wood- or coal-
burning) unless the heating appliance has
a sealed, non-removable cover. There must
be no flying sparks.
Hot oil or grease ignites very quickly.
▶Always supervise hot oil and fat.
▶Never extinguish burning oil or fat with wa-
ter. Switch off the cooking zone. Extinguish
flames carefully using a lid, fire blanket or
something similar.
When gas burners are in operation without
any cookware placed on them, they can build
up a lot of heat. A ventilation appliance in-
stalled above the cooker may become dam-
aged or catch fire.
▶Only operate the gas burners with cook-
ware on them.
Operating multiple gas hobs at the same time
generates a great deal of heat. A ventilation
appliance installed above the cooker may be-
come damaged or catch fire.
▶Only operate the gas hobs with cookware
on them.
▶Select the highest fan setting.
▶Never operate two gas hobs simultan-
eously on the highest flame for longer than
15 minutes. Two gas hobs correspond to
one large burner.
▶Never operate large burners of more than
5kW with the highest flame for longer
than 15minutes, e.g. a wok.
WARNING‒Risk of burns!
The accessible parts of the appliance become
hot during operation.
▶Never touch these hot parts.
▶Keep children at a safe distance.
The appliance becomes hot during operation.
▶Allow the appliance to cool down before
cleaning.
WARNING‒Risk of injury!
Components inside the appliance may have
sharp edges.
▶Carefully clean the appliance interior.
Items placed on the appliance may fall off.
▶Do not place any objects on the appliance.

en Avoiding material damage
4
Changes to the electrical or mechanical as-
sembly are dangerous and may lead to mal-
functions.
▶Do not make any changes to the electrical
or mechanical assembly.
Risk of injury when opening and closing the
hinges.
▶Keep your hands away from the hinges.
The light emitted by LED lights is very
dazzling, and can damage the eyes (risk
group 1).
▶Do not look directly into the switched-on
LED lights for longer than 100seconds.
WARNING‒Risk of electric shock!
An ingress of moisture can cause an electric
shock.
▶Before cleaning, pull out the mains plug or
switch off the fuse in the fuse box.
▶Do not use steam- or high-pressure clean-
ers to clean the appliance.
WARNING‒Risk of explosion!
Highly caustic alkaline or highly acidic clean-
ing agents in conjunction with aluminium parts
in the interior of the appliance may cause ex-
plosions.
▶Never use highly caustic alkaline or highly
acidic cleaning agents. In particular, do not
use commercial or industrial cleaning
agents in conjunction with aluminium parts,
e.g. grease filter on extractor hoods.
WARNING‒Risk of fire!
Fatty deposits in the grease filters may catch
fire.
▶Clean the grease filters regularly.
WARNING‒Risk of injury!
Improper repairs are dangerous.
▶Repairs to the appliance should only be
carried out by trained specialist staff.
▶If the appliance is defective, call Customer
Service.
WARNING‒Risk of electric shock!
Penetrating moisture may cause an electric
shock.
▶Do not use wet sponge cloths.
Avoiding material damage
2 Avoiding material damage
ATTENTION!
Condensate may cause corrosion damage.
▶To prevent condensation from building up, switch on
the appliance during cooking.
If moisture gets into the controls, this may result in
damage.
▶Never clean controls with a wet cloth.
Incorrect cleaning damages the surfaces.
▶Follow the cleaning instructions.
▶Do not use harsh or abrasive detergents.
▶Clean stainless steel surfaces in the direction of the
finish only.
▶Never clean controls with stainless steel cleaners.
Condensation that flows back in may damage the ap-
pliance.
▶To prevent condensate from returning, fit the ex-
haust air pipe with a 1° gradient from the appliance.
If you put incorrect stress on the design elements, they
may break off.
▶Do not pull design elements.
▶Do not place objects on the design elements or
hang objects from them.
There is a risk of surface damage if you do not peel off
the protective film.
▶Remove the protective film from all parts of the ap-
pliance before using for the first time.
If one lamp is defective, this may overload the remain-
ing lamps.
▶Replace any defective lamps.
Painted surfaces are easily damaged.
▶Follow the cleaning instructions.
→"Cleaning the appliance", Page6
▶Ensure that the painted surfaces are not scratched.
Environmental protection and saving energy
3 Environmental protection and saving energy
3.1 Disposing of packaging
The packaging materials are environmentally compat-
ible and can be recycled.
▶Sort the individual components by type and dispose
of them separately.
3.2 Saving energy
If you follow these instructions, your appliance will use
less power.

Operating modes en
5
Adjust the fan speed to the amount of steam pro-
duced during cooking.
¡The lower the fan speed, the less energy is con-
sumed.
If cooking produces large amounts of steam, select a
higher fan speed in good time.
¡The odours are distributed around the room less.
Switch off the lighting if it is no longer required.
¡When the lighting is switched off, it does not con-
sume any energy.
Clean or replace the filters at regular intervals.
¡The effectiveness of the filter is retained.
Put the cooking lid on.
¡The cooking vapours and condensation are re-
duced.
Only use the additional functions if required.
¡Switching off additional functions reduces power
consumption.
Operating modes
4 Operating modes
You can use your appliance in air extraction mode or
circulating-air mode.
4.1 Air extraction mode
The air which is drawn in is cleaned by the grease fil-
ters and conveyed to the exterior by a pipe system.
The air must not be discharged into a
flue that is used for exhausting fumes
from appliances burning gas or other
fuels (not applicable to appliances that
only discharge the air back into the
room).
¡If the exhaust air is to be conveyed
into a non-functioning smoke or ex-
haust gas flue, you must obtain the
consent of the heating engineer re-
sponsible.
¡If the exhaust air is conveyed
through the external wall, a tele-
scopic duct should be used.
4.2 Air recirculation
The air which is drawn in is cleaned by the grease fil-
ters and an odour filter, and conveyed back into the
room.
To bind odours in air recirculation
mode, you must install an odour filter.
The different options for operating the
appliance in air circulation mode can
be found in our catalogue. Alternatively,
ask your dealer. The required accessor-
ies are available from specialist retail-
ers, from our after-sales service or from
the online shop.
→"Accessories", Page5
Familiarising yourself with your appliance
5 Familiarising yourself with your appliance
5.1 Controls
The controls are used to configure all functions of your
appliance and to obtain information about the operat-
ing status.
Switches on fan setting1.
Switches fan setting 2 on.
Switches on fan setting3.
Switch the lighting on or off.
Accessories
6 Accessories
You can buy accessories from the after-sales service,
from specialist retailers or online. Only use original ac-
cessories, as these have been specifically designed for
your appliance.
Accessories vary from one appliance to another. When
purchasing accessories, always quote the exact
product number (E no.) of your appliance. →Page9
You can find out which accessories are available for
your appliance in our catalogue, in the online shop or
from our after-sales service.
siemens-home.bsh-group.com

en Basic operation
6
Accessories Order number
Standard odor filter LA10LKA6
Basic operation
7 Basic operation
7.1 Switching on the appliance
▶Press .
aThe appliance starts at fan setting 1.
7.2 Setting a fan setting
▶Press or to set the corresponding fan level.
7.3 Switching off the appliance
▶Press the button for the selected fan level again.
7.4 Switching on the fan run-on
During the fan run-on, the appliance continues to run
for a short time and then switches off automatically.
▶Press and hold , or .
aThe appliance switches off automatically after ap-
prox. 15minutes.
7.5 Switching off the fan run-on
▶Press , or .
aThe fan run-on ends before the remaining run-on
time has elapsed.
aThe ventilation system continues at the selected fan
setting and does not switch off automatically.
7.6 Switching on the lighting
The lighting can be switched on and off independently
of the ventilation system.
▶Press .
7.7 Switching off the lighting
▶Press .
Cleaning and servicing
8 Cleaning and servicing
To keep your appliance working efficiently for a long
time, it is important to clean and maintain it carefully.
8.1 Cleaning products
You can obtain suitable cleaning products from after-
sales service or the online shop.
ATTENTION!
Unsuitable cleaning products may damage the sur-
faces of the appliance.
▶Do not use harsh or abrasive detergents.
▶Do not use cleaning products with a high alcohol
content.
▶Do not use hard scouring pads or cleaning
sponges.
▶Only use glass cleaners, glass scrapers or stainless
steel care products if recommended in the cleaning
instructions for the relevant part.
▶Wash sponge cloths thoroughly before use.
8.2 Cleaning the appliance
Clean the appliance as specified. This will ensure that
the different parts and surfaces of the appliance are
not damaged by incorrect cleaning or unsuitable clean-
ing products.
WARNING‒Risk of explosion!
Highly caustic alkaline or highly acidic cleaning agents
in conjunction with aluminium parts in the interior of the
appliance may cause explosions.
▶Never use highly caustic alkaline or highly acidic
cleaning agents. In particular, do not use commer-
cial or industrial cleaning agents in conjunction with
aluminium parts, e.g. grease filter on extractor
hoods.
WARNING‒Risk of electric shock!
An ingress of moisture can cause an electric shock.
▶Before cleaning, pull out the mains plug or switch
off the fuse in the fuse box.
▶Do not use steam- or high-pressure cleaners to
clean the appliance.
WARNING‒Risk of burns!
The appliance becomes hot during operation.
▶Allow the appliance to cool down before cleaning.
WARNING‒Risk of injury!
Components inside the appliance may have sharp
edges.
▶Carefully clean the appliance interior.
1. Observe the information regarding the cleaning
agents.
2. Clean as follows, depending on the surface:
‒Clean stainless steel surfaces in the direction of
the finish using a sponge cloth and hot soapy
water.
‒Clean painted surfaces using a damp sponge
cloth and hot soapy water.

Cleaning and servicing en
7
‒Clean aluminium using a soft cloth and glass
cleaner.
‒Clean plastic using a soft cloth and glass
cleaner.
‒Clean glass using a soft cloth and glass cleaner.
3. Dry with a soft cloth.
4. Apply a thin layer of the stainless steel cleaning
product to stainless steel surfaces using a soft
cloth.
You can obtain stainless steel cleaning products
from the after-sales service or the online shop.
8.3 Cleaning controls
WARNING‒Risk of electric shock!
Penetrating moisture may cause an electric shock.
▶Do not use wet sponge cloths.
1. Observe the information regarding the cleaning
agents.
2. Clean using a damp sponge cloth and hot soapy
water.
3. Dry with a soft cloth.
8.4 Removing the grease filter
1. ATTENTION!
Falling grease filters may damage the hob below.
▶Grip below the grease filter with one hand.
Open the locks on the grease filters.
2. Remove the grease filters from the holders.
To prevent grease from dripping, hold the grease fil-
ter horizontally.
8.5 Cleaning grease filters manually
The grease filters filter the grease from the cooking va-
pour. Regularly cleaned grease filters guarantee a high
level of grease removal. We recommend cleaning the
grease filters every two months.
WARNING‒Risk of fire!
Fatty deposits in the grease filters may catch fire.
▶Clean the grease filters regularly.
Requirement:The grease filters have been removed.
→"Removing the grease filter", Page7
1. Observe the information regarding the cleaning
agents.
2. Soak the grease filter in hot soapy water.
Use special grease solvent for stubborn dirt. You
can obtain grease solvents from after-sales service
or the online shop.
3. Use a brush to clean the grease filters.
4. Rinse the grease filters thoroughly.
5. Allow the grease filters to drain.
8.6 Cleaning grease filters in the
dishwasher
The grease filters filter the grease from the cooking va-
pour. Regularly cleaned grease filters guarantee a high
level of grease removal. We recommend cleaning the
grease filters every two months.
WARNING‒Risk of fire!
Fatty deposits in the grease filters may catch fire.
▶Clean the grease filters regularly.
ATTENTION!
The grease filters may become damaged if they are
squeezed.
▶Do not squeeze the grease filters.
Note:When cleaning the grease filter in the dish-
washer, light discolouration may occur. This discoloura-
tion has no effect on the performance of the metal
grease filters.
Requirement:The grease filters have been removed.
→"Removing the grease filter", Page7
1. Observe the information regarding the cleaning
agents.
2. Place the grease filters loosely into the dishwasher.
Do not clean heavily soiled grease filters with
utensils.
Use special grease solvent for stubborn dirt. You
can obtain grease solvents from after-sales service
or the online shop.
3. Start the dishwasher.
Select a temperature of no more than 70°C.
4. Allow the grease filters to drain.
8.7 Fitting grease filters
ATTENTION!
Falling grease filters may damage the hob below.
▶Grip below the grease filter with one hand.
1. Fit the grease filters.
2. Fold the grease filters upwards and engage the
locks.
3. Make sure that the locks engage.
8.8 Odour filter for recirculating air mode
Odour filters bind odorous substances in air recircula-
tion mode. Regularly replaced odour filters guarantee a
high level of odour removal.
With normal use (approx.onehour a day), the odour fil-
ter must be replaced every 3-5 months. The odour fil-
ter cannot be cleaned or regenerated.
You can obtain odour filters from the after-sales service
or the online shop. Only use original odour filters.
→"Accessories", Page5
Removing odour filter
Requirement:The grease filters have been removed.
→"Removing the grease filter", Page7

en Troubleshooting
8
▶Rotate the old odour filters and remove them
from the holder .
1
1
2
2
Fitting odour filters
1. Push the new odour filters onto the holder and ro-
tate .
1
2
2
1
2. Install the grease filters.
→"Fitting grease filters", Page7
Troubleshooting
9 Troubleshooting
You can rectify minor faults on your appliance yourself.
Read the troubleshooting information before contacting
after-sales service. This will avoid unnecessary costs.
WARNING‒Risk of injury!
Improper repairs are dangerous.
▶Repairs to the appliance should only be carried out
by trained specialist staff.
▶If the appliance is defective, call Customer Service.
9.1 Malfunctions
Fault Cause and troubleshooting
The appliance is not
working. The mains plug of the power cord is not plugged in.
▶Connect the appliance to the power supply.
The circuit breaker is faulty.
▶Check the circuit breaker in the fuse box.
There has been a power cut.
▶Check whether the lighting in your room or other appliances are working.
The LED lighting
does not work. The LED lamp is defective.
▶→"Replacing the LED lights", Page8
9.2 Replacing the LED lights
WARNING‒Risk of electric shock!
When changing the bulb, the bulb socket contacts are
live.
▶Before replacing the bulb, unplug the appliance
from the mains or switch off the circuit breaker in
the fuse box.
WARNING‒Risk of injury!
The light emitted by LED lights is very dazzling, and
can damage the eyes (risk group 1).
▶Do not look directly into the switched-on LED lights
for longer than 100seconds.
Note:
Only use bulbs of the same type and wattage.
1. Disconnect the appliance from the power supply.
2. Remove the grease filters.
→"Removing the grease filter", Page7

Disposal en
9
3. Push the lamp out of the appliance from the rear. 4. Turn the lamp a quarter turn anti-clockwise and re-
move it.
5. Replace the lamp with one of the same type.
6. Install the grease filters.
7. Insert the mains plug and switch on the fuse again.
Disposal
10 Disposal
10.1 Disposing of old appliance
Valuable raw materials can be reused by recycling.
▶Dispose of the appliance in an environmentally
friendly manner.
Information about current disposal methods are
available from your specialist dealer or local author-
ity.
This appliance is labelled in accord-
ance with European Directive
2012/19/EU concerning used elec-
trical and electronic appliances
(waste electrical and electronic equip-
ment - WEEE).
The guideline determines the frame-
work for the return and recycling of
used appliances as applicable
throughout the EU.
Customer Service
11 Customer Service
Detailed information on the warranty period and terms
of warranty in your country is available from our after-
sales service, your retailer or on our website.
If you contact Customer Service, you will require the
product number (E-Nr.) and the production number
(FD) of your appliance.
The contact details for Customer Service can be found
in the enclosed Customer Service directory or on our
website.
11.1 Product number (E-Nr.) and production
number (FD)
You can find the product number (E-Nr.) and the pro-
duction number (FD) on the appliance's rating plate.
Depending on the model, the rating plate can be found:
¡Inside the appliance (remove grease filters for ac-
cess).
¡On top of the appliance.
Make a note of your appliance's details and the Cus-
tomer Service telephone number to find them again
quickly.
Installation instructions
12 Installation instructions
Observe this information when installing the appliance.

en Installation instructions
10
12.1 Scope of delivery
After unpacking all parts, check for any damage in
transit and completeness of the delivery.
12.2 Appliance dimensions
You will find the dimensions of the appliance here
12.3 Safety clearances
Comply with the safety clearances for the appliance.
12.4 Secure installation
Follow these safety instructions when in-
stalling the appliance.
WARNING‒Risk of poisoning!
Risk of poisoning from flue gases being
drawn back in. Room-air-dependent heat-pro-
ducing appliances (e.g. gas, oil, wood or coal-
operated heaters, continuous flow heaters or
water heaters) obtain combustion air from the
room in which they are installed and dis-
charge the exhaust gases into the open
through an exhaust gas system (e.g. a chim-
ney). With the extractor hood switched on, air
is extracted from the kitchen and the adjacent
rooms. Without an adequate supply of air, the
air pressure falls below atmospheric pressure.
Toxic gases from the chimney or the extrac-
tion shaft are sucked back into the living
space.
▶Always ensure adequate fresh air in the
room if the appliance is being operated in
exhaust air mode at the same time as a
room-air-dependent heat-producing appli-
ance is being operated.
▶It is only possible to safely operate the ap-
pliance if the pressure in the room in which
the heating appliance is installed does not
fall below 4Pa(0.04mbar). This can be
achieved whenever the air needed for com-
bustion is able to enter through openings
that cannot be sealed, for example in

Installation instructions en
11
doors, windows, incoming/exhaust air wall
boxes or by other technical means. An in-
coming/exhaust air wall box alone is not
sufficient to ensure compliance with the
limit.
▶In any case, consult your responsible chim-
ney sweep. They are able to assess the
house's entire ventilation setup and will
suggest the suitable ventilation measures
to you.
▶Unrestricted operation is possible if the ap-
pliance is operated exclusively in circulat-
ing-air mode.
Risk of poisoning from flue gases being
drawn back in.
▶If an extractor hood with an open-flued heat
production source is installed, the power
supply for the extractor hood must be
provided with a suitable safety switch.
Risk of poisoning from flue gases being
drawn back in.
▶Do not emit the exhaust air into a smoke or
exhaust gas flue that is in operation.
▶Do not emit the exhaust air into a shaft that
is used to ventilate installation rooms for
heat-producing appliances.
▶If the exhaust air is to be conveyed into a
smoke or exhaust gas flue, you must obtain
the consent of the heating engineer re-
sponsible.
WARNING‒Risk of suffocation!
Children may put packaging material over
their heads or wrap themselves up in it and
suffocate.
▶Keep packaging material away from chil-
dren.
▶Do not let children play with packaging ma-
terial.
WARNING‒Risk of fire!
The grease deposits in the grease filter may
catch fire.
▶Never work with naked flames close to the
appliance (e.g. flambéing).
▶Do not install the appliance near a heat-
producing appliance for solid fuel (e.g.
wood or coal) unless a closed, non-remov-
able cover is present. There must be no fly-
ing sparks.
▶The specified safety clearances must be
complied with in order to prevent a build-up
of heat.
▶Observe the specifications for your cooking
appliances. If the installation instructions for
the cooking appliances specify a different
clearance, the larger of the two must al-
ways be provided for. If gas hobs and elec-
tric hobs are operated together, the largest
specified clearance applies.
▶The appliance must be installed with no
more than one side directly next to a tall
unit, an upper cabinet or a wall. The dis-
tance between the appliance and the tall
cabinet, an upper cabinet or the wall must
be at least 50mm.
WARNING‒Risk of injury!
Components inside the appliance may have
sharp edges.
▶Wear protective gloves.
The appliance may fall down if it has not been
properly fastened in place.
▶All fastening components must be fixed
firmly and securely in place.
Risk of injury from glass splinters.
▶Protect the filter cover against impact.
▶Do not drop the filter cover.
▶Wear protective goggles during installation.
The appliance is heavy.
▶To move the appliance, twopeople are re-
quired.
▶Use only suitable tools and equipment.
The appliance is heavy.
▶The appliance must not be fitted directly
onto plasterboard or similar lightweight ma-
terials.
▶To ensure correct installation, you must use
a material which is sufficiently stable and
suitable for both the structural conditions
and the weight of the appliance.
Changes to the electrical or mechanical as-
sembly are dangerous and may lead to mal-
functions.
▶Do not make any changes to the electrical
or mechanical assembly.
Risk of injury when opening and closing the
hinges.
▶Keep your hands away from the hinges.
WARNING‒Risk of electric shock!
Sharp-edged components inside the appli-
ance may damage the connecting cable.
▶Do not kink or trap the connecting cable.

en Installation instructions
12
Incorrect installation is dangerous.
▶Connect and operate the appliance only in
accordance with the specifications on the
rating plate.
▶Connect the appliance to a power supply
with alternating current only via a properly
installed socket with earthing.
▶The protective conductor system of the do-
mestic electrical installation must be prop-
erly installed.
▶Never equip the appliance with an external
switching device, e.g. a timer or remote
control.
▶When the appliance is installed, the mains
plug of the power cord must be freely ac-
cessible. If free access is not possible, an
all-pole isolating switch must be installed in
the permanent electrical installation accord-
ing to the conditions of Overvoltage Cat-
egory III and according to the installation
regulations.
▶When installing the appliance, check that
the power cable is not trapped or dam-
aged.
12.5 General information
Follow these general instructions during the installation.
¡For the installation, observe the currently valid build-
ing regulations and the regulations of the local elec-
tricity and gas suppliers.
¡When discharging the exhaust air, the official and
legal regulations, such as the regional building
code., must be observed.
¡In order to freely access the appliance for servicing,
select an easy-to-reach installation site.
¡The surfaces of the appliance are sensitive. Avoid
damaging them during installation.
12.6 Instructions for the electrical
connection
In order to safely connect the appliance to the elec-
trical system, follow these instructions.
WARNING‒Risk of electric shock!
It must always be possible to disconnect the appliance
from the electricity supply. The appliance must only be
connected to a protective contact socket that has been
correctly installed.
▶The mains plug for the mains power cable must be
easily accessible after the appliance is installed.
▶If this is not possible, an all-pole isolating switch
must be integrated into the permanent electrical in-
stallation according to the conditions of overvoltage
category III and according to the installation regula-
tions.
▶The permanent electrical installation must only be
wired by a professional electrician. We recommend
installing a residual-current circuit breaker (RCCB)
in the appliance's power supply circuit.
Sharp-edged components inside the appliance may
damage the connecting cable.
▶Do not kink or trap the connecting cable.
¡The connection data can be found on the rating
plate. →Page9
¡The connecting cable is approx.1.30m long.
¡This appliance complies with the EC interference
suppression regulations.
¡The appliance corresponds to protection class 1.
You should therefore only use the appliance with a
protective earth connection.
¡Do not connect the appliance to the power supply
during installation.
¡Ensure that the protection against contact is guaran-
teed during installation.
12.7 Information on the installation situation
¡Install this appliance on the kitchen wall.
¡To install additional special accessory parts, ob-
serve the enclosed installation instructions.
¡The appliance must be installed with no more than
one side directly next to a tall unit, an upper cabinet
or a wall. The distance between the appliance and
the tall cabinet, upper cabinet or the wall must be at
least 50mm.
¡The width of the extractor hood must correspond at
least with the width of the hob.
¡To optimally detect the cooking vapours, install the
appliance in the middle of the hob.
12.8 Instructions for the exhaust air pipe
The appliance manufacturer does not provide any war-
ranty for faults attributable to the pipeline.
¡Use a short, straight exhaust air pipe with as large a
pipe diameter as possible.
¡Long, rough exhaust air pipes, many pipe bends or
small pipe diameters reduce the suction power and
increase the fan noise.
¡Use an exhaust air pipe that is made of non-com-
bustible material.
¡To prevent condensate from returning, fit the ex-
haust pipe with a 1° gradient from the appliance.
Flat ducts
Use flat ducts with an inner cross-section that corres-
ponds to the diameter of the round pipes:
¡Diameter of 150mm corresponds to ap-
prox.177cm².
¡Diameter of 120mm corresponds to ap-
prox.113cm².
¡Use sealing strips for different pipe diameters.
¡Do not use any flat ducts with sharp bends.
Round pipes
Use round pipes with an inner diameter of 150mm (re-
commended) or at least 120mm.
12.9 Instructions for the air extraction mode
For air extraction mode, a one-way flap should be in-
stalled.
Notes
¡If a one-way flap is not included with the appliance,
one can be ordered from a specialist retailer.

Installation instructions en
13
¡If the exhaust air is conveyed through the external
wall, a telescopic duct should be used.
12.10 Information about circulating-air
mode
The appliance must only be operated when it is se-
curely installed and the pipework is connected.
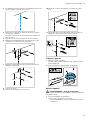
12.11 Installation
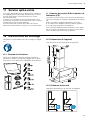
Checking the wall
1. Check whether the wall is vertical and has sufficient
load-bearing capacity.
The maximum weight of the appliance is 16kg.
2. Drill the hole depth in accordance with the length of
the screws.
The wall plugs must have a secure grip.
The enclosed screws and wall plugs are suitable for
use with solid brickwork. Suitable fasteners must be
used for other structures (e.g. plasterboard, aerated
concrete, Poroton blocks).
Note:When drilling holes, always check the wall's sta-
bility before the unit is attached to the wall. If the wall is
not sufficient stability, the appliance cannot be moun-
ted.
Preparing the wall
1. Ensure that there are no electrical wires, gas pipes
or water pipes in the area where holes are to be
drilled.
2. Cover the hob to prevent damage.
3. Mark a vertical centre line on the wall from the ceil-
ing to the lower edge of the appliance.
4. Centre the angle brackets using the centre line.
The centre of the angle brackets is marked with a
notch.
5. Align the angle brackets horizontally.
6. Mark the holes for the angle brackets in the flue.
7. Mark the holes for the appliance bracket.
370
8. Drill the holes.
9. Insert the wall plugs flush with the wall.
10. Screw on the angle bracket for the flue duct.
11. Screw in the screws for the appliance bracket
loosely; do not tighten them fully.
Preparing the appliance
1. Remove the grease filters.
To avoid causing damage, do not bend the grease
filters.
2. Secure the air pipe connector to the appliance.

en Installation instructions
14
Installing the appliance
WARNING‒Risk of injury!
Components inside the appliance may have sharp
edges.
▶Wear protective gloves.
1. Remove the protective film from the rear.
‒Once the appliance is installed, fully remove the
protective film.
2. Hook on the appliance.
3. Align the appliance horizontally using screws.
4. Fit the grease filters.
To avoid causing damage, do not bend the grease
filters.
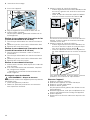
Establishing the exhaust air connection
(exhaust pipe, 150mm diameter)
1. Secure the exhaust pipe to the air pipe connector.
2. Establish the connection to the exhaust air opening.
3. Seal the joints.
Establishing the exhaust air connection
(exhaust pipe, 120mm diameter)
1. Secure the reducing connector to the air-pipe con-
nector.
2. Secure the exhaust pipe to the air pipe connector.
3. Establish the connection to the exhaust air opening.
4. Seal the joints.
Connecting to the power supply
1. Insert the mains plug into the protective contact
socket.
2. If a fixed connection is required, follow the instruc-
tions in the section
→"Instructions for the electrical connection",
Page12.
Fitting the flue duct
WARNING‒Risk of injury!
Components inside the appliance may have sharp
edges.
▶Wear protective gloves.
1. Remove the protective foil from both flue duct sec-
tions.
2. Fit the upper flue duct section.
‒Gently push the two side panels apart, and then
hook them into the angle bracket on the left and
right.
‒Screw the upper flue duct section onto the sides
of both angle brackets.
If air extraction is required, fit the flue duct section
with its slots facing downwards.
3. Install the lower flue duct section.
‒Gently push the two side panels apart, hook
them in behind the upper flue duct section and
then push them back together as far as they will
go.
‒Place the flue duct sections onto the appliance
and screw them to the sides of the angle
bracket.
To prevent scratches, lay paper over the edges of
the lower flue duct section to protect the surface.
Removing the appliance
1. Remove the flue duct.
2. Disconnect the appliance from the power supply.
3. Loosen the exhaust pipe.
4. Remove the grease filters.
To avoid causing damage, do not bend the grease
filters.
5. Loosen the screws for the appliance bracket slightly
but do not undo them fully.
6. Remove the appliance.
7. Loosen the angle bracket for the flue duct.

Sécurité fr
15
Table des matières
MANUEL D'UTILISATION
1 Sécurité..............................................................15
2 Prévenir les dégâts matériels...........................17
3 Protection de l'environnement et écono-
mies d'énergie...................................................18
4 Modes de fonctionnement................................18
5 Description de l'appareil...................................19
6 Accessoires.......................................................19
7 Utilisation ..........................................................19
8 Nettoyage et entretien ......................................19
9 Dépannage ........................................................21
10 Mise au rebut.....................................................22
11 Service après-vente ..........................................23
12 INSTRUCTIONS DE MONTAGE ........................23
12.4 Installation en toute sécurité............................24
1 Sécurité
Respectez les consignes de sécurité sui-
vantes.
1.1 Indications générales
¡Lisez attentivement cette notice.
¡Conservez la notice ainsi que les informa-
tions produit en vue d’une réutilisation ulté-
rieure ou pour un futur nouveau proprié-
taire.
¡Ne branchez pas l’appareil si ce dernier a
été endommagé durant le transport.
1.2 Utilisation conforme
Cet appareil est conçu pour être encastré uni-
quement. Respecter les instructions de mon-
tage spécifiques.
La sécurité d'utilisation est garantie unique-
ment en cas d'installation correcte et
conforme aux instructions de montage. Le
monteur est responsable du fonctionnement
correct sur le lieu où l'appareil est installé.
Utilisez l‘appareil uniquement:
¡pour aspirer les vapeurs de cuisson.
¡pour un usage privé et dans les pièces fer-
mées d’un domicile.
¡jusqu'à une altitude maximale de 2000m
au-dessus du niveau de la mer.
N’utilisez pas l’appareil:
¡avec une minuterie externe
1.3 Restrictions du périmètre utilisateurs
Les enfants de 8 ans et plus, les personnes
souffrant d’un handicap physique, sensoriel
ou mental ou ne détenant pas l’expérience et/
ou les connaissances nécessaires pourront
utiliser cet appareil à condition de le faire
sous surveillance, ou que son utilisation sûre
leur ait été enseignée et qu’ils aient compris
les dangers qui en émanent.
Les enfants ne sont pas autorisés à jouer
avec l'appareil.
Les enfants ne doivent en aucun cas s’occu-
per du nettoyage et de la maintenance utilisa-
teur, sauf s’ils sont âgés de 15ans et plus et
agissent sous surveillance.
Les enfants de moins de 8ans doivent être
tenus à distance de l’appareil et du cordon
d’alimentation secteur.
1.4 Utilisation sûre
AVERTISSEMENT‒Risque d'asphyxie!
Les enfants risquent de s’envelopper dans les
matériaux d’emballage ou de les mettre sur la
tête et de s’étouffer.
▶Conserver les matériaux d’emballage hors
de portée des enfants.
▶Ne jamais laisser les enfants jouer avec les
emballages.
Les enfants risquent d'inhaler ou d'avaler des
petits morceaux et s'étouffer.
▶Conserver les petites pièces hors de por-
tée des enfants.
▶Ne pas laisser les enfants jouer avec les
petites pièces.

fr Sécurité
16
AVERTISSEMENT‒Risque
d'empoisonnement!
Les gaz de combustion aspirés peuvent
conduire à l'empoisonnement. Les foyers à
combustion alimentés en air ambiant (par
exemple appareils de chauffage au gaz, au
fioul, au bois ou au charbon, les chauffe-eaux
intégrés sous cuve, les chauffe-eaux accumu-
lateurs) prélèvent l'air de combustion dans la
pièce où ils sont installés et rejettent les gaz
de fumée à l'extérieur par le biais d'un sys-
tème spécifique (par ex., cheminée). Lorsque
la hotte aspirante est en marche, elle prélève
de l'air dans la cuisine et dans les pièces voi-
sines. L'absence d'un apport d'air suffisant
crée une pression négative. Les gaz toxiques
provenant de la cheminée ou du conduit
d'évacuation sont réaspirés dans les pièces
d'habitation.
▶En cas d'utilisation simultanée de l'appareil
en mode évacuation extérieure et d'un
foyer à combustion alimenté en air am-
biant, veillez impérativement à ce que l'ap-
port d'air soit toujours suffisant.
▶Le fonctionnement sûr de l'appareil n'est
possible que si la dépression dans la pièce
où est installé le foyer ne dépasse pas
4Pa (0,04mbar). Cette valeur n'est réali-
sable que si l'apport d'air frais nécessaire à
la combustion est assuré par des ouver-
tures non obturables, par exemple dans
des portes ou fenêtres, associées à un
caisson mural d'entrée et de sortie d'air, ou
bien par d'autres moyens techniques. Un
caisson mural d'entrée et de sortie d'air ne
suffit pas à assurer la valeur minimale né-
cessaire.
▶Demandez toujours conseil à un maître ra-
moneur compétent qui pourra évaluer l'en-
semble du réseau de ventilation de la mai-
son et vous proposer le moyen le mieux
adapté pour l'aération.
▶Si l'appareil est utilisé exclusivement en
mode recirculation de l'air, le fonctionne-
ment est possible sans restriction.
AVERTISSEMENT‒Risque d'incendie!
Les dépôts de graisse dans les filtres à
graisse peuvent s'enflammer.
▶Ne faites jamais fonctionner l'appareil sans
filtre à graisse.
▶Nettoyez régulièrement le filtre à graisse.
▶Ne travaillez jamais avec une flamme nue à
proximité de l'appareil (par ex. ne faites
rien flamber).
▶Installez l’appareil à proximité d’un foyer à
combustibles solides (par ex. bois ou char-
bon) uniquement en présence d’un capot
fermé et non amovible. Il ne doit pas y
avoir de projection d’étincelles.
L'huile et la graisse chaudes s'enflamment ra-
pidement.
▶Surveillez constamment l'huile et la graisse
chaudes.
▶N'éteignez jamais de l'huile ou de la
graisse enflammée avec de l'eau. Éteignez
le foyer. Étouffez les flammes prudemment
avec un couvercle, une couverture ou
quelque chose de similaire.
Les foyers à gaz dégagent une forte chaleur
lorsqu'aucun récipient n'est posé dessus. Un
appareil de ventilation monté au-dessus d'eux
risque alors d'être endommagé ou de prendre
feu.
▶Utilisez les foyers à gaz uniquement avec
un récipient placé dessus.
Le fonctionnement simultané de plusieurs
foyers au gaz engendre une forte production
de chaleur. Un appareil de ventilation monté
au-dessus d'eux risque alors d'être endomma-
gé ou de prendre feu.
▶Utilisez les foyers à gaz uniquement avec
un récipient placé dessus.
▶Réglez la vitesse de ventilation la plus éle-
vée.
▶Ne faites jamais fonctionner en même
temps deux foyers à gaz à feu vif pendant
plus de 15minutes. Deux foyers à gaz cor-
respondent à un brûleur grande puissance.
▶Ne faites jamais fonctionner les grands brû-
leurs de plus de 5kW avec la plus grande
flamme pendant plus de 15minutes, par
ex. un wok.
AVERTISSEMENT‒Risque de brûlures!
Les éléments accessibles deviennent chauds
pendant le fonctionnement.
▶Ne touchez jamais les éléments chauds.
▶Éloignez les enfants.

Prévenir les dégâts matériels fr
17
L'appareil devient chaud pendant son utilisa-
tion.
▶Laissez refroidir l'appareil avant de le net-
toyer.
AVERTISSEMENT‒Risque de
blessure!
Certaines pièces à l'intérieur de l'appareil
peuvent présenter des arêtes vives.
▶Nettoyez l'intérieur de l'appareil avec pré-
caution.
Les objets déposés sur l'appareil peuvent
tomber.
▶Ne déposez aucun objet sur l’appareil.
Des modifications sur la construction élec-
trique ou mécanique sont dangereuses et
peuvent conduire à des dysfonctionnements.
▶N'effectuez aucune modification sur la
construction électrique ou mécanique.
Risque de blessure lors de l'ouverture et de la
fermeture de la charnière.
▶Ne posez jamais les doigts dans la zone
mobile de la charnière.
La lumière de l'éclairage par LED est très
éblouissante et peut causer des dommages
aux yeux (groupe de risque 1).
▶Ne regardez pas directement l'éclairage
par LED allumé pendant plus de 100se-
condes.
AVERTISSEMENT‒Risque
d'électrocution!
L’infiltration d’humidité peut occasionner un
choc électrique.
▶Avant le nettoyage, retirez la fiche secteur
ou coupez le disjoncteur.
▶Ne pas utiliser de nettoyeur vapeur ou
haute pression pour nettoyer l’appareil.
AVERTISSEMENT‒Risque d'explosion!
Les nettoyants caustiques fortement alcalins
ou acides peuvent provoquer des explosions
lorsqu'ils entrent en contact avec des pièces
d’aluminium situées dans le compartiment de
nettoyage du lave-vaisselle.
▶N'utilisez jamais de nettoyants caustiques
fortement alcalins ou acides. Notamment,
n'utilisez aucun produit de nettoyage d'ori-
gine commerciale ou industrielle pour net-
toyer des pièces en aluminium, par
exemple des filtres à graisse pour hottes
aspirantes.
AVERTISSEMENT‒Risque d'incendie!
Les dépôts de graisse dans les filtres à
graisse peuvent s'enflammer.
▶Nettoyez régulièrement le filtre à graisse.
AVERTISSEMENT‒Risque de
blessure!
Les réparations non conformes sont dange-
reuses.
▶Seul un personnel qualifié est en droit d’ef-
fectuer des réparations sur l’appareil.
▶Si l'appareil est défectueux, appeler le ser-
vice après-vente.
AVERTISSEMENT‒Risque
d'électrocution!
L'infiltration d’humidité peut occasionner un
choc électrique.
▶N'utilisez pas de tissu éponge mouillé.
Prévenir les dégâts matériels
2 Prévenir les dégâts matériels
ATTENTION!
La condensation peut provoquer de la corrosion.
▶Allumez toujours l'appareil lorsque vous cuisinez
afin d'éviter la formation de condensation.
Si de l'humidité pénètre dans les éléments de com-
mande, des dommages peuvent survenir.
▶Ne nettoyez jamais les éléments de commande
avec un chiffon humide.
Un nettoyage incorrect endommage les surfaces.
▶Respectez les consignes de nettoyage.
▶N’utilisezpasdeproduits denettoyage agressifs
ourécurants.
▶Nettoyez les surfaces en inox uniquement dans le
sens de polissage du métal.
▶Ne nettoyez jamais les éléments de commande
avec un nettoyant pour inox.
L'eau de condensation qui s'écoule à l'arrière peut en-
dommager l'appareil.
▶Pour éviter tout retour de condensat, monter le
conduit d'évacuation de l'appareil avec 1° de pente.
Si vous sollicitez les éléments de design de manière in-
correcte, ils peuvent se casser.
▶Ne tirez pas sur les éléments de design.
▶Ne posez ou ne suspendez aucun objet sur/à des
éléments de design.
Les surfaces peuvent être endommagées par un film
protecteur non retiré.
▶Retirez le film protecteur de toutes les parties de
l'appareil avant de l'utiliser pour la première fois.

fr Protection de l'environnement et économies d'énergie
18
Si une lampe est défectueuse, les autres peuvent être
surchargées.
▶Remplacez les lampes défectueuses.
Les surfaces laquées sont fragiles.
▶Respectez les consignes de nettoyage.
→"Nettoyer l'appareil", Page20
▶Protégez les surfaces laquées contre les rayures.
Protection de l'environnement et économies d'énergie
3 Protection de l'environnement et économies d'énergie
3.1 Élimination de l'emballage
Les emballages sont écologiques et recyclables.
▶Veuillez éliminer les pièces détachées après les
avoir triées par matière.
Eliminez l'emballage en respectant
l'environnement.
3.2 Économies d’énergie
Si vous respectez les instructions suivantes, votre ap-
pareil consommera moins de courant.
Adaptez la vitesse du ventilateur à l'intensité des va-
peurs de cuisson.
¡Une faible vitesse du ventilateur est synonyme
d'une faible consommation d'énergie.
En cas de vapeurs de cuisson intensives, sélection-
nez dès que possible une vitesse de ventilation plus
importante.
¡Les odeurs se répandent moins dans la pièce.
Éteignez l'éclairage quand vous n'en avez plus be-
soin.
¡Lorsque l'éclairage est éteint, il ne consomme pas
d'énergie.
Nettoyez ou remplacez les filtres aux intervalles spéci-
fiés.
¡L'efficacité du filtre est conservée.
Utilisez le couvercle de cuisson.
¡Les vapeurs de cuisson et les condensats sont ré-
duits.
N'utilisez les fonctions supplémentaires qu'en cas de
besoin.
¡La désactivation des fonctions supplémentaires
permet de réduire la consommation d'énergie.
Modes de fonctionnement
4 Modes de fonctionnement
Vous pouvez utiliser votre appareil en mode évacuation
extérieure ou en mode recirculation de l'air.
4.1 Mode évacuation extérieure
L’air aspiré est débarrassé des particules de graisse
par les filtres, et transite par un conduit avant de ga-
gner l’extérieur.
L'air ne doit pas être acheminé dans
une cheminée servant à l'évacuation
des gaz d'appareils qui sont utilisés
pour la combustion de gaz ou d'autres
combustibles (cela ne s'applique pas
aux appareils de recyclage).
¡Si l’air sortant circule par une chemi-
née ou une cheminée d'évacuation
des gaz, vous devrez d'abord obte-
nir l’accord d’un ramoneur compé-
tent.
¡Si l’air sortant traverse la paroi exté-
rieure, il convient d'utiliser un cais-
son télescopique mural.
4.2 Mode recyclage
L'air aspiré est nettoyé par l'intermédiaire des filtres à
graisse et d'un filtre anti-odeurs, puis il est renvoyé
dans la pièce.
Pour neutraliser les odeurs en mode re-
cyclage, vous devez installer un filtre
anti-odeurs. Pour connaître les diffé-
rentes possibilités d'utiliser l’appareil en
mode recyclage, consultez notre cata-
logue ou votre revendeur spécialisé.
Vous pouvez vous procurer les acces-
soires dans un commerce spécialisé,
auprès du service après-vente ou sur la
boutique en ligne.
→"Accessoires", Page19

Description de l'appareil fr
19
Description de l'appareil
5 Description de l'appareil
5.1 Éléments de commande
Les éléments de commande vous permettent de confi-
gurer toutes les fonctions de votre appareil et vous
donnent des informations sur l'état de fonctionnement.
Activer la vitesse de ventilation 1.
Activer la vitesse de ventilation 2.
Activer la vitesse de ventilation 3.
Allumer ou éteindre l'éclairage.
Accessoires
6 Accessoires
Vous pouvez acheter des accessoires auprès du ser-
vice après-vente ou sur notre site internet. Utilisez uni-
quement les accessoires d'origine, car ils sont parfaite-
ment adaptés à votre appareil.
Les accessoires sont spécifiques à l'appareil. Lors de
l'achat, indiquez toujours la désignation exacte de votre
appareil (E-Nr.). →Page23
Pour connaître les accessoires disponibles pour votre
appareil, consultez notre boutique en ligne ou le ser-
vice après-vente.
siemens-home.bsh-group.com
Accessoires Référence
Filtre à charbon actif LA10LKA6
Utilisation
7 Utilisation
7.1 Allumer l’appareil
▶Appuyer sur .
aL'appareil démarre à la vitesse de ventilation 1.
7.2 Régler la vitesse de ventilation
▶Appuyez sur la touche ou pour régler la vitesse
appropriée du ventilateur.
7.3 Éteindre l’appareil
▶Appuyer à nouveau sur la touche de la vitesse de
ventilation réglée.
7.4 Activer la poursuite du ventilateur
En mode de poursuite du ventilateur, l'appareil conti-
nue à fonctionner pendant un certain temps, puis
s'éteint automatiquement.
▶Maintenir , ou appuyé.
aL'appareil s'éteint automatiquement après env.
15minutes.
7.5 Désactiver la poursuite du ventilateur
▶Appuyer sur , ou sur .
aLa poursuite du ventilateur s'arrête avant écoule-
ment du temps de poursuite restant.
aLa ventilation continue à la vitesse réglée et ne
s'éteint pas automatiquement.
7.6 Allumer l'éclairage
Vous pouvez allumer et éteindre l’éclairage indépen-
damment de la ventilation.
▶Appuyer sur .
7.7 Éteindre l’éclairage
▶Appuyer sur .
Nettoyage et entretien
8 Nettoyage et entretien
Pour que votre appareil reste longtemps opérationnel,
nettoyez-le et entretenez-le avec soin.
8.1 Produits de nettoyage
Vous pouvez vous procurer les produits de nettoyage
appropriés auprès du service après-vente ou sur la
boutique en ligne.
ATTENTION!
Des produits nettoyants inappropriés peuvent endom-
mager les surfaces de l’appareil.
▶Ne pas utiliser de produits de nettoyage agressifs
ou récurants.
▶N’utilisez pas de nettoyants fortement alcoolisés.
▶Ne pas utiliser de tampon en paille métallique ni
d’éponge à dos récurant.

fr Nettoyage et entretien
20
▶Utilisez uniquement des nettoyants pour vitres, des
racloirs à verre ou des produits d'entretien pour
acier inox si ceux-ci sont recommandés dans les
instructions de nettoyage de la pièce correspon-
dante.
▶Rincez soigneusement les tissus et éponges avant
de les utiliser.
8.2 Nettoyer l'appareil
Nettoyez l'appareil comme indiqué, afin de ne pas en-
dommager les différentes surfaces et pièces par un
nettoyage incorrect ou par des produits de nettoyage
non appropriés.
AVERTISSEMENT‒Risque d'explosion!
Les nettoyants caustiques fortement alcalins ou acides
peuvent provoquer des explosions lorsqu'ils entrent en
contact avec des pièces d’aluminium situées dans le
compartiment de nettoyage du lave-vaisselle.
▶N'utilisez jamais de nettoyants caustiques fortement
alcalins ou acides. Notamment, n'utilisez aucun pro-
duit de nettoyage d'origine commerciale ou indus-
trielle pour nettoyer des pièces en aluminium, par
exemple des filtres à graisse pour hottes aspirantes.
AVERTISSEMENT‒Risque d'électrocution!
L’infiltration d’humidité peut occasionner un choc élec-
trique.
▶Avant le nettoyage, retirez la fiche secteur ou cou-
pez le disjoncteur.
▶Ne pas utiliser de nettoyeur vapeur ou haute pres-
sion pour nettoyer l’appareil.
AVERTISSEMENT‒Risque de brûlures!
L'appareil devient chaud pendant son utilisation.
▶Laissez refroidir l'appareil avant de le nettoyer.
AVERTISSEMENT‒Risque de blessure!
Certaines pièces à l'intérieur de l'appareil peuvent pré-
senter des arêtes vives.
▶Nettoyez l'intérieur de l'appareil avec précaution.
1. Respectez les informations sur les produits de net-
toyage.
2. Selon la surface, nettoyez comme suit:
‒Nettoyez les surfaces en acier inoxydable avec
une lavette éponge et de l'eau chaude addition-
née de produit de nettoyage dans le sens du
brossage.
‒Nettoyez les surfaces laquées avec une lavette
éponge et de l'eau chaude additionnée de pro-
duit de nettoyage.
‒Nettoyez l'aluminium avec un nettoyant pour
vitres et un chiffon doux.
‒Nettoyez le plastique avec un nettoyant pour
vitres et un chiffon doux.
‒Nettoyez le verre avec un nettoyant pour vitres et
un chiffon doux.
3. Séchez-les ensuite avec un chiffon doux.
4. Sur les surfaces en acier inoxydable, appliquez une
fine pellicule de produit pour acier inox avec un chif-
fon doux.
Vous pouvez vous procurer les produits d'entretien
pour acier inox auprès du service après-vente ou
sur la boutique en ligne.
8.3 Nettoyage des éléments de commande
AVERTISSEMENT‒Risque d'électrocution!
L'infiltration d’humidité peut occasionner un choc élec-
trique.
▶N'utilisez pas de tissu éponge mouillé.
1. Respectez les informations sur les produits de net-
toyage.
2. Nettoyez avec un tissu éponge et de l'eau chaude
additionnée de produit à vaisselle.
3. Séchez-les ensuite avec un chiffon doux.
8.4 Démontage des filtres à graisse
métallique
1. ATTENTION!
Les filtres à graisse qui tombent peuvent endomma-
ger la table de cuisson qui se trouve en-dessous.
▶Avec une main sous le filtre à graisse, intercep-
tez ce dernier.
Ouvrir les dispositifs de verrouillage des filtres à
graisse.
2. Retirez les filtres à graisse des fixations.
Pour éviter l'égouttement de graisse, tenez les filtres
à graisse à l'horizontale.
8.5 Nettoyage manuel des filtres à graisse
Les filtres à graisse filtrent la graisse issue de la va-
peur de cuisson. Des filtres à graisse régulièrement
nettoyés assurent un haut niveau d'absorption des
graisses. Nous vous recommandons de nettoyer les
filtres à graisse tous les 2mois.
AVERTISSEMENT‒Risque d'incendie!
Les dépôts de graisse dans les filtres à graisse
peuvent s'enflammer.
▶Nettoyez régulièrement le filtre à graisse.
Condition:Les filtres à graisse sont retirés.
→"Démontage des filtres à graisse métallique",
Page20
1. Respectez les informations sur les produits de net-
toyage.
2. Faites tremper les filtres à graisse dans un produit
de nettoyage chaud.
En présence de salissures tenaces, vous pouvez uti-
liser un dégraissant spécial. Vous trouverez un dé-
graissant auprès du service après-vente ou sur la
boutique en ligne.
3. Nettoyez les filtres à graisse à l'aide d'une brosse.
4. Rincez-les soigneusement.
5. Laissez s'égoutter les filtres à graisse.
La page est en cours de chargement...
La page est en cours de chargement...
La page est en cours de chargement...
La page est en cours de chargement...
La page est en cours de chargement...
La page est en cours de chargement...
La page est en cours de chargement...
La page est en cours de chargement...
La page est en cours de chargement...
La page est en cours de chargement...
La page est en cours de chargement...
La page est en cours de chargement...
-
 1
1
-
 2
2
-
 3
3
-
 4
4
-
 5
5
-
 6
6
-
 7
7
-
 8
8
-
 9
9
-
 10
10
-
 11
11
-
 12
12
-
 13
13
-
 14
14
-
 15
15
-
 16
16
-
 17
17
-
 18
18
-
 19
19
-
 20
20
-
 21
21
-
 22
22
-
 23
23
-
 24
24
-
 25
25
-
 26
26
-
 27
27
-
 28
28
-
 29
29
-
 30
30
-
 31
31
-
 32
32


Siemens LC95KA670/01 Manuel utilisateur
- Catégorie
- Hottes
- Taper
- Manuel utilisateur
dans d''autres langues
- English: Siemens LC95KA670/01 User manual
Documents connexes
Autres documents
-
Bosch DWK065G60T/05 User manual and assembly instructions
-
Bosch DWK65AD.0R Manuel utilisateur
-
-
-
-
Neff D51NAA1C0B Guide d'installation
-
CONSTRUCTA CD30976 Assembly Instructions
-
-
Bosch DWK095G20T/07 Mode d'emploi
-