Siemens EQ.500 integral (TQ507RX3) Manuel utilisateur
- Catégorie
- Cafetières
- Taper
- Manuel utilisateur


en
6
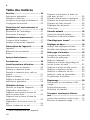
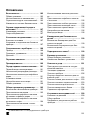
Table of contents
Safety ...............................................8
General information ...........................8
Intended use......................................8
Restriction on user group...................8
Safety information ..............................9
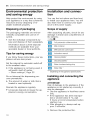
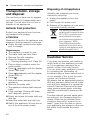
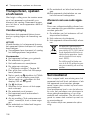
Environmental protection and
saving energy .................................12
Disposing of packaging ...................12
Tips for saving energy......................12
Installation and connection ............12
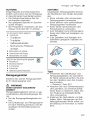
Scope of supply...............................12
Installing and connecting the ap-
pliance.............................................12
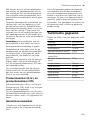
Familiarising yourself with your
appliance ........................................13
Appliance ........................................13
Controls...........................................13
Display ............................................13
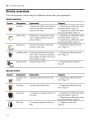
Drinks overview..............................14
Accessories....................................15
Before using for the first time.........15
Perform the initial start-up ................15
Fill the water tank.............................15
Fill coffee bean container.................15
Setting the language........................16
Setting the water hardness...............16
General information .........................16
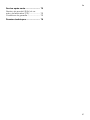
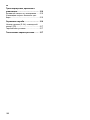
Basic operation ..............................17
Switching the appliance on and
off....................................................17
Dispensing drinks ............................17
Dispensing a coffee drink made
from fresh beans .............................18
Dispensing a coffee drink made
from ground coffee ..........................18
Dispensing drinks with milk..............18
Using the milk container ..................19
Dispensing coffee drink with milk.....19
Dispensing special drinks ................20
Dispensing milk froth .......................20
Dispensing hot water .......................20
Drink settings...................................20
Water filter .......................................22
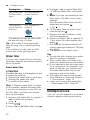
Childproof lock...............................22
Activating the childproof lock ...........23
Deactivating the childproof lock .......23
Cup heater
1
.....................................23
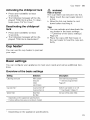
Basic settings.................................23
Overview of the basic settings .........23
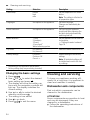
Changing the basic settings.............24
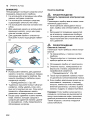
Cleaning and servicing...................24
Dishwasher-safe components ..........24
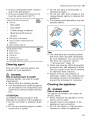
Cleaning agent ................................25
Cleaning the appliance ....................25
Cleaning the drip tray and coffee
dregs container ...............................26
Cleaning the ground coffee com-
partment ..........................................26
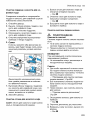
Cleaning the milk system .................26
Cleaning the milk container..............27
Cleaning brewing unit ......................28
Service programmes........................28
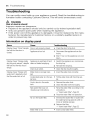
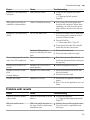
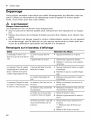
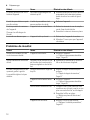
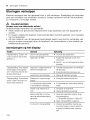
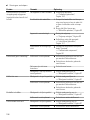
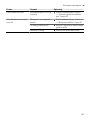
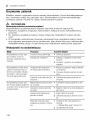
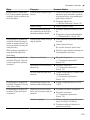
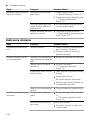
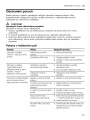
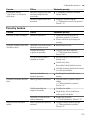
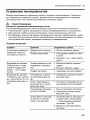
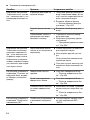
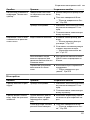
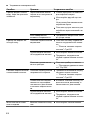
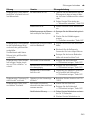
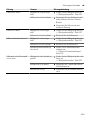
Troubleshooting .............................32
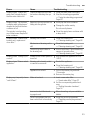
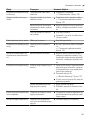
Information on display panel ............32
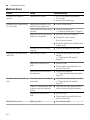
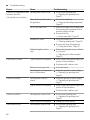
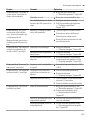
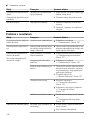
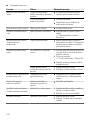
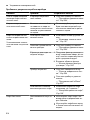
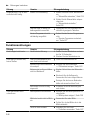
Malfunctions ....................................34
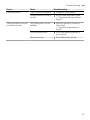
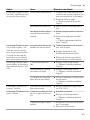
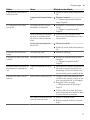
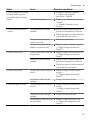
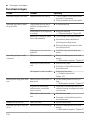
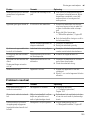
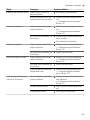
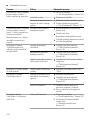
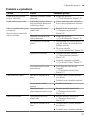
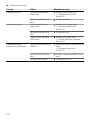
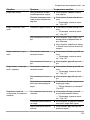
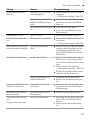
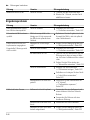
Problem with results ........................35
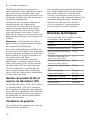
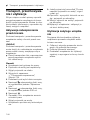
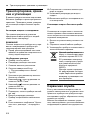
Transportation, storage and dis-
posal...............................................38
Activate frost protection ...................38
Disposing of old appliance ..............38
1
Depending on the appliance specifications


en Safety
8
Safety
Please read the safety information to ensure that you use the ap-
pliance safely.
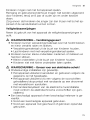
General information
You can find general information about this instruction manual
here.
¡ Read this instruction manual carefully. Only this will ensure you
use the appliance safely and efficiently.
¡ This manual is intended for the user of the appliance.
¡ Follow the safety instructions and warnings.
¡ Keep the instruction manual and the product information safe
for future reference or for the next owner.
¡ Check the appliance after unpacking it. Do not connect the ap-
pliance if it has been damaged in transit.
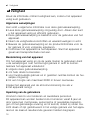
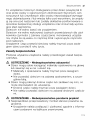
Intended use
Please read the information on intended use to ensure you use
the appliance correctly and safely.
Only use this appliance:
¡ As specified in this instruction manual.
¡ for preparing hot drinks.
¡ In private households and in enclosed spaces in a domestic en-
vironment.
¡ Up to an altitude of max. 2000m above sea level.
Disconnect the appliance from the power supply when:
¡ cleaning the appliance.
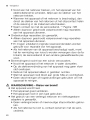
Restriction on user group
Avoid risks to children and vulnerable persons.


Familiarising yourself with your appliance en
13
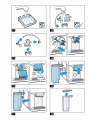
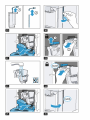
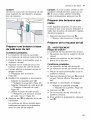
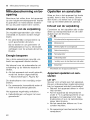
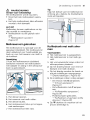
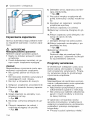
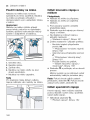
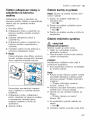
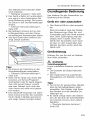
2. Place the appliance on a level, wa-
ter-resistant surface that is capable
of bearing its weight.
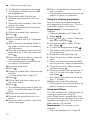
3. Using the mains plug, connect the
appliance to an earthed socket that
has been correctly installed.
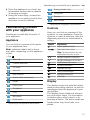
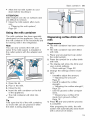
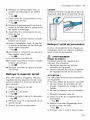
Familiarising yourself
with your appliance
Familiarise yourself with the parts of
your appliance.
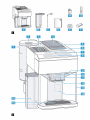
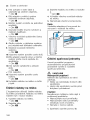
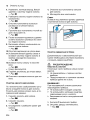
Appliance
You can find an overview of the parts
of your appliance here.
Note:Individual details and colours
may differ, depending on the appliance
model.
→Fig.
2
1
Water tank
2
Cover for water tank
3
Cup heater
1
4
Aroma lid
5
Bean container
6
Ground coffee compartment
7
Display
8
Control panel
9
Cup lighting
1
10
Cover
11
Milk system
12
Outlet system
1
Depending on the appliance specifications
13
Brewing chamber door
14
Rating plate
15
Drip tray
16
Milk container
1
Depending on the appliance specifications
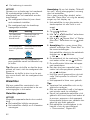
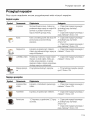
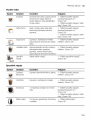
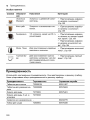
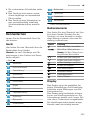
Controls
Here you can find an overview of the
symbols on your appliance. Press the
symbols to make a selection, start the
dispensing process or make/adjust a
setting.
Symbol Explanation
Switch appliance on/off
Open menu/leave menu
Note:The menu buttons are only
visible when the menu is open.
Navigate upwards in the menu
Navigate downwards in the menu
Confirm/save in the menu
Go back in the menu
Dispense two cups
Select coffee strength
Adjusting the amount
Start/stop
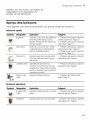
Display
The display shows the selected drinks,
settings and setting options, as well as
messages about the appliance’s oper-
ating status.
The display shows additional informa-
tion and action steps. The information
is hidden after a short period, or by
pressing a button. The action steps are
hidden when they have been com-
pleted.


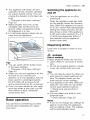
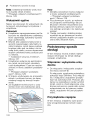
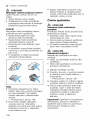
en Before using for the first time
16
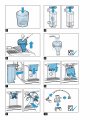
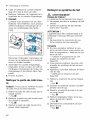
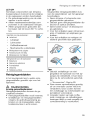
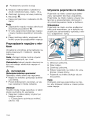
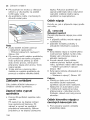
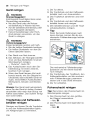
1. Open the lid.
2. Fill with the coffee beans.
The appliance will adjust to the cof-
fee beans with the next dispensing
process.
3. Close the lid.
Tip:To keep the coffee beans at their
best, store them in a sealed container
in a cool place.
You can keep the coffee beans in the
bean container for a number of days
without them losing their aroma.
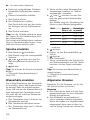
Setting the language
1. Press to switch the appliance on.
a The display will show the language
that is preset.
2. Press or until the display
shows the desired language.
3. Press .
Tip:You can change the language at
any time.
→"Overview of the basic settings",
Page23
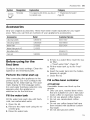
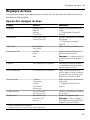
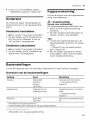
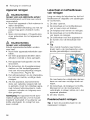
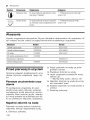
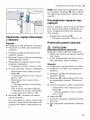
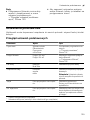
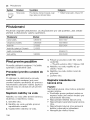
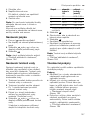
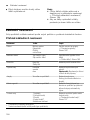
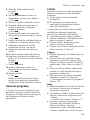
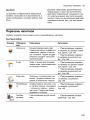
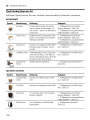
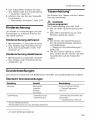
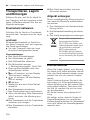
Setting the water hardness
It is important to set the water hardness
correctly, so that the appliance indic-
ates in good time that it needs descal-
ing. You can use the enclosed test strip
to determine the water hardness, or
ask your local water company.
1. Briefly dip the test strip in fresh tap
water.
2. Allow the water to drip off the test
strip.
a The test strip will indicate the water
hardness after 1minute.
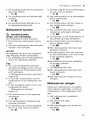
3. If a water softening system is in-
stalled in your house, select "Soften-
ing system".
4. Press or until the display
shows the desired water hardness.
The table shows the allocation of the
levels to the different degrees of wa-
ter hardness:
Level German de-
grees in °dH
Total hard-
ness in
(mmol/l)
1 1-7 0.18 - 1.25
2 8-14 1.42 - 2.49
3 15-21 2.67 - 3.74
4
1
22-30 3.92 - 5.34
1
Factory setting (may vary according to
model)
5. Press .
6. Check whether the bean container
has been filled.
7. Press .
a The appliance now rinses itself.
a When the symbols for drink selection
and the buttons light up on the oper-
ating panel, the appliance is ready
for use.
Tip:You can change the water hard-
ness at any time.
→"Overview of the basic settings",
Page23
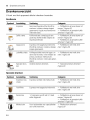
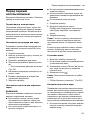
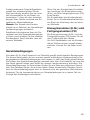
General information
Please bear this information in mind so
that you can get the best out of your
appliance.
Notes
¡ The appliance has been pro-
grammed at the factory with stand-
ard settings for optimum operation.
¡ The grinder has been factory-set for
optimum operation. If coffee is only
dispensed drop by drop or is too
thin with too little crema, you can ad-
just the grinding level when the
grinder is running.
→"Adjusting the grinding level",
Page21


La page est en cours de chargement...
La page est en cours de chargement...
La page est en cours de chargement...
La page est en cours de chargement...
La page est en cours de chargement...
La page est en cours de chargement...
La page est en cours de chargement...
La page est en cours de chargement...
La page est en cours de chargement...
La page est en cours de chargement...
La page est en cours de chargement...
La page est en cours de chargement...
La page est en cours de chargement...
La page est en cours de chargement...
La page est en cours de chargement...
La page est en cours de chargement...
La page est en cours de chargement...
La page est en cours de chargement...
La page est en cours de chargement...
La page est en cours de chargement...
La page est en cours de chargement...
La page est en cours de chargement...
La page est en cours de chargement...
La page est en cours de chargement...
La page est en cours de chargement...
La page est en cours de chargement...
La page est en cours de chargement...
La page est en cours de chargement...
La page est en cours de chargement...
La page est en cours de chargement...
La page est en cours de chargement...
La page est en cours de chargement...
La page est en cours de chargement...
La page est en cours de chargement...
La page est en cours de chargement...
La page est en cours de chargement...
La page est en cours de chargement...
La page est en cours de chargement...
La page est en cours de chargement...
La page est en cours de chargement...
La page est en cours de chargement...
La page est en cours de chargement...
La page est en cours de chargement...
La page est en cours de chargement...
La page est en cours de chargement...
La page est en cours de chargement...
La page est en cours de chargement...
La page est en cours de chargement...
La page est en cours de chargement...
La page est en cours de chargement...
La page est en cours de chargement...
La page est en cours de chargement...
La page est en cours de chargement...
La page est en cours de chargement...
La page est en cours de chargement...
La page est en cours de chargement...
La page est en cours de chargement...
La page est en cours de chargement...
La page est en cours de chargement...
La page est en cours de chargement...
La page est en cours de chargement...
La page est en cours de chargement...
La page est en cours de chargement...
La page est en cours de chargement...
La page est en cours de chargement...
La page est en cours de chargement...
La page est en cours de chargement...
La page est en cours de chargement...
La page est en cours de chargement...
La page est en cours de chargement...
La page est en cours de chargement...
La page est en cours de chargement...
La page est en cours de chargement...
La page est en cours de chargement...
La page est en cours de chargement...
La page est en cours de chargement...
La page est en cours de chargement...
La page est en cours de chargement...
La page est en cours de chargement...
La page est en cours de chargement...
La page est en cours de chargement...
La page est en cours de chargement...
La page est en cours de chargement...
La page est en cours de chargement...
La page est en cours de chargement...
La page est en cours de chargement...
La page est en cours de chargement...
La page est en cours de chargement...
La page est en cours de chargement...
La page est en cours de chargement...
La page est en cours de chargement...
La page est en cours de chargement...
La page est en cours de chargement...
La page est en cours de chargement...
La page est en cours de chargement...
La page est en cours de chargement...
La page est en cours de chargement...
La page est en cours de chargement...
La page est en cours de chargement...
La page est en cours de chargement...
La page est en cours de chargement...
La page est en cours de chargement...
La page est en cours de chargement...
La page est en cours de chargement...
La page est en cours de chargement...
La page est en cours de chargement...
La page est en cours de chargement...
La page est en cours de chargement...
La page est en cours de chargement...
La page est en cours de chargement...
La page est en cours de chargement...
La page est en cours de chargement...
La page est en cours de chargement...
La page est en cours de chargement...
La page est en cours de chargement...
La page est en cours de chargement...
La page est en cours de chargement...
La page est en cours de chargement...
La page est en cours de chargement...
La page est en cours de chargement...
La page est en cours de chargement...
La page est en cours de chargement...
La page est en cours de chargement...
La page est en cours de chargement...
La page est en cours de chargement...
La page est en cours de chargement...
La page est en cours de chargement...
La page est en cours de chargement...
La page est en cours de chargement...
La page est en cours de chargement...
La page est en cours de chargement...
La page est en cours de chargement...
La page est en cours de chargement...
La page est en cours de chargement...
La page est en cours de chargement...
La page est en cours de chargement...
La page est en cours de chargement...
La page est en cours de chargement...
La page est en cours de chargement...
La page est en cours de chargement...
La page est en cours de chargement...
La page est en cours de chargement...
La page est en cours de chargement...
La page est en cours de chargement...
La page est en cours de chargement...
La page est en cours de chargement...
La page est en cours de chargement...
La page est en cours de chargement...
La page est en cours de chargement...
La page est en cours de chargement...
La page est en cours de chargement...
La page est en cours de chargement...
La page est en cours de chargement...
La page est en cours de chargement...
La page est en cours de chargement...
La page est en cours de chargement...
La page est en cours de chargement...
La page est en cours de chargement...
La page est en cours de chargement...
La page est en cours de chargement...
La page est en cours de chargement...
La page est en cours de chargement...
La page est en cours de chargement...
La page est en cours de chargement...
La page est en cours de chargement...
La page est en cours de chargement...
La page est en cours de chargement...
La page est en cours de chargement...
La page est en cours de chargement...
La page est en cours de chargement...
La page est en cours de chargement...
La page est en cours de chargement...
La page est en cours de chargement...
La page est en cours de chargement...
La page est en cours de chargement...
La page est en cours de chargement...
La page est en cours de chargement...
La page est en cours de chargement...
La page est en cours de chargement...
La page est en cours de chargement...
La page est en cours de chargement...
La page est en cours de chargement...
La page est en cours de chargement...
La page est en cours de chargement...
La page est en cours de chargement...
La page est en cours de chargement...
La page est en cours de chargement...
La page est en cours de chargement...
La page est en cours de chargement...
La page est en cours de chargement...
La page est en cours de chargement...
La page est en cours de chargement...
La page est en cours de chargement...
La page est en cours de chargement...
La page est en cours de chargement...
La page est en cours de chargement...
La page est en cours de chargement...
La page est en cours de chargement...
La page est en cours de chargement...
La page est en cours de chargement...
La page est en cours de chargement...
La page est en cours de chargement...
La page est en cours de chargement...
La page est en cours de chargement...
La page est en cours de chargement...
La page est en cours de chargement...
La page est en cours de chargement...
La page est en cours de chargement...
La page est en cours de chargement...
La page est en cours de chargement...
La page est en cours de chargement...
La page est en cours de chargement...
La page est en cours de chargement...
La page est en cours de chargement...
La page est en cours de chargement...
La page est en cours de chargement...
La page est en cours de chargement...
La page est en cours de chargement...
La page est en cours de chargement...
La page est en cours de chargement...
La page est en cours de chargement...
La page est en cours de chargement...
La page est en cours de chargement...
La page est en cours de chargement...
La page est en cours de chargement...
La page est en cours de chargement...
La page est en cours de chargement...
La page est en cours de chargement...
La page est en cours de chargement...
La page est en cours de chargement...
La page est en cours de chargement...
La page est en cours de chargement...
La page est en cours de chargement...
La page est en cours de chargement...
La page est en cours de chargement...
La page est en cours de chargement...
La page est en cours de chargement...
La page est en cours de chargement...
La page est en cours de chargement...
La page est en cours de chargement...
-
 1
1
-
 2
2
-
 3
3
-
 4
4
-
 5
5
-
 6
6
-
 7
7
-
 8
8
-
 9
9
-
 10
10
-
 11
11
-
 12
12
-
 13
13
-
 14
14
-
 15
15
-
 16
16
-
 17
17
-
 18
18
-
 19
19
-
 20
20
-
 21
21
-
 22
22
-
 23
23
-
 24
24
-
 25
25
-
 26
26
-
 27
27
-
 28
28
-
 29
29
-
 30
30
-
 31
31
-
 32
32
-
 33
33
-
 34
34
-
 35
35
-
 36
36
-
 37
37
-
 38
38
-
 39
39
-
 40
40
-
 41
41
-
 42
42
-
 43
43
-
 44
44
-
 45
45
-
 46
46
-
 47
47
-
 48
48
-
 49
49
-
 50
50
-
 51
51
-
 52
52
-
 53
53
-
 54
54
-
 55
55
-
 56
56
-
 57
57
-
 58
58
-
 59
59
-
 60
60
-
 61
61
-
 62
62
-
 63
63
-
 64
64
-
 65
65
-
 66
66
-
 67
67
-
 68
68
-
 69
69
-
 70
70
-
 71
71
-
 72
72
-
 73
73
-
 74
74
-
 75
75
-
 76
76
-
 77
77
-
 78
78
-
 79
79
-
 80
80
-
 81
81
-
 82
82
-
 83
83
-
 84
84
-
 85
85
-
 86
86
-
 87
87
-
 88
88
-
 89
89
-
 90
90
-
 91
91
-
 92
92
-
 93
93
-
 94
94
-
 95
95
-
 96
96
-
 97
97
-
 98
98
-
 99
99
-
 100
100
-
 101
101
-
 102
102
-
 103
103
-
 104
104
-
 105
105
-
 106
106
-
 107
107
-
 108
108
-
 109
109
-
 110
110
-
 111
111
-
 112
112
-
 113
113
-
 114
114
-
 115
115
-
 116
116
-
 117
117
-
 118
118
-
 119
119
-
 120
120
-
 121
121
-
 122
122
-
 123
123
-
 124
124
-
 125
125
-
 126
126
-
 127
127
-
 128
128
-
 129
129
-
 130
130
-
 131
131
-
 132
132
-
 133
133
-
 134
134
-
 135
135
-
 136
136
-
 137
137
-
 138
138
-
 139
139
-
 140
140
-
 141
141
-
 142
142
-
 143
143
-
 144
144
-
 145
145
-
 146
146
-
 147
147
-
 148
148
-
 149
149
-
 150
150
-
 151
151
-
 152
152
-
 153
153
-
 154
154
-
 155
155
-
 156
156
-
 157
157
-
 158
158
-
 159
159
-
 160
160
-
 161
161
-
 162
162
-
 163
163
-
 164
164
-
 165
165
-
 166
166
-
 167
167
-
 168
168
-
 169
169
-
 170
170
-
 171
171
-
 172
172
-
 173
173
-
 174
174
-
 175
175
-
 176
176
-
 177
177
-
 178
178
-
 179
179
-
 180
180
-
 181
181
-
 182
182
-
 183
183
-
 184
184
-
 185
185
-
 186
186
-
 187
187
-
 188
188
-
 189
189
-
 190
190
-
 191
191
-
 192
192
-
 193
193
-
 194
194
-
 195
195
-
 196
196
-
 197
197
-
 198
198
-
 199
199
-
 200
200
-
 201
201
-
 202
202
-
 203
203
-
 204
204
-
 205
205
-
 206
206
-
 207
207
-
 208
208
-
 209
209
-
 210
210
-
 211
211
-
 212
212
-
 213
213
-
 214
214
-
 215
215
-
 216
216
-
 217
217
-
 218
218
-
 219
219
-
 220
220
-
 221
221
-
 222
222
-
 223
223
-
 224
224
-
 225
225
-
 226
226
-
 227
227
-
 228
228
-
 229
229
-
 230
230
-
 231
231
-
 232
232
-
 233
233
-
 234
234
-
 235
235
-
 236
236
-
 237
237
-
 238
238
-
 239
239
-
 240
240
-
 241
241
-
 242
242
-
 243
243
-
 244
244
-
 245
245
-
 246
246
-
 247
247
-
 248
248
-
 249
249
-
 250
250
-
 251
251
-
 252
252
-
 253
253
-
 254
254
-
 255
255
-
 256
256
-
 257
257
-
 258
258
-
 259
259
-
 260
260


Siemens EQ.500 integral (TQ507RX3) Manuel utilisateur
- Catégorie
- Cafetières
- Taper
- Manuel utilisateur