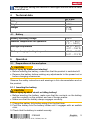
Hilti SL 6-A22 Manuel utilisateur
- Catégorie
- Lampes de poche
- Taper
- Manuel utilisateur


1
Printed: 22.10.2018 | Doc-Nr: PUB / 5458888 / 000 / 00

2
3
Printed: 22.10.2018 | Doc-Nr: PUB / 5458888 / 000 / 00

SL 6-A22
en Original operating instructions . . . . . . . . . . . . . . . . . . . . . . . . . . 1
fr Notice d'utilisation originale . . . . . . . . . . . . . . . . . . . . . . . . . . . 10
es Manual de instrucciones original . . . . . . . . . . . . . . . . . . . . . . . 19
pt Manual de instruções original . . . . . . . . . . . . . . . . . . . . . . . . . . 28
Printed: 22.10.2018 | Doc-Nr: PUB / 5458888 / 000 / 00

*2195846*
2195846 English 1
1 Information about the documentation
1.1 About this documentation
• Read this documentation before initial operation or use. This is a
prerequisite for safe, trouble-free handling and use of the product.
• Observe the safety instructions and warnings in this documentation and
on the product.
• Always keep the operating instructions with the product and make sure
that the operating instructions are with the product when it is given to
other persons.
1.2 Explanation of symbols used
1.2.1 Warnings
Warnings alert persons to hazards that occur when handling or using the
product. The following signal words are used:
DANGER
DANGER !
▶ Draws attention to imminent danger that will lead to serious personal
injury or fatality.
WARNING
WARNING !
▶ Draws attention to a potential threat of danger that can lead to serious
injury or fatality.
CAUTION
CAUTION !
▶ Draws attention to a potentially dangerous situation that could lead to
slight personal injury or damage to the equipment or other property.
1.2.2 Symbols in the documentation
The following symbols are used in this document:
Read the operating instructions before use.
Instructions for use and other useful information
Dealing with recyclable materials
Do not dispose of electric equipment and batteries as household
waste
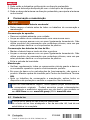
1.2.3 Symbols in the illustrations
The following symbols are used in illustrations:
Printed: 22.10.2018 | Doc-Nr: PUB / 5458888 / 000 / 00

2 English 2195846
*2195846*
These numbers refer to the corresponding illustrations found at the
beginning of these operating instructions
The numbering reflects the sequence of operations shown in the
illustrations and may deviate from the steps described in the text
Item reference numbers are used in the overview illustrations and
refer to the numbers used in the product overview section
This symbol is intended to draw special attention to certain points
when handling the product.
Wireless data transfer
1.3 Product-specific symbols
1.3.1 Symbols
The following symbols are used on the product:
Do not look into the light source.
1.4 Product information
products are designed for professional users and only trained,
authorized personnel are permitted to operate, service and maintain the
products. This personnel must be specifically informed about the possible
hazards. The product and its ancillary equipment can present hazards if
used incorrectly by untrained personnel or if used not in accordance with
the intended use.
The type designation and serial number are printed on the rating plate.
▶ Write down the serial number in the table below. You will be required to
state the product details when contacting Hilti Service or your local Hilti
organization to inquire about the product.
Product information
Cordless lamp SL 6-A22
Generation 01
Serial no.
1.5 Declaration of conformity
We declare, on our sole responsibility, that the product described here
complies with the applicable directives and standards. A copy of the
declaration issued by the certification department can be found at the end
of this documentation.
The technical documentation is filed here:
Hilti Entwicklungsgesellschaft mbH | Tool Certification | Hiltistrasse 6 | 86916
Kaufering, Germany
Printed: 22.10.2018 | Doc-Nr: PUB / 5458888 / 000 / 00

*2195846*
2195846 English 3
2 Safety
2.1 Use and care
▶ Use the product only when it is in perfect working order.
▶ Never tamper with or modify the product in any way.
▶ Keep the product out of reach of children.
▶ Do not use the product where there is a risk of fire or explosion.
▶ Use the product in a dry environment only.
▶ Replace the complete cordless lamp when the light source has reached
the end of its life. The light source in this cordless lamp is not replaceable.
▶ Do not look into the beam and do not direct the beam toward other
persons.
▶ Whenever you suspend the product by means of the scaffold hook, make
sure that it is securely and safely positioned.
2.2 Personal safety
The user and the persons in the vicinity must wear suitable protective
goggles, protective gloves and a hard hat while the product is in use!
2.3 Battery use and care
▶ Observe the special regulations and instructions applicable to the trans-
port, storage and use of Li-ion batteries.
▶ Do not expose batteries to high temperatures, direct sunlight or fire.
▶ Do not disassemble, crush or incinerate batteries and do not subject them
to temperatures over 80 °C.
▶ Do not use or charge batteries that have suffered mechanical impact,
have been dropped from a height or show signs of damage. In this case,
always contact your Hilti Service.
▶ If the battery is too hot to touch it may be defective. In this case, place the
product in a non-flammable location, well away from flammable materials,
where it can be kept under observation and allowed to cool down. In this
case, always contact your Hilti Service.
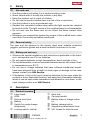
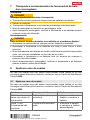
3 Description
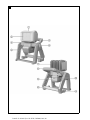
3.1 Product overview 1
@
Lamp head
;
LEDs
=
Vertical pivot joint
%
Battery
&
Switch for mode change
(brightness)
(
Locking switch, vertical
)
Heat sink
+
Carrying handle
§
Battery state of charge indica-
tor
/
Battery release button
:
Suspension/attachment hook
∙
5/8" thread for tripod mount
Printed: 22.10.2018 | Doc-Nr: PUB / 5458888 / 000 / 00

4 English 2195846
*2195846*
3.2 Intended use
The product described is a cordless floodlight. It is for lighting up jobsites.
The lamp head can be pivoted horizontally and vertically. Additionally, the
light can be set on a flat surface, suspended from various construction
materials by means of the integral hook, or mounted on a tripod with 5/8"
thread.
▶ Use only Hilti Liion batteries from the B 18 / B 22 series with this product.
▶ Use only the Hilti battery chargers of the C4/36 series to charge these
batteries.
3.3 Charge state indicator
Lightly press (no more than until resistance is perceptible) either of the
battery release buttons to check the charge state of the Liion battery.
Status Meaning
4 LEDs light up. • Charge state: 75 % to 100 %
3 LEDs light up. • Charge state: 50 % to 75 %
2 LEDs light up. • Charge state: 25 % to 50 %
1 LED lights up. • Charge state: 10 % to 25 %
1 LED flashes. • Charge state: < 10 %
If the LEDs of the charge state indicator flash, follow the instructions in
the 'Troubleshooting' section.
3.4 Items supplied
Cordless lamp, operating instructions.
Other system products approved for use with this product can be found at
your local Hilti Store or online at: www.hilti.group | USA: www.hilti.com
3.5 4-mode switch
Use the 4-mode switch to set brightness.
Status Meaning
Press once • The lamp shines at maximum
brightness (100 %).
Press twice • The lamp shines at reduced
brightness (66 %).
Press three times • The lamp shines at reduced
brightness (33 %).
Press and hold down for several
seconds
• The lamp is off.
Printed: 22.10.2018 | Doc-Nr: PUB / 5458888 / 000 / 00

*2195846*
2195846 English 5
The brightness setting last selected is used again the next time the lamp
is switched on.
4 Technical data
SL 6-A22
Voltage
21.6 V
Brightness
3,000 lm
Weight
3.2 kg
(7.1 lb)
4.1 Battery
Battery operating voltage
21.6 V
Ambient temperature for operation
−17 ℃ … 60 ℃
(1 ℉ … 140 ℉)
Storage temperature
−20 ℃ … 40 ℃
(−4 ℉ … 104 ℉)
Battery charging starting temperature
−10 ℃ … 45 ℃
(14 ℉ … 113 ℉)
5 Operation
5.1 Preparations at the workplace
CAUTION
Risk of injury by inadvertent starting!
▶ Before inserting the battery, make sure that the product is switched off.
▶ Remove the battery before making any adjustments to the power tool or
before changing accessories.
Observe the safety instructions and warnings in this documentation and on
the product.
5.1.1 Inserting the battery
CAUTION
Risk of injury by short circuit or falling battery!
▶ Before inserting the battery, make sure that the contacts on the battery
and the contacts on the product are free of foreign matter.
▶ Make sure that the battery always engages correctly.
1. Charge the battery fully before using it for the first time.
2. Push the battery into the battery holder until it engages with an audible
click.
3. Check that the battery is seated securely.
Printed: 22.10.2018 | Doc-Nr: PUB / 5458888 / 000 / 00

6 English 2195846
*2195846*
5.1.2 Removing the battery
1. Press the release buttons on the battery.
2. Pull the battery out of its holder in the device.
5.1.3 Charging the battery
1. Before charging the battery, read the operating instructions for the
charger.
2. Make sure that the contacts on the battery and the contacts on the
charger are clean and dry.
3. Use an approved charger to charge the battery.
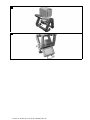
5.1.4 Switching on 2
Whenever you engage the product on the universal hook or mount it on
a tripod, make sure that the product is secure.
▶ Select a mode by pressing the 4-mode switch.
5.1.5 Turning the lamp head 3
CAUTION
Risk of damage to the eyes (the retina). Looking directly into the lamp
presents a risk of damage to the eyes (the retina).
▶ Do not direct the lamp at yourself or at anyone else.
▶ Do not, under any circumstances, look into the lamp.
CAUTION
There is a risk of crushing fingers in the joint area When the lamp head is
being turned, there is a risk of the fingers being caught between the support
leg and the casing.
▶ Wear protective gloves.
The multi-position hinge and the lamp head can be turned in either
direction along the axis. Do not attempt to force the lamp head past the
end stops.
1. Unlock the multi-position hinge with the locking switch to adjust the lamp
vertically.
2. Then turn the multi-position hinge in the desired direction.
3. Lock the multi-position hinge with the locking switch.
4. Turn the lamp head to the desired position to adjust the lamp horizontally.
Printed: 22.10.2018 | Doc-Nr: PUB / 5458888 / 000 / 00

*2195846*
2195846 English 7
6 Care and maintenance
WARNING
Risk of injury with battery inserted !
▶ Always remove the battery before carrying out care and maintenance
tasks!
Care and maintenance of the tool
• Carefully remove stubborn dirt.
• Clean the air vents carefully with a dry brush.
• Use only a slightly damp cloth to clean the casing. Do not use cleaning
agents containing silicone as these can attack the plastic parts.
Care of the Liion batteries
• Keep the battery free from oil and grease.
• Use only a slightly damp cloth to clean the casing. Do not use cleaning
agents containing silicone as these may attack the plastic parts.
• Avoid ingress of moisture.
Maintenance
• Check all visible parts and controls for signs of damage at regular intervals
and make sure that they all function correctly.
• Do not operate the product if signs of damage are found or if parts
malfunction. Have it repaired immediately by Hilti Service.
• After cleaning and maintenance, fit all guards or protective devices and
check that they function correctly.
To help ensure safe and reliable operation, use only genuine Hilti spare
parts and consumables. Spare parts, consumables and accessories
approved by Hilti for use with the product can be found at your local
Hilti Store or online at: www.hilti.group | USA: www.hilti.com
6.1 Light source
The light source in this lamp is not replaceable!
When the light source reaches the end of its service life, the entire lamp
has to be replaced.
7 Transport and storage of cordless tools
Transport
CAUTION
Accidental starting during transport !
▶ Always transport your products with the batteries removed!
▶ Remove the battery.
▶ Transport the tool and batteries individually packaged.
▶ Never transport batteries in bulk form (loose, unprotected).
Printed: 22.10.2018 | Doc-Nr: PUB / 5458888 / 000 / 00

8 English 2195846
*2195846*
▶ Check the tool and batteries for damage before use after long periods of
transport.
Storage
CAUTION
Accidental damage caused by defective or leaking batteries !
▶ Always store your products with the batteries removed!
▶ Store the tool and batteries in a place that is as cool and dry as possible.
▶ Never store batteries in direct sunlight, on heating units or behind a
window pane.
▶ Store the tool and batteries in a place where they cannot be accessed by
children or unauthorized persons.
▶ Check the tool and batteries for damage before use after long periods of
storage.
8 Troubleshooting
If the trouble you are experiencing is not listed in this table or you are unable
to remedy the problem by yourself, please contact Hilti Service.
8.1 Troubleshooting
If the trouble you are experiencing is not listed in this table or you are unable
to remedy the problem by yourself, contact Hilti Service.
Trouble or fault Possible cause Action to be taken
The battery does
not engage with an
audible double click.
The retaining lugs on the
battery are dirty.
▶ Clean the retaining
lugs and push the
battery in until it
engages.
1 LED flashes.
The device does not
work.
The battery is
discharged.
▶ Change the battery
and charge the empty
battery.
The battery is too hot or
too cold.
▶ Allow the battery to
cool down or warm
up slowly to room
temperature.
9 Disposal
Most of the materials from which Hilti tools and appliances are manu-
factured can be recycled. The materials must be correctly separated before
they can be recycled. In many countries, your old tools, machines or appli-
ances can be returned to Hilti for recycling. Ask Hilti Service or your Hilti
representative for further information.
Printed: 22.10.2018 | Doc-Nr: PUB / 5458888 / 000 / 00

*2195846*
2195846 English 9
Battery disposal
Improper disposal of batteries can result in health hazards from leaking
gases or fluids.
▶ DO NOT send batteries through the mail!
▶ Cover the terminals with a non-conductive material (such as electrical
tape) to prevent short circuiting.
▶ Dispose of your battery out of the reach of children.
▶ Dispose of the battery at your Hilti Store, or consult your local govern-
mental garbage disposal or public health and safety resources for disposal
instructions.
▶ Do not dispose of power tools, electronic equipment or batteries as
household waste!
10 Manufacturer’s warranty
▶ Please contact your local Hilti representative if you have questions about
the warranty conditions.
Printed: 22.10.2018 | Doc-Nr: PUB / 5458888 / 000 / 00

10 Français 2195846
*2195846*
1 Indications relatives à la documentation
1.1 À propos de cette documentation
• Lire intégralement la présente documentation avant la mise en service.
C'est la condition préalablement requise pour assurer la sécurité du travail
et un maniement sans perturbations.
• Bien respecter les consignes de sécurité et les avertissements de la
présente documentation ainsi que celles figurant sur le produit.
• Toujours conserver le mode d'emploi à proximité du produit et uniquement
le transmettre à des tiers avec ce mode d'emploi.
1.2 Explication des symboles
1.2.1 Avertissements
Les avertissements attirent l'attention sur des dangers liés à l'utilisation du
produit. Les termes de signalisation suivants sont utilisés :
DANGER
DANGER !
▶ Pour un danger imminent qui peut entraîner de graves blessures corpo-
relles ou la mort.
AVERTISSEMENT
AVERTISSEMENT !
▶ Pour un danger potentiel qui peut entraîner de graves blessures corpo-
relles ou la mort.
ATTENTION
ATTENTION !
▶ Pour attirer l'attention sur une situation pouvant présenter des dangers
entraînant des blessures corporelles légères ou des dégâts matériels.
1.2.2 Symboles dans la documentation
Les symboles suivants sont utilisés dans la présente documentation :
Lire le mode d'emploi avant d'utiliser l'appareil
Pour des conseils d'utilisation et autres informations utiles
Maniement des matériaux recyclables
Ne pas jeter les appareils électriques et les accus dans les ordures
ménagères
1.2.3 Symboles dans les illustrations
Les symboles suivants sont utilisés dans les illustrations :
Printed: 22.10.2018 | Doc-Nr: PUB / 5458888 / 000 / 00

*2195846*
2195846 Français 11
Ces chiffres renvoient à l'illustration correspondante au début du
présent mode d'emploi
La numérotation détermine la séquence des étapes de travail dans
l'image et peut se différencier de celles des étapes de travail dans le
texte
Les numéros de position sont utilisés dans l'illustration Vue d’en-
semble et renvoient aux numéros des légendes dans la section Vue
d'ensemble du produit
Ce signe doit inviter à manier le produit en faisant particulièrement
attention.
Transmission de données sans fil
1.3 Symboles spécifiques au produit
1.3.1 Symboles
Les symboles suivants sont utilisés sur le produit :
Ne pas regarder dans la source lumineuse.
1.4 Informations produit
Les produits sont destinés aux professionnels et ne doivent
être utilisés, entretenus et réparés que par un personnel autorisé et formé.
Ce personnel doit être spécialement instruit quant aux dangers inhérents
à l'utilisation de l'appareil. Le produit et ses accessoires peuvent s'avérer
dangereux s'ils sont utilisés de manière incorrecte par un personnel non
qualifié ou de manière non conforme à l'usage prévu.
La désignation du modèle et le numéro de série figurent sur sa plaque
signalétique.
▶ Inscrivez le numéro de série dans le tableau suivant. Les informations
produit vous seront demandées lorsque vous contactez nos revendeurs
ou services après-vente.
Caractéristiques produit
Lampe sur accu SL 6-A22
Génération 01
N° de série
1.5 Déclaration de conformité
Nous déclarons sous notre seule et unique responsabilité que le produit
décrit ici est conforme aux directives et normes en vigueur. Une copie de
l'attestation délivrée par l'organisme de certification se trouve en fin de la
présente documentation.
Pour obtenir les documentations techniques, s'adresser à :
Printed: 22.10.2018 | Doc-Nr: PUB / 5458888 / 000 / 00

12 Français 2195846
*2195846*
Hilti Entwicklungsgesellschaft mbH | Zulassung Geräte | Hiltistraße 6 | 86916
Kaufering, DE
2 Sécurité
2.1 Utilisation et emploi soigneux
▶ Utiliser le produit uniquement dans un état techniquement impeccable.
▶ Ne jamais entreprendre de manipulation ni de modification sur le produit.
▶ Le produit doit être tenu à l'écart des enfants en bas âge.
▶ Ne pas utiliser le produit dans des endroits présentant un danger d'incen-
die ou d'explosion.
▶ Utiliser le produit uniquement dans un environnement sec.
▶ Remplacer entièrement la lampe sur accu si la source lumineuse est
arrivée en fin de durée de service. La source lumineuse de cette lampe
sur accu n'est pas remplaçable.
▶ Ne pas regarder directement dans le faisceau et ne pas diriger le faisceau
contre des personnes.
▶ Si le produit est suspendu à un crochet pour échafaudages, veiller à ce
qu'il soit positionné en toute sécurité.
2.2 Sécurité des personnes
Pendant le fonctionnement du produit, l'utilisateur et les personnes se
trouvant à proximité doivent porter des lunettes de protection appropriées,
des gants de protection ainsi qu'un casque de protection !
2.3 Utilisation et emploi soigneux des batteries
▶ Respecter les directives spécifiques relatives au transport, au stockage
et à l'utilisation des batteries li-ion.
▶ Ne pas exposer les batteries à des températures élevées, ni au rayonne-
ment direct du soleil ou au feu.
▶ Les batteries ne doivent pas être démontées, écrasées, chauffées à une
température supérieure à 80 °C ou jetées au feu.
▶ Ne jamais utiliser ni charger d'accus qui ont subi un choc électrique,
qui sont tombés de plus d'un mètre ou qui ont été endommagés d'une
manière quelconque. Si tel est le cas, il convient de contacter le S.A.V
Hilti.
▶ Si la batterie est trop chaude pour être touché, elle peut être défectueuse.
Déposer le produit à un endroit non inflammable d'où il peut être surveillé,
à une distance suffisante de matériaux inflammables et le laisser refroidir.
Si tel est le cas, il convient de contacter le S.A.V Hilti.
Printed: 22.10.2018 | Doc-Nr: PUB / 5458888 / 000 / 00

*2195846*
2195846 Français 13
3 Description
3.1 Vue d'ensemble du produit 1
@
Tête de la lampe
;
Témoins à LED
=
Articulation pivotante verticale
%
Accu
&
Commutateur de changement
de mode (intensité lumineuse)
(
Bouton de verrouillage vertical
)
Dissipateur thermique
+
Poignée de manutention
§
Indicateur de l'état de charge
de l'accu
/
Bouton de déverrouillage de
l'accu
:
Crochets de suspension /
fixation
∙
Raccordement au trépied à
filetage "5/8"
3.2 Utilisation conforme à l'usage prévu
Le produit décrit est un projecteur d'éclairage de surface sans fil. Il est utilisé
pour éclairer les chantiers.
La tête du projecteur peut être orientée horizontalement et verticalement. De
plus, le projecteur peut être positionné sur une surface plane, être accroché
à différents matériaux support du chantier à l'aide du crochet intégré ou
monté sur un trépied avec filetage 5/8".
▶ Pour ce produit, utiliser exclusivement les accus LiIon Hilti de la série
B 18 / B 22.
▶ Pour ces accus, utiliser exclusivement les chargeurs Hilti de la série
C4/36.
3.3 Indicateur de l'état de charge
L'état de charge de l'accu LiIon peut être visualisé en appuyant légèrement
sur l'un des deux boutons de déverrouillage (jusqu'à une résistance percep-
tible).
État Signification
4 LED allumées. • État de charge : 75 % à 100 %
3 LED allumées. • État de charge : 50 % à 75 %
2 LED allumées. • État de charge : 25 % à 50 %
1 LED allumée. • État de charge : 10 % à 25 %
1 LED clignote. • État de charge : < 10 %
Si les LED de l'indicateur de l'état de charge de l'accu clignotent, se
reporter au chapitre Aide au dépannage.
3.4 Éléments livrés
Lampe sur accu, Mode d'emploi original.
Printed: 22.10.2018 | Doc-Nr: PUB / 5458888 / 000 / 00

14 Français 2195846
*2195846*
D'autres produits système autorisés pour votre produit peuvent être obtenus
auprès du centre Hilti Store ou en ligne sous : www.hilti.group | États-
Unis : www.hilti.com
3.5 Commutateur 4 modes
La luminosité se règle à l'aide du commutateur 4 modes.
État Signification
Appuyer une fois • La lampe est allumée à la
luminosité maximale (100 %).
Appuyer une deuxième fois • La lampe est allumée à une
luminosité moyenne (66 %).
Appuyer une troisième fois • La lampe est allumée à une
luminosité moyenne (33 %).
Appuyer pendant plusieurs se-
condes
• La lampe est éteinte.
L'intensité lumineuse sélectionnée en dernier sera reprise à la prochaine
mise en marche.
4 Caractéristiques techniques
SL 6-A22
Tension
21,6 V
Luminosité
3.000 lm
Poids
3,2 kg
(7,1 lb)
4.1 Batterie
Tension nominale de l'accu
21,6 V
Température de service en cours de service
−17 ℃ … 60 ℃
(1 ℉ … 140 ℉)
Température de stockage
−20 ℃ … 40 ℃
(−4 ℉ … 104 ℉)
Température de l'accu au début de la charge
−10 ℃ … 45 ℃
(14 ℉ … 113 ℉)
Printed: 22.10.2018 | Doc-Nr: PUB / 5458888 / 000 / 00

*2195846*
2195846 Français 15
5 Utilisation
5.1 Préparatifs
ATTENTION
Risque de blessures du fait d'une mise en marche inopinée !
▶ Avant d'insérer l'accu, s'assurer que le produit correspondant est bien
sur arrêt.
▶ Retirer le bloc-accu, avant d’effectuer des réglages sur l’appareil ou de
changer les accessoires.
Bien respecter les consignes de sécurité et les avertissements de la présente
documentation ainsi que celles figurant sur le produit.
5.1.1 Introduction de l'accu
ATTENTION
Risque de blessures du fait d'un court-circuit ou de la chute de l'accu !
▶ Avant d'insérer l'accu dans l'appareil, s'assurer que les contacts de l'accu
et les contacts sur le produit sont exempts de corps étrangers.
▶ S'assurer que l'accu s'encliquette toujours correctement.
1. L'accu doit être entièrement chargé avant la première mise en service.
2. Insérer l'accu dans l'appareil jusqu'à ce qu'il s'encliquette avec un clic
audible.
3. Vérifier que l'accu est bien en place.
5.1.2 Retrait de l'accu
1. Appuyer sur les boutons de déverrouillage de l'accu.
2. Retirer l'accu hors de l'appareil.
5.1.3 Recharge de l'accu
1. Avant de commencer la charge, lire le mode d'emploi du chargeur.
2. Veiller à ce que les contacts de l'accu et du chargeur sont propres et
secs.
3. Charger l'accu à l'aide d'un chargeur homologué.
5.1.4 Mise en marche 2
Pour utiliser le produit sur le crochet universel ou sur un trépied,
s'assurer que le produit est bien monté.
▶ Sélectionner un mode en appuyant autant de fois que nécessaire sur le
commutateur 4 modes.
Printed: 22.10.2018 | Doc-Nr: PUB / 5458888 / 000 / 00

16 Français 2195846
*2195846*
5.1.5 Rotation de la tête de la lampe 3
ATTENTION
Risque de lésions de la rétine. Il y a risque de lésions de la rétine en
regardant directement dans la lampe.
▶ Ne pas diriger la lampe vers soi ou toute autre personne.
▶ Ne jamais regarder dans la lampe.
ATTENTION
Risque d'écrasement des doigts dans la zone d'articulation Lors de la
rotation de la tête de la lampe, il y a un risque de se coincer les doigts entre
le pied d'appui et le boîtier.
▶ Porter des gants de protection.
La charnière multi-position et la tête de la lampe peuvent être tournées
le long de l'axe dans les deux sens. Veiller à ne pas appuyer avec force
sur les butées.
1. Déverrouiller la charnière multi-position à l'aide du commutateur de
verrouillage pour régler la lampe à la verticale.
2. Basculer ensuite la charnière multi-position dans la direction souhaitée.
3. Verrouiller la charnière multi-position à l'aide du commutateur de ver-
rouillage.
4. Tourner la tête de la lampe dans la direction souhaitée pour régler la
lampe à l'horizontale.
6 Nettoyage et entretien
AVERTISSEMENT
Risque de blessures lorsque l'accu est inséré !
▶ Toujours retirer l'accu avant tous travaux de nettoyage et d'entretien !
Entretien de l'appareil
• Éliminer prudemment les saletés récalcitrantes.
• Nettoyer les ouïes d'aération avec précaution au moyen d'une brosse
sèche.
• Nettoyer le boîtier uniquement avec un chiffon légèrement humidifié. Ne
pas utiliser de nettoyants à base de silicone, ceci pourrait attaquer les
pièces en plastique.
Entretien des accus Liion
• Veiller à ce que l'accu soit toujours propre et exempt de traces de graisse
et d'huile.
• Nettoyer le boîtier uniquement avec un chiffon légèrement humidifié. Ne
pas utiliser de nettoyants à base de silicone, ceci pourrait attaquer les
pièces en plastique.
Printed: 22.10.2018 | Doc-Nr: PUB / 5458888 / 000 / 00
La page est en cours de chargement...
La page est en cours de chargement...
La page est en cours de chargement...
La page est en cours de chargement...
La page est en cours de chargement...
La page est en cours de chargement...
La page est en cours de chargement...
La page est en cours de chargement...
La page est en cours de chargement...
La page est en cours de chargement...
La page est en cours de chargement...
La page est en cours de chargement...
La page est en cours de chargement...
La page est en cours de chargement...
La page est en cours de chargement...
La page est en cours de chargement...
La page est en cours de chargement...
La page est en cours de chargement...
La page est en cours de chargement...
La page est en cours de chargement...
La page est en cours de chargement...
La page est en cours de chargement...
-
 1
1
-
 2
2
-
 3
3
-
 4
4
-
 5
5
-
 6
6
-
 7
7
-
 8
8
-
 9
9
-
 10
10
-
 11
11
-
 12
12
-
 13
13
-
 14
14
-
 15
15
-
 16
16
-
 17
17
-
 18
18
-
 19
19
-
 20
20
-
 21
21
-
 22
22
-
 23
23
-
 24
24
-
 25
25
-
 26
26
-
 27
27
-
 28
28
-
 29
29
-
 30
30
-
 31
31
-
 32
32
-
 33
33
-
 34
34
-
 35
35
-
 36
36
-
 37
37
-
 38
38
-
 39
39
-
 40
40
-
 41
41
-
 42
42


Hilti SL 6-A22 Manuel utilisateur
- Catégorie
- Lampes de poche
- Taper
- Manuel utilisateur
dans d''autres langues
- español: Hilti SL 6-A22 Manual de usuario
- português: Hilti SL 6-A22 Manual do usuário
Documents connexes
-
Hilti WFE 380 / 450-E Mode d'emploi
-
-
Hilti SL 6-A22 Mode d'emploi
-
-
-
-
-
-
Hilti SID 8-A Mode d'emploi
-
Hilti 3559786 Manuel utilisateur