eero K010001 Manuel utilisateur
- Catégorie
- Des ponts
- Taper
- Manuel utilisateur

Model
s K010001
draft
Confidential and Proprietary
9/2
3
/2020
User Manual
>> eero Model K010001 draft <<
eero Pro 6
Getting started with eero
One of the biggest frustrations with a traditional router has to be the confusing and complex
setup process, so at eero we’ve taken a different approach: make the entire setup experience as
quick and easy as possible. So, whether you’re an old hand at networking or are taking your first
step into home WiFi, eero is for you.
Our app will walk you through the process and do most of the heavy lifting, but here’s a quick
overview of what to expect. If you’re new to WiFi, or just need a refresher, we encourage you to
read this article and refer back to it if you have any concerns during in-app setup.
Before you begin:
Setup components
In the box:
o Ethernet cable
o eero(s)
o Power cord(s)
What you’ll need:
o eero iOS or Android app
o At least one 1st or 2nd-generation eero (eero Beacons cannot be used to start a network)
o Mobile device with a data connection (If you don't have access to a data connection, see
our workaround instructions here.)
o Internet service
o Cable or DSL modem (if required)*
Don’t know what a modem is? Unsure if you have one? Find out here.
Here’s how to get started getting your eero network online:
STEP 1: Download the eero app for iOS or Android:
Download the free eero app – you can find it on the Apple Store or Google Play. eero supports
both iOS and Android (check here for details on the versions we support). You’ll need the app to
set up your eero network. You won’t be able to set up your system on a web browser.
STEP 2: Create an eero account

Model
s K010001
draft
Confidential and Proprietary
9/2
3
/2020
You’ll need to enter your phone number and email address. By default, we’ll send a verification
code to your email address, but you can opt to receive it via text message instead instead. Enter
this code on the verification screen of the app to create your account.
STEP 3: Set up your eero
The eero app will guide you through setting up your gateway eero. It’s three easy steps:
1. Unplug your modem. If you have other wireless equipment connected to your modem, please
unplug it as well.
o Note: if you have a modem-router combination device from your provider, you can plug
the eero directly into one of the 4 Ethernet ports on the back without powering down.
2. Connect your eero to your modem using the Ethernet cable. You can use either of the Ethernet
ports on the back of your eero.
3. Plug your eero in with the power adapter that came in the box, then plug your modem back into
power. For placement tips, including DO's and DON'Ts, visit here.
STEP 4: Create your eero network
Now that you’ve got everything plugged in, it’s time to create your eero network.
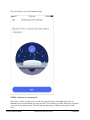
After tapping Next, the eero app will begin to look for your eero. You will notice that your
gateway eero's LED will begin to flash blue and then turn solid once found. Once your eero has
been detected, you will select a name for your eero (naming the eero after its location is a
common choice).
If prompted, you may need to enter your eero’s serial number, which is located on a sticker
attached to the bottom of your eero. Just look for a barcode with the letters SN on it – it’s small,
but it’s there.
Once you've selected a name for your eero, you will choose your network name (SSID) and
network password. This is how devices will join your network.
If you’re replacing an existing router, one easy option for choosing a network name (SSID) and
password is to simply reuse your current SSID and password. This way, you won’t have to
reconnect devices that were previously on the network.
Keep in mind that running two networks with the same SSID can be problematic. If you have a
modem/router combo device, as mentioned above, we strongly encourage you to enable bridge
mode on that device. Need help? Give us a call and we’ll walk you through it.

Model
s K010001
draft
Confidential and Proprietary
9/2
3
/2020
Tap Next and your eero will complete setup!
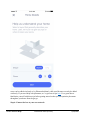
STEP 5: Add eeros to your network
Once you’ve set up your gateway eero, the eero app will walk you through steps to set up
additional eeros or eero Beacons on your network. The first thing you'll be asked is for a general
overview of your home layout. This will help the app properly judge the placement of your
eeros.

Model
s K010001
draft
Confidential and Proprietary
9/2
3
/2020
eeros can be added wirelessly or by Ethernet backhaul, while eero Beacons can only be added
wirelessly. If you need help with placement, we’ve got lots of tips here. It’s a great idea to
familiarize yourself with these tips before getting started so that you can optimize placement
throughout your home from the get-go.
Step 6: Connect devices to your eero network

Model
s K010001
draft
Confidential and Proprietary
9/2
3
/2020
One final (and important) step is to remember to connect all of your devices to your new eero
network. To do this, simply find your eero network on your device, enter the network password
that you’ve created, and get connected. If you’re using the same network name (SSID) and
password as your previous router, your devices should automatically reconnect. However, you
may need to toggle WiFi on these devices or power cycle for them to recognize the new eero
network.
If you experience any trouble connecting specific devices to your new eero network, try
disconnecting and reconnecting WiFi on the device. If that doesn’t work, try rebooting the device
and then reconnecting to the network once it powers back on.
If you have any questions, don’t hesitate to reach out. We’re here to help.
================ ====================================================
For more info on the following topics, please go to our web site:
https://support.eero.com/hc/en-us/sections/115000878663-Getting-started-with-eero
How do I set up eero?
Can I use eero with my modem?
How do I add devices to my network?
What is required to setup eero?
How many eero and eero Beacons can I add to my network?
Where should I place my eeros?
Where should I place my eero Beacon?
How do I set up my eero if I want to keep my existing router?
How do I bridge my modem/router combo device?
eero device compatibility list

Model
s K010001
draft
Confidential and Proprietary
9/2
3
/2020
Supplier’s Declaration of Conformity
eero Model: K010001 Trade Name: eero Pro 6
eero LLC - 660 3rd Street, 4th Floor, San Francisco, CA 94107 - (415) 738-7972
FCC Radio Frequency Interference Warnings & Instructions
This device complies with part 15 of the FCC Rules. Operation is subject to the following two conditions:
(1) This device may not cause harmful interference, and (2) this device must accept any interference
received, including interference that may cause undesired operation.
No Unauthorized Modifications:
Do not make any changes or modifications to this product without the prior express written approval of
eero, Inc. Any changes or modifications made without express written approval could void the user’s
authority to operate this product.
Note: This equipment has been tested and found to comply with the limits for a Class B digital device,
pursuant to part 15 of the FCC Rules. These limits are designed to provide reasonable protection against
harmful interference in a residential installation. This equipment generates uses and can radiate radio
frequency energy and, if not installed and used in accordance with the instructions, may cause harmful
interference to radio communications. However, there is no guarantee that interference will not occur in a
particular installation. If this equipment does cause harmful interference to radio or television reception,
which can be determined by turning the equipment off and on, the user is encouraged to try to correct the
interference by one or more of the following measures:
•Reorient or relocate the receiving antenna.
•Increase the separation between the equipment and receiver.
•Connect the equipment into an outlet on a circuit different from that to which the receiver is connected.
•Consult the dealer or an experienced radio/TV technician for help.
FCC Guidelines for Human Exposure
This equipment complies with FCC radiation exposure limits set forth for an uncontrolled environment.
This equipment should be installed and operated with minimum distance of 21 cm between the radiator
and your body.
FCC Information to User
This product does not contain any user serviceable components and is to be used with approved antennas
only. Any product changes or modifications will invalidate all applicable regulatory certifications and
approvals.
This device and its antenna(s) must not be co-located or operation in conjunction with any other antenna
or transmitter.
Any changes or modifications not expressly approved by the party responsible for compliance could void
the user’s authority to operate this equipment.
For product available in the USA market, only channel 1~11 can be operated. Selection of other channels
is not possible.

Model
s K010001
draft
Confidential and Proprietary
9/2
3
/2020
Industry Canada
This Class B digital apparatus complies with Canadian ICES-003
Cet appareil numérique de la classe B est conforme à la norme NMB-003 du Canada
This device complies with Industry Canada license-exempt RSS standard(s). Operation is subject to the
following two conditions: (1) this device may not cause interference and (2) this device must accept any
interference, including interference that may cause undesired operation of the device
Le present appareil est conforme aux CNR d'Industrie Canada applicables aux appareils radio exempts de
licence.
L'exploitation est autorisée aux deux conditions suivantes: (1) l'appareil ne doit pas produire de
brouillage, et (2) l'utilisateur de l'appareil doit accepter tout brouillage radioélectrique subi, même si le
brouillage est susceptible d'en compromettre le fonctionnement”
The radio transmitter has been approved by Industry Canada to operate only with the antenna(s) supplied.
Use of any other antenna(s) is strictly prohibited for use with this product.
L'émetteur radio a été approuve par Industrie Canada pour fonctionner uniquement avec l'antenne(s)
INDUSTRY CANADA RADIATION EXPOSURE STATEMENT
MPE/SAR
To comply with RSS-102 requirements, a separation distance of 29 cm must be kept between
the device and the user at all times.
Pour se conformer aux exigences RSS-102, une distance de séparation de 29 cm doit être maintenue entre
l'appareil et l'utilisateur à tout moment.
Operation in the Band 5150-5250 MHz
Operation in the band 5150-5250 MHz is only for indoor use to reduce the potential for harmful
interference to co-channel mobile satellite systems.
La bande 5 150-5 250 MHz est réservés uniquement pour une utilisation à l'intérieur afin de
réduire les risques de brouillage préjudiciable aux systèmes de satellites mobiles utilisant les
mêmes canaux.
-
 1
1
-
 2
2
-
 3
3
-
 4
4
-
 5
5
-
 6
6
-
 7
7


eero K010001 Manuel utilisateur
- Catégorie
- Des ponts
- Taper
- Manuel utilisateur
dans d''autres langues
- English: eero K010001 User manual
Documents connexes
Autres documents
-
Sercomm RP582B Manuel utilisateur
-
Babyletto 16623 Assembly And Operation Manual
-
 Aqara датчик вибрации (DJT11LM) Manuel utilisateur
-
Anker Classic Bluetooth Speaker Manuel utilisateur
-
Lego 8059 Le manuel du propriétaire
-
-
Creative D100 Guide de démarrage rapide
-
Sony XS-HL535 Guide d'installation
-
Philips SSA5HS/00 Guide de démarrage rapide
-
