
FuturaSI 24808521 20-05-14
FUTURA-SI
24808521
Italiano
IT
English
EN
Français
FR
Deutsch
DE
Español
ES
Nederlands
NL
Português
PT
Polskie
PL
Русский
RU
www.bpt.it
≥
3
0
m
m
1
2
1
2
3
207 75
163
FUTURA-SI kit da incasso
Installazione
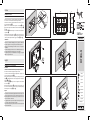
Installare la scatola da incasso a lo muro utilizzando il paramalta in dotazione.
La scatola deve essere installata ad una altezza adeguata all’utente.
Installata la scatola d’incasso, prima di installare il videocitofono, eseguire l’o-
perazione indicata in gura A.
Rimuovere la cornice dal videocitofono togliendo le 4 viti (gura B punto
a) e montare la guida acustica utilizzando le due viti in dotazione (gura B
punto b).
Fissare il telaio C evitando di stringere eccessivamente le viti ed eettuare i
collegamenti D.
Assicurarsi che il dispositivo di bloccaggio sia spostato verso sinistra (posi-
zione aperta). Una volta eettuati i collegamenti agganciare il videocitofono
e ssarlo spostando il dispositivo di bloccaggio verso destra (E punto c).
Smaltimento
Assicurarsi che il materiale d’imballaggio non venga disperso nell’ambiente,
ma smaltito seguendo le norme vigenti nel paese di utilizzo del prodotto.
Alla ne del ciclo di vita dell’apparecchio evitare che lo stesso venga disperso
nell’ambiente.
Lo smaltimento dell’apparecchiatura deve essere eettuato rispettando le nor-
me vigenti e privilegiando il riciclaggio delle sue parti costituenti.
Sui componenti, per cui è previsto lo smaltimento con riciclaggio, sono riportati
il simbolo e la sigla del materiale.
Italiano
English
A
B
DE
C
FUTURA-SI kit for recessed installation
Installation
Install the recessed box ush with wall using the mortar guard supplied.
The box must be installed at an appropriate height for the user.
Once the recessed box is installed, before installing the video entry phone, car-
ry out the operation shown in gure A.
Remove the back-box from the video entry phone by taking out the 4 screws
(gure B point a) and t on the acoustic strip using the two screws provid-
ed (gure B point b).
Attach the back-box C, taking care not to over-tighten the screws, and make
the connections D.
Make sure that the blocking device is moved to the left (open position). Once
the connections are made, hook on the video entry phone and x it by moving
the blocking device to the right (E point c).
Disposal
Do not litter the environment with packing material: make sure it is disposed of
according to the regulations in force in the country where the product is used.
When the equipment reaches the end of its life cycle, take measures to ensure
it is not discarded in the environment.
The equipment must be disposed of in compliance with the regulations in for-
ce, recycling its component parts wherever possible.
Components that qualify as recyclable waste feature the relevant symbol and
the material’s abbreviation.

FUTURA-SI kit à encastrement
Installation
Installer le boîtier à encastrement au ras du mur en utilisant la plaque de pro-
tection contre le plâtre/ciment fournie.
Le boîtier doit être installé à une hauteur adéquate pour l’usager.
Une fois le boîtier à encastrement installé et avant d’installer le portier vidéo,
eectuer l’opération indiquée à la gure A.
Retirer le cadre du portier vidéo en enlevant les 4 vis (gure B point a) et
monter le guide sonore en utilisant les deux vis fournies (gure B point b).
Fixer le cadre C en évitant de trop serrer les vis et eectuer les branchements
D.
Veiller à ce que le dispositif de blocage soit déplacé vers la gauche (position
ouverte). Une fois les branchements eectués, accrocher le portier vidéo et le
xer en déplaçant le dispositif de blocage vers la droite (E point c).
Elimination
S’assurer que le matériel d’emballage n’est pas abandonné dans la nature et
qu’il est éliminé conformément aux normes en vigueur dans le pays d’utilisa-
tion du produit. À la n du cycle de vie de l’appareil, faire en sorte qu’il ne soit
pas abandonné dans la nature.
L’appareil doit être éliminé conformément aux normes en vigueur et en privilé-
giant le recyclage de ses pièces.
Le symbole et le sigle du matériau sont indiqués sur les pièces pour lesquelles
le recyclage est prévu.
FUTURA-SI kit de empotrar
Instalación
Instale la caja de empotrar a ras de la pared utilizando la tapa de protección
contra argamasa incluida.
La caja debe instalarse a una altura adecuada para el usuario.
Una vez instalada la caja de empotrar, y antes de instalar el videoportero, reali-
ce la operación que se indica en la gura A.
Quite el marco del videoportero extrayendo los 4 tornillos (gura B punto
a) y monte la guía acústica utilizando los dos tornillos incluidos (gura B
punto b). Fije el armazón C sin apretar demasiado los tornillos y realice las
conexiones D.
Asegúrese de que el dispositivo de bloqueo esté desplazado hacia la izquierda
(posición abierta). Una vez realizadas las conexiones, enganche el videoportero
y fíjelo desplazando el dispositivo de bloqueo hacia la derecha (E punto c).
Eliminacion
Comprobar que no se tire al medioambiente el material de embalaje, sino que
sea eliminado conforme a las normas vigentes en el país donde se utilice el
producto. Al nal del ciclo de vida del aparato evítese que éste sea tirado al
medioambiente.
La eliminación del aparato debe efectuarse conforme a las normas vigentes y
privilegiando el reciclaje de sus partes componentes.
En los componentes, para los cuales está prevista la eliminación con reciclaje,
se indican el símbolo y la sigla del material.
FUTURA-SI kit de embutir
Instalação
Instale a caixa de embutir nivelada com a parede, utilizando a proteção de
argamassa fornecida.
A caixa tem de ser instalada a uma altura adequada ao utilizador.
Instalada a caixa de embutir, antes de instalar o vídeo porteiro, realize a opera-
ção ilustrada na gura A.
Remova a moldura do vídeo porteiro removendo os 4 parafusos (gura B
ponto a) e monte a guia acústica, utilizando os dois parafusos fornecidos
(gura B ponto b). Fixe a estrutura C evitando apertar demasiado os
parafusos e faça as ligações D.
Certique-se de que o dispositivo de bloqueio ca desviado para a esquerda
(posição aberta). Após ter terminado as ligações encaixe o vídeo porteiro e xe-
-o deslocando o dispositivo de bloqueio para a direita (E ponto c).
Eliminação
Assegurar-se que o material da embalagem não seja disperso no ambiente,
mas eliminado seguindo as normas vigentes no país de utilização do produto.
Ao m do ciclo de vida do aparelho evitar que o mesmo seja disperso no am-
biente.
A eliminação da aparelhagem deve ser efectuada respeitando as normas vi-
gentes e privilegiando a reciclagem das suas partes constituintes.
Sobre os componentes, para os quais é previsto o escoamento com reciclagem,
estão reproduzidos o símbolo e a sigla do material.
Встраиваемый модуль FUTURA-SI
Установка
Установить встраиваемую коробку заподлицо со стеной, используя при-
лагаемую защитную крышку. Коробку следует устанавливать на высоте,
удобной для пользователя. После установки встраиваемой коробки и пе-
ред установкой видеодомофона, выполните операцию, указанную на ри-
сунке A. Снимите рамку видеодомофона, открутив 4 винта (рисунок B
пункт a), и установите акустическую пластину, используя прилагаемые
винты (рисунок B пункт b). Закрепите раму (рисунок C), не затягивая
сильно винты, и выполните соединения (рисунок D).
Убедитесь в том, что запорное устройство сдвинуто влево (открытое
положение). После выполнения подсоединений подключите видеодомо-
фон и зафиксируйте его, переместив запорное устройство вправо (фигура
E пункт c).
УТИЛИЗАЦИЯ
Не загрязняйте окружающую среду упаковочным материалом: убеди-
тесь, что утилизация выполнена всоответствии с нормативами, действу-
ющими встране использования продукта. По окончании срока службы
оборудования утилизируйте его надлежащим образом. Оборудование
следует утилизировать всоответствии с действующими нормативами, по
возможности используя повторную переработку составных частей.
Компоненты, подлежащие повторной переработке, имеют соответствую-
щий символ и аббревиатуру материала.
Français Español Portugûes Русский
Deutsch Nederlands Polski
Kit FUTURA-SI für die Unterputzmontage
Installation
Das Unterputzgehäuse mithilfe der beiliegenden Schutzabdeckung wandbün-
dig installieren.
Das Unterputzgehäuse muss auf einer für den Nutzer angemessenen Höhe
montiert werden.
Nach Einbau des Unterputzgehäuses erst die Video-Innenstation installieren
und dann den in Abbildung A gezeigten Vorgang ausführen.
Den Rahmen von der Video-Innenstation durch Entfernen der 4 Schrauben
abnehmen (Abbildung B Punkt a) und die akustische Schiene mithilfe der
beiden beiliegenden Schrauben montieren (Abbildung B Punkt b).
Den Rahmen C befestigen, ohne die Schrauben dabei zu fest anzuziehen, und
die Anschlüsse vornehmen D.
Vergewissern, dass die Blockiervorrichtung nach links geschoben ist (oene
Position). Nachdem die Anschlüsse vorgenommen wurden, die Video-Innen-
station einhängen und durch Verschieben der Blockiervorrichtung nach rechts
befestigen (E Punkt c).
Entsorgung
Vergewissern Sie sich, dass das Verpackungsmaterial gemäß den Vorschriften
des Bestimmungslandes ordnungsgemäß und umweltgerecht entsorgt wird.
Das nicht mehr benutzbare Gerät ist umweltgerecht zu entsorgen.
Die Entsorgung hat den geltenden Vorschriften zu entsprechen und vorzugs-
weise das Recycling der Geräteteile vorzusehen. Die wiederverwertbaren Ge-
räteteile sind mit einem Materials.
FUTURA-SI-kit voor inbouw
Installatie
Installeer de inbouwdoos verzonken in de muur met behulp van de bijgelever-
de cementbescherming.
De doos moet geïnstalleerd worden op een hoogte die geschikt is voor de ge-
bruiker.
Nadat de inbouwdoos is geïnstalleerd, voordat u de deurvideo installeert, dient
u de handeling uit te voeren die afgebeeld is op g. A.
Verwijder de lijst van de deurvideo door de 4 schroeven te verwijderen (g. B
punt a). Monteer de akoestische geleiding met behulp van de twee bijgele-
verde schroeven (g. B punt b).
Maak het frame vast C. Let erop dat u de schroeven niet te vast aandraait.
Voer de aansluitingen uit D.
Controleer of het blokkeringssysteem naar links geplaatst is (geopende
positie). Nadat u de aansluitingen heeft uitgevoerd, plaats de deurvideo en
maak hem vast door het blokkeringssysteem naar rechts te verplaatsen (E
punt c).
Afdanking
Zorg ervoor dat het materiaal van de verpakking niet in het milieu terechtkomt,
maar afgedankt wordt volgens de wetgeving die van kracht is in het land waar
het product gebruikt wordt. Vermijd dat het toestel aan het einde van haar
levensduur in het milieu terechtkomt. Het toestel moet afgedankt worden in
overstemming met de geldende wetgeving. Geef voorkeur aan het recyclen
van de onderdelen. Op de onderdelen die gerecycled kunnen worden is het
symbool en de afkorting van het materiaal aangebracht.
FUTURA-SI zestaw do wbudowania
Instalacja
Zainstalować wbudowywaną skrzynkę równo ze ścianą wykorzystując do-
starczoną na wyposażeniu osłonę przed zaprawą.
Skrzynkę należy zainstalować na wysokości odpowiadającej użytkownikowi.
Po zainstalowaniu skrzynki, ale przed instalacją wideodomofonu, należy
przeprowadzić czynność wskazaną na rysunku A.
Usunąć ramkę z wideodomofonu wyjmując 4 śruby (rysunek B punkt a) i
zamontować prowadnicę akustyczną przy użyciu dwóch dostarczonych śrub
(rysunek B punkt b).
Przymocować ramkę (rysunek C), nie dokręcając zbyt mocno śrub, i prze-
prowadzić połączenia (rysunek D).
Upewnić się, że urządzenie blokujące jest przesunięte w lewą stronę (po-
łożenie otwarte). Po wykonaniu połączeń, należy przyczepić wideodomofon
i zamocować go przesuwając urządzenie blokujące w prawo (rysunek E
punkt c).
USUWANIE
Nie wolno zaśmiecać środowiska elementami opakowania. Należy upewnić
się, że produkt zostanie usunięty zgodnie z prawem obowiązującym w kraju, w
którym jest używany. Jeżeli urządzenie zakończy swój cykl użytkowania, nale-
ży upewnić się, że nie będzie ono zaśmiecać środowiska naturalnego.
Urządzenie musi być usunięte zgodnie z obowiązującymi przepisami, a o ile
to możliwe, jego części należy poddać recyklingowi. Części, które mogą zostać
poddane recyklingowi są opatrzone odpowiednim symbolem oraz skrótem
materiału, z którego są wykonane.
-
 1
1
-
 2
2


dans d''autres langues
- italiano: CAME FUTURA-SI Guida d'installazione
- español: CAME FUTURA-SI Guía de instalación
- Deutsch: CAME FUTURA-SI Installationsanleitung
- Nederlands: CAME FUTURA-SI Installatie gids
- português: CAME FUTURA-SI Guia de instalação
- polski: CAME FUTURA-SI Instrukcja instalacji
Documents connexes
-
CAME DC00UNICO01 Guide d'installation
-
-
-
-
-
-
-
-
