Chicco Digital Bottle Warmer and Sterilizer Le manuel du propriétaire
- Catégorie
- Chauffe-biberons
- Taper
- Le manuel du propriétaire

Digital Bottle Warmer and Sterilizer
Calienta biberones digital y esterilizador
Chauffe-biberon et stérilisateur numérique
Owner's Manual
Manual del propietario • Manuel du propriétaire
IS0207ESF_01 ChiccoUSA.com
©2022 Artsana USA, INC. 10/22
Read all instructions BEFORE
assembly and USE of product.
KEEP INSTRUCTIONS FOR
FUTURE USE.
Lea todas las instrucciones
ANTES de armar y USAR este
producto. CONSERVE LAS
INSTRUCCIONES PARA USO
FUTURO.
Lire les instructions AVANT ď
assembler et ď UTILISER
le produit. GARDER CES
INSTRUCTIONS POUR S'Y
RÉFÉRER AU BESOIN.

2 3
WARNING
BURN HAZARD
To avoid risk of burns:
• Bottle warmer components and water
temperature can be very hot. Avoid direct
contact with water and steam. Handle with
care.
• Do not touch surfaces that may be hot.
Wait until all parts of the unit have cooled
before touching them.
• Bottles and food jars will be hot; remove
with care.
• Before serving, be sure food is at a safe
temperature.
• To avoid direct contact with hot water, use
support tray when warming food containers
or small bottles.
• Extreme caution must be used when moving
the bottle warmer with hot liquid in it.
CAUTION
• NEVER use without water.
•
This is NOT a toy. Keep out of reach of children.
• Adult supervision required.
• Close supervision is necessary when any
appliance is used near children.
• For household use ONLY - Do NOT use
outdoors.
• Only use appliance for intended use, do not
modify or alter warmer.
• Do not use accessories, spare parts, or any
components not supplied or approved by
Chicco as they may cause injuries or
damage.
• Do NOT use with any bottle or food
container that is not intended to be heated.
• Do not place on or near a hot gas or electric
burner, or in a heated oven.
CAUTION
• Not for space heating purposes.
• Do NOT let cord hang over edge of table or
counter or touch hot surfaces.
• NEVER use an extension cord.
• Before serving, unplug cord from wall outlet.
Do not leave cord within child's reach.
• Always attach plug to bottle warmer first,
then plug cord into the wall outlet. Always
turn off the bottle warmer before removing
the plug from the wall outlet.
• This appliance has a polarized plug (one
blade is wider than the other). To reduce the
risk of electric shock, a polarized electrical
outlet will only allow the plug to be inserted
one way. If the plug does not fit fully into
the outlet, reverse the plug. If it still does
not fit, contact a qualified electrician. Do
not attempt to modify the plug in any way.
• Remove plug from outlet when the
appliance is not in use, before putting on or
taking off parts, and before cleaning.
Allow to cool before handling.
• Inspect carefully before each use. Do not
operate any appliance with a damaged cord
or plug or after the appliance malfunctions
or is dropped or damaged in any manner. If
bottle warmer is faulty and/or not working
correctly, switch it off immediately and
unplug it from the wall outlet.
• To protect against electrical shock do not
immerse cord, plugs, or bottle warmer in
water or other liquid.
• Do NOT use if the bottle warmer, plug, or
cord accidentally falls into water or
becomes submerged.
WHEN USING THIS ELECTRICAL EQUIPMENT, BASIC SAFETY PRECAUTIONS
SHOULD ALWAYS BE FOLLOWED INCLUDING THE FOLLOWING:
IMPORTANT SAFETY
INSTRUCTIONS
READ AND FOLLOW ALL
INSTRUCTIONS
SAVE THESE
INSTRUCTIONS
READ INSTRUCTIONS
CAREFULLY

4 5
Sterilizer Lid
Bottle Warmer Tank
Support Tray
PARTS LIST CONTROL PANEL
WIDE NECK
BOTTLE NARROW
NECK BOTTLE GLASS
BOTTLE
STERILIZE
FOOD
JAR
MILK
BAG
QUICK
MODE STEADY
MODE CONTENT
LEVEL
STARTING TEMP
ROOM
STARTING TEMP
REFRIGERATOR
STARTING TEMP
FREEZER
DESCALING
ALERT
START/
STOP
DELAYED
START
SELECT TIME, SELECT
CONTENT LEVEL,
TIMER COUNTDOWN

6 7
Using the chart below, determine the level of water that is needed for
heating. Content level is the actual amount of liquid inside the bottle
or milk bag being warmed. It is NOT the size or capacity of the bottle.
Note: Warming cycle times may vary based on starting temperature, bottle size and
contents. Use the chart below as a starting point. Warming cycle time may need to
be adjusted to reach the desired temperature.
SETUP - ADD WATER TO TANK
6-9 oz.
2
12-5 oz.
•
QUICK mode: BOTTLE 6-9 oz (190-290 ml)
•
STEADY mode: BOTTLE or MILK BAG 2-9 oz
(60-290 ml)
•
FOOD JARS
Note: SILICONE BOTTLES - Use LEVEL 2 for
all content levels (2-9 oz, 60-290 ml).
•
QUICK mode: BOTTLE 2-5 oz (60-150 ml)
•
STERILIZER mode
6-9 oz.
2
12-5 oz.
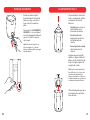
Make sure the Bottle Warmer is
unplugged and placed on a flat,
stable, heat resistant surface.
Pour water directly into the Bottle
Warmer Tank up to the correct
level (LEVEL 1 or LEVEL 2).
Chicco Duo is a wide neck
hybrid baby bottle – glass
inside & plastic outside.
Select the Wide Neck
Plastic Bottle setting for
warming.
SETUP - ADD WATER TO TANK

8 9
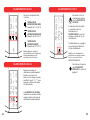
Place bottle, milk bag, or food jar
in the Bottle Warmer Tank.
For Bottles: Attach bottle
ring and nipple before
heating.
For Milk Bags: Make sure bag
is sealed before heating.
For Food Jars: Remove lid
before heating.
Make sure the tank water does
not reach the ring of the bottle,
the seal of the milk bags, or the
top of the food jar.
Note: Works with most bottle types.
If applicable, remove bottle venting
systems when warming. Bottles made
of various materials and construction
will heat at different times.
Use the Support Tray for food
jars and milk bags.
WARMING - STEP 1
Plug the cord into the back of
the Bottle Warmer Tank and then
plug it into the outlet. It will beep
once.
Touch the START/STOP button.
The icons on the Control Panel
will blink indicating that a cycle is
ready to be selected.
Note: If no warming cycle is selected for
three minutes the Warmer will beep and
switch off automatically.
SETUP - POWER ON

10 11
For Bottles: Select QUICK or
STEADY mode.
For Milk Bags: Only STEADY
mode is available - Milk Bags can
NOT be warmed using QUICK
mode. Skip to STEP 4.
For Jars: Skip to STEP 5.
QUICK
Mode
STEADY
Mode
WARMING - STEP 3
Touch “+” or “-“ to select the
Bottle/Milk Bag content level in
ounces.
Then touch the flashing
CONTENT LEVEL icon to
confirm the amount.
Max. Allowable Content
Bottles: 9 oz (290 ml)
Milk Bags: 6 oz (190 ml)
Note: The content level is the actual
amount of liquid inside the bottle
or milk bag to be warmed.
WARMING - STEP 4
Select the warming mode by
touching the desired button.
The icon will light up to confirm
your selection.
Note: At any time during this process
you can go back and change a previously
selected setting by touching on that icon.
The selection program will restart from
that point.
WIDE NECK
BOTTLE*
NARROW NECK
BOTTLE
GLASS
BOTTLE
MILK
BAG
FOOD
JAR
*Always select “WIDE NECK BOTTLES”
when warming any silicone bottles.
WARMING CYCLE MEMORY
FUNCTION: The bottle warmer
will save the previous settings
to memory - Simply touch the
START/STOP button to begin
reheating using the previous
settings.
WARMING - STEP 2

12 13
WARMING - STEP 5
Select the content temperature.
STARTING TEMP
FREEZER:
About 0°F (-18 °C)
STARTING TEMP
REFRIGERATOR:
About 40°F (4 °C)
STARTING TEMP
ROOM:
about 70°F (21 °C).
Note: Frozen setting unavailable for
bottles. Room Temp. setting
unavailable for Milk Bags.
A default warming time
will appear based on the
previous selections. This time
can be modified by touching
“+” or “-“ to increase or
decrease the warming time.
SILICONE BOTTLES take longer
to heat. Always add 3 minutes to
the default warming time.
WARMING - STEP 6
WARMING - STEP 7
To start the warming
cycle touch the
START/STOP button.
The warmer will beep and the
warming cycle will begin. The
TIMER will show you the time
remaining in the warming cycle.
The bottle warmer will turn off
automatically once the warming
cycle is complete.
Note: The warming cycle can be
stopped at any time by simply touching
the START/STOP button.
For information on
DELAYED START
see page 15.

15
14
The warming cycle can be delayed
for up to 60 mins. before
beginning the cycle.
Before touching the START/STOP
button (to start the warming
cycle), touch the DELAYED START
button. Adjust the time by
pressing the “+” and “-“ buttons.
The delayed start can be set for
15 mins., 30 mins., 45 mins.,
and 60 mins.
Then touch the START/STOP
button to start the warming
cycle with a delay. The timer will
countdown and then the cycle will
begin.
The delay can be skipped at any
point by touching the START/
STOP button again to run the
cycle immediately.
DELAYED START
ONCE WARMING CYCLE IS COMPLETE
CAUTION: BOTTLE WARMER TANK WATER MAY BE HOT: CAREFULLY REMOVE
THE BOTTLE, MILK BAG, OR FOOD JAR IMMEDIATELY AFTER WARMING CYCLE IS
COMPLETED.
ALWAYS CHECK THE TEMPERATURE OF THE CONTENTS BEFORE SERVING:
FOR FEEDING BOTTLES AND MILK BAGS:
Gently shake or stir the contents to ensure the temperature is even; check
the temperature by squeezing a few drops onto the inside of your wrist.
FOR FOOD JARS:
Stir the contents of the jar to make sure the temperature is even; check the
temperature by tasting.
• For best results, allow the bottle warmer to cool completely (approx. 30 mins.)
before starting a new warming cycle.
• If you have twins, the Bottle Warmer can be used for two consecutive warming
cycles by removing the plug from the wall outlet and carefully emptying the hot
water and replacing it with room temperature water. After plugging in the warmer
and turning it back on, simply touch the START/STOP button to begin reheating
using the previous settings stored in memory.
• When warming Milk Bags and Jars from frozen, you may need to run a second cycle.
The initial default warming time should be decreased as needed to prevent
overheating during the second cycle.
• If the jar contents are not warm enough, repeat warming cycle until desired
temperature is reached. When repeating a cycle, check the temperature of contents
at regular intervals to avoid overheating. The initial default warming time can also
be decreased as needed to prevent overheating during the second cycle.
• When finished, remove the plug from the wall outlet. Do not leave cord within
child's reach. Allow the tank to cool down completely before pouring out the
water. Dry the inside thoroughly.

16 17
STERILIZING - STEP 2
Plug the cord into the back of
the Bottle Warmer Tank and then
plug it into the outlet. It will
beep once.
Touch the START/STOP button.
The icons on the Control Panel
will blink indicating that a cycle
is ready to be selected.
Note: If no warming cycle is selected for
three minutes the Warmer will beep and
switch off automatically.
Before first use as a Sterilizer, run through a sterilizing cycle
without anything except the support tray in the Bottle Warmer.
Make sure Bottle Warmer is
unplugged and placed on a flat,
stable, heat resistant surface.
Always clean and rinse the bottles
and accessories before placing
them in the Bottle Warmer Tank.
Pour water directly into the Bottle
Warmer Tank up to LEVEL 1.
Then place the Support Tray into
the Bottle Warmer Tank.
STERILIZING - BEFORE FIRST USE
STERILIZING - STEP 1

18 19
Touch the STERILIZE button. The
icon will stop flashing to confirm
your selection.
Then touch the START/STOP
button to begin the cycle. The
TIMER will show you the time
remaining in the sterilization
cycle.
STERILIZING - STEP 4
ONCE STERILIZING CYCLE IS COMPLETE
When the cycle is complete, a long audible beep will be heard and the
Warmer will turn off automatically.
Always clean your hands thoroughly before touching the sanitized
objects. Sanitized items will remain sterile inside the Warmer with the
lid on for about 24 hours. If there is a power outage during use of the
Sterilizer the cycle must be restarted.
Allow the Warmer to cool completely before starting a new cycle. If
complete, allow to cool then remove the plug from the wall outlet,
pour out the water, and dry thoroughly before storing in a cool dry
place.
STERILIZING - STEP 3
Place the bottle ring into the
Support Tray.
Place the bottle UPSIDE DOWN
into the Bottle Warmer Tank.
Then arrange the bottle cap, and
nipple, as shown.
Place Sterilizer Lid onto the Bottle
Warmer making sure the groove
in the BACK of the Sterilizer Lid
fits into the cutout in the Support
Tray.
Make sure bottles and
accessories do not prevent the lid
from closing correctly.
Bottle Cap
Nipple
Bottle
Support Tray Cutout
Sterilizer Lid Groove
Bottle Ring

20 21
CARE AND MAINTENANCE
AFTER EACH USE: Remove the plug from the wall outlet. Do not leave
cord within child's reach. Allow the tank to cool down completely
before pouring out the water. Dry the inside thoroughly.
CLEANING THE BOTTLE WARMER: Make sure the bottle warmer
has cooled down completely and the plug has been removed from the
wall outlet before cleaning. Use a damp soft cloth to clean the bottle
warmer. Do NOT use bleach or any other harsh chemicals. The bottle
warmer is NOT dishwasher safe. Dry thoroughly before storing in a
cool, dry place.
REMOVING THE LEVEL
INDICATOR: The tank level
indicator is removable for
cleaning. Push up on the part to
slide it up and out of the slot in
the side of the tank.
REASSEMBLING THE LEVEL
INDICATOR: Make sure to clean
the level indicator and the slot
before reassembling. Make sure
the level indicator is completely
inserted before adding water to
the tank.
The normal use of the Bottle
Warmer can cause the formation of
scale residue on the heating plate.
Excessive scale residue may cause
incorrect operation and prevent
proper sanitation of the objects
inserted in the appliance and/or
cause permanent damage to the
appliance.
The DESCALING icon will light up
to indicate that you need to descale
the Bottle Warmer.
To descale the Bottle Warmer,
make sure it is unplugged and has
cooled down completely.
Pour equal parts of water and
vinegar directly into the Bottle
Warmer Tank up to LEVEL 2. Let
soak overnight.
Do NOT run the unit while
soaking. After it has soaked
overnight, empty out the water and
vinegar solution. Dry thoroughly
with a soft cloth.
After descaling, press and hold the
DESCALING icon/button for about
2 seconds until it resets the
descaling function and switches off.
DESCALING

23
22
PROBLEM POSSIBLE CAUSE SOLUTION
The Warmer does not
turn ON. There is no power.
The cord plug or the cord
connector has not been plugged in
correctly, or they are damaged.
Appliance was submerged in water.
Check that there is power in the
electrical outlet.
Check that the plug and connector
have been plugged in correctly, and
that they are in good condition.
Should the product still not work,
contact Customer Service.
Discard unit.
The feeding bottles are
stained at the end of the
sterilization cycle.
There are scale deposits in the
appliance.
High mineral content in tap water.
The Warmer needs to be descaled.
See the "Descaling" section for
more details.
Use distilled water.
Noise – Incomplete cycle. Excessive scale deposits on heating
plate. The Warmer needs to be descaled.
See the "Descaling" section for
more details.
Rapid scale build-up. Use of tap water with high mineral
content, softened or treated water. Use distilled water.
The Warmer needs to be descaled.
See the "Descaling" section for
more details.
TROUBLE SHOOTING AND REPAIR
Please do not return this product to the store.
If you have any questions or comments about
this product, or are missing any of the parts,
contact us in one of the following ways:
(877)-424-4226
1826 William Penn Way
Lancaster, PA 17601
www.chiccousa.com
@
Reference: 00007390100070
Electrical Ratings: 220W 120V~ 60Hz
Model: 06867_MU
Made In China
= WARNING! = WARNING! Hot Steam.
= WARNING! Hot Surface.
!
FOR MORE INFORMATION
TECHNICAL INFORMATION
Bottle Warmer
E351537

24 25
INSTRUCCIONES DE SEGURIDAD
IMPORTANTES
LEA Y SIGA TODAS LAS
INSTRUCCIONES
GUARDE ESTAS
INSTRUCCIONES
LEA LAS INSTRUCCIONES
CUIDADOSAMENTE
RIESGO DE QUEMADURA
Para evitar el riesgo de sufrir
quemaduras:
• Los componentes del calienta biberones y
la temperatura del agua pueden estar muy
calientes. Evite el contacto directo con agua
o vapor. Manéjelo con cuidado.
• No toque superficies que puedan estar
calientes. Espere a que todas las piezas de la
unidad se hayan enfriado antes de tocarlas.
• Los biberones y los recipientes de comida
estarán calientes; retírelos con cuidado.
• Antes de servir, asegúrese de que los
alimentos estén a una temperatura segura.
• Para evitar el contacto directo con el agua
caliente, utilice la bandeja de apoyo al
calentar recipientes de comida o biberones
pequeños.
• Se debe tener extrema precaución al mover
el calienta biberones con líquido caliente
adentro.
PRECAUCIÓN
• NUNCA lo utilice sin agua.
• NO es un juguete. Manténgalo fuera del
alcance de los niños.
• Se requiere la supervisión de un adulto.
• Es necesario supervisar atentamente
cualquier aparato que se utilice cerca de los
niños.
• Es para uso doméstico EXCLUSIVAMENTE.
NO lo utilice en el exterior.
• Utilice el aparato únicamente para el uso
indicado; no lo modifique ni lo altere.
• No utilice accesorios, piezas de repuesto ni
ningún componente no suministrado o no
aprobado por Chicco, ya que pueden
provocar lesiones o daños.
• NO lo utilice con ningún biberón o
recipiente de comida que no se haya
diseñado para calentarse.
• No lo coloque sobre un quemador de gas o
eléctrico, ni cerca de estos, ni en un horno
caliente.
PRECAUCIÓN
• No es apto para la calefacción de espacios.
• NO deje el cable colgando del borde de la
mesa o de la superficie sobre la que está
apoyado ni tocando superficies calientes.
• NUNCA utilice un cable de extensión.
• Antes de servir, desconecte el cable del
tomacorriente. No deje el cable al alcance
de los niños.
• Siempre conecte el enchufe primero al
calienta biberones y luego enchufe el cable
al tomacorriente de pared. Siempre apague
el calienta biberones antes de desconectarlo
del tomacorriente.
• Este aparato tiene un enchufe polarizado
(una clavija es más ancha que la otra). Para
reducir el riesgo de descarga eléctrica, este
enchufe fue diseñado para que entre en un
tomacorriente polarizado solo en una única
posición. Si el enchufe no entra
completamente en el tomacorriente,
invierta el enchufe. Si aun así no entra,
comuníquese con un electricista cualificado.
No intente modificar el enchufe de manera
alguna.
• Retire el enchufe del tomacorriente cuando
el aparato no esté en uso, antes de
introducir o quitar piezas y antes de
limpiarlo. Deje que se enfríe antes de
manipularlo.
• Revíselo con cuidado antes de cada uso. No
ponga en funcionamiento ningún aparato
que tenga un cable o enchufe dañado, que
funcione mal o que se haya caído o haya
sufrido algún daño. Si el calienta biberones
presenta fallas o no funciona correctamente,
apáguelo de inmediato y desenchúfelo del
tomacorriente de pared.
• Para evitar una descarga eléctrica, no
sumerja el cable, los enchufes ni el calienta
biberones en agua u otro líquido.
• NO lo utilice si el calienta biberones, el
enchufe o el cable se caen accidentalmente
al agua o se sumergen.
AL UTILIZAR ESTE EQUIPO ELÉCTRICO, SE DEBEN SEGUIR PRECAUCIONES
DE SEGURIDAD BÁSICAS, ENTRE LAS SIGUIENTES:
ADVERTENCIA

26 27
PANEL DE CONTROL
BIBERÓN DE
CUELLO ANCHO BIBERÓN DE
CUELLO ANGOSTO BIBERÓN DE
VIDRIO
ESTERILIZAR
RECIPIENTE DE
COMIDA
BOLSA DE
LECHE
MODO
RÁPIDO MODO
CONTINUO NIVEL DE
CONTENIDO
TEMPERATURA
DE ENCENDIDO
AMBIENTE
TEMPERATURA
DE ENCENDIDO
REFRIGERADOR
TEMPERATURA
DE ENCENDIDO
CONGELADOR
ALERTA DE
ELIMINACIÓN
DE SARRO
ENCENDIDO/
APAGADO
ENCENDIDO
RETRASADO
SELECCIONAR TIEMPO,
SELECCIONAR NIVEL DE CONTENIDO,
TEMPORIZADOR REGRESIVO
Tapa del esterilizador
Depósito del calienta biberones
Bandeja de apoyo
LISTA DE PIEZAS

28 29
Asegúrese de que el calienta
biberones esté desenchufado y
que se encuentre sobre una
superficie plana, estable y
resistente al calor.
Vierta agua directamente en el
depósito del calienta biberones
hasta el nivel correcto (NIVEL 1 o
NIVEL 2).
Chicco Duo es un
biberón híbrido de cuello
ancho, con el interior
de vidrio y el exterior de
plástico. Seleccione la
configuración del biberón
de plástico de cuello
ancho para calentarlo.
MONTAJE: AGREGAR AGUA AL DEPÓSITO
Utilizando la siguiente tabla, determine el nivel de agua que se
necesita para calentar. El nivel de contenido es la cantidad real de
líquido dentro del biberón o de la bolsa de leche que se va a calentar.
NO es el tamaño ni la capacidad del biberón.
Nota: El tiempo del ciclo de calentamiento puede variar según la temperatura de
inicio, el tamaño del biberón y los contenidos. Utilice el siguiente cuadro como
referencia. Puede ser necesario ajustar el tiempo del ciclo de calentamiento para
alcanzar la temperatura deseada.
MONTAJE: AGREGAR AGUA AL DEPÓSITO
6-9 oz.
2
12-5 oz.
•
Modo RÁPIDO: BIBERÓN 6-9 oz (190-290 ml)
•
Modo CONTINUO: BIBERÓN o BOLSA DE LECHE
2-9 oz (60-290 ml)
•
RECIPIENTES DE COMIDA
Nota: Con BIBERONES DE SILICONA, utilice el
NIVEL 2 para todos los niveles de contenido
(2-9 oz, 60-290 ml).
•
Modo RÁPIDO: BIBERÓN 2-5 oz (60-150 ml)
•
Modo ESTERILIZADOR
6-9 oz.
2
12-5 oz.

30 31
Coloque el biberón, la bolsa de
leche o el recipiente de comida
en el depósito del calienta
biberones.
Para biberones: coloque el
anillo del biberón y la
tetina antes de calentar.
Para bolsas de leche:
asegúrese de que la bolsa
esté sellada antes de
calentar.
Para recipientes de comida:
retire la tapa antes de
calentar.
Asegúrese de que el agua del
depósito no llegue al anillo del
biberón, al sello de las bolsas de
leche ni a la parte superior del
recipiente de comida.
Nota: Funciona con la mayoría de los
tipos de biberones. Si es el caso, retire
los sistemas de ventilación de los
biberones al calentarlos. Los biberones
de distintos materiales y construcciones
se calentarán en tiempos diferentes.
Utilice la bandeja de apoyo para
los recipientes de comida y las
bolsas de leche.
CALENTAMIENTO: PASO 1
Enchufe el cable en la parte
trasera del depósito del calienta
biberones y luego conéctelo al
tomacorriente. Se emitirá un
pitido.
Presione el botón ENCENDIDO/
APAGADO. Los íconos del panel
de control parpadearán indicando
que un ciclo está listo para ser
seleccionado.
Nota: Si durante tres minutos no se
selecciona ningún ciclo, el calienta
biberones emitirá un pitido y se apagará
automáticamente.
MONTAJE: ENCENDIDO

32 33
Para biberones: seleccione el
modo RÁPIDO o CONTINUO.
Para bolsas de leche: solo el
modo CONTINUO está
disponible. Las bolsas de leche
NO se pueden calentar en modo
RÁPIDO. Vaya al PASO 4.
Para recipientes: vaya al PASO 5.
MODO
RÁPIDO
MODO
CONTINUO
CALENTAMIENTO: PASO 3
Toque “+” o “-” para seleccionar
el nivel de contenido de la
botella/bolsa de leche en onzas.
Luego toque el ícono
parpadeante NIVEL DE
CONTENIDO para
confirmar la cantidad.
Contenido máximo permitido
Biberones: 9 oz (290 ml)
Bolsas de leche: 6 oz (190 ml)
Nota: El nivel de contenido es la
cantidad real de líquido dentro del
biberón o de la bolsa de leche que se va
a calentar.
CALENTAMIENTO: PASO 4
Seleccione el modo de
calentamiento presionando el
botón deseado. El ícono se
iluminará para confirmar su
selección.
Nota: En cualquier momento de este
proceso puede volver atrás y cambiar
un ajuste previamente seleccionado
tocando sobre ese ícono. El programa de
selección se reiniciará desde ese punto.
BIBERÓN DE CUELLO
ANCHO*
BIBERÓN DE CUELLO
ANGOSTO
BIBERÓN
DE VIDRIO
BOLSA
DE LECHE
RECIPIENTE DE COMIDA
*Seleccione siempre “BIBERONES DE
CUELLO ANCHO” para calentar
cualquier biberón de silicona.
FUNCIÓN DE MEMORIA DEL
CICLO DE CALENTAMIENTO:
El calienta biberones guardará la
configuración anterior en la
memoria. Basta con pulsar el
botón ENCENDIDO/APAGADO
para comenzar a recalentar
utilizando la configuración
anterior.
CALENTAMIENTO: PASO 2

34 35
CALENTAMIENTO: PASO 7
Para iniciar el ciclo de
calentamiento, presione
el botón ENCENDIDO/
APAGADO.
El calentador emitirá un pitido
y comenzará el ciclo de
calentamiento. El
TEMPORIZADOR le mostrará
el tiempo restante del ciclo de
calentamiento.
El calienta biberones se apagará
una vez que haya finalizado el
ciclo de calentamiento.
Nota: El ciclo de calentamiento se
puede detener en cualquier momento
tan solo con presionar el botón
ENCENDIDO/APAGADO.
Para obtener información
sobre ENCENDIDO
RETRASADO, consulte la
página 37.
CALENTAMIENTO: PASO 5
Seleccione la temperatura del
contenido.
TEMPERATURA DE
ENCENDIDO CONGELADOR:
Alrededor de 0° F (-18° C)
TEMPERATURA DE
ENCENDIDO REFRIGERADOR:
Alrededor de 40° F (4° C)
TEMPERATURA DE
ENCENDIDO AMBIENTE:
Alrededor de 70° F (21° C).
Nota:
Configuración congelado no
disponible para biberones. La configuración
de temperatura ambiente no está
disponible para las bolsas de leche.
Aparecerá un tiempo de
calentamiento predeterminado
basado en las selecciones
anteriores. Este tiempo se puede
modificar tocando “+” o “-” para
aumentar o disminuir el tiempo
de calentamiento.
Los BIBERONES DE SILICONA
tardan más en calentarse. Añada
siempre 3 minutos al tiempo de
calentamiento predeterminado.
CALENTAMIENTO: PASO 6

37
36
Los modos pueden demorarse
hasta 60 minutos antes de
comenzar el ciclo.
Antes de presionar el botón
ENCENDIDO/APAGADO (para
iniciar el ciclo de calentamiento),
presione el botón ENCENDIDO
RETRASADO. Ajuste el tiempo
presionando los botones “+” y “-”.
El inicio retrasado puede
configurarse por 15 minutos, 30
minutos, 45 minutos y 60
minutos.
Luego presione el botón
ENCENDIDO/APAGADO para
iniciar el ciclo de calentamiento
con un retraso. El temporizador
realizará una cuenta regresiva y
luego comenzará el ciclo.
La demora puede omitirse en
cualquier momento presionando
el botón ENCENDIDO/APAGADO
para iniciar el ciclo de inmediato.
ENCENDIDO RETRASADO
UNA VEZ FINALIZADO EL CICLO DE CALENTAMIENTO
ADVERTENCIA: EL AGUA DEL DEPÓSITO DEL CALIENTA BIBERONES PUEDE
ESTAR CALIENTE: RETIRE CON CUIDADO EL BIBERÓN, LA BOLSA DE LECHE O
EL RECIPIENTE DE COMIDA INMEDIATAMENTE DESPUÉS DE QUE EL CICLO DE
CALENTAMIENTO HAYA FINALIZADO.
CONTROLE SIEMPRE LA TEMPERATURA DE LOS CONTENIDOS ANTES DE
SERVIR:
PARA BIBERONES O BOLSAS DE LECHE:
Agite o remueva suavemente el contenido para asegurarse de que la
temperatura sea uniforme; compruebe la temperatura vertiendo unas gotas
en la cara interna de su muñeca.
PARA RECIPIENTES DE COMIDA:
Remueva el contenido del recipiente para asegurarse de que la temperatura
sea uniforme; compruebe la temperatura probando el contenido.
• Para obtener mejores resultados, deje que el calienta biberones se enfríe
completamente (aproximadamente 30 minutos) antes de iniciar un nuevo ciclo de
calentamiento.
• Si tiene mellizos, el calienta biberones puede utilizarse durante dos ciclos de
calentamiento consecutivos: se retira el enchufe del tomacorriente y se quita
cuidadosamente el agua caliente que luego se sustituye por agua a temperatura
ambiente. Luego de enchufar el calentador y volver a encenderlo, basta con
presionar el botón ENCENDIDO/APAGADO para comenzar a recalentar utilizando
las configuraciones anteriores almacenadas en la memoria.
•
Al calentar las bolsas de leche y los recipientes congelados, es posible que tenga que
realizar un segundo ciclo. El tiempo de calentamiento inicial predeterminado debe
reducirse según sea necesario para evitar el sobrecalentamiento durante el segundo ciclo.
• Si los contenidos del recipiente no están lo suficientemente calientes, repita el ciclo
de calentamiento hasta alcanzar la temperatura deseada. Al repetir el ciclo, controle
la temperatura de los contenidos a intervalos regulares para evitar el
sobrecalentamiento. El tiempo de calentamiento inicial predeterminado también
puede reducirse según sea necesario para evitar el sobrecalentamiento durante el
segundo ciclo.
• Al finalizar, retire el enchufe del tomacorriente. No deje el cable al alcance de los
niños. Deje que el depósito se enfríe por completo antes de verter el agua. Seque
bien el interior.

38 39
ESTERILIZACIÓN: PASO 2
Enchufe el cable en la parte
trasera del depósito del calienta
biberones y luego conéctelo al
tomacorriente. Se emitirá un
pitido.
Presione el botón ENCENDIDO/
APAGADO. Los íconos del panel
de control parpadearán
indicando que un ciclo está listo
para ser seleccionado.
Nota: Si durante tres minutos no se
selecciona ningún ciclo, el calienta
biberones emitirá un pitido y se apagará
automáticamente.
Antes de utilizarlo por primera vez como esterilizador, realice un ciclo
de esterilización sin nada más que la bandeja de apoyo en el calienta
biberones.
Asegúrese de que el calienta
biberones esté desenchufado y
que se encuentre sobre una
superficie plana, estable y
resistente al calor. Siempre lave y
enjuague los biberones y
accesorios antes de colocarlos en
el depósito del calienta biberones.
Vierta agua directamente en el
depósito del calienta biberones
hasta el NIVEL 1.
Luego coloque la bandeja de
apoyo en el depósito del calienta
biberones.
ESTERILIZACIÓN: ANTES DEL PRIMER USO
ESTERILIZACIÓN: PASO 1
La page est en cours de chargement...
La page est en cours de chargement...
La page est en cours de chargement...
La page est en cours de chargement...
La page est en cours de chargement...
La page est en cours de chargement...
La page est en cours de chargement...
La page est en cours de chargement...
La page est en cours de chargement...
La page est en cours de chargement...
La page est en cours de chargement...
La page est en cours de chargement...
La page est en cours de chargement...
La page est en cours de chargement...
La page est en cours de chargement...
-
 1
1
-
 2
2
-
 3
3
-
 4
4
-
 5
5
-
 6
6
-
 7
7
-
 8
8
-
 9
9
-
 10
10
-
 11
11
-
 12
12
-
 13
13
-
 14
14
-
 15
15
-
 16
16
-
 17
17
-
 18
18
-
 19
19
-
 20
20
-
 21
21
-
 22
22
-
 23
23
-
 24
24
-
 25
25
-
 26
26
-
 27
27
-
 28
28
-
 29
29
-
 30
30
-
 31
31
-
 32
32
-
 33
33
-
 34
34
-
 35
35


Chicco Digital Bottle Warmer and Sterilizer Le manuel du propriétaire
- Catégorie
- Chauffe-biberons
- Taper
- Le manuel du propriétaire