Arenti OUTDOOR1 Mode d'emploi
- Catégorie
- Des caméras de sécurité
- Taper
- Mode d'emploi

EN Outdoor Wi-Fi Camera
FR Caméra Wi-Fi extérieure
NL wifi-camera voor buiten
ES Cámara wifi al aire libre
PT Câmera Wi-Fi externa
DE Wi-Fi-Außenkamera
IT Telecamera Wi-Fi esterna
RU Уличная камера Wi-Fi
TU Açık Wi-Fi Kamera
JP スマート屋内Wi-Fiカメラ
QUICK GUIDE
OUTDOOR1
Compatible with Amazon Alexa & Google Assistant


EN
Quick start guide
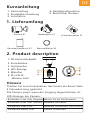
1. Packing list
2. Product description
3. Installation
4. Product configuration
5. Legal notice
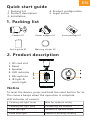
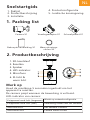
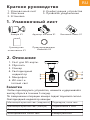
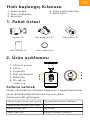
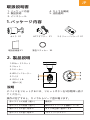
1. Packing list
EN
Power adaptor X1 Scew package X1
Quick guide X1
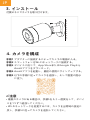
2. Product description
1. SD card slot
2. Reset
3. Speaker
4. LED indicator
5. Microphone
6. IR light &
warm light
Camera X1
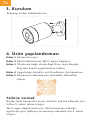
Notice
To reset the device, press and hold the reset button for 5s.
The camera beeps when the operation is complete.
LED indicator of camera:
Flashing red light (slow)
Flashing red light (fast)
Fixed red light
Fixed blue light
Wait for network config
Connecting the network
Network is malfunctional
Camera is working correctly
Warning sticker X2

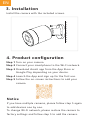
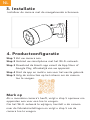
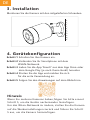
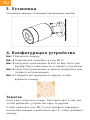
3. Installation
EN
EN
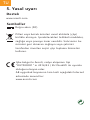
4. Product configuration
Step 1 Turn on your camera.
Step 2 Connect your smartphone to the Wi-Fi network.
Step 3 Download Arenti app from the App Store or
Google Play depending on your device.
Step 4 Launch the App and sign up for the first use.
Step 5 Follow the on-screen instructions to add your
camera.
Install the camera with the included screws.
If you have multiple cameras, please follow step 5 again
to add devices one by one.
To change Wi-Fi network, please restore the camera to
factory settings and follow step 5 to add the camera.
Notice

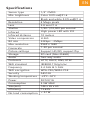
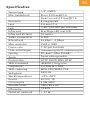
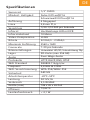
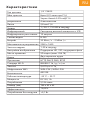
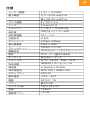
Sensor type
Min. brightness
Resolution
Lens
Shutter
Infrared
Infrared distance
Video compression
Bit rate
Max resolution
Framerate
Picture settings
Storage
Audio
Protocols
WiFi standard
Frequency
WiFi encryption
Security
Working temperature
Power
Consumption
Size(mm)
Efficiency
No-load consumption
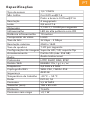
1/3" CMOS
Color [email protected]
Black and white [email protected]
4 Mega pixels
2.8 mm F1.6
1/20-1/10,000 per second
High power LED with ICR
10 meters
H.265
32Kbps - 2Mbps
2560 x 1440
1-20 per second
Support HD/SD; support flip
SD card (Max 256GB)
Two-way audio
HTTP, DHCP, DNS, RTSP
IEEE802.11b/g/n/ac
2.4 GHz & 5 GHz
WPA-PSK/WPA2-PSK
AES128
-20℃~50℃
DC12V,1A
5.5W MAX
146 x 65 x 65
73.62%
< 0.1W
Specifications
EN
EN

EN
EN
Support
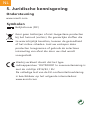
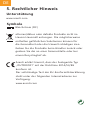
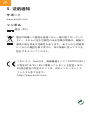
5. Legal notice
www.arenti.com
Symbols
Direct current (DC)
Don't throw batteries or out of order products with
the household waste (garbage). The dangerous
substances that they are likely to include may harm
health or the environment. Make your retailer take
back these products or use the selective collect of
garbage proposed by your city.
Hereby, Arenti, declares that the radio equipment
type ‘OUTDOOR1' is in compliance with the
Directive 2014/53/EU
The full test of the EU declaration of conformity is
available at the following Internet address:
www.arenti.com

EN
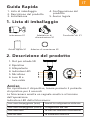
Guide de démarrage rapide
1. Liste de colisage
2. Description du produit
3. Installation
4. Configuration de l'appareil
5. Mention légale
FR
Caméra X1 Adaptateur secteur X1 Paquet de vis X1
Manuel d'utilisation X1
2. Description du produit
Remarquer
Pour réinitialiser l'appareil, maintenez le bouton de
réinitialisation enfoncé pendant 5 secondes.
Caméra émet un bip lorsque l'opération est terminée.
Indicateur LED de la caméra:
Attendez la configuration du réseau
Connexion au réseau
Le réseau est défectueux
La caméra fonctionne correctement
1. Liste de colisag
1. Emplacement pour
carte SD
2. Réinitialiser
3. Conférencier
4. Indicateur LED
5. Micro
6. Lumière infrarouge et
lumière chaude
Lumière rouge clignotant (lent)
Lumière rouge clignotant (rapide)
Lumière rouge fixe
Lumière bleue fixe
Autocollant
d'avertissement X2

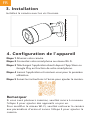
3. Installation
EN
FR
Si vous avez plusieurs caméras, veuillez suivre à nouveau
l'étape 5 pour ajouter des appareils un par un.
Pour modifier le réseau Wi-Fi, veuillez restaurer la caméra
aux paramètres d'usine et suivre l'étape 5 pour ajouter la
caméra.
Remarquer
Installez la caméra avec les vis fournies.
4. Configuration de l'appareil
Étape 1 Allumez votre caméra.
Étape 2 Connectez votre smartphone au réseau Wi-Fi.
Étape 3 Téléchargez l'application Arenti depuis l'App Store ou
Google Play en fonction de votre smartphone.
Étape 4 Lancez l'application et inscrivez-vous pour la première
utilisation.
Étape 5 Suivez les instructions à l'écran pour ajouter la caméra.

Type de capteur
Min. luminosité
Résolution
Lentille
Obturateur
Infrarouge
Distance infrarouge
Compression de vidéo
Débit binaire
Résolution max
Framerate
Paramètres d'image
Espace de rangement
l'audio
Protocoles
Norme WiFi
La fréquence
Cryptage WiFi
Sécurité
Température de fonctionnement
Puissance
Consommation
Taille (mm)
Efficacité
Consommation à vide
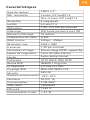
CMOS 1/3"
Couleur [email protected]
Noir et blanc [email protected]
4 mégapixels
2,8 mm F1.6
1/20-1/10 000 par seconde
LED haute puissance avec ICR
10 mètres
H.265
32Kbps - 2Mbps
2560 x 1440
1-20 par seconde
Prise en charge HD/SD ; support flip
Carte SD (Max 256 Go)
Audio bidirectionnel
HTTP, DHCP, DNS, RTSP
IEEE802.11b/g/n/ac
2,4 GHz et 5 GHz
WPA-PSK/WPA2-PSK
AES128
-20℃~50℃
DC12V, 1A
5.5W MAX
146x65x65
73,62 %
< 0,1 W
Caractéristiques
EN
FR

EN
FR
Soutien
5. Mention légale
www.arenti.com
Symboles
Courant continu (DC)
Ne jetez pas les piles ou les produits en panne avec
les déchets ménagers ( g arba g e). Les substances
dangereuses qu'elles sont susceptibles d'inclure
peuvent nuire à la santé ou à l'environnement.
Faites reprendre ces produits à votre revendeur ou
utilisez la collecte sélective des déchets proposée
par votre ville.
Par la présente, Arenti, déclare que le type
d'équipement radio 'OUTDOOR1' is in savoir
la conformité h la Directive 2014/53 / UE
Le test complet de la déclaration de conformité
UE est disponible à l'adresse Internet suivante :
www.arenti.com

EN
Snelstartgids
1. Paklijst
2. Productbeschrijving
3. Installatie
4. Productconfiguratie
5. Juridische kennisgeving
1. Packing list
NL
Camera X1 Voedingsadapter X1 Schroefpakket X1
Beknopte handleiding X1
2. Productbeschrijving
1. SD-kaartsleuf
2. Resetten
3. Spreker
4. LED-indicator:
5. Microfoon
6. IR-licht &
warm licht
Merk op
Houd de resetknop 5 seconden ingedrukt om het
apparaat te resetten.
De camera piept wanneer de bewerking is voltooid.
LED-indicator van camera:
Knipperend rood licht (langzaam)
Knipperend rood licht (snel)
Vast rood licht
Vast blauw licht
Wacht op netwerkconfiguratie
Verbinding maken met het netwerk
Het netwerk is defect
Camera werkt correct
Waarschuwings-
sticker X2

3. Installatie
EN
NL
4. Productconfiguratie
Stap 1 Zet uw camera aan.
Stap 2 Verbind uw smartphone met het Wi-Fi-netwerk.
Stap 3 Download de Arenti-app vanuit de App Store of
Google Play, afhankelijk van uw apparaat.
Stap 4 Start de app en meld u aan voor het eerste gebruik.
Stap 5 Volg de instructies op het scherm om de camera
toe te voegen.
Als u meerdere camera's heeft, volgt u stap 5 opnieuw om
apparaten een voor een toe te voegen.
Om het Wi-Fi-netwerk te wijzigen, herstelt u de camera
naar de fabrieksinstellingen en volgt u stap 5 om de
camera toe te voegen.
Merk op
Installeer de camera met de meegeleverde schroeven.

Sensortype
Min. helderheid
Resolutie
Lens
Luik
Infrarood
Infrarood afstand
Video compressie
Bitsnelheid
Max resolutie
Frame rate
Foto-instellingen
Opslag
Audio
Protocollen
WiFi standaard
Frequentie
WiFi-codering
Veiligheid
Werktemperatuur
Kracht
Consumptie
Grootte (mm)
Efficiëntie
Onbelast verbruik
1/3" CMOS
Kleur [email protected]
Zwart en wit [email protected]
4 megapixels
2,8 mm F1.6
1/20-1/10.000 per seconde
Krachtige LED met ICR
10 meter
H.265
32 Kbps - 2 Mbps
2560 x 1440
1-20 per seconde
Ondersteuning HD/SD; ondersteuning flip
SD-kaart (Max 256GB)
Tweerichtingsaudio
HTTP, DHCP, DNS, RTSP
IEEE802.11b/g/n/ac
2,4 GHz & 5 GHz
WPA-PSK/WPA2-PSK
AES128
-20℃~50℃
DC12V, 1A
5.5W MAX
146 x 65 x 65
73,62%
< 0.1W
Specificaties
EN
NL

EN
NL
Ondersteuning
5. Juridische kennisgeving
www.arenti.com
Symbolen
Gelijkstroom (DC)
Gooi geen batterijen of niet-toegestane producten
bij het huisvuil (vuilnis). De gevaarlijke stoffen die
ze waarschijnlijk bevatten, kunnen de gezondheid
of het milieu schaden. Laat uw verkoper deze
producten terugnemen of gebruik de selectieve
inzameling van afval die door uw stad wordt
voorgesteld.
Hierbij verklaart Arenti dat het type
radioapparatuur ‘OUTDOOR1'in overeenstemming is
met de richtlijn 2014/53 / EU
De volledige test van de EU-conformiteitsverklaring
is beschikbaar op het volgende internetadres:
www.arenti.com

EN
Guía de inicio rápido
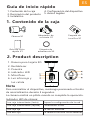
1. Contenido de la caja
2. Descripción del producto
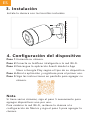
3. Instalación
4. Configuración del dispositivo
5. Avisos Legales
1. Contenido de la caja
ES
Cámara X1 Adaptador de
corriente X1
Paquete de
tornillos X1
Guía de inicio
rápido X1
2. Product description
1. Ranura para tarjeta SD
2. Restablecer
3. Ponente
4. indicador LED
5. Micrófono
6. Luz infrarroja y
luz calida
Nota
Para reinicializar el dispositivo, mantenga presionado el botón
de reinicialización durante 5 segundos.
La cámara emitirá un pitido cuando se complete la operación.
Indicador LED de cámara:
Luz roja intermitente (lenta)
Luz roja intermitente (rápida)
Luz roja fija
Luz azul fija
Espere la configuración de la red
Conectando la red
La red no funciona
La cámara funciona correctamente
Etiqueta de
advertencia X2

3. Instalación
EN
ES
4. Configuración del dispositivo
Paso 1 Encienda su cámara.
Paso 2 Conecte su teléfono inteligente a la red Wi-Fi.
Paso 3 Descargue la aplicación Arenti desde la App
Store o Google Play según el tipo de su dispositivo.
Paso 4 Abra la aplicación y regístrese para el primer uso.
Paso 5 Siga las instrucciones en pantalla para agregar su
cámara.
Si tiene varias cámaras, siga el paso 5 nuevamente para
agregar dispositivos uno por uno.
Para cambiar la red Wi-Fi, restaure la cámara a la
configuración de fábrica y siga el paso 5 para agregar la
cámara.
Nota
Instale la cámara con los tornillos incluidos.

Tipo de sensor
Min. brillo
Resolución
Lente
Obturador
Infrarrojo
Distancia infrarroja
Compresión de video
Tasa de bits
Resolución máxima
Cuadros por segundo
Configuraciones de imagen
Almacenamiento
Audio
Protocolos
Estándar WiFi
Frecuencia
Cifrado WiFi
Seguridad
Temperatura de trabajo
Poder
Consumo
Tamaño (mm)
Eficiencia
Consumo sin carga
CMOS de 1/3 "
Color [email protected]
Blanco y negro [email protected]
4 megapíxeles
2,8 mm F1,6
1 / 20-1 / 10,000 por segundo
LED de alta potencia con ICR
10 metros
H.265
32 Kbps - 2 Mbps
2560 x 1440
1-20 por segundo
Soporta HD / SD; apoyo flip
Tarjeta SD (Max 256GB)
Audio bidireccional
HTTP, DHCP, DNS, RTSP
IEEE802.11b / g / n / ac
2,4 GHz y 5 GHz
WPA-PSK / WPA2-PSK
AES128
-20 ℃ ~ 50 ℃
DC12V, 1A
5,5 W MÁX.
146 x 65 x 65
73,62%
<0,1 W
Especificaciones
EN
ES

EN
ES
Soporte
5. Avisos Legales
www.arenti.com
Símbolos
Corriente continua (DC)
No tire las pilas ni los productos fuera de servicio
con la basura doméstica (basura). Las sustancias
peligrosas que probablemente incluyan pueden
dañar la salud o el medio ambiente. Haga que su
minorista retire estos productos o utilice la
recogida selectiva de basura propuesta por su
ciudad.
Por la presente, Arenti, declara que el tipo de
equipo de radio 'OUTDOOR1' cumple con la
Directiva 2014/53/UE
La prueba completa de la declaración UE de
conformidad está disponible en la siguiente
dirección de Internet :
www.arenti.com

EN
Guia rápido
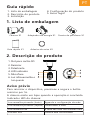
1. Lista de embalagem
2. Descrição do produto
3. Instalação
4. Configuração do produto
5. Aviso legal
1. Lista de embalagem
PT
Câmera X1 Adaptador de energia X1 Pacote de parafusos X1
Guia rápido X1
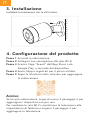
2. Descrição do produto
1. Slot para cartão SD
2. Reiniciar
3. Palestrante
4. LED indicador
5. Microfone
6. Luz infravermelha e
luz quente
Aviso prévio
Para reiniciar o dispositivo, pressione e segure o botão
reiniciar por 5s.
A câmera emite um bipe quando a operação é concluída.
Indicador LED da câmera:
Luz vermelha piscando (lento)
Luz vermelha piscando (rápido)
Luz vermelha fixa
Luz azul fixa
Aguarde a configuração da rede
Conectando a rede
A rede não está funcionando bem
Câmera está funcionando
Adesivo de aviso X2

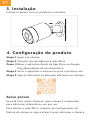
3. Instalação
EN
PT
4. Configuração do produto
Etapa 1 Ligue sua câmera.
Etapa 2 Conecte seu smartphone à rede Wi-Fi.
Passo 3 Baixe o aplicativo Arenti da App Store ou Google
Play dependendo do seu dispositivo.
Etapa 4 Inicie o aplicativo e inscreva-se para o primeiro uso.
Etapa 5 Siga as instruções na tela para adicionar sua câmera.
Se você tiver várias câmeras, siga a etapa 5 novamente
para adicionar dispositivos um por um.
Para alterar a rede Wi-Fi, restaure as configurações de
fábrica da câmera e siga a etapa 5 para adicionar a câmera.
Aviso prévio
Instale a câmera com os parafusos incluídos.
La page est en cours de chargement...
La page est en cours de chargement...
La page est en cours de chargement...
La page est en cours de chargement...
La page est en cours de chargement...
La page est en cours de chargement...
La page est en cours de chargement...
La page est en cours de chargement...
La page est en cours de chargement...
La page est en cours de chargement...
La page est en cours de chargement...
La page est en cours de chargement...
La page est en cours de chargement...
La page est en cours de chargement...
La page est en cours de chargement...
La page est en cours de chargement...
La page est en cours de chargement...
La page est en cours de chargement...
La page est en cours de chargement...
La page est en cours de chargement...
La page est en cours de chargement...
La page est en cours de chargement...
La page est en cours de chargement...
La page est en cours de chargement...
-
 1
1
-
 2
2
-
 3
3
-
 4
4
-
 5
5
-
 6
6
-
 7
7
-
 8
8
-
 9
9
-
 10
10
-
 11
11
-
 12
12
-
 13
13
-
 14
14
-
 15
15
-
 16
16
-
 17
17
-
 18
18
-
 19
19
-
 20
20
-
 21
21
-
 22
22
-
 23
23
-
 24
24
-
 25
25
-
 26
26
-
 27
27
-
 28
28
-
 29
29
-
 30
30
-
 31
31
-
 32
32
-
 33
33
-
 34
34
-
 35
35
-
 36
36
-
 37
37
-
 38
38
-
 39
39
-
 40
40
-
 41
41
-
 42
42
-
 43
43
-
 44
44


Arenti OUTDOOR1 Mode d'emploi
- Catégorie
- Des caméras de sécurité
- Taper
- Mode d'emploi
dans d''autres langues
- italiano: Arenti OUTDOOR1 Guida utente
- español: Arenti OUTDOOR1 Guía del usuario
- 日本語: Arenti OUTDOOR1 ユーザーガイド
- Türkçe: Arenti OUTDOOR1 Kullanici rehberi
Documents connexes
Autres documents
-
Chacon IPCAM-FE05 Manuel utilisateur
-
-
-
Nooie IPC007D Manuel utilisateur
-
-
Samsung SCC-C4303AP Manuel utilisateur
-
winees WP2700 Manuel utilisateur
-
-
-
Hyundai Indoor Camera Manuel utilisateur