Sony BDV-NF620 Guide d'installation
- Catégorie
- Supports muraux à panneau plat
- Taper
- Guide d'installation

Speaker Installation Guide
Guide d’installation des enceintes
Guía de instalación de los altavoces
Montageanleitung für Lautsprecher
Guida all’installazione dei diffusori
Installatiegids voor de luidspreker
Podręcznik instalacji głośników
扬声器安装指南
4-418-185-11(1)
BDV-NF620
©2012 Sony Corporation Printed in Malaysia
(1)
To install speakers on a wall, see the reverse side.
Pour installer les enceintes au mur, reportez-vous au verso.
Para instalar altavoces en una pared, consulte el reverso.
Wenn Sie Lautsprecher an der Wand montieren wollen, lesen Sie auf der Rückseite nach.
Per installare i diffusori a parete, consultare il retro.
Raadpleeg de ommezijde om de luidsprekers aan een muur te bevestigen.
Aby zainstalować głośniki na ścianie, zapoznaj się z drugą stroną.
若要将扬声器安装到墙壁上,请参见反面。
Assembling the speaker
Assemblage de l’enceinte
Montaje del altavoz
Aufstellen des Lautsprechers
Montaggio del diffusore
De luidspreker monteren
Składanie głośnika
组装扬声器
List of parts/Liste des pièces/Lista de piezas/Teileliste/Elenco dei componenti/Onderdelenlijst/
Lista części/
部件列表
English
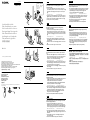
Assembling the speaker
Spread a cloth on the floor to avoid damaging the floor when you
assemble the speakers.
1 Choose a speaker cord () by matching the color of the label on the back of a
speaker with the speaker cord’s connector (see below). Thread the speaker cord ()
through the hole of the stand (), then connect the speaker cord to the speaker
().
Front left speaker (L): White Front right speaker (R): Red
2 Insert the projections of the stand () into the holes on the bottom of the speaker
(), then insert the projection of the stand into the hole on the rear of the speaker.
3 Secure the speaker and stand with a screw (
), then attach the screw cover ().
4 Secure the speaker cord in the speaker cord holder .
Français
Assemblage de l’enceinte
Recouvrez le sol d’un linge pour éviter de l’endommager lors de
l’assemblage des enceintes.
1 Choisissez un cordon d’enceinte (
) en veillant à ce que la couleur de
l’étiquette située à l’arrière d’une enceinte corresponde à celle du connecteur
du cordon d’enceinte (voir ci-dessous). Faites passer le cordon d’enceinte (
) à
travers l’orifice de la base (
), puis raccordez le cordon d’enceinte à l’enceinte
(
).
Enceinte avant gauche (L) : blanc Enceinte avant droite (R) : rouge
2
Insérez les parties saillantes de la base (
) dans les orifices du dessous de
l’enceinte (
), puis insérez la partie saillante de la base dans l’orifice situé à
l’arrière de l’enceinte.
3
Fixez l’enceinte et la base à l’aide d’une vis (
), puis fixez le couvercle de la vis
(
).
4
Fixez le cordon d’enceinte au support du cordon d’enceinte.
Español
Montaje del altavoz
Para evitar dañar el suelo al colocar los altavoces, coloque encima una
tela.
1 Elija un cable de altavoz (
) haciendo que el color de la etiqueta situada en la
parte posterior de un altavoz coincida con el conector del cable de altavoz (ver
abajo). Pase el cable de altavoz (
) por el orificio del soporte (
) y, a
continuación, conecte el cable de altavoz al altavoz (
).
Altavoz frontal izquierdo (L): blanco Altavoz frontal derecho (R): rojo
2 Inserte las partes salientes del soporte (
) en los orificios situados en la parte
inferior del altavoz (
) y, a continuación, inserte la parte saliente del soporte
en el orificio situado en la parte posterior del altavoz.
3 Fije el altavoz y el soporte con un tornillo (
) y, a continuación, coloque la tapa
del tornillo (
).
4 Fije el cable de altavoz en el soporte para el cable de altavoz.
Deutsch
Aufstellen des Lautsprechers
Breiten Sie beim Aufstellen der Lautsprecher ein Tuch auf dem Boden aus,
um Kratzer zu vermeiden.
1
Achten Sie bei der Auswahl des Lautsprecherkabels (
) darauf, dass die Farbe
des Etiketts an der Lautsprecherrückseite mit der des Steckers am
Lautsprecherkabel übereinstimmt (siehe unten). Führen Sie das
Lautsprecherkabel (
) durch die Bohrung am Ständer (
) und schließen Sie
dann das Lautsprecherkabel an den Lautsprecher (
) an.
Vorderer linker Lautsprecher (L): Weiß Vorderer rechter Lautsprecher (R): Rot
2
Setzen Sie die vorstehenden Teile des Ständers (
) in die Aussparungen an der
Unterseite des Lautsprechers (
) ein und setzen Sie dann das vorstehende Teil
des Ständers in die Aussparung an der Rückseite des Lautsprechers ein.
3
Befestigen Sie den Lautsprecher mit einer Schraube (
) am Ständer und
bringen Sie dann die Schraubenabdeckung (
) an.
4
Sichern Sie das Lautsprecherkabel im Halter für Lautsprecherkabel.
Italiano
Montaggio del diffusore
Stendere un telo sul pavimento per evitare di danneggiare quest’ultimo
durante il montaggio dei diffusori.
1
Scegliere un cavo del diffusore (
) facendo corrispondere il colore
dell’etichetta sulla parte posteriore di un diffusore con il connettore del cavo
del diffusore (vedere di seguito). Instradare il cavo del diffusore (
) attraverso
il foro del supporto (
), quindi collegare il cavo del diffusore al diffusore (
).
Diffusore anteriore sinistro (L): bianco Diffusore anteriore destro (R): rosso
2
Inserire le parti sporgenti del supporto (
) nei fori sulla parte inferiore del
diffusore (
), quindi inserire la parte sporgente del supporto nel foro sul retro
del diffusore.
3
Assicurare il diffusore e il supporto con una vite (
), quindi applicare il
coperchio della vite (
).
4
Assicurare il cavo del diffusore nel supporto dei cavi dei diffusori.
Nederlands
De luidspreker monteren
Spreid een doek op de vloer om te vermijden dat u de vloer beschadigt
terwijl u de luidsprekers monteert.
1
Kies een luidsprekerkabel (
) waarvan de kleur van het label op de achterkant
overeenkomt met de aansluiting van de luidsprekerkabel (zie onder). Haal de
luidsprekerkabel (
) door de opening van de standaard (
) en sluit
vervolgens de luidsprekerkabel aan op de luidspreker (
).
Linkerluidspreker vooraan (L): wit Rechterluidspreker vooraan (R): rood
2
Stop de uitsteeksels van de standaard (
) in de openingen onderaan in de
luidspreker (
) en stop vervolgens het uitsteeksel van de standaard in de
opening aan de achterkant van de luidspreker.
3
Zet de luidspreker en de standaard vast met een schroef (
) en maak
vervolgens de schroefafdekking (
) vast.
4
Maak de luidsprekerkabel vast in de houder van de luidsprekerkabel.
Polski
Składanie głośnika
Aby podczas składania głośnika nie zniszczyć podłogi, rozłóż na niej
dowolną tkaninę.
1
Wybierz przewód głośnikowy (
), dopasowując kolor oznaczenia z tyłu
głośnika do koloru przewodu głośnikowego (patrz poniżej). Przeprowadź
przewód głośnikowy (
) przez otwór podstawy (
), a następnie podłącz
przewód głośnikowy do głośnika (
).
Głośnik przedni lewy (L): biały Głośnik przedni prawy (R): czerwony
2
Włóż wystające elementy podstawy (
) do otworów na dole głośnika (
), a
następnie włóż elementy wystające podstawy do otworu z tyłu głośnika.
3
Przymocuj głośniki i podstawę przy użyciu wkrętu (
), a następnie załóż
osłonę wkrętu (
).
4
Włóż przewód głośnikowy do uchwytu na przewód głośnikowy.
简体中文
组装扬声器
组装扬声器时,请在地板上铺一块布以防损坏地板。
1 通过将扬声器背面的标签颜色与扬声器导线的连接器颜色(如下所示)相匹配选
择扬声器导线(
)。将扬声器导线(
)穿过底座(
)的孔,然后将扬声器
导线连接至扬声器(
)。
左前置扬声器(L):白色 右前置扬声器(R):红色
2 将底座(
)的突起插入扬声器(
)的底部孔中,然后将底座的突起插入扬声
器背面的孔中。
3 用螺丝(
)固定扬声器和底座,然后安装螺丝盖(
)。
4 将扬声器导线固定于扬声器导线固定板中。
1
Colored tube
Tube coloré
Tubo de color
Farbige Kabelschlaufe
Cilindro colorato
Gekleurde buis
Kolorowa opaska
彩色套管
2
3
4

English
Caution
Contact a screw shop or installer regarding the wall material or screws to be
used.
Use screws that are suitable for the wall material and strength. As a plaster board
wall is especially fragile, attach the screws securely to a beam and fasten them to
the wall. Install the speakers on a vertical and flat wall where reinforcement is
applied.
Sony is not responsible for accidents or damage caused by improper installation,
insufficient wall strength or improper screw installation, natural calamity, etc.
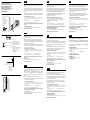
1 Connect the speaker cord to the speaker.
Be sure to match the speaker cords to the appropriate terminals on the speakers: the speaker cord
with the color tube to , and the speaker cord without the color tube to .
Tube colors:
Front left speaker (L): White Front right speaker (R): Red
Thread the speaker cord through the dent below the speaker terminal.
2 Prepare screws (not supplied) that are suitable for the hole on the back of each
speaker.
3 Fasten the screws to the wall.
Leave a space of about 9 mm to 11 mm between the wall and the head of the screw.
4 Hang the speaker on the screw.
Français
Avertissement
Adressez-vous à un quincaillier ou à un installateur pour connaître le matériau
du mur ou les vis à utiliser.
Utilisez des vis adaptées au matériau et à la résistance du mur. Comme les
plaques de plâtre sont particulièrement fragiles, fixez fermement les vis à une
poutre et fixez-les au mur. Installez les enceintes sur une paroi verticale et plane à
un endroit où se trouve un renforcement.
Sony ne peut être tenu responsable de tout accident ou dégât entraîné par une
installation incorrecte, une résistance insuffisante du mur, une mauvaise fixation
des vis, une catastrophe naturelle, etc.
1 Raccordez le cordon d’enceinte à l’enceinte.
Veillez à faire correspondre les cordons d’enceinte aux bornes appropriées des enceintes : le
cordon d’enceinte doté du tube coloré à et le cordon d’enceinte dépourvu de tube coloré à .
Couleurs de tube :
Enceinte avant gauche (L) : Blanc Enceinte avant droite (R) : Rouge
Faites passer le cordon d’enceinte à travers l’encoche située sous la borne d’enceinte.
2 Préparez des vis (non fournies) adaptées à l’orifice situé au dos de chaque
enceinte.
3 Fixez les vis au mur.
Laissez un espace de 9 mm à 11 mm environ entre le mur et la tête de la vis.
4 Accrochez l’enceinte à la vis.
Español
Precaución
Consulte con una tienda especializada en tornillos o con un instalador acerca del
material de pared o de los tornillos que se deben utilizar.
Utilice tornillos adecuados para el material y la resistencia de la pared. Dado que
una pared de yeso es especialmente frágil, acople los tornillos firmemente a una
viga y fíjelos en la pared. Instale los altavoces en una pared vertical y lisa que esté
reforzada.
Sony no se responsabiliza de ningún accidente o daño causado por una
instalación inadecuada, una pared de poca resistencia, una instalación incorrecta
de los tornillos, una catástrofe natural, etc.
1 Conecte el cable de altavoz al altavoz.
Asegúrese de que los cables de altavoz coincidan con los terminales adecuados de los altavoces: el
cable de altavoz con el tubo de color en y el cable de altavoz sin el tubo de color en .
Colores de los tubos:
Altavoz frontal izquierdo (L): blanco Altavoz frontal derecho (R): rojo
Pase el cable de altavoz por la parte inferior dentada del terminal de altavoz.
2 Prepare unos tornillos (no suministrados) que sean adecuados para el orificio
situado en la parte posterior de cada altavoz.
3 Fije los tornillos en la pared.
Deje un espacio de 9 mm a 11 mm aproximadamente entre la pared y la cabeza del tornillo.
4 Cuelgue el altavoz en el tornillo.
Installing speakers on a wall
Installation des enceintes au mur
Instalación de los altavoces en una pared
Montage der Lautsprecher an der Wand
Installazione dei diffusori a parete
De luidsprekers aan een muur bevestigen
Instalowanie głośników na ścianie
将扬声器安装到墙壁上
1
Colored tube
Tube coloré
Tubo de color
Farbige Kabelschlaufe
Cilindro colorato
Gekleurde buis
Kolorowa opaska
彩色套管
2
30 mm (1
3
/
16
in / 1
3
/
16
po / 1
3
/
16
pulg)
4 mm (
3
/
16
in /
3
/
16
po /
3
/
16
pulg)
10 mm (
13
/
32
in /
13
/
32
po /
13
/
32
pulg)
5 mm (
7
/
32
in /
7
/
32
po /
7
/
32
pulg)
Hole on the back of the speaker
Orifice situé au dos de l’enceinte
Orificio de la parte posterior del altavoz
Bohrung an der Rückseite des
Lautsprechers
Foro nella parte posteriore del diffusore
Opening aan de achterkant van de
luidspreker
Otwór w tylnej części głośnika
扬声器背面的孔
3
9 mm to 11 mm (
3
/
8
in to
7
/
16
in)
9 mm à 11 mm (
3
/
8
po à
7
/
16
po)
de 9 mm a 11 mm (
3
/
8
pulg a
7
/
16
pulg)
9 mm bis 11 mm
da 9 mm a 11 mm
9 mm tot 11 mm
9 mm do 11 mm
9 mm至11 mm
4
Deutsch
Vorsicht
Wenden Sie sich bei Fragen bezüglich des Wandmaterials oder geeigneter
Schrauben an einen Fachmann.
Verwenden Sie Schrauben, die für das Material der Wand und die Wandstärke
geeignet sind. Wände aus Gipskarton sind nicht sehr stabil. Drehen Sie die
Schrauben zur Befestigung in einen Holzträger. Montieren Sie die Lautsprecher
an einer senkrechten und ebenen Wand, die ausreichend verstärkt ist.
Sony haftet nicht für Unfälle oder Schäden, die durch unsachgemäße Montage,
unzureichende Wandstärke, schlechte Schraubenverankerung,
Naturkatastrophen usw. entstehen.
1 Schließen Sie das Lautsprecherkabel an den Lautsprecher an.
Achten Sie darauf, die Lautsprecherkabel an die entsprechenden Anschlüsse der Lautsprecher
anzuschließen: das Lautsprecherkabel mit der farbigen Kabelschlaufe an und das
Lautsprecherkabel ohne farbige Kabelschlaufe an .
Schlaufenfarben:
Vorderer linker Lautsprecher (L): Weiß Vorderer rechter Lautsprecher (R): Rot
Führen Sie das Lautsprecherkabel durch die Einkerbung unter dem Lautsprecheranschluss.
2 Beschaffen Sie Schrauben (nicht mitgeliefert), die sich für die Bohrung an der
Rückseite der einzelnen Lautsprecher eignen.
3 Drehen Sie die Schrauben in die Wand.
Lassen Sie zwischen der Wand und dem Schraubenkopf etwa 9 mm bis 11 mm Platz.
4 Hängen Sie den Lautsprecher an die Schraube.
Italiano
Attenzione
Rivolgersi a una ferramenta o a un installatore per informazioni sul tipo di
materiale della parete e sul tipo di viti da utilizzare.
Usare viti adatte al tipo di materiale della parete e alla sua robustezza. Nel caso di
una parete di cartongesso, materiale particolarmente fragile, fissare saldamente le
viti a una trave, quindi alla parete. Installare i diffusori su una parete verticale,
piatta e rinforzata.
Sony declina qualsiasi responsabilità per eventuali incidenti o danneggiamenti
causati da installazioni non corrette, pareti non sufficientemente robuste o
installazioni delle viti non corrette, calamità naturali, ecc.
1 Collegare il cavo del diffusore al diffusore.
Assicurarsi di far corrispondere i cavi dei diffusori ai terminali corretti dei diffusori: il cavo del
diffusore con il cilindro colorato al terminale e il cavo del diffusore senza il cilindro colorato al
terminale .
Colori dei cilindri:
Diffusore anteriore sinistro (L): bianco Diffusore anteriore destro (R): rosso
Instradare il cavo del diffusore attraverso l’incavo sotto il terminale del diffusore.
2 Preparare delle viti (non in dotazione) adatte ai fori che si trovano nella parte
posteriore di ciascun diffusore.
3 Fissare le viti alla parete.
Lasciare uno spazio di circa 9 mm - 11 mm tra la parete e la testa della vite.
4 Appendere il diffusore alla vite.
Nederlands
Opgelet
Contacteer een ijzerhandel of installateur voor meer informatie omtrent het
muurmateriaal of de schroeven die u dient te gebruiken.
Gebruik schroeven die geschikt zijn voor het materiaal en de stevigheid van de
muur. Aangezien een muur in gipsplaat erg zwak is, draait u de schroeven het
best in een balk om de luidsprekers te bevestigen. Bevestig de luidsprekers op een
verticale, vlakke en verstevigde muur.
Sony is niet aansprakelijk voor ongevallen noch schade ten gevolge van een
ondeskundige montage, een onvoldoende sterke muur, verkeerd aangebrachte
schroeven, natuurrampen enz.
1 Sluit de luidsprekerkabel aan op de luidspreker.
Verbind de luidsprekerkabels met de juiste aansluitingen op de luidsprekers: de luidsprekerkabel
met de gekleurde buis naar en de luidsprekerkabel zonder gekleurde buis naar .
Buiskleuren:
Linkerluidspreker vooraan (L): wit Rechterluidspreker vooraan (R): rood
Haal de luidsprekerkabel door de uitsparing onder de luidsprekeraansluiting.
2 Neem schroeven (niet bijgeleverd) die geschikt zijn voor de opening aan de
achterkant van elke luidspreker.
3 Bevestig de schroeven in de muur.
Laat een ruimte over van ongeveer 9 mm tot 11 mm tussen de muur en de kop van de schroef.
4 Hang de luidspreker op aan de schroef.
Polski
Ostrzeżenie
Jeśli masz wątpliwości co do rodzaju wkrętów lub materiału, z którego wykonana
jest ściana, skontaktuj się ze sprzedawcą wkrętów lub instalatorem.
Używaj wkrętów odpowiednich do materiału i wytrzymałości ściany. Ponieważ
ściana gipsowa jest wyjątkowo delikatna, najpierw przytwierdź wkręty do deski,
a następnie do ściany. Głośniki należy instalować na płaskich, pionowych
i zbrojonych ścianach.
Firma Sony nie ponosi odpowiedzialności za wypadki lub uszkodzenia
spowodowane niewłaściwą instalacją, niewystarczającą wytrzymałością ścian lub
nieprawidłowym wkręceniem wkrętów, klęskami żywiołowymi itd.
1 Podłącz przewód głośnikowy do głośnika.
Pamiętaj, aby dopasować przewody głośnikowe do odpowiednich złącz w głośnikach: przewód
głośnikowy z kolorową opaską do złącza , a przewód głośnikowy bez opaski kolorowej do złącza
.
Kolory opasek:
Głośnik przedni lewy (L): biały Głośnik przedni prawy (R): czerwony
Przeprowadź przewód głośnikowy przez wycięcie poniżej złącza głośnika.
2 Przygotuj wkręty (nie wchodzą w skład zestawu) odpowiadające średnicą
otworom w tylnej części każdego z głośników.
3 Zamocuj wkręty w ścianie.
Pozostaw ok. 9 mm do 11 mm odstępu między ścianą i główką wkrętu.
4 Powieś głośnik na wkręcie.
简体中文
注意
关于使用的墙面材料或螺丝,请联络螺丝商店或安装人员。
使用适合墙面材料和强度的螺丝。由于石膏板墙壁特别易碎,请将螺丝牢
固钉入柱子并拧入墙壁。将扬声器安装在足够牢固的垂直和平整的墙壁
上。
Sony对因安装不当、墙壁不够坚固或螺丝安装不当、自然灾害等引起的事
故或损坏不承担责任。
1 将扬声器导线连接至扬声器。
确保扬声器导线与扬声器上合适的端子相匹配:带有色管的扬声器导线与 匹配,不带
色管的扬声器导线与 匹配。
色管颜色:
左前置扬声器(L):白色 右前置扬声器(R):红色
将扬声器导线穿过扬声器端子下的凹口。
2 准备适合各扬声器背面孔的螺丝(不提供)。
3 将螺丝拧紧在墙上。
在墙壁和螺丝头部之间留出约9mm至11mm的空间。
4 将扬声器悬挂于螺丝上。
-
 1
1
-
 2
2


Sony BDV-NF620 Guide d'installation
- Catégorie
- Supports muraux à panneau plat
- Taper
- Guide d'installation
dans d''autres langues
- italiano: Sony BDV-NF620 Guida d'installazione
- English: Sony BDV-NF620 Installation guide
- español: Sony BDV-NF620 Guía de instalación
- Deutsch: Sony BDV-NF620 Installationsanleitung
- Nederlands: Sony BDV-NF620 Installatie gids
- polski: Sony BDV-NF620 Instrukcja instalacji
Documents connexes
-
Sony BDV-NF720 Guide d'installation
-
Sony BDV-EF200 Guide d'installation
-
Sony BDV-L600 Guide d'installation
-
Sony BDVE780W Le manuel du propriétaire
-
Sony BDV-N790W Le manuel du propriétaire
-
-
Sony BDV-L800M Guide d'installation
-
Sony BDV-E500W Guide d'installation
-
Sony BDV-E4100 Manuel utilisateur
-